RensBerserker's Keezer... The RensBerKeezer

Homebrew Talk - Beer, Wine, Mead, & Cider Brewing Discussion Forum

Help Support Homebrew Talk - Beer, Wine, Mead, & Cider Brewing Discussion Forum:

This site may earn a commission from merchant affiliate links, including eBay, Amazon, and others.

RensBerserker

Well-Known Member
Joined
Feb 12, 2011
Messages
65
Reaction score
1
Location
Arvada
I am finally here.

I have spent the last few (and only few) years of my brewing career lurking around these forums, trying to learn as much as I could about every aspect of this glorious pastime. This place taught me to brew all-grain. It taught me how to make my own stir plate and yeast starters. Most importantly, a few years ago I stumbled upon a now-infamous thread documenting the build of a national treasure. Of course, I am referring to the original Keezer. Jester's. That day set me upon a path that has been winding and meandering. There were stretches of little progress, bumps in the road, and hours and hours and hours spent reading other people's threads documenting their keezer builds. If you read on, you will see many things that are similar to other people's work, which I have shamelessly stolen. My friends and family think that I am a genius. :cross: Thanks to all who inspired me for making me look so good!

And so, I have finally been delivered. Here. I am finally here. Posting about my own build. hoping to give back at least a little bit to this community that has given me so much. Or at least to show off a bit. ;) And without further ado, let's begin.

Rest assured that there are plenty of pictures to follow, and thanks in advance to those of you who bother to read my ramblings that accompany the pics.

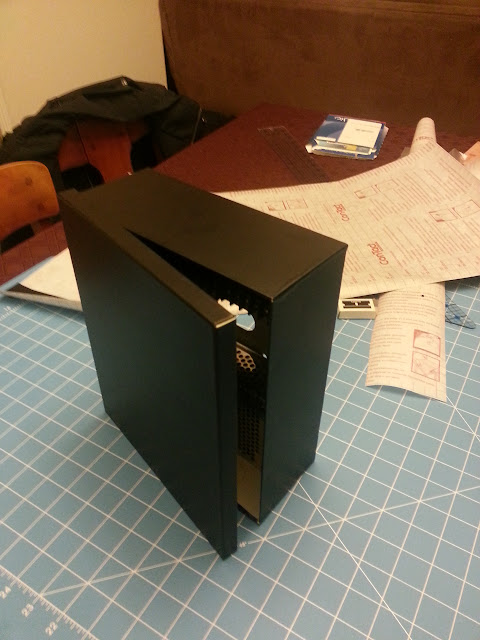
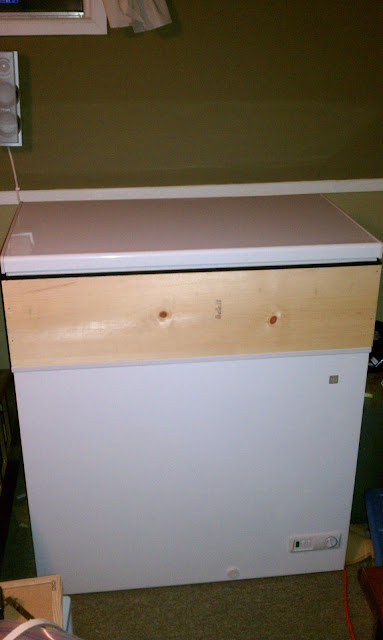
My first step along the path to keezer fulfillment was, of course, purchasing a freezer. Black Friday 2010 I bought a 7.0cf GE chest freezer. By Christmas of that year, I had acquired a kit from KegConnection with a dual-body regulator and a total of 4 kegs. I got by for a while with the 5# tank sitting on the compressor hump, jumping gas lines from keg to keg as needed and pouring every pint through party taps. Four kegs fit on the floor, or three with the 20# tank that I eventually bought. The next logical step was, of course, a collar.

IMAG0112.jpg


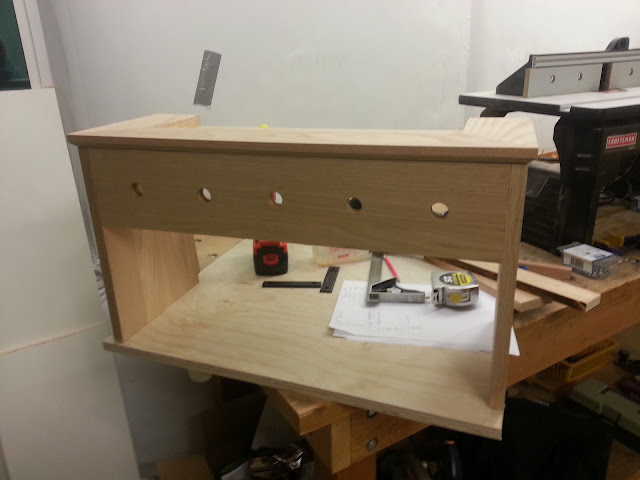
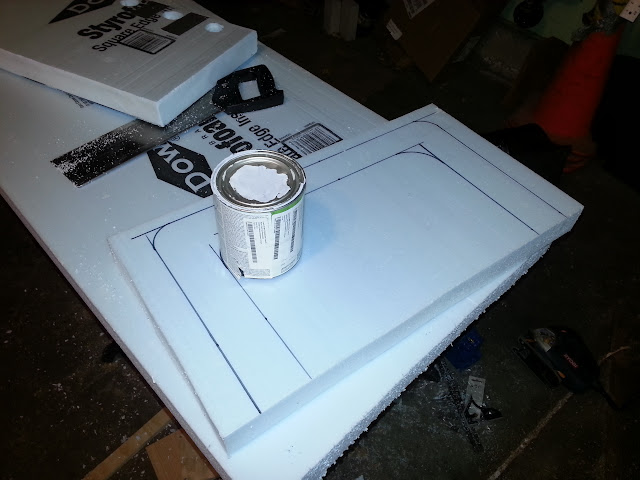
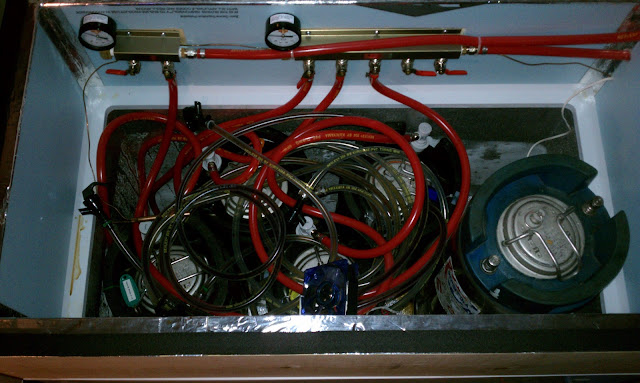
The collar is 0.75"x9" select pine, with 1" styrofoam insulation. It allows me to fit an additional keg inside, and lets me keep the CO2 tank outside of the freezer, with gas lines penetrating the collar from the regulator. I also mounted my gas distribution to it.

IMAG0082.jpg


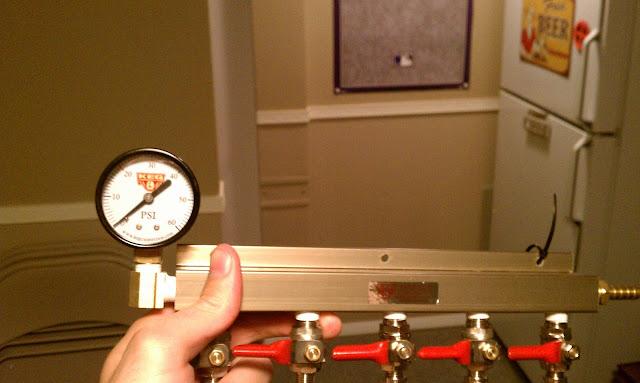
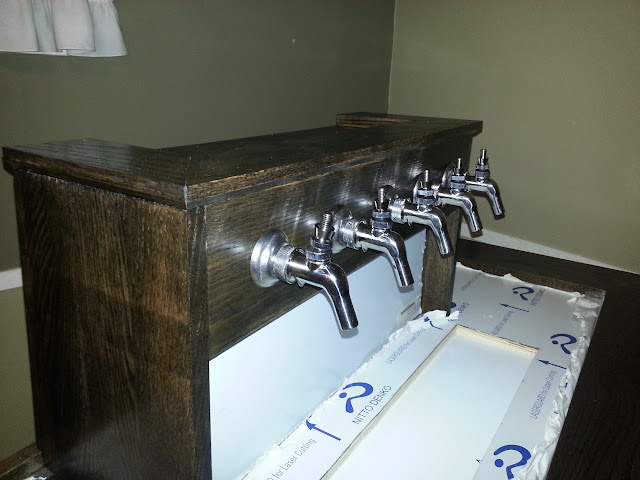
For gas distribution, I bought two manifolds - one five-way and one two-way. I asked KegConnection to mount an extra gauge to the end of each manifold, which I upgraded with brass elbows to make them easier to read.

IMAG0113.jpg


I got by with this arrangement (5 kegs, with 2 different pressures, pouring out of party taps and lifting the freezer lid to get every beer) for a long time. I spent the better part of the next two years planning the final design and buying parts as I found them on sale.

As so many have done who went before me, I used SketchUp to do my entire design. I was hesitant to try it, as I am an engineer with plenty of experience in SolidWorks. Unfortunately, I don't have a SolidWorks license at home, and SWMBO would have likely killed me (and rightly so) if I had spent any extra time at the office to design my keezer after hours. After I gave SketchUp a chance, it proved to be easy to learn, and certainly more than adequate for working up this project. Plus, the price is right! :)

SketchUp offered me the canvas upon which to pour out my design. I had spent many hours thinking of what features I wanted here and there, and how I would be able to construct them. SketchUp is where these ideas became a virtual reality:

Sketchup%2520Design%2520Iso.jpg


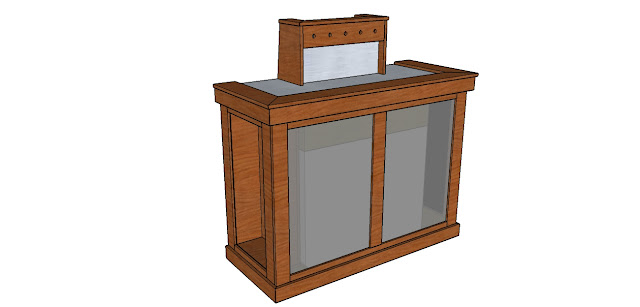
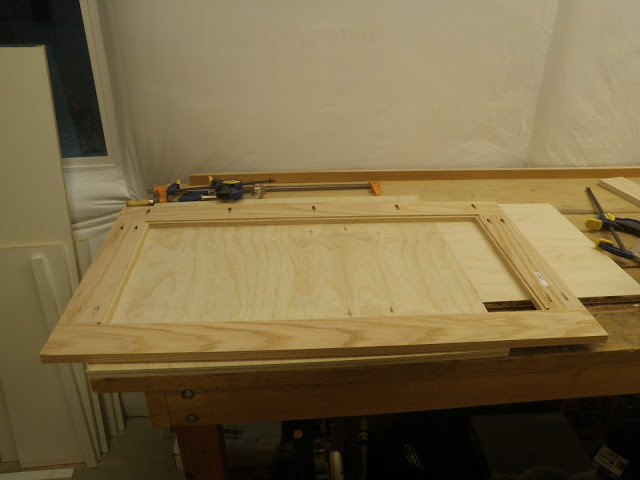
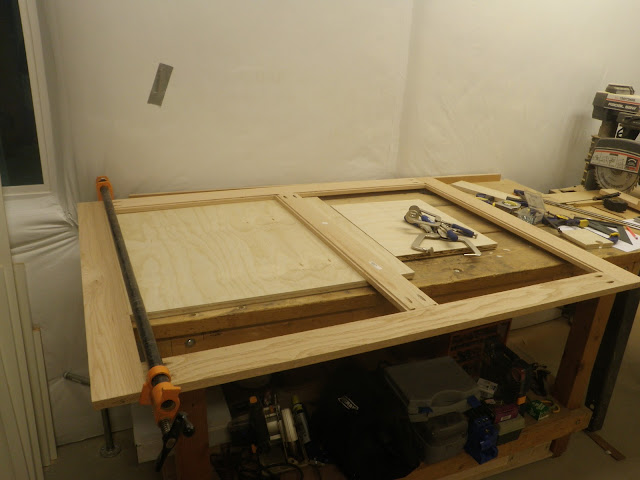
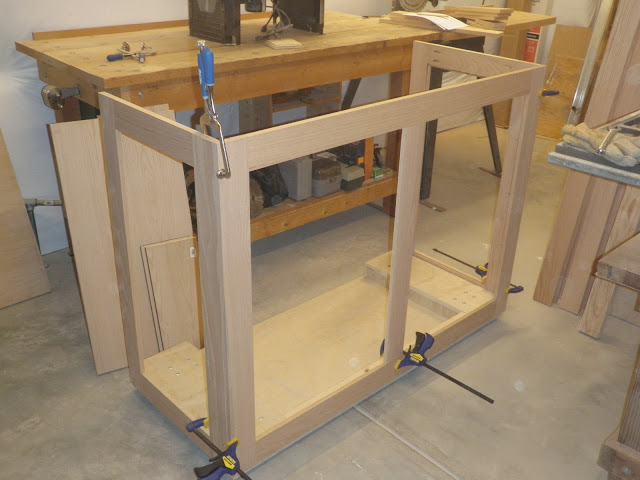
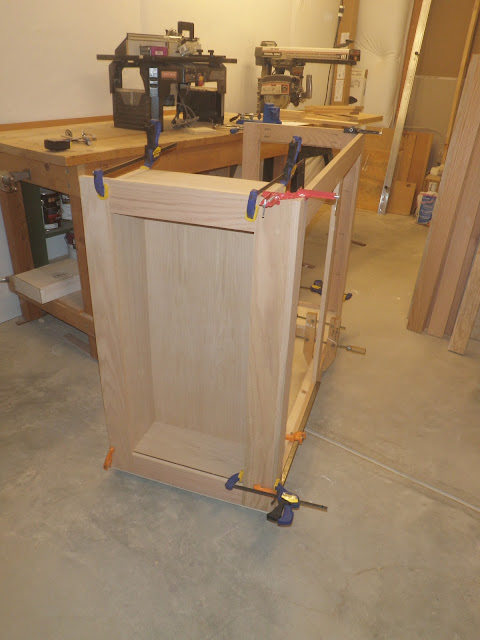
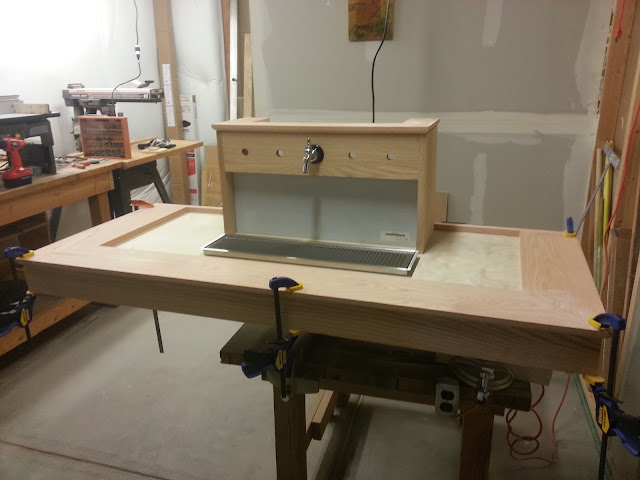
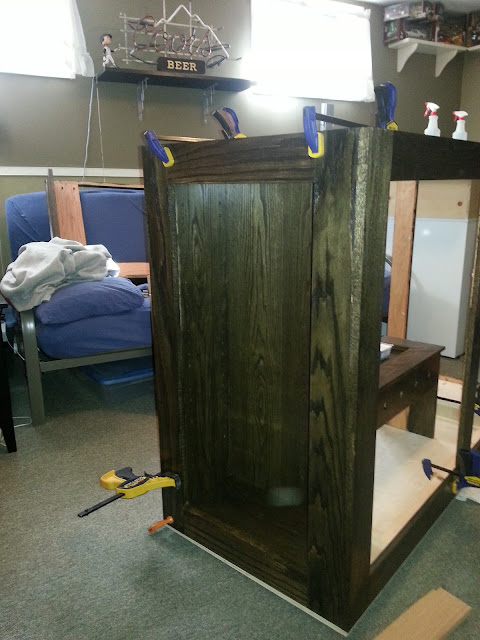
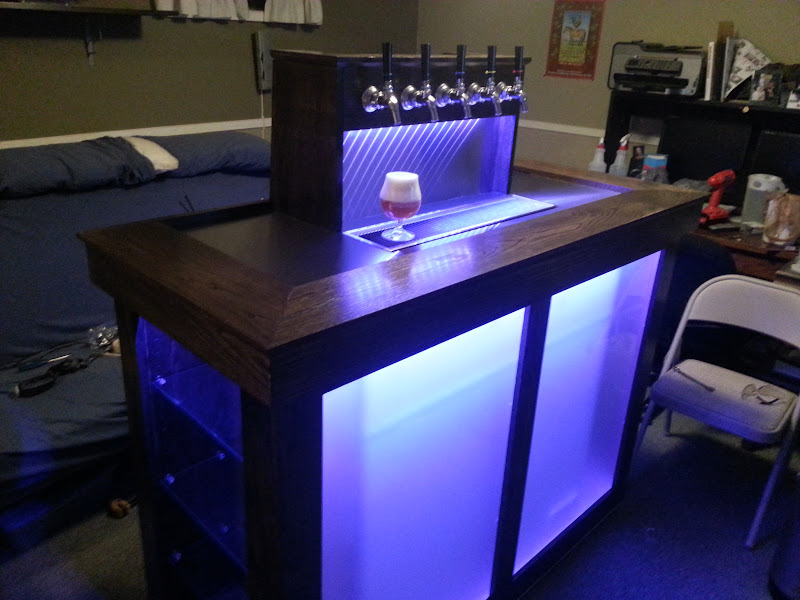
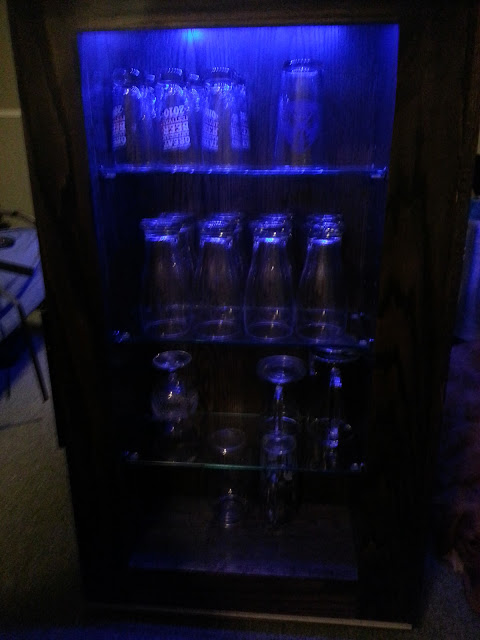
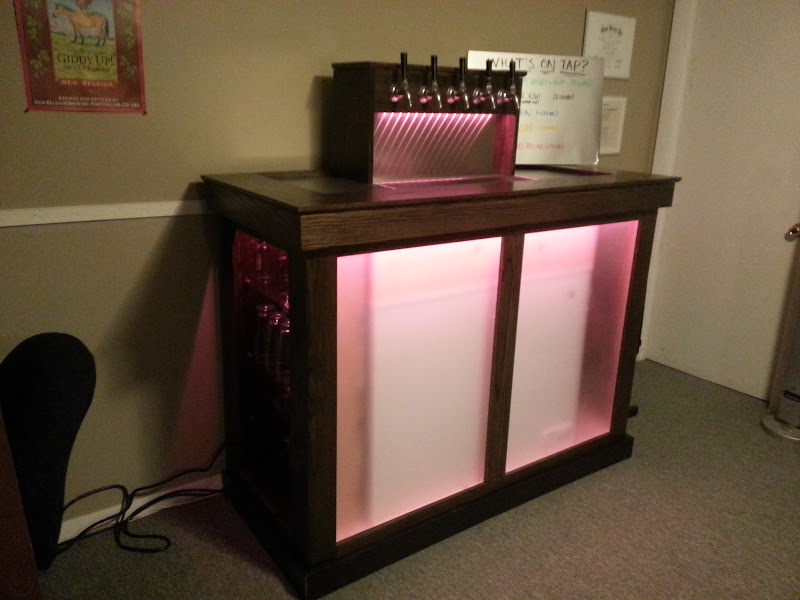
With my 9" collar and the tap coffin, we are already talking some serious height. Any additional height to put the thing on casters was something I wanted to avoid. The freezer sits on a plywood cart, which extends beyond the freezer body in order to 'inset' the casters and save several inches. These extensions also allow space for my 20# CO2 tank to sit on one side of the cart and be hidden/enclosed by the cabinet. The other side hosts a glassware cabinet.

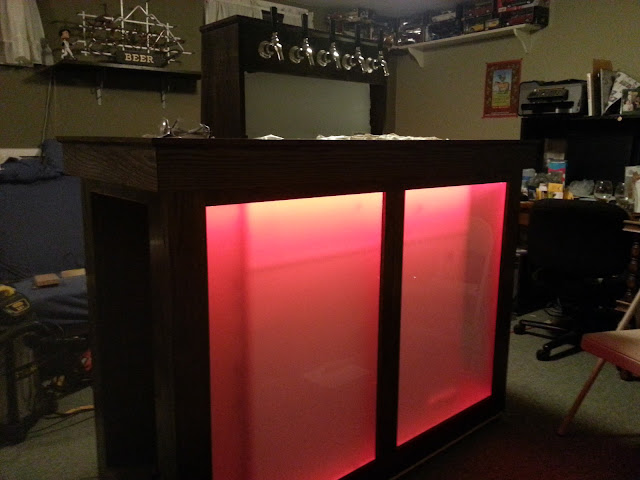
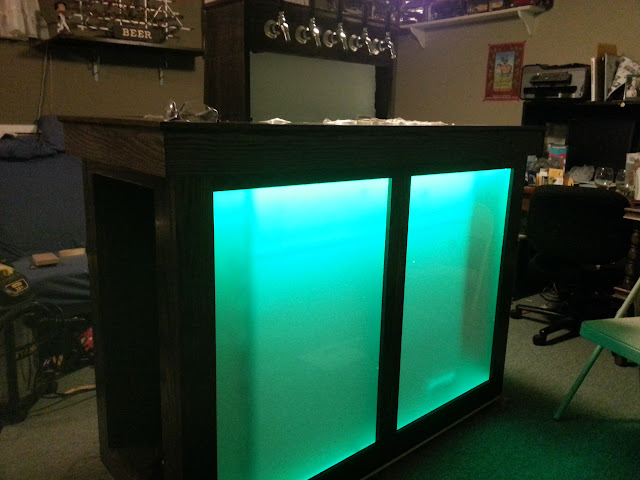
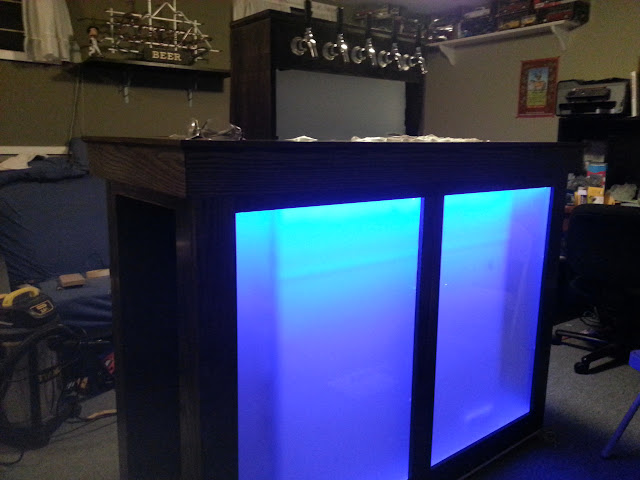
The panels contained in the face frames are frosted acrylic. Much lighter weight than tempered glass, and much more durable when I'm slinging full kegs over a 9" collar. The top and backsplash are brushed stainless steel. (316 #4 finish, for anybody keeping score). I'll get to the lighting later. ;)

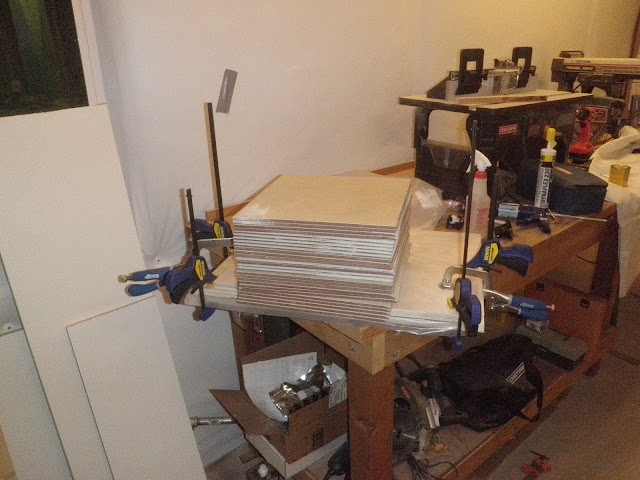
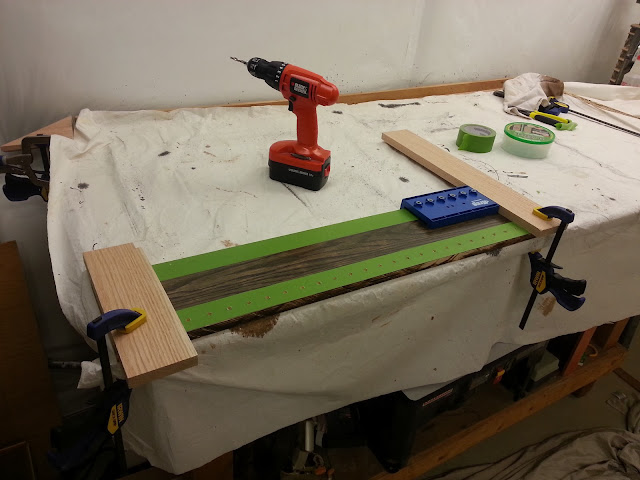
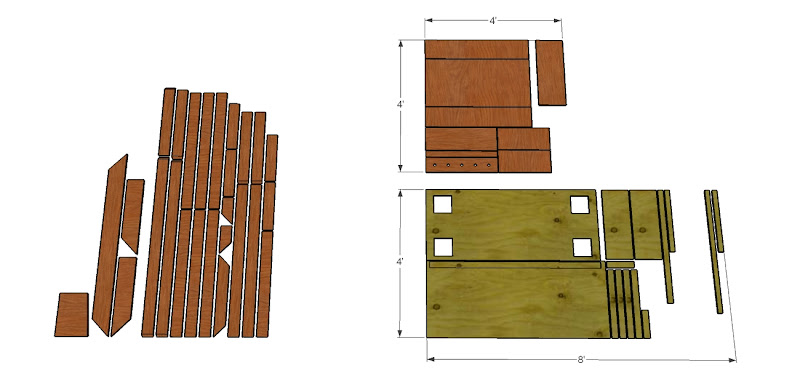
SketchUp also allowed me to lay everything out into a digital cut list, which was a priceless tool for planning ahead and buying materials. I was able to determine that I could get by with a single 4'x8' sheet of pine (structural) plywood, and a single 4'x4' sheet of oak plywood (cabinet and select other finished surfaces). It also helped me to plan out how many 8' (standard at Lowe's) lengths of 1x4 oak I needed to buy, etc.

cut%2520list%2520layout.jpg
 
I finally saw a chance to begin construction when back-to-back 4-day weekends presented themselves this holiday season. So now the real fun begins with the build pics. :)

PC230306.JPG

You can see the boxes on each side of the freezer space. The cart is built out of 3/4" furniture-grade plywood, with a 2x4 across the middle to add stiffness/strength. Carriage bolts are used to attach the footplates of the casters to the cart. They are set into counterbores.

PC230302.JPG

Holes in the plywood deck are oversized to allow free rotation of all 4 casters.

PC230303.JPG

The boxes that make up the extensions on either side of the freezer allow me to save almost 3" of height on the overall assembly. Just enough of the wheels stick out below the deck to allow free motion on carpet.

As I alluded to earlier, the finish work is all in oak - solid for the face frames, trim, and fascia, and plywood for the cabinet and some surfaces of the coffin that don't have exposed edges.

PC240308.JPG


The face frames are assembled with pocket screws, with rabbets routed in to inset the plexiglass panels.

PC240309.JPG
 
I couldn't keep myself from doing a quick mock-up of the face frame assembly once the frames were put together.
PC240310.JPG


The cabinet got its own mock-up treatment next.
PC240311.JPG


The stainless backsplash is attached to a plywood substrate with liquid nails. Some spare tiles helped to apply clamping pressure while the adhesive set.
PC300315.JPG


One of the challenges of this project that has as-yet gone unmentioned is the fact that I currently have no shop space to use for woodworking. More accurately, the shop space in my basement is currently unfit for woodworking due to it being used exclusively for brewing. ;) As such, the work took place mostly at my parents' house, where my dad keeps his table saw and radial arm saw. He does not have a miter saw, but another friend does. For those keeping track, that means three separate work sites, and shuffling cut pieces across town several times during the project.
20121230_130719.jpg


The end-mitered pieces are just about the only things that aren't joined using pocket screws. The same guy with the miter saw also has a biscuit joiner, so it was a convenient one-stop shop to get the miters done.
PC300317.JPG
 
Once the miter cuts were made, the real assembly could get underway. The tap board is 24" long total, and if I remember correctly, the taps are spaced 4.5" on center.
20121231_164908.jpg


Yet another mockup, this time for the lid assembly. 7/8" forstners made for perfect fits with my shanks. You may recognize a Perlick 525SS. Note that the hole is not yet cut to flush-mount the 24" drip tray.
20121231_171055.jpg


Once I was finished making sawdust on the main bits, it was time to move on to some of the finish work. To complement the brushed stainless and the light color of the frosted glass, I chose a black stain for my oak woodwork.
P1010320.JPG

20130101_213521.jpg

20130101_213455.jpg
 
After three coats of polyurethane (with the necessary sanding between coats), it was time to drill the sides of the cabinet for adjustable shelf pins. After drilling these pin holes, I went back in with stain and a q-tip to reduce the stark contrast between the darkly stained surface and the bright, newly exposed plywood in the middle of the holes. Drilling after finishing prevented the holes from gunking up with accumulated poly. I used another Kreg product to drill the adjustable holes - it worked great!
20130120_201406.jpg


Once the finishing work was all completed, most of what was left was final assembly. As you may have noticed, the final design is quite large. Rather than try to wrestle the final assembly down the stairs and into its final location in my basement, it was easier to just complete the final assembly there. It was also much easier to transport the face frames and the rest of the components when they stack neatly on top of one another. So, time to take everything across town and get to work on final assembly...

Here's the cabinet mocked up with the face frames on the cart.
20130127_115041.jpg


One big challenge of my design is getting the necessary penetrations cut in the 316 SS bar top. Of course, I could have just had it waterjet- or laser-cut, but that wouldn't have been any fun, right? Plus, it would have added a few extra shekels to what was already a very pricey project. So, out came the trusty Dremel, with fiberglass-reinforced cuttoff wheels.
20130126_110950.jpg


In case you are wondering, cutting 316 SS does take quite a while to cut with a little Dremel wheel. Cutting the large hole for the drip tray and the two smaller holes (one for beer lines and one for coffin ventilation) took about 5 of those little fiberglass wheels. Fortunately, it worked great and the cut edges cleaned up very well with a carbide tool (also on the Dremel).

Next in assembly was getting my designs attached to the freezer lid itself. The Dremel was once again the perfect tool to cut holes in the thin sheetmetal of the freezer lid.
20130126_182018.jpg


Once the metal was cut, I used an old MiracleBlade knife to cut through the expanded foam insulation and plastic liner to complete the perforations through the lid. It worked great, but probably wouldn't have been a SWMBO-approved technique. Glad I didn't ask first!
20130126_183124.jpg
 
Now we're getting somewhere... I kept the protective film on the SS backsplash and top as long as possible. Despite that, it sure was beautiful to see those Perlicks in place where they belong!
20130127_224349.jpg


To insulate the coffin, I filled most of the 'dead' space with layers of 2" blue styrofoam insulation. Some old paint cans made for nice radii while drawing out the cuts for the chase that will carry cooling air and beer lines.
20130128_191532.jpg

This blue styrofoam cuts very well with a circular, table, or jigsaw, and cut edges clean up nicely with a little sandpaper.

I bought a bunch of cooling fans to circulate air across the freezer's skin, to pull air through the coffin, and to stir up the cooled air inside the freezer itself. It turned out that the fans that I found on sale for $1 each were each rated at 0.57V, so the little wall wart power supplies that I've collected wouldn't drive more than one or two at a time. I decided to buy a CCTV camera power supply unit from monoprice.com, which allows me plenty of power to drive my fans, and has a nice finished end result. The only drawback is that the metal case is painted in the typical beige color, which stuck out like a sore thumb against the dark wood. My solution was to wrap the thing in matte black contact paper, which saved me from trying to spraypaint the thing when it was 8 degrees outside.

Here's a shot mid-contact-papering, with the lid still the awful beige color:
20130129_205439.jpg


And one after:
20130129_211251.jpg


After the power was figured out, it was time to install the lighting. The whole thing is lit with RGB LED strips that I got from Amazon. The price on this type of lighting has really come down in the past few years, but sometimes you get what you pay for. I had two separate remote control units die on me while I was still doing preliminary testing. After getting a full set together, I was finally able to get the lighting to function... And get a glimpse of what the finished product would look like:
20130201_012913.jpg
 
Of course, I did mention the lighting was R G B, right...?
20130201_012827.jpg

20130201_012635.jpg


After running the beer lines and installing the coffin insulation and the rest of the lighting (which seems should have taken much less time than it actually did when I can write it out in a single sentence like that...), it was finally time. Here's a shot of the first pour:
20130201_223402.jpg


And a crappy cell-phone shot of the glassware cabinet, all loaded up. The shelves in the cabinet are clear tempered glass, custom-cut by a local shop.
20130201_224939.jpg


The keezer was completed on Friday night, the weekend of the SuperBowl. I couldn't resist the call of the slopes, so after snowboarding the next day (Vail had gotten 29" in the previous 7 days, can you blame me..?), I spent some time moving it into its final position against the wall in the man cave. Sitting on the lid next to the coffin is a dry-erase board that I used to label the taps during our SuperBowl party.
20130204_185651.jpg
 
And that's where she currently sits. The acrylic is a little less frosted than I would have liked, so my next improvement is going to be to install something to give it a more uniform appearance. I'll try first with a hung bedsheet and see if that will give me the results I'm looking for. If not, some FRP or similar will do just fine and won't be too difficult to install.

And now, for the bad news. Unfortunately, I'm afraid the freezer itself hasn't responded very well to the installation process... After spending some time unplugged while I installed the lid, it hasn't cooled much beyond 50 degrees and seems to be running constantly. Frost seems to form only in a relatively small region of the inside walls. Is this something that I might be able to remedy with a coolant recharge? It won't be the end of the world if I have to trade out freezer bases - I'd just buy the same model and move the collar/lid/coffin assembly from old to new... I'd just prefer to avoid that eventuality if possible.
 
Nice build "but" your not allowing enough air exchange for proper cooling, fans are useful only if they can move the heat off the skin and replace it with air from the surrounding area. I have shelf's on both ends but left the skin exposed, the bottom is also open to draw cool air up from the floor. Chest freezers need an air gap or the heat soaks back towards the inside cause the temp inside to rise and the system to cycle/run without being able to cool. I think your compressor will fail prematurely.....Wood work is very nice though.
 
Nice build "but" your not allowing enough air exchange for proper cooling, fans are useful only if they can move the heat off the skin and replace it with air from the surrounding area. I have shelf's on both ends but left the skin exposed, the bottom is also open to draw cool air up from the floor. Chest freezers need an air gap or the heat soaks back towards the inside cause the temp inside to rise and the system to cycle/run without being able to cool. I think your compressor will fail prematurely.....Wood work is very nice though.

I know. I have a plan for this, I just haven't had a chance to install it yet. Once I get it in place, I'll post the pictures, etc. The freezer was acting up before I enclosed it though, so that isn't what is causing issues with it.
 
Very nice. I'm planning something similar. I'm hoping to avoid using a collar though. Since it will be a coffin build, I don't care if I end up drilling through the lid one more time for gas.
 
Nice freakin' job! :mug:

Thanks! I owe my inspiration to you, so I appreciate the support. :D

Welcome to the club!

That is one sweet build!

Much appreciated, Jeebas. While it's still a work-in-progress, I'm glad to have a keezer to call my own.

Very nice. I'm planning something similar. I'm hoping to avoid using a collar though. Since it will be a coffin build, I don't care if I end up drilling through the lid one more time for gas.
The real reason I went with the collar on mine was to fit in another keg. It is also a convenient place to mount my gas distribution that's up and out of the way. Looking forward to seeing your build once you get it going!
 
Does anybody have any insight into the issues I'm having with my freezer/compressor? To review, it seems to keep the temp at about 45F, though my temp controller is set to about 42. The compressor runs constantly, and there seems to be just one 'cold spot' on the back wall that builds frost.

Bad comes to worse, I can buy a new freezer and move the collar/lid assembly over to it, but I'd much prefer if there is a way to fix this!
 
Rens,

a couple of suggestions. Did you put another probe/thermometer in the keezer to check the accuracy of the temp probe that's feeding your controller?

What is your delta T set to? If it's small, i.e. less than 0.5 degrees, then the compressor would be running much more, than if you had a delta set point of 2 or 3 degrees.

A dumb question, but any leaks where the cold air is getting out?
Also, is the metal skin of the freezer getting hot? If so, it's having a hard time self-regulating, and that could cause a problem.
You may also need to install a fan to move the air around inside the freezer, if there's spotty areas of cold.

A couple of things I failed to mention... I have two PC fans in the freezer to move the air around. The 45°F figure I mentioned comes from an independent thermometer that lives on the compressor hump full-time. My temp controller is a cheap analog controller, and I believe the delta is at 3 degrees or so.

The skin doesn't feel extraordinarily warm, and the temperature issues started up before I enclosed the freezer with my acrylic surround. The coffin is insulated very well, with no fan currently installed to drive air through it specifically. I suppose it's possible that some air is leaking through the coffin, but it would be minimal at most.

Some extra background info... the freezer first started acting up when I unplugged it for a few (2-3) hours and removed the lid to cut holes in it for the coffin. Once I plugged it back in, the headaches began. At that time, I had some extra insulation taped over the holes to mitigate issues, so once again I don't think that air leaking is the issue.

Thanks for the help!
 
Back
Top