Draft Head Build

Homebrew Talk - Beer, Wine, Mead, & Cider Brewing Discussion Forum

Help Support Homebrew Talk - Beer, Wine, Mead, & Cider Brewing Discussion Forum:

This site may earn a commission from merchant affiliate links, including eBay, Amazon, and others.

Photomask

Well-Known Member
Joined
Nov 3, 2009
Messages
132
Reaction score
1
Location
Deepinaheartatexas
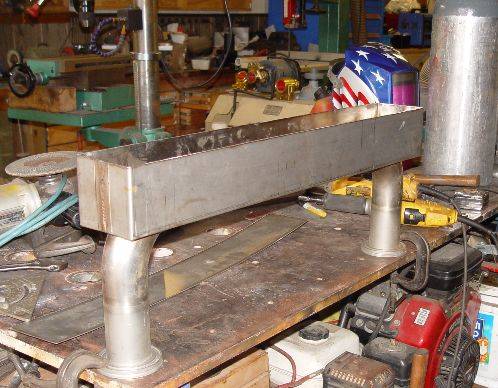
I started on a draft head for a keezer that's going in the house. I am working, mostly, with scrap I have laying around waiting to be recycled into something more useful. They throw away a lot of goodies where I work and I try to be first in line at haul-it-off time.

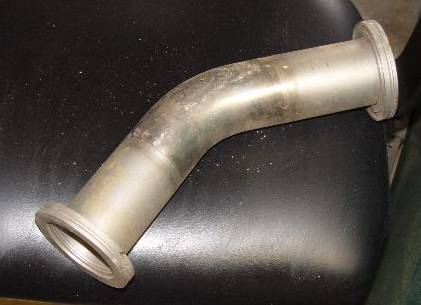
Picture #1-A scrapped out vacuum trunk part.
Picture #2-Scrapped out stainless panels. These are probably 316L, no magnetic attraction whatsoever.
Picture #3-The initial weld-up.

01-Exhaust parts.jpg


01-Scrap Stainless.jpg


01-Initial Weldup.jpg
 
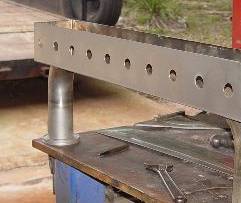
Picture #1-Slugs from drilling the holes with a holesaw. (For all you naysayers that believe it can't be done.)
Picture #2-The holesaw in question. A 7/8in Blue-Mol that was well used when I started on this draft head, 10 holes later and still cutting great.
Picture #3-Holes cut and a satin finish put on the face to see how it would look.
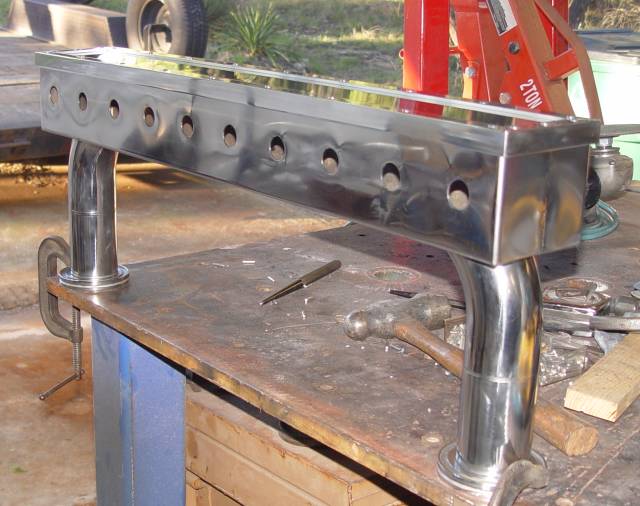
Picture #4-I mirror polished the face and did the initial fit-up to check everything out.:D
Picture #5-Polishing the face took about 10 minutes and this is what I did it with. Don't ask about the price....:eek:

I still haven't decided to go with a mirror finish or satin. Time will tell as it get closer to being finished. I'll try to get the lid done in the next day or two.

01-Slugs.jpg


01-Hole Saw.jpg


01-Holes Cut & Satin Finish.jpg


01-Initial Fitup.jpg


01-Walther Big Buff II.jpg
 
That's sick looking! :rockin:

My vote is for polished. Brushed or satin is nice, but there's nothing like the gleam of shiny shiny metal.
 
I vote for polished, it's easier to clean and will match the faucets. Great use of recycled materials.
Ya... It will probably wind up polished. It doesn't take much to polish it once the metal has been random orbit sanded to a satin finish and it's so purdy when done.
 
WOW! I should show this to the wife! She thinks I'm a Sandford for collecting scrap.
Just proves that it is all useful.
GREAT Work and find man.
Props!:rockin:
 
WOW! I should show this to the wife!
Careful.... She might have some projects of her own in mind.:eek:


I managed to finish the lid this morning and finished up the polishing. The lid is a little tight but I don't plan on removing it much anyway.

Picture #1 With the completed lid on and polishing complete.
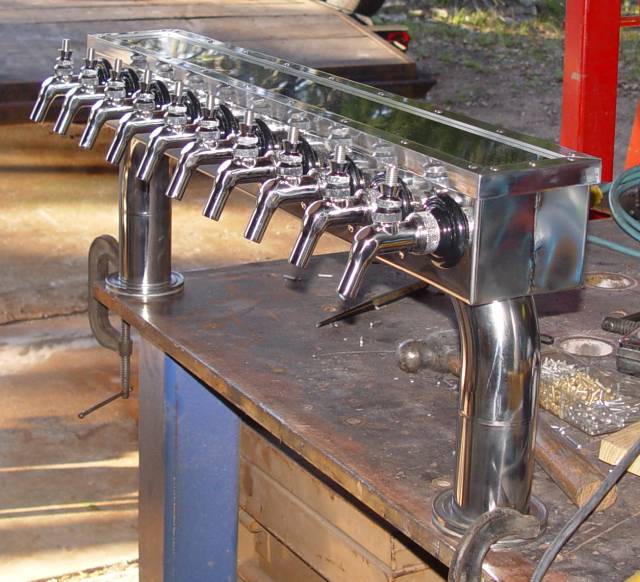
Picture #2 The final fit-up with shanks and faucets.
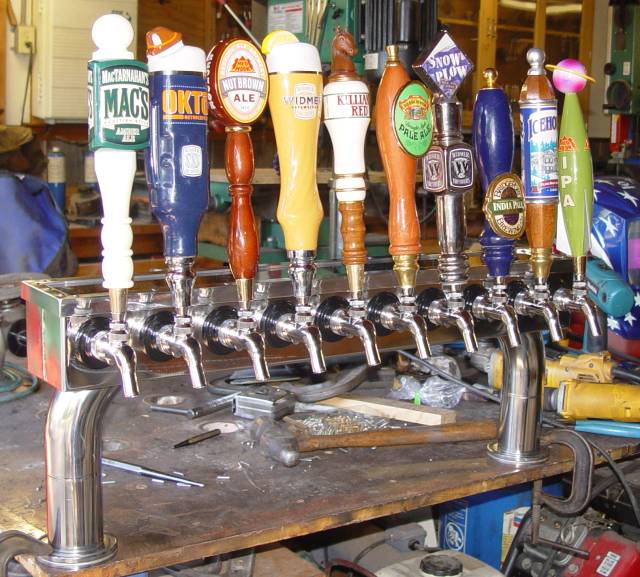
Picture #3 I just had to throw some tap handles on it.

01-With The Lid On.jpg


01-Final Fitup.jpg


01-With Tap Handles.jpg
 
Love the look of the lid! Are those rivits? or small bolts? Welds?
either way looks tough!
BTW everytime I mention stuff like this she mentions the coach outlet or buying a new vehicle.... WTF right?
GREAT JOB MAN! if you could get one more pic of the top that would be cool
 
Love the look of the lid! Are those rivits? or small bolts? Welds?
either way looks tough!
BTW everytime I mention stuff like this she mentions the coach outlet or buying a new vehicle.... WTF right?
GREAT JOB MAN! if you could get one more pic of the top that would be cool
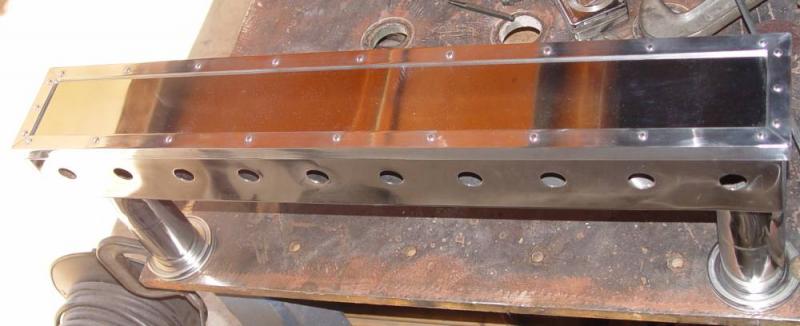
The lid is a single panel of polished stainless surrounded by 1/8inx3/4inx3/4in aluminuminuminum angle, hand riveted with round-head-soft-solid aircraft rivets. I thought it would give it a more MANLY appearance than just plain 'ol countersink rivets.:D

That's the problem with many wives... Screwed up priorities.:mug:

As requested... A shot from the top...

01-Lid Shot.jpg
 
I will PM you with my address for QA testing purposes. Just wanna make sure no leaks and stuff....
Awsome man, I wish I had half your skill and all your tools to do something like that. :rockin:
 
What is the spacing of your taps? I'm going to use big tap handles like yours, and want the spacing to be right. I was looking at 4 inches on center.
 
I will PM you with my address for QA testing purposes. Just wanna make sure no leaks and stuff....
Awsome man, I wish I had half your skill and all your tools to do something like that. :rockin:
I used to live in San Antonio. It's only about a 2hr drive up. If you're seriously interested. PM me sometime and give it a shot.

Just so you know.... I'm still in AWWW
Very Manly & very jealous :cross:
Don't be jealous.... Just look at a pile of scrap and envision what it could be...:tank:

I'll be back in a few minutes, I uhhh... ...have to take care of something. :eek:
I hope you washed your hands...;)

This has to be one of the best looking "home built" draft heads. Awesome job!
High praise indeed. I hope the kezzer turns out well enough to be worthy.

What is the spacing of your taps? I'm going to use big tap handles like yours, and want the spacing to be right. I was looking at 4 inches on center.
I centered mine at 3 inches due to space limitations. The tap handles are really a bit too close together. If space wasn't as much of an issue I would have probably gone for a 5 inch spacing. I have some smaller size tap handles and may have to go to those depending on how this works out in application.:eek:
 
I centered mine at 3 inches due to space limitations. The tap handles are really a bit too close together. If space wasn't as much of an issue I would have probably gone for a 5 inch spacing. I have some smaller size tap handles and may have to go to those depending on how this works out in application.:eek:

Thanks, I'm goint to do a prototype tonight out of some cheap wood. I'll do a 4 inch and 5 inch spacing and post pictures.
 
I ran into a problem with the faucets mating to the shanks. I noticed it during the fit-up but knew I could take it back and they would straighten it out. Initially, I thought it was the shanks... It couldn't possibly be the Perlik faucets.... So, I took the whole lot down to Austin Home brew Supply and they ran across a note from the management that stated "There is a problem with Perlik faucets mating to short shanks". We started looking into it further and I had 7 faucets that would fit any of the 10 shanks I had and 3 faucets that would not fit any of the shanks I had. Imagine that! Perlik faucets being the problem! You could see a minor variation in the mating teeth of the offending three faucets. We went through a whole stack of faucets that they had on-hand and none of them would fit. All of the Perlik faucets they had on hand would fit any of the longer shanks but none of them would fit the short shanks. (Note: Austin Home Brew Supply put forth a lot of effort in an attempt to resolve my problem. Thanks for the effort guys! I really do appreciate it.) I eventually resolved myself to the fact that I would have to figure it out. An hour with a needle file and a Dremel tool spinning a diamond dust needle bit cleaned up the mating teeth and now those three faucets will fit any of the shanks I have.

So, if anybody else has run into this problem, it can be resolved. It's not easy, but it can be resolved.
 
You have a great deal more patients than me, I’ll tell you that. Glad you got it worked out. Still working on the faucet faceplate for my keezer. Spaced the faucets 3 7/8” on center. Yea, weird number, but it’s from the center after tweaking it to fit the rest of the coffen.
 
Photomask, hell of a job, yet again!

This whole build looks a whole lot cheaper than the 12 faucet tower I hope to have someday soon, I'll have to start collecting scrap piles of my own.

Out of curiosity regarding the short shank issue, are we talking 2" shanks or the tower type shanks that are really f-ing short?
 
You have a great deal more patients than me, I’ll tell you that. Glad you got it worked out. Still working on the faucet faceplate for my keezer. Spaced the faucets 3 7/8” on center. Yea, weird number, but it’s from the center after tweaking it to fit the rest of the coffen.
We all work within limitations, although I do try to stretch them at times...

Out of curiosity regarding the short shank issue, are we talking 2" shanks or the tower type shanks that are really f-ing short?
We're talking about 2in shanks. (And that issue is still unproven, as to the source. Are the mating teeth on a 2in shank larger than a longer shank? Were all the 2in shanks machined slightly too large? Were all the longer shanks machined slightly too small? Did I just get lucky and receive 7 faucets that were cut slightly too large?)
 
I had problems initially with Perlick faucets and some of my shanks, but i blamed the cheap shanks. A little persuasion and they fit up, and fit much easier next time. Glad to hear you got it resolved. My shanks were tower style.
 
I ran into a problem with the faucets mating to the shanks. I noticed it during the fit-up but knew I could take it back and they would straighten it out. Initially, I thought it was the shanks... It couldn't possibly be the Perlik faucets.... So, I took the whole lot down to Austin Home brew Supply and they ran across a note from the management that stated "There is a problem with Perlik faucets mating to short shanks". We started looking into it further and I had 7 faucets that would fit any of the 10 shanks I had and 3 faucets that would not fit any of the shanks I had. Imagine that! Perlik faucets being the problem! You could see a minor variation in the mating teeth of the offending three faucets. We went through a whole stack of faucets that they had on-hand and none of them would fit. All of the Perlik faucets they had on hand would fit any of the longer shanks but none of them would fit the short shanks. (Note: Austin Home Brew Supply put forth a lot of effort in an attempt to resolve my problem. Thanks for the effort guys! I really do appreciate it.) I eventually resolved myself to the fact that I would have to figure it out. An hour with a needle file and a Dremel tool spinning a diamond dust needle bit cleaned up the mating teeth and now those three faucets will fit any of the shanks I have.

So, if anybody else has run into this problem, it can be resolved. It's not easy, but it can be resolved.
I am glad to see that I am not the only one with that problem. My Perlick's had the same problem, but under careful observation you will notice that the shanks that are problematic have roughly two more threads or so than the ones that fit! It took me half an hour to figure that out and many shanks from my LHBS display case to figure that out. They finally had one that was a couple threads shorter like my others and it fit perfectly. No Dremel required.
 
I am glad to see that I am not the only one with that problem. My Perlick's had the same problem, but under careful observation you will notice that the shanks that are problematic have roughly two more threads or so than the ones that fit! It took me half an hour to figure that out and many shanks from my LHBS display case to figure that out. They finally had one that was a couple threads shorter like my others and it fit perfectly. No Dremel required.
In my case, all the shanks were exactly the same size. Seven of my faucets would fit any of the ten shanks. Three of my faucets would not fit any of the ten shanks. I went though another few shanks and, at least, another dozen faucets at Austin Home Brew Supply with no gain. AHBS would have swapped them out, refunded my money or attempted anything to resolve it. Their customer support is impressive. In the end, I decided to keep the three faucets and clean up the machining to get those three faucets to fit any of the ten shanks. I could not go to longer shanks, nor would I settle for chrome faucets. Bull-headed, I guess.:eek:
 
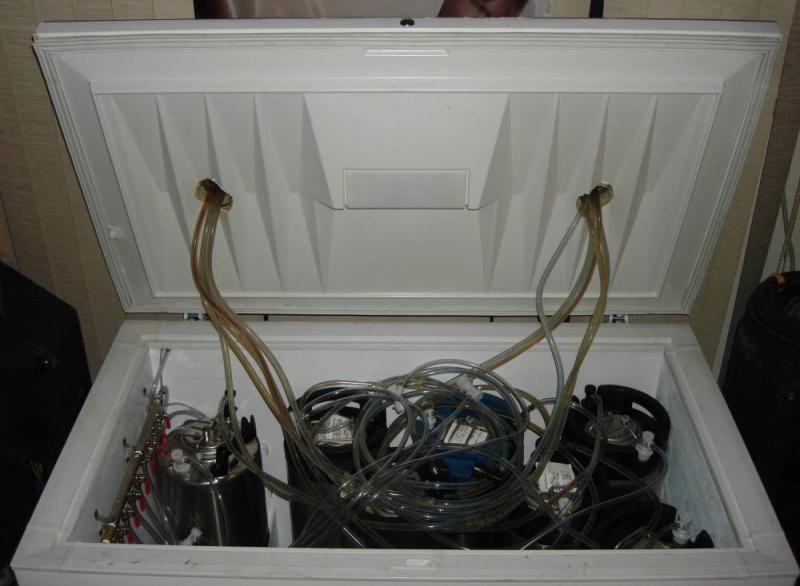
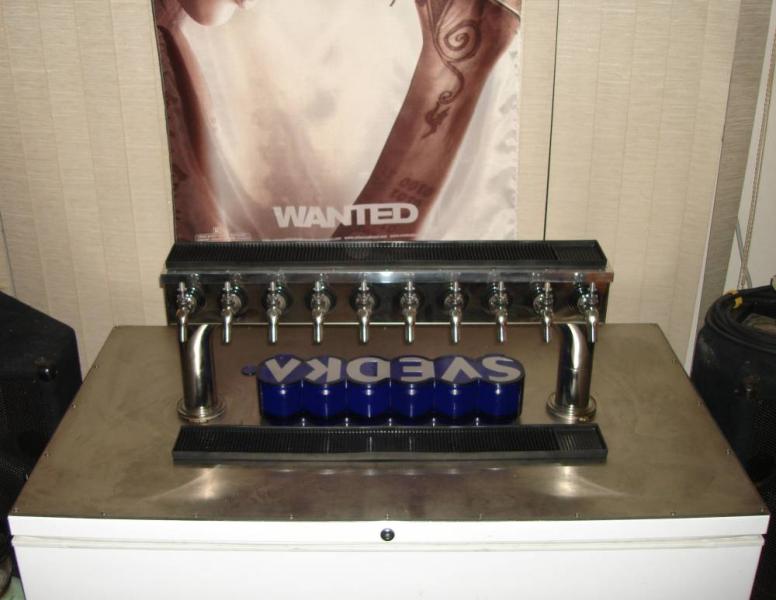
I finally got around to building the keezer and putting the draft head to use. It holds eight 5 gallon kegs and two 2-1/2 gal kegs. I topped the lid with stainless steel, bored the holes through the stainless steel and all the way through the lid with a hole saw, and TIG welded the draft head to it. I wanted the tap handles to be numbered. Pool balls seemed like a good idea. I used no risers on the tap handles and that allows me to open the keezer all the way without moving it. I have another idea for the backlit sign but will get to that another day.:mug:

Inside.jpg


Outside.jpg


New Tap Handles.jpg
 
Very nice! I can't wait to get going on my keezer project. So many other things to do though :( Oh well, at least I get to soak in all this inspiration for when the time comes.
 
Very nice! I can't wait to get going on my keezer project. So many other things to do though :( Oh well, at least I get to soak in all this inspiration for when the time comes.
There is plenty of inspiration out there and many projects to do. :rockin:

That turned out great!! Also, it looks like your drip tray is bent in the middle.
Actually, it's a rubber bar mat. :eek:
Very easy to clean, just drop it in the sink.
 
Very slick keezer build up...

Be interested to know how you got the pool balls drilled out... Did you make a flat spot on the bottom, so that the drill bit could get a proper bite?

I think steel (or brass) balls would be more up my alley than pool balls... :D

With the issues you had with three of the taps, I would have changed them for ones that could be used with nitro... Then you could have seven 'normal' and three 'special' taps for brews...
 
Be interested to know how you got the pool balls drilled out... Did you make a flat spot on the bottom, so that the drill bit could get a proper bite?
I mounted a piece of wood in my drill press vice and drilled a 1-1/2 hole in it. I placed the pool ball in the hole which is centered to the drill chuck. That centered everything up made it easy to keep the pool ball from moving. I drilled 5/16 inch holes in the pool balls and tapped them with a standard thread 3/8-16 tap.
 

Latest posts

Back
Top