Danby DCR122BLDD 4.3 cf kegerator conversion

Homebrew Talk - Beer, Wine, Mead, & Cider Brewing Discussion Forum

Help Support Homebrew Talk - Beer, Wine, Mead, & Cider Brewing Discussion Forum:

This site may earn a commission from merchant affiliate links, including eBay, Amazon, and others.

spaceyaquarius

Well-Known Member
Joined
Mar 1, 2013
Messages
414
Reaction score
16
Location
Oklahoma City
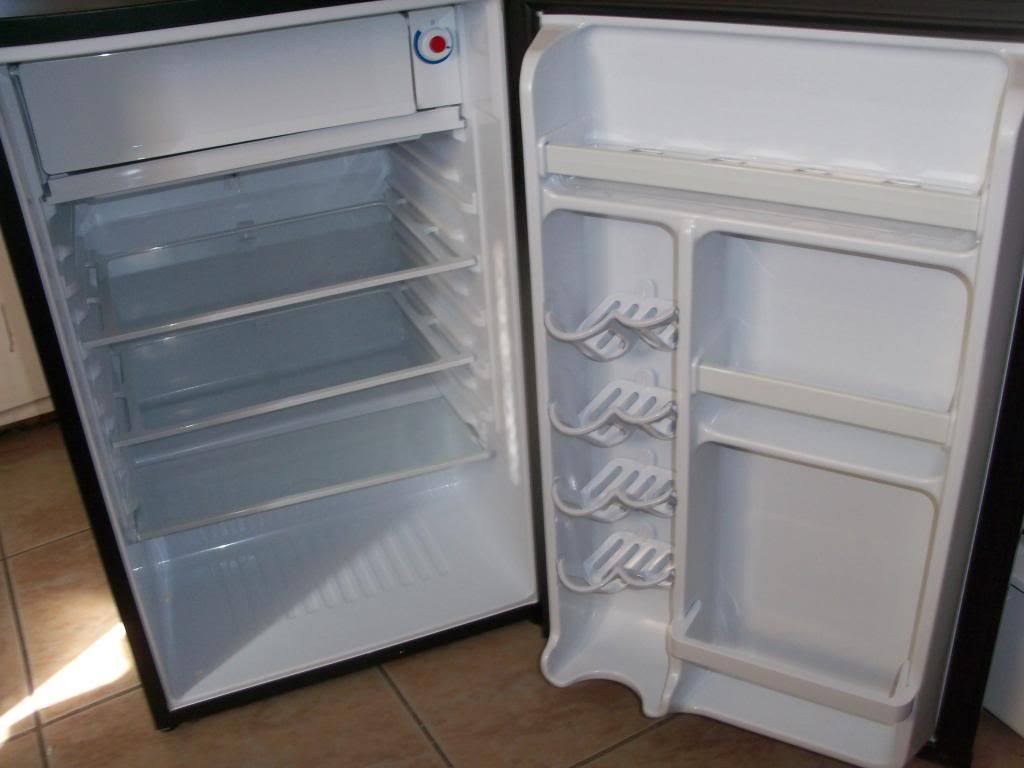
I accidentally ordered this Danby model# DCR122BLDD 4.3 cubic foot mini-fridge when I was trying to order the Danby model # 440BL 4.4 cubic foot mini-frdige (which I have already converted into a kegerator).


Below is the link for my step by step Danby model 440BL kegerator conversion:

https://www.homebrewtalk.com/f51/danby-dar440bl-mini-fridge-conversion-kegerator-453105/


You can convert this model into a kegerator, and it is $50-$150 cheaper than the Danby 440BL. For some reason, the 440BL price ranges from $115-$300, I got the DCR122BLDD for $115 + free shipping with Amazon. The 440BL is easier, so if you can find it at a good price, pick the 440BL.

Ok, you have the DCR122BLDD for some reason.


Equipment Required:
• One Danby brand 4.4 inner cubic feet, model number DAR440BL mini-fridge = $200
• Two 5-gallon Cornelius kegs outer aluminum and inner stainless steel = $120-$180
• Double-tap stainless steel draft tower 3” ID w/Perlick 525SS faucets = $100-$120
• Vice grips/box knife/hammer/allen wrench/electrical tape/wire cutter = $25
• New CO2 tank (filled) = $90-$100 (with refills at $10-$20 each)
• Four MFL ball lock quick-connects w/3/16" male barbs = $32
• Two sets of 10 ft., ¾” inner diameter lines = $22
• Double CO2 regulator + plumbers tape = $100
• Drip tray for the top of the fridge = $40
• Progressively larger screws/ nails = $5
• PC fan with cool blue lighting = $15
• Two 5/16" ID vinyl gas lines = $20
• Waterproof aluminum tape = $7
• Power converter AC/DC = $4
• Two male to male barbs = $6
• Four fender washers = $2


The main difference between the models is that the cheaper DCR122BLDD has a freezer compartment that has to be moved, and also that the side shelving has to be cut out with a box knife. The DCR122BLDD also has no inner light source, or drain hole that I could find, so instead of running a PC fan through it, you could just use the copper pipe method (or just run your PC fan wire out the door.

 
01 - Moving the freezer compartment. Take out all the shelving in the fridge, the plastic drip tray under the freezer, and unscrew the 4 phillips head screws holding the freezer in place. There are 3 more phillips head screws holding the thermostat on the right in place.


02 - Moving the freezer compartment. Being very pateint, slowly push the freezer compartment down towards the back wall of the fridge. You can now take the same phillips head screws and attach the compartment to the side walls of the inside of the mini-fridge.


03 - Cut the inner shelf supports out. Take a box knife and cut out the protrusions and then seal with waterproof aluminum tape. You only have to cut as far deep into the fridge as the back shelf. I didn't realize this for a few minutes.

In able to fit two Cornelius (Pepsi-style) ball lock 5-gallon kegs into this fridge, you will have to cut one side of the plastic shelving supports. You may as well cut both sides out for just a little extra room.


04 - Remove the fridge door. Next, remove the mini-fridge door hinge by using a Phillips head screwdriver, and then removing two more Phillips head screws which are underneath the black plastic cover. The door will come right off without doing anything to the bottom hinge of the mini-fridge door.

 
05 - Cut out the inner shelf supports. – Take the removed mini-fridge door, place it on a table, and use your box knife to cut the outside edges of the white plastic shelving. Keep the box knife at a 90 degree angle to the plastic at all times.

 
06 – Cut and seal up the foam areas. Next, pull out the four plastic soda can holders by hand. No tools are necessary.

Use the box knife to cut the inner edges of the plastic, and then smooth out any pointed plastic edges while also smoothing out any insulation that is not flush to the mini-fridge door. You can try to pry off the unwanted plastic section with a flat-head screwdriver, though it seems easier to just pull the entire thing off by hand after the appropriate cuts have been made. Use your waterproof aluminum tape to seal the open areas. Two to three layers will ensure that no moisture gets into the insulation. You do not want any mold to occur inside the mini-fridge door.


07 - Trace the circle for the draft tower. The center of the draft tower will be drilled 5.5” from the back of the mini-fridge (with the front door facing you), and 10” from the left of the top of the fridge. The tap tower may end up being slightly to the left of center while facing the front of the mini-fridge, but this is necessary in order to avoid the refrigerant lines. Take your measuring tape and mark the center of the draft tower. Then cut out a 3” diameter cardboard circle which you will use to draw a circle on the top of the mini-fridge with a red Sharpie pen.
 
08 - Making the hole without a power drill – If you do not have a high torque power drill, it is cheaper and safer to simply hammer a 1/2" drill bit into the edge of the circumference of the circle that you have just drawn onto the top of the mini-fridge. After piercing the black sheet metal, you can now hammer progressively larger drill bits, nails, or screws into the original hole. A Klein brand nibbling tool ($20) can be used to cut the 3” diameter circle (though this will take some patience and an entire day timewise). I used a high quality wire cutter that was able to do the same job and which also cost only $3. The hole does not have to be perfect, as it will be covered by the draft tower.


09 - Cut out the draft tower hole The nibbling tool was taking too long to cut a hole in the top of the fridge, so after creating a hole, I just simply used the wire cutters to cut and then peel back the sheet metal in small parts. The hole will not be perfectly circular, though it is not necessary as long as you make sure to not create a circle that is more than a few millimeters outside the circle that you have drawn earlier with the Sharpie. After you have created a 3” diameter hole in the top of the mini-fridge, use the box knife and a flat head screwdriver to pull out the insulating foam while being careful to not cut any electrical or refrigerant lines (even though they should not be there). After removing the foam, use the box knife to easily cut through the thin white plastic which is the roof of the inside of the mini-fridge. Now your mini-fridge has a cylindrical hole cut from the inner area to the outer top of the mini-fridge.

 
11 - Seal the hole Next, take the waterproof aluminum tape, and with at least two layers, seal the hole that you have just made. You don’t want any moisture to reach the insulation. I used three layers of aluminum tape.


Now that the aluminum tape is in place, you can mark the four bolt holes with a red Sharpie pen, and then use the same 1/2" drill bit with the earlier hammer method, followed with progressively larger nails in order to create a ¼” hole. This may sound strange, but the 1/2" drill bit is only being used to create a hole, and will not result in a 1/2" hole in the top of the fridge. Keep checking the size of the hole for the perfect fit for your screws. Of course if you have a high torque electrical drill, you can just drill the holes. The bolts will need to be 2 ¼” long with a small washer on top of the mini-fridge and a larger fender washer of the correct inner diameter for the underside. Plastic covers over the inside and outside screws may look nicer and protect from rust.
 
12 - Drill the holes for the draft tower Screw the bolts into the draft tower and make sure your 3/16” inner diameter, 10-12 foot long beer lines are ready to hook up to each of the kegs. Most draft towers come with 5 foot long lines, so you’ll need to purchase an extra 5-7 feet of beer lines and an adapter (male-male barb) in order to connect the two beer lines. I had to microwave a bowl of water for 2.5 minutes and soak the beer line for 5 minutes to get the male-male barb into each beer line. The barb can be forced into the first half of the beer line with your hands, while forcing the 2nd beer line onto the other half of the male-male barb will probably require a combination of vice grips and needle nose pliers.

Many HBT threads seem to suggest that if you have 3/16" inner diameter beer lines, you will need around 10-12 feet of beer line length, or you may end up "knocking out carbonation" from the beer before it ends up reaching the beer glass. If your beer lines are the wrong length/inner diameter combination, then you can easily end up wasting CO2 from your tank (if you are not [naturally] sugar carbonating). Having the wrong inner diameter and beer line length vinyl tubes resulted in several batches of acidic/carbonic acid aftertaste problems when I was very new to home brewing. Many "starter" home brew kits come with 1/4" inner diameter beer lines at 5 feet of length for some reason, and will need to be replaced.


13 - Secure the draft tower to the top of the fridge Utilize a socket wrench set in combination with an allen wrench of the correct size in order to secure the draft tower to the top of the Danby mini-fridge. You can see that the hole in the top of the mini-fridge is not perfect, and neither is the aluminum taping. You may need to adjust the aluminum tape so that it does not stick out of the outer diameter of the draft tower.


If you don't have anyone helping you, you can just put the allen wrench into the bolt at the top of the fridge and tighten the nut from the inside of the fridge with your socket set.

 
14 - Using an adapter to extend your beer lines In order to extend your beer lines from the double tap tower to your 10-12 foot beer lines, you will need a male-to-male barb adapter. Soak the beer lines in hot water as previously stated after microwaving hot water for around 3 minutes. Make sure that the beer lines meet at the middle of the male-to-male aluminum barb. I have read that some homebrewers suggest that a small incision should be made with a box knife at the edge of the vinyl beer line in order to allow for an easier barb to beer line connection, but try to just force the beer line onto the barb to reduce the possibility of a leak. Of course if you have a difference in diameter between the barb and the vinyl beer line, you could make a small incision with the box knife, but make sure to use a flat head hose lock.

The below photo shows the beer lines coming from the draft tower into the fridge. The left side has the male to male aluminum barb connected to the longer 10 foot 3/16" inner diameter beer lines, while the right side shows the barb not yet connected to the longer length of beer line (this is the Danby 440BL model, but you get the idea).


15 - Installing a PC fan/copper tubing to cool the draft tower Mini-fridge thermostats will cycle the refrigeration process off and on, resulting in unstable temperatures. You can either replace the thermostat with a $40 digital replacement (that you will have to re-wire yourself), or an $80 plug in thermostat that is a simple plug in adapter. If you choose to add a new thermostat, you should mount the probe into a water bottle which can be filled with the gel that is inside “Blue Ice”, which will maintain a constant temperature.

Alternately, you can install a $15 PC fan inside the fridge to ensure that the air circulation keeps the thermostat kicking on, in order to keep your kegs cooler. An Antec brand LED tri-cool 9V 100mA 4”x6” hobby box with 3” PC fan with PVC elbow is available on Amazon for $15 will work just fine and will also add a cool blue light. If you want to connect the PC fan straight into the draft tower to make sure that the very first pour is always cold and not foamy, you can purchase a "hobby box" from Radio Shack to enclose the fan, buy an elbow piece PVC, and then a 1" inner diameter plastic hose to push up into the draft tower.


I purchased the PC fan, though this does require a $4 AC/DC power converter that plugs into the wall. You will have to split the black and red wires on the PC fan and also the power converter and tape it with electrical tape. Make sure you match up the hot wire (red) from the PC fan to the hot wire (all black) of the AC/DC power converter. The black PC wire should be the ground, and the black and white power converter wire should also be the ground.


The power supply cord will fit through the drain hole of the Danby 440BL fridge (but not the DCR122BLDD, you will just have to run the power supply cord through the mini-fridge door.


Alternately, you can just purchase a short length of 1/2" inner diameter copper tubing from a hardware store and this will transfer cooler temperatures into the beer tower. About 12" should be long enough, so that it doesn't interfere with the CO2 tank/regulator. This passive cooling method requires no extra power consumption. Then with the addition of 2 more 12" (1/2" outer diameter) copper tubes into the draft tower, then extending 7.5" across the ceiling of the fridge and down another 10" down the inner wall of the fridge, you will not need a PC fan at all.


16 - Prepare the CO2 tank In order to run two different 5-gallon kegs inside of this Kegerator, you will need a dual line regulator with 3 gauges (which runs about $100). Each keg can be set at a different PSI, allowing you to force carbonate one keg while serving your primary keg. Make sure to apply Teflon (plumbers tape) in order to seal the connection between the CO2 tank and the dual line regulator. The gas lines connected to the CO2 tank will not need to be very long, as there is limited space in your newly converted Kegerator.


At first I used vinyl beer lines for my CO2, there was a gas leakage problem of course. These red gas lines have 2 walls for protection, and only cost about $10 each on amazon and come with the hose clamps and ball lock quick disconnects.


Make sure to secure the nut (next to the quick disconnect gas line) with a crescent wrench while twisting the quick disconnect. Then turn the gas on, submerge the gas post in a container of sanitizer and see if there are any bubbles.

 
17 - Secure the CO2 tank inside the fridge You may need to secure the CO2 tank with a bungee cord to make sure that is doesn’t fall forwards when you take one of the Cornelius kegs out of your really cool DIY Kegerator.

 
18 - Place your kegs inside the fridge and connect all the hoses You will have to reconnect the thermostat to the top of the fridge with the same phillips head screws that were connecting it earlier.

This configuration will fit either:

• Two Cornelius 1/6 BBL (5-gallon) Pepsi-style ball lock kegs.
• One 1/6 BBL pin lock (Coke model) keg + one 1/6 BBL ball lock (Pepsi model) Cornelius keg.
• One Cornelius keg + one Sanke keg (which will need a Sanke keg tap adapter if you want to buy 1/6 BBL 5-gallon kegs from your liquor store).


The photo below shows my two Cornelius (Pepsi model) 5-gallon kegs with a 5 pound CO2 tank on the shelf behind the kegs which is secured by a bungee cord. An $8 digital thermometer with probe can tell you the ambient temp inside your fridge.

 
20 - Time to drink up! Invite some young college girls over, get twisted, and call in sick to work tomorrow. If the wifey hassles you, tell her to get off your back.

 
This is just great! I would like to transform the same fridge but I'm afraid of breaking the little cylinder thing (shown on the second pic of "#3" post) connecting the back wall to the freezer plate. Does it bend easily? Does it bend at all? Thx for the pictures and the instructions! :)
 
Sure, it seemed to bend pretty easy for some reason. Of course, I moved it pretty slowly, using just hand pressure, but that freezer plate does have to get pushed back pretty far for the kegs to fit in there.

I accidentally bought that model, not knowing that the freezer wasn't removable, so I didn't really have a choice but to bend it back.

Have fun with your convesion!
 
With the freezer pan bent down, do you find a problem with water collecting in the fridge?

Its my understanding that the there is a drain hole in the upper right corner. Now, the water will run down the coil pan and drip in the fridge.

Did you have to drill new drip hole? Or are you just dealing with the water? (towel or small catcher?)

Elmwoodie.
 
Did everything as shown for a single tower mod. I didn't need to but out the interior shelf supports because only one keg. Mine also was able to unscrew the door shelving without having to cut it. I bent my freezer shelf carefully and slowly. Did everything as shown and now my fridge doesn't seem to be turning on. It's plugged in, but motor isn't running. Tried turning it all the way off and then on high for 2 hours like manual says after a defrost period. Nothing. Can you troubleshoot for me at all? Any ideas? Only things I can think of are I screwed shelf into a wire - maybe? I didn't see any wires when I cut the hole for the tower, so don't think it's that. Or I broke it when bending freezer shelf but nothing cracked and it went gently and easily. Please help! Don't want a $200 anchor!
 
So I took the thermostat off again to check it and there was a wire disconnected. Plugged it back in and now she's running like a champ! This was super simple and I'm not mechanically inclined at all. Thanks for all the great instructions and pictures.
 
FYI


16.5" is the inner width of what you can fit into the mini-fridge (back to front)

17.5" is the inner width of the inside of the mini-fridge (left to right)

29" is the inner height of the mini-fridge (top to bottom)

6.5" is the height of the compressor hump from the bottom of the mini-fridge to the top of the hump.

These measurements aren't 100% accurate, but they are conservative (I rounded down the exact measurements because I didn't feel like taking exact numbers since I have the poops tonight from some bad cheese fries tonight).

:mad: How the heck does someone mess up cheese fries? :mad:
 
Doh!:eek:

I meant to say that the measurements are conservative - meaning that the real measurements are slightly larger than what I just posted. But only by a fraction of an inch any direction. Go Pokes!!!:eek:
 
I'm eyeing this as it's really cheap and it doesn't look like bending the freezer is that bad.

I'm going to use mine as a fermentation chamber though, does anyone know if a 6.5 gallon glass carboy fits OK? I'm guessing it does given the dimensions listed but would love to hear before I make the jump.

Thanks!
 
Hey Spacey, I have successfully completed your conversion! I did it on two fridges at the same time and it worked out perfectly! I also didn't have to cut out the shelving when i moved the thermostat!

I was wondering if you knew where the coolant lines run inside the fridge itself? In my attached picture I am looking to drill in the red box (very top left of the inside of the fridge) so that I can run out drain lines to a tank behind the fridge. Before I start cutting I would like to see what you thought. Also I think where I have the green box there should be no coolant lines, just the electrical for the compressor, this doesnt help with my drain hold issue. Thoughts?

Great guide by the way!

12391450_10153841101868384_8067278179056815005_n.jpg
 

Latest posts

Back
Top