4 taps, glycol chilled from basement to butlers pantry

Homebrew Talk - Beer, Wine, Mead, & Cider Brewing Discussion Forum

Help Support Homebrew Talk - Beer, Wine, Mead, & Cider Brewing Discussion Forum:

This site may earn a commission from merchant affiliate links, including eBay, Amazon, and others.

barron35

Member
Joined
Jan 4, 2011
Messages
17
Reaction score
1
Location
Freehold
First off, I must thank the folks on this site for all the great info. Without them, I don't know if I would have even attempted something like this.

Direct links to posts...

To start, I've been kegging for a short while and had a typical freezer top fridge in the basement. This is great and the finger tap got the job done, but who doesn't want their beer more readily available? Our kitchen has a butlers pantry which would be a great spot for a tap. After wife approval, we were a go.

My entire basis for the trunk line was from the following post https://www.homebrewtalk.com/f35/long-draw-salt-water-chilled-beer-tower-271578/ so a huge thanks to runningweird. My parts list:


I would highly recommend trying to straighten the tubing before you start as much as possible.

2013-05-30%2021.04.10.jpg


Cable tying was a pita as I only did this so much. You definitely don't want to end up with the serpentine I did!

2013-05-31%2019.30.44.jpg


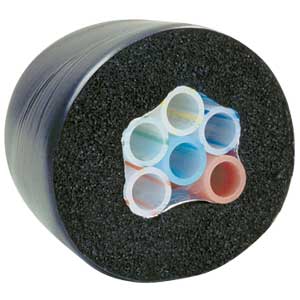
When cable tying, you want to make sure you wrap the 4 beer lines around the out coolant line (cold) and the in coolant line (warm) next to the out.
CDI432.jpg


Once you've organized the tubing in such a way, wrap a cable tie around it, move 1 ft down and do it again. Once you are all tied up, cut all the ends, wrap the saran wrap around the entire length as a moisture barrier, then tin foil as a temperature barrier, then pipe tubing and lastly electrical tape. The pipe tubing adhesive was only so good which was I used electrical tape; this is optional.

2013-06-10%2019.55.52.jpg
2013-06-10%2020.40.34.jpg


Cooling up next...
 
Beer line length formula and beer line cooling

Before getting to cooling, I should mention how you should come up with the length of your beer line. There are many sites with this info, but the formula to use is line_length = (keg_pressure – 1 – (Lift/2)) / Resistance. While the formula these sites discuss is the same, the resistance they list are all over the place. From the beersmith blog, "Beer lines have two types of resistance – one due to elevation change (i.e. the keg being higher or lower than the tap), and a second due to the beer lines themselves which generate friction as the beer flows through the lines." If you are able to get the resistance of the specific beer line you are buying, that would be the best. In my case, I just averaged what I read online for 1/4" ID poly tubing which was .5.

This gives us line_length = (20psi - 1 - (14/2)) / .5 which equals 24ft. These numbers are very rough. Temperature of the beer changes things. I will not claim to be anywhere even close to an expert on this. I just estimated and went with it.

Ok, onto cooling....

I read a lot about cooling from blowing cold air to salt water, but the only option which really seemed to fit what I was looking to do was glycol. Proylene glycol to be specific, which is the food grade safe kind. This is readily available and pretty inexpensive. I picked this up at walmart, http://www.walmart.com/ip/Super-Tech-RV-Marine-Antifreeze/17179674

0068113100234_500X500.jpg


The plan was to have a storage bin in the freezer holding the glycol and the beer in the fridge which would utilize as much space as possible and maybe even leave some room for my wife to store food :) I can't even count how many stores I visited, plastic containers I measured until I went crazy. In the end, as funny as I now think it is, I realized this is a diy project so looked for something around the house. I had a cat litter bucket lying around which was the EXACT size needed, length, width and height.

10-8-2013%209-31-02%20PM.jpg


At this point, I'm really happy, that was driving me nuts.

So, remembering back to the trunk line, there was a glycol out (cold) and in (warm). Now we need a way to move that glycol through the system. Some research led me to pond pumps which are available at harbor freight. As I was going between floors, the key thing to look for is the "lift" of the pump. Going horizontal isn't so much of an issue as pushing straight up. You need to measure from the pump to the top of your tower to properly calculate the lift.

The first pump I picked up got me part of the way there, but wasn't enough. I used http://www.harborfreight.com/264-gph-submersible-fountain-pump-68395.html, but only had lift of 4.6ft whereas I needed 14ft. I put water in the bucket with some food coloring so I could see it travel.

2013-01-05%2015.24.54.jpg
2013-01-05%2015.49.42.jpg


Back to harbor freight for the next size up, http://www.harborfreight.com/620-gph-submersible-fountain-pump-68393.html. This pump has a lift of 11.5ft, much better. But wait a second, I thought you said the lift you needed was 14ft? Here's where I cheated. I didn't want to keep searching for yet another pump so I gave it a little help and sucked on the bottom of the in (warm) line to get it over the hump. Now, I don't condone anyone doing this once you replace the water with glycol, probably better to get the properly sized pump, but this is just how I did it. If you go with this approach, physics helps us a bit and the flow keeps going so you can get away with a pump a little bit smaller than needed.

The pump has suction cups on the bottom and sticks to the bottom of the bucket. Make a small hole in the lid of the bucket and push the in (warm) line through it about an inch or so so it stays in place.

As of now I know I haven't touched on what the coolant lines are connected to upstairs, but I'll get there :) Hopefully this level of detail is on point, please let me know otherwise and I can adjust.
 
Hey guys, before I put up the next big section, is there any way to specify where it goes in the thread? I'd like the posts to be sequential but not sure if there's a way to do that.

ScotBrew, my basement is crying out for a lot of things :) if anything, I'd put a brewing area there.

The project is actually already finished, I'm just finally documenting it! Work has been keeping me quite busy lately but I will get to the other sections soon. Thanks for all the kind words thus far.
 
I believe only if you reserved posts under your thread starter. Sometimes you'll see someone start a build thread and they'll reserve 5 posts or so under the thread starter so they can own the first few posts on the page. Otherwise I think you just post in the thread and they are ordered by date/time. A mod may be able to do something, but I don't think so...
 
Tower time :)

Have beer, need a way to serve it. Enter the beer tower. The tower has 2 main components, the base and the faucets; more on the faucets later. When picking a tower, you have 2 main choices which I will call active and passive cooling. Active cooling, which I use, has copper run through the tower and the glycol runs through it to keep everything cold. Passive is meant to be cooled via air or the line is so short it doesn't matter. Knowing I was going with glycol cooling, I went on the search for a tower. I found out very quickly that glycol cooled towers are crazy expensive. Ebay was my savior here and I found a 4 faucet tower for under $200, 1/4 the original price.

10-10-2013%2010-40-16%20PM.jpg


This was a pull from a bar so I had to do some cleanup. Also, it was listed as in full working order, but was anything but. All 4 faucets were frozen and not moving at all. In the end, I was able to negotiate with the seller to pay for half of all new faucets.

Speaking of faucets, they are replaceable and can be made of stainless steel or brass, standard or stout, flow control, etc. From my research, the Perlick 525SS is the standard by which all others are judged. Of course once I found this, I rushed out to buy 4 replacements. In retrospect, I should have bought 1 stout faucet.

10-11-2013%2012-08-51%20AM.jpg
2013-01-13%2014.22.37.jpg


The cabinet I was mounting on had a drawer which would be a bit problematic when trying to run the beer lines :) Part of my wife's rules with this project was that it couldn't look like crap which meant looking somewhat "stock". I pulled out the drawer, broke the face of the drawer off and used 3m command strips to mount it. I'll need to clean this up a bit, perhaps put screws in from the back, but it'll work for now.

20131011_001825.jpg


Mounting the tower was rather simple and just involved using a hole saw to cut through the countertop. Here you can see the 6 lines coming from the bottom of the tower, 4 for beer and 2 for coolant.

10-10-2013%2011-08-09%20PM.jpg


Creating the pass-through between floors was a bit more difficult. Going through the bottom of the cabinet wasn't an issue, but the floor was tiled and was hell. The hole saw wasn't making a dent so I used a drill bit, made many holes in a circular pattern and then used a hammer to break thru from the basement side. A rasp was used for cleanup. Once finished, I wrapped the hole with foil tape, passed the trunk line thru and sealed with expanding foam sealant.

20131011_000118.jpg


Connecting the lines to the tower is pretty simple as well, but of course there are 2 options. You can use hose clamps or oetiker clamps, pros and cons to both. Hose clamps are more readily accessible and only requires a screw driver. Oetiker clamps are arguably more secure and possibly reliable, but requires a special tool to use. Not wanting to buy yet another tool I might only use once, I decided on hose clamps. I would caution you not to skimp on this and go with heavy duty ones. The first batch I bought, http://www.harborfreight.com/40-piece-hose-clamp-assortment-67578.html, were complete garbage, did not create a tight seal and half of them got stripped if I tightened them even a tiny bit too much; these clamps from Home Depot worked much better.

2013-06-14%2022.28.34.jpg


Before you seal anything up for good, I highly recommend you test your connections and ensure they are leak proof. I had a coolant leak which I didn't realize until it started leaking in the basement, not good. Run coolant or water through the lines for a couple of days and keep tightening until you are sure everything is dry. Once done, wrap the exposed lines with saran wrap, tin foil and pipe insulation.
 
Excellent build, and great documentation! Thanks for sharing.

Before getting to cooling, I should mention how you should come up with the length of your beer line. There are many sites with this info, but the formula to use is line_length = (keg_pressure – 1 – (Lift/2)) / Resistance. While the formula these sites discuss is the same, the resistance they list are all over the place. From the beersmith blog, "Beer lines have two types of resistance – one due to elevation change (i.e. the keg being higher or lower than the tap), and a second due to the beer lines themselves which generate friction as the beer flows through the lines." If you are able to get the resistance of the specific beer line you are buying, that would be the best. In my case, I just averaged what I read online for 1/4" ID poly tubing which was .5.

This gives us line_length = (20psi - 1 - (14/2)) / .5 which equals 24ft. These numbers are very rough. Temperature of the beer changes things. I will not claim to be anywhere even close to an expert on this. I just estimated and went with it.

FWIW that equation is for use with commercial systems and makes a few assumptions that aren't always valid for home systems. What it's designed to do is give you a flow rate of 1 gal/min, which is too fast for many situations. As long as you keep the carb level under ~2.8 vol and the temp under ~38°, it should be fine. A few degrees warmer and you'll need a slower flow rate and gentler pour to keep the CO2 in solution. Since the resistance for a particular beer line is not a constant as the articles like the one you quoted would have you believe, but rather dependent on flow rate, those equations and resistance figures are useless for any flow rate other than 1 gal/min.

At 20 psi I'm guessing you're planning on either a very warm serving temp, or a very high carb level (or both). If that's the case, you'll very likely need to either adjust your plans, or add some 3/16" ID choker lines to each run. There is one line length calculator out there that doesn't ignore the basic laws of fluid mechanics, but you need to have a desired flow rate to input. The warmer or the higher carbed the beer is, the slower/gentler it will need to be poured. If you can share what your desired serving temps and carb levels will be, I might be able to suggest a flow rate that will prevent excessive foaming. (You'll want to change the surface roughness to ~9.8*10^-6 ft since you're using poly lines instead of vinyl).

https://docs.google.com/spreadsheet/ccc?key=0ApGb-vIKLq7FdGtzN3BrY2xZSldORzQ2bHVVX0hzaEE#gid=0
 
I believe only if you reserved posts under your thread starter. Sometimes you'll see someone start a build thread and they'll reserve 5 posts or so under the thread starter so they can own the first few posts on the page. Otherwise I think you just post in the thread and they are ordered by date/time. A mod may be able to do something, but I don't think so...

Ok, thanks, I was worried that was the case. I'll put direct links to each post in the initial post.
 
JuanMoore, awesome info and that spreadsheet is a great reference. I like that you can calculate length from pressure and especially vice versa for those of us that are finding out how to properly do this after completing their project :p. I plugged in values and was prompted with "Warning: Use Larger Hose Diameter". Looking at the formula, if your height is greater than your pressure, it flags it. As you mentioned possibly needing a choker, thoughts as to why this is?

My wife likes the carb level high for her beers and the seltzer we have on tap. For me, I'm thinking 12-13psi is more to my liking (and incredibly close to the 13.34psi the spreadsheet calculated for my SG of 1.018). I'll need to check the temp of the fridge as it is. Serving temp is good, but we recently had to make it a bit warmer as the seltzer was freezing in the line. I printed and posted a carbonation chart on my fridge a long time ago...I guess I should finally read it.

That warning pops up when the required line length is less than the height, not when the pressure is less than the height. If it only takes 5' of a specific line to get the desired pour speed, but the height is 10', then you're obviously going to need lower resistance (larger diameter) line to achieve that pour speed. This would be the opposite of requiring a choker.

You shouldn't be getting that warning based on what you've posted so far though. Are you sure you're inputting everything correctly? Your SG you said was 1.018, the pressure obviously varies depending on whether it's beer or seltzer, and the carb level, but should be in the ~8-35 psi range, your hose diameter is 0.25, your tap height is 14, and since you're using poly instead of vinyl the hose roughness should be reduced to 9.8*(10^-6). For the pint fill speed, I'd start with 10 sec for 38° or less, and maybe a little longer for warmer serving temps.

Using your numbers, that warning only pops up when the pressure is less than 10 psi. All that means is that serving a beer on less than 10 psi with your set-up will result in a slower pint fill speed than 10 sec. You can adjust the pint fill speed until the output matches your line length to see exactly how long a pint will take to fill at a lower pressure.
 
It looks like you've got a foot+ of exposed tubing and pipe - are you concerned about that length warming up?

I've read where people go as far as wrap their coolant lines around the shanks themselves, to keep every inch of the system cold. Overkill?
 
bbshopplf said:
It looks like you've got a foot+ of exposed tubing and pipe - are you concerned about that length warming up? I've read where people go as far as wrap their coolant lines around the shanks themselves, to keep every inch of the system cold. Overkill?

He's using a glycol cooled tower, which has the coolant circulating right against where the shanks pass through. This is a step above wrapping coolant lines around the shanks.
 
Sorry; I get it now.

So the four inches or so of exposed beer line - adjacent to the coolant lines, I understand, but without insulation and still exposed to the heat of the cabinet - I suppose you don't worry about those inches.
 
It looks like you've got a foot+ of exposed tubing and pipe - are you concerned about that length warming up?

Good catch. I had that pic there to show the line connections, but once I was sure there were no leaks, I gave it the same saran wrap, tin foil and pipe insulation treatment.
 
thanks for this post, i just setup some trunk lines and a pump just like yours.

I have about 6 inches of exposed coolant pipe in my home built tap box.
Its got visible frost on the pipe...i was thinking of wrapping in saran wrap and insulation, but its going to be a pain now that they are in there. (not really enough room to pull them out to do it). I bent a piece of copper to connect the cold and return lines since they were too rigid to just curve and keep as one.
I was thinking of putting some pink fiberglass insulation in there or do you guys think that will eventually get wet from condensation and turn into a moldy mess?

photo 2 (6).JPG

photo 1 (6).JPG
 
thanks for this post, i just setup some trunk lines and a pump just like yours.

I have about 6 inches of exposed coolant pipe in my home built tap box.
Its got visible frost on the pipe...i was thinking of wrapping in saran wrap and insulation, but its going to be a pain now that they are in there. (not really enough room to pull them out to do it). I bent a piece of copper to connect the cold and return lines since they were too rigid to just curve and keep as one.
I was thinking of putting some pink fiberglass insulation in there or do you guys think that will eventually get wet from condensation and turn into a moldy mess?

View attachment 282772

View attachment 282773

Given the space you have available, why not just completely fill in the box with expanding foam? if you ever need to get in there to change out the lines/shanks (can't imagine that would be too often) you'd just dig out the foam.. Filling it in completely should solve the insulation, condensation and potential mildew/mold problems. plus you'd not need to pull anything apart to wrap/insulate..
 
Given the space you have available, why not just completely fill in the box with expanding foam? if you ever need to get in there to change out the lines/shanks (can't imagine that would be too often) you'd just dig out the foam.. Filling it in completely should solve the insulation, condensation and potential mildew/mold problems. plus you'd not need to pull anything apart to wrap/insulate..

Wouldn't you be better off leaving no insulation between the glycol lines and the beer lines and just insulating the box and put a vapor barrier around it to keep moisture out? That way the exposed beer lines are still kept cold.
 
thats basically how it is in that pic, but the exposed end of the glycol line creates frost/condensation. so i went with the first suggestion, found a plastic 1 inch vaccum hose. cut that down the middle and layed it over the glycol. then did a controled spray foam inside of that, so its just foamed over the glycol lines.
 
I know this thread is old but, I am thinking of trying this. My first question is how big around is the trunk line when its all done and wrapped with foam?

thanks
 

Latest posts

Back
Top