Brad's eBIAB 240v recirculating rig

Homebrew Talk - Beer, Wine, Mead, & Cider Brewing Discussion Forum

Help Support Homebrew Talk - Beer, Wine, Mead, & Cider Brewing Discussion Forum:

This site may earn a commission from merchant affiliate links, including eBay, Amazon, and others.

bsperr

Well-Known Member
Joined
Jul 23, 2013
Messages
103
Reaction score
14
Location
Athens
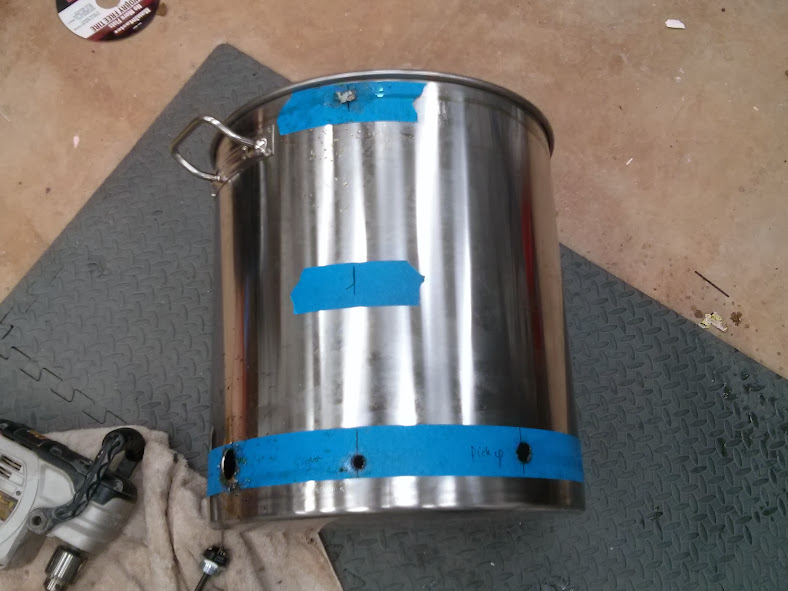
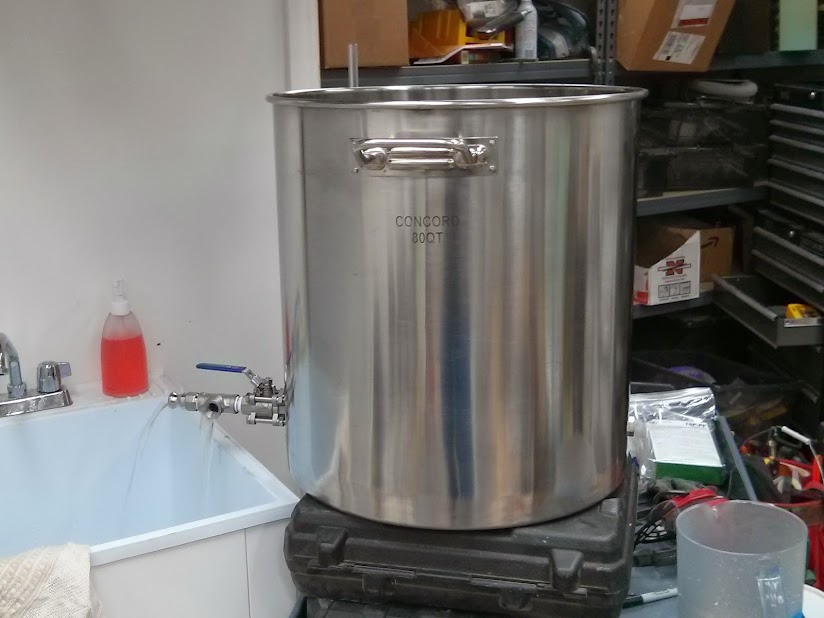
I've been getting a lot of great ideas and inspiration from other people's build threads, so I thought I'd start my own. I'm building a recirculating eBIAB based off the one from high gravity brewing, with a few modifications. I'm hoping to be able to do 10 gallon full volume mash batches. I started off with a Concorde 80 quart stainless kettle. This is an awesome kettle for the price. I drilled it out with step bits chucked in a stud and joist drill (extremely high torque). I'm glad I didn't spend money on chassis punches, because the holes came out just fine with my $10 HF bits.

IMG_20140109_233807.jpg


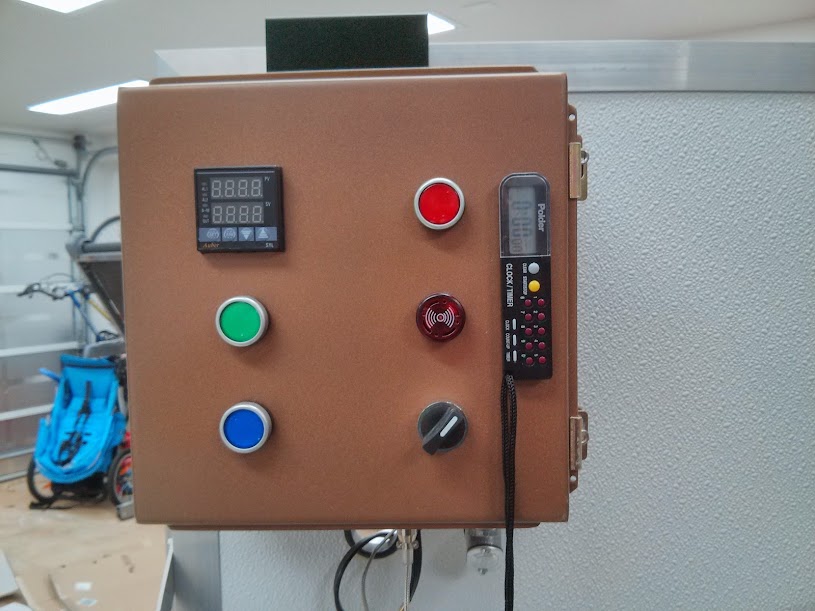
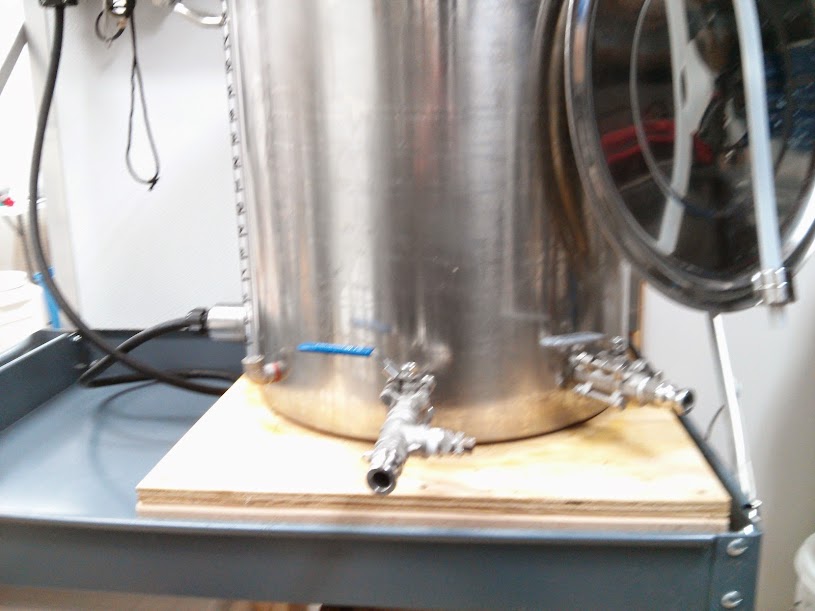
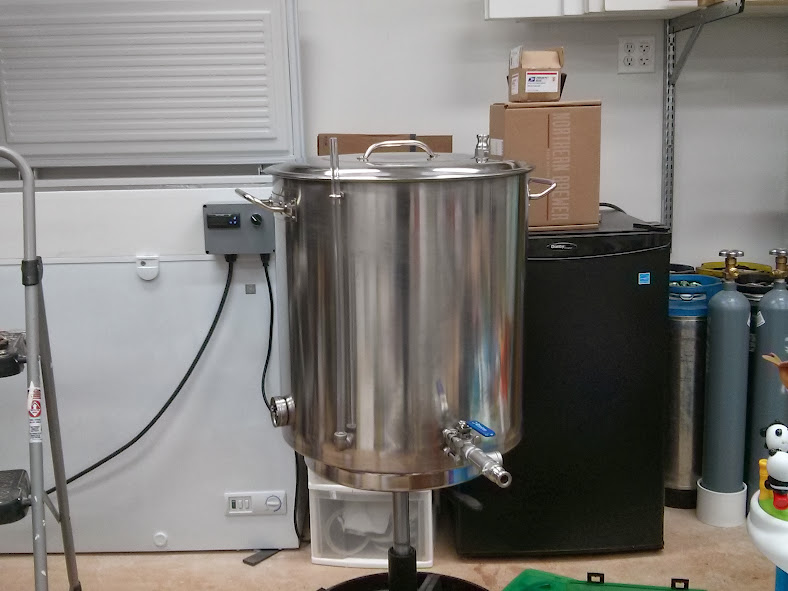
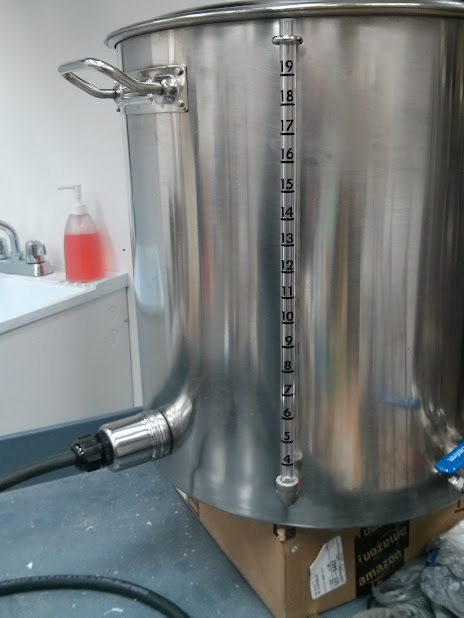
After deburring the holes and giving the kettle a quick bath in some oxyclean, I started installing my fittings. I'm going completely weldless. I'm using a Camco 5500W element, a sight glass and element enclosure from brewhardware, a side pickup from bargainfittings, and a magnesium RV water heater anode. In hindsight, I wish I'd sprung for the all stainless element from brewmation, but we'll see if I have any problems with element rust. I'll be recirculating through a camlock bulkhead in the lid. Here is the kettle getting ready for a leak test/sight glass calibration (please ignore the messy garage)

IMG_20140114_214158.jpg


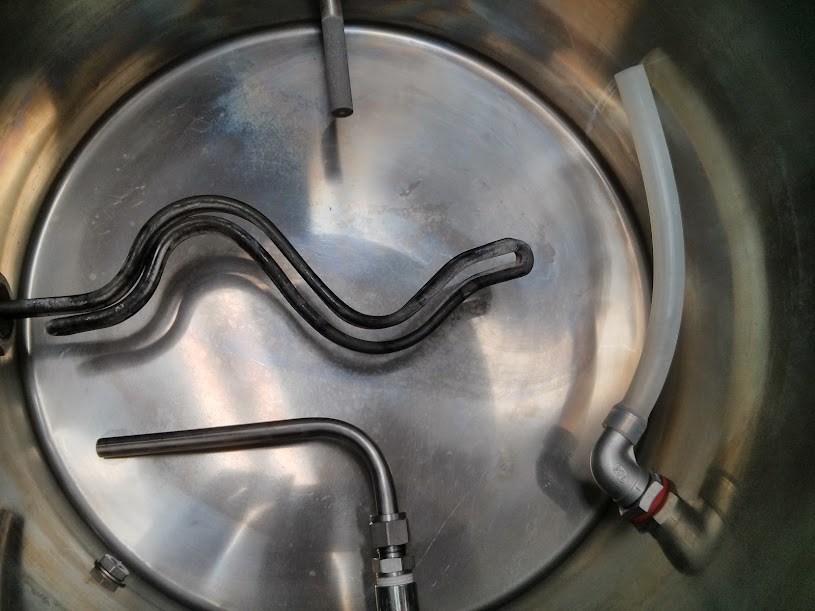
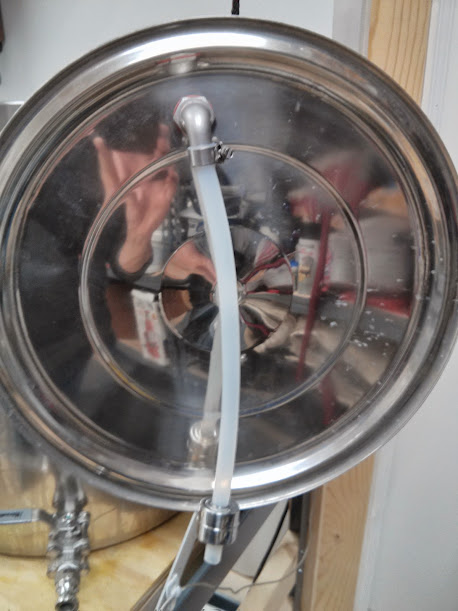
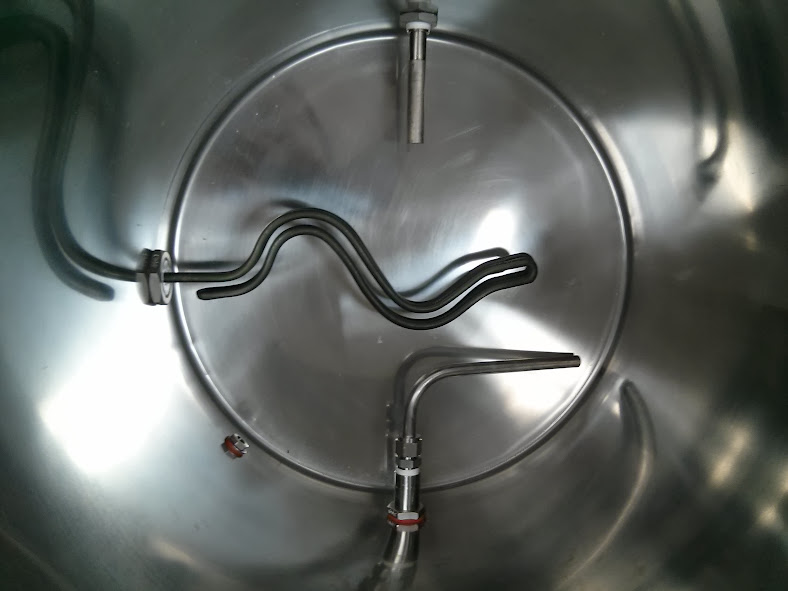
Here is a view from the inside of the kettle. If you look closely, you'll notice I installed the sight glass wrong :smack: I'll be taking the sight glass off to install the markers after calibration anyway.

IMG_20140114_214222.jpg
 
Nice work! Are you going to use some sort of sparge arm, or recirculate straight through the bulkhead in the lid? Have you built your control box yet, and what schematic did you use for its design? I'm in the middle of a similar project, so I'm interested in your experiences. Thanks!
 
Nice work! Are you going to use some sort of sparge arm, or recirculate straight through the bulkhead in the lid? Have you built your control box yet, and what schematic did you use for its design? I'm in the middle of a similar project, so I'm interested in your experiences. Thanks!

Thanks Woodbrews, I've got a high flow ell barb on the bulkhead inside the lid, and I'm going to attach a short length of silicon tubing to it for recirculation. I might put a float ball on the tubing to keep it on top of the mash. I've put the control box together but haven't wired it up yet. I'll be using one of PJ's excellent diagrams. Pictures should be coming soon!
 
I would have tried going without the magnesium anode for a few batches to see if you got rust or not. It seems most people have rusting issues in the HLT and not the BK because of the acidity of the wort. That's what I'm going to try at least. Less holes to poke in my kettle that way
 
I have the magnesium anode and got rust following a leak test on my setup I'm building. The issue I believe I had was because the remaining drops of water left on the threads (the area that can rust) was no longer in contact with the anode. Thus no protection and thus rust. I'm not sure if this will be different even with wort as you always have to clean the kettle with water. I'm going to try and dry the threads after each brew. If I still get rust I'm going to remove the anode and use food grade silicone.
 
I have the magnesium anode and got rust following a leak test on my setup I'm building. The issue I believe I had was because the remaining drops of water left on the threads (the area that can rust) was no longer in contact with the anode. Thus no protection and thus rust. I'm not sure if this will be different even with wort as you always have to clean the kettle with water. I'm going to try and dry the threads after each brew. If I still get rust I'm going to remove the anode and use food grade silicone.

I dried off the face and threads of my element after my leak test and didn't develop any rust. I'm not sure how the anode will do in the long run and kind of wish I had used the totally stainless element.

My build has slowed down a little bit and there's not much to report. Here's a quick pic of the leak test/sight glass calibration. The service cart I'll be using as a brew stand started sagging noticeably under the weight of all that water, so I'll have to beef it up a bit.

IMG_20140114_223143.jpg


Here's a pic with the element enclosure and calibrated sight glass from brewhardhare installed. I would recommend these two products to anyone.

IMG_20140118_155809.jpg
 
It looks like you are off to a great start. Are you planning to use a bag? I started off that way, but ended up with a basket.
 
This is really cool, and exactly what I would like to build :D Thank you very much for sharing this, I can't wait to see how it ends up :) :mug:
 
Hey there... what is your expected batch volume with this system? Are you doing 5 or 10 gallon batches?
 
It looks like you are off to a great start. Are you planning to use a bag? I started off that way, but ended up with a basket.

I'm thinking about sewing my own voile bag and using a grill rack or something similar in the bottom of the kettle to keep the bag off the element. I'm planning just to sew some handles into the bag to lift it out of the kettle with a ratchet pulley.

Hey there... what is your expected batch volume with this system? Are you doing 5 or 10 gallon batches?

I'm hoping to be able to do 10 gallon batches of smaller beers with a full volume mash. That's probably going to be up to the brim of the kettle though, so I might have to scale it back a bit.

Do you have a link to where you got your kettle?

(EDIT: I was a little quick on the trigger-finger there...found them on AMZ easily enough. I'm assuming this is the one:
http://www.amazon.com/dp/B0085ZNXZ6/?tag=skimlinks_replacement-20)

I actually bought mine on Ebay from the same seller. It came out just a few bucks cheaper. It looks like Concord is also selling a "value" brew kettle on Ebay now, which is half as thick as the one I have. I would probably stay away from that one.
 
Last edited by a moderator:
Finally, a little progress to report. I got my control panel built and wired up. I used a steel enclosure I found on ebay (I think it's 10*10*6), and I got all of the components from Auber, except for the wire, terminal blocks, and a few other electrical parts. Here's a pic of the front

IMG_20140131_005027.jpg


The controls are pretty basic: PID, push buttons for the PID, pump, and element contactor, and a temperature alarm with on/off switch. I painted the enclosure with some "copper" Rustoleum that I found in my garage. I tried to top coat it with some spray poly, but I must have had an adhesion problem because it scratches if I look at it wrong. Here's a pic of the bottom of the panel

IMG_20140131_005408.jpg


There's a twist lock for the kettle, a pilot light to show when the element fires, a plug for the pump, an RTD input, and two panel mount fuse holders. The pull box on the lower right end is where I'll hard wire the panel. If I had to do it over again, I would probably just wire in a short extension cord for the pump rather than the panel mount receptacle.

Here's a quick pic of the Auber heat sync on top of the panel

IMG_20140131_005130.jpg


Here are some pics of the internal wiring, which didn't come out as clean as I'd hoped

IMG_20140131_005242.jpg


IMG_20140131_005236.jpg


The terminal blocks I bought ended up being way bigger than I needed. I also should have positioned the double pole contactor on the left hand side of the box to feed directly into the twist lock receptacle. I ended up just wrapping the wires that feed over to the door with some electrical tape rather than buying spiral wrap.

I'm hoping to get my brew stand built this weekend and get the panel installed.
 
I finally found some time to work on my brew stand. I needed it to be mobile so I could roll it over to the fermentation chamber. I started off with an Edsal service cart that I got from zoro tools. It's 24" deep, has a 500lb capacity, and only cost around $70 after a coupon. I wanted to have a back splash on the brew stand to mount the control panel and avoid any mess from steam or boil overs, so I bolted a simple wooden frame to the cart (as always, ignore the mess in the background).

IMG_20140219_205154.jpg


I attached 1/2" plywood to the frame and covered the plywood in FRP. Then I trimmed out the exposed edges of the back splash with some aluminum

IMG_20140219_205244.jpg


I used some flat aluminum stock to make some braces to keep the back splash from racking or tipping.

IMG_20140219_205300.jpg


Now I just have to attach the control panel to the back splash and beef up the cart to distribute the weight of a full kettle better (it started sagging pretty bad during my leak test).
 
I haven't been very good about updating this build thread. I got my system finished and finally got around to brewing this past weekend. I mounted the control panel to the back splash of my brewing stand. I decided to add a timer to the panel at the last minute:D
IMG_20141203_221117.jpg


I also added a whirlpool port to the kettle so I can recirculate during cooling. This picture sucks, but you can just make it out to the right.
IMG_20141203_221502.jpg


My first brew day went great except for when I first added the grains. I think the mash got seriously stuck at the bottom of my bag, which sits on a stand above the element, because it wasn't draining at all. I didn't realize there was a problem until I looked at my sight glass and realized it was empty, i.e. nothing was in the kettle below the bag! I stirred the mash some more and picked up the bag to help it drain. When wort started coming through the bag the element steamed some of it off immediately. It's a wonder the element didn't pop. Once things got unstuck and recirculating, the mash was a lot hotter than I wanted it to be. Once I got it down to the temperature I wanted, the PID held it within a degree for the rest of the mash. I was dead on with my pre boil and original gravity marks, but I hope the wort wasn't scorched and is still as fermentable as I want it to be. I bought a large whisk to break up the mash for next brew day.
 
On the inside of the kettle, the whirlpool port has a high flow right angle barb that I attached a short length of silicone tubing to.
IMG_20141203_203116.jpg


I wanted a stand to keep the bag away from the element and the diptube, so I got the steamer insert that Concorde makes for this kettle, cut off the legs, and put in stainless steel bolts to raise it higher than the element. then I enlarged one of the holes in the steamer insert to thread the tubing through and held it down loosely with a stainless hose clamp.
IMG_20141203_204313.jpg


The output of the whirlpool ends up right around the six gallon mark. In practice, the whirlpool ends up being pretty weak. I'm thinking that may just be because the pot is so wide. The whirlpool still ended up keeping the hops in the kettle when I transferred to the fermenter though.

I also put a stainless float ball on the silicone tubing coming from the recirculation port in the lid, because the silicone just seemed to sink otherwise.
IMG_20141203_222301.jpg
 
I wish I would have seen this thread two months ago! I recently started my very similiar build, like same pot and everything similiar. Much more confident about it going forward after reading this. Thanks!

Any issues with the bag clogging during recirc?
 
I like the way all of the returns, siphon, element sit nice and low in the kettle. Great job!
 
I wish I would have seen this thread two months ago! I recently started my very similiar build, like same pot and everything similiar. Much more confident about it going forward after reading this. Thanks!

Any issues with the bag clogging during recirc?

I only had an issue with clogging after I first added the grains. It was a pretty large grain bill (28lbs) and I double crushed so I'm thinking it got stuck at the bottom of the bag. Once I broke everything up it recirculated fine, but I kept the recirculation at a trickle to ensure the draining from the bag could keep up.
 
I like the way all of the returns, siphon, element sit nice and low in the kettle. Great job!

Thanks! I borrowed a lot of great ideas from other folks. Just one more picture of the brew stand. I took some scrap lumber to build a frame to house a cheap two drawer storage unit and mount my counter flow chiller and pump. I use a bus tub in the bottom of the stand to hold all of my hoses after hanging them out to dry.

IMG_20141203_221449.jpg


I had a really hard time deciding on what chiller to get, and I couldn't be happier with the Zchiller. I chose it over other copper counterflow chillers primarily because it's made by a company that specializes in making heat exchangers, Packless Industries. I also got great customer service from Dave at Packless in getting it put together. They custom braze the fittings on the wort and water ports, and it looks flawless. Despite being December, our ground water is still pretty warm, so I had to pump ice water through the chiller towards the end to get to pitching temp. Still only took around 20 minutes I would guess from beginning to end. Afterwards, I just pumped pump warm cleaning solution through the chiller, flushed with water, dunked it in my star san bucket and hung it up to dry.

IMG_20141203_222122.jpg
 
After recirculating and cooling the batch, I pumped directly into my fermenter, which is a 12 gallon HDPE open head drum that I converted with MFL bulkheads following the instructions in this thread.

IMG_20141203_202927.jpg


I used MFL to ball lock adapters on the bulkheads and put a liquid and gas post on the top. On the other end of the liquid post, I've attached an MFL to barb adapter with 1/4" silicone tubing going to a cask widge float, so that I have a floating diptube. When I was practicing with water, I was able to rack from the fermenter under CO2 pressure through the cask widge float without any problems. The real test will come when I need to rack to a couple of purged kegs in a week or so.
 
You really need a stainless basket (I got one custom built with feet and hooks from Chad at arborfab.com) to replace the bag and your system will be similar to mine - no problems with stuck recirc - works a dream!
 
Excellent build!
Can you share where you got the float you use on the recirculation tubing?
Thanks

Sorry, I missed your post. I used this stainless float ball from Amazon. The inner diameter of the float was a little small for the tubing I had on the recirculation arm, so I replaced it with this thin wall 1/2" silicone tubing, which fits perfectly in the float.


You really need a stainless basket (I got one custom built with feet and hooks from Chad at arborfab.com) to replace the bag and your system will be similar to mine - no problems with stuck recirc - works a dream!

That would be pretty sweet! I'm going to try stirring like crazy next batch and see if it still gets stuck. If so, then maybe a basket is in my future.
 
Last edited by a moderator:
Sorry, I missed your post. I used this stainless float ball from Amazon.

Thanks much for responding. I followed that link down the rabbit hole a bit and found another float that has a 23mm hole, which I think will fit the tubing I have on hand.


As to the idea of get a stuck bag while recirculating, I've had that happen once in the first three brews on my ebiab system. The malt bill included a lot of flaked oats and barley (2.5 pounds) and I was trying out an industrial sized potato masher as a mash paddle. I think I smashed the grain down onto the false bottom and that's what caused it. I was able to free it by lifting the edges of the bag and making sure that the wort level was the same inside and outside the bag. This may also be a case for using a more open fabric for the bag, allowing more flow.

I really like the idea of systems like the grainfather that have an overflow tube so that any excess wort that cannot flow through the grains is directed below the "bag" area. This protects the elements and therefore the batch.
 
Last edited by a moderator:
How come you went with a 20 gallon instead of a smaller 16 gallon pot for 10 gallon batches?
 
How come you went with a 20 gallon instead of a smaller 16 gallon pot for 10 gallon batches?

Not the op, but to do a full volume, no sparge, 10 gal, high gravity, BIAB batch, a 20 gallon kettle is necessary to accommodate the grain bill and total water volume.
 
Not the op, but to do a full volume, no sparge, 10 gal, high gravity, BIAB batch, a 20 gallon kettle is necessary to accommodate the grain bill and total water volume.

Thanks for the clarification. That makes sense now
 
Nice work enjoyed your post and everyone els3s so much!i already brew in 3.5 hours so im not desperate or nothing to ebiab but i have stayed up late night after night trying to decide if i want a build like this
Is it worth the cheddar?
Will it be quick?
Is it easy?
You gotta make the pid controller ya know?
And im so very grateful for reviews like this
 
I also added a whirlpool port to the kettle so I can recirculate during cooling. This picture sucks, but you can just make it out to the right.
IMG_20141203_221502.jpg

What length of probe are you using? I have a 1.5" and it doesn't fit in the tee like yours...
 
What length of probe are you using? I have a 1.5" and it doesn't fit in the tee like yours...

It's the 1.5" probe from auber. I'm not sure why yours isn't fitting in the tee. Maybe the tee is not a standard size?
 
It's the 1.5" probe from auber. I'm not sure why yours isn't fitting in the tee. Maybe the tee is not a standard size?

Thanks for the reply :mug:
Do you have a closer picture of your fittings? I could have a smaller tee, but I didn't realize more than one type was made
 
Back
Top