CO2 on outside of the kegerator

Homebrew Talk - Beer, Wine, Mead, & Cider Brewing Discussion Forum

Help Support Homebrew Talk - Beer, Wine, Mead, & Cider Brewing Discussion Forum:

This site may earn a commission from merchant affiliate links, including eBay, Amazon, and others.

Sublime8365

Well-Known Member
Joined
Jan 31, 2011
Messages
149
Reaction score
1
Location
Houston
So I'm planning on making the necessary modifications to my kegerator so I can have my CO2 tank on the outside of the fridge. I'm doing this because I want to be able to carb my kegs on the outside while dispensing beers on the inside (I've also heard that the lower temp in the fridge can throw off the readings on the regulator, is this true?). I already have the kegs and have a dual gauge regulator. I have the tools to drill the holes in the side too. I plan on just sticking the air hose through the holes and using some insulation that I have from my build to plug up the holes to make sure not much can escape.

My question is, what other parts do I need?

2 of these - http://www.austinhomebrew.com/product_info.php?products_id=2000

2 of these - http://www.austinhomebrew.com/product_info.php?products_id=1674

Plus the hose and clamps to connect the 2 way distributors to my reg (so 2 short pieces of hose and 4 clamps).

That should cover it right? Is there any other way I should be approaching this?

Also, I have problems with too much foam when I pour. I figure this comes from beer lines that are too short (I think mine are only 5'), warm beer in the tower (I tried putting in a lot of insulation and used copper piping that runs down into the fridge but that doesn't seem to work), improper carbonation (I usually try natural carbing), or a combination of those things. I plan on doing this project regardless, but do you think it will help my foaming problems much?
 
You do realize the coolant lines run in the walls of your freezer. Putting a hole in one of the lines turns your keezer into a pretty box where you keep your warm. beer. The only real effects of cooling your tank are; it takes up space you could use for beer and it renders your tank pressure gauge into a thermometer. I have seen thermal imaging used to locate the cooling lines( neat picture) . Good luck
 
Maybe lower the cooler temp to help with warm tower issue? Also make sure to use 3/16 hose not 1/4 for serving. There is huge difference in size.
 
Look into the model fridge/freezer that you're looking to use. A lot of people have done this before, so they can tell you where the coolant lines are and you should definitely avoid them. If you can't find someone who's done it before, I recommend drilling a pilot hole to JUST get through the metal, then probing (tee-hee) the hole with something like a tongue depressor to see if there is a line there or just insulation.

I modified a Haier, and there was actually a hole in the back that was perfect, just had to remove the insulation and drill through the plastic on the inside.
 
The other problem I see is that the pressures you'll use to carb outside the keezer are going to be much higer than you'll need to serve inside (30-40 vs 10-12). You could always switch off the inside line while you were carbing outside and change the pressure back when you wanted to serve, but I tend to be lazy about these kinds of things. If you bought a dual body regulator (three gauges if you also get the tank gauge), you could set each to the pressure you needed it for.

But, everything goose mentioned is right, the only downside to storing your tank inside is if its taking up the place of another keg that you wanted to use. If you've got room inside for the tank, don't worry about putting it there. If you're worried about drilling through the sides, you could always drill through the lid at the back of the keezer and make sure you leave some extra line inside so it has room to move around when you open the lid.
 
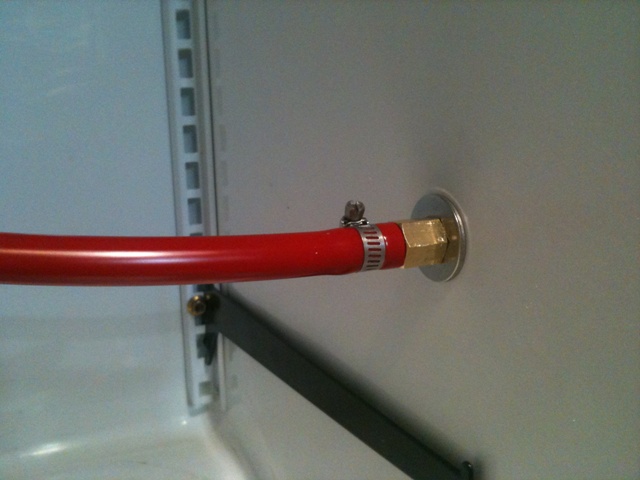
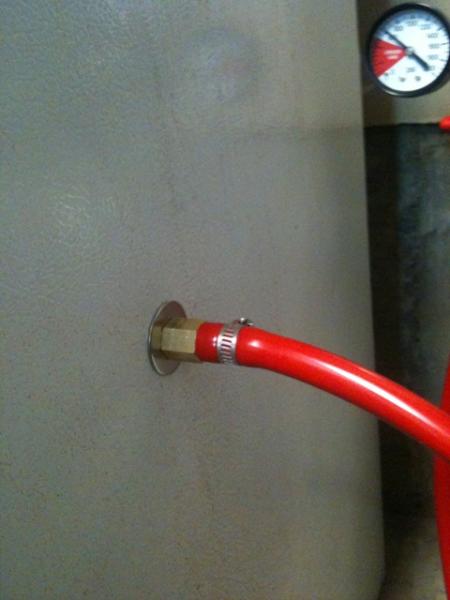
I just put a hole in the side of my full-size fridge. This should really only be slightly different than what you're doing. I drilled a small hole (1/4") from the inside of the fridge out, just barely going through the inner plastic lining. Then I used a very small straight pick to poke away at the insulation, pulling small pieces out at a time, examining with a flashlight as I went. Once I hit the outer metal skin, with no lines nearby, I drilled through the whole thing with a 1/2" bit... went through the plastic from the inside, then went through the metal from the outside.

As others have said, take every necessary precaution to guarantee that you don't nick a refrigerant line... oftentimes they are adhered to the outer skin of larger fridges, I'm not sure about mini fridges. Otherwise you're paying to dispose of the old one, and get a new one. Not something to be happy about!

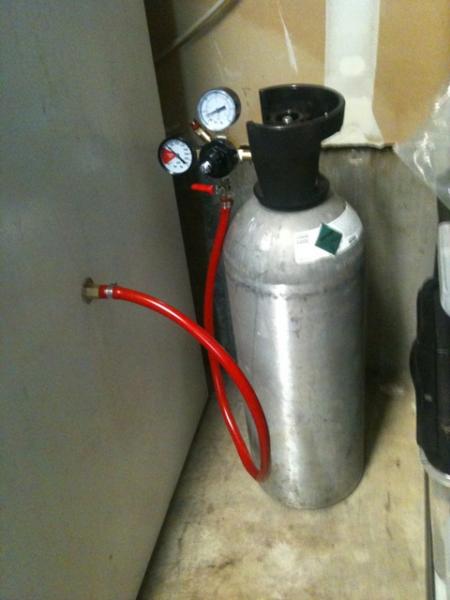
I used a 2" threaded brass nipple from Lowe's, along with two 1/4" MPT barb fittings and some stainless steel 1/2" washers on either side to make it a solid, snug fit - it basically sandwiched the side of the fridge between the two fittings/washers. This worked really well for my purposes... Basically have a barbed fitting on the inside, and a barbed fitting on the outside. Hook up your gas lines to that with hose clamps and you're good to go. Also make sure to use teflon tape to seal those threads on the nipple... don't want leaks there. And spray with soapy water to check for leaks.

Right now I've just got 10PSI running through there, but eventually I'll crank it up and put a dual regulator inside so I can serve at different pressures.

photo 1s.jpg


photo 3s.jpg


photo 2s.jpg
 
Also if it wasn't already stated, wait a year to do this or kiss the warranty good bye.;)
 
You do realize the coolant lines run in the walls of your freezer. Putting a hole in one of the lines turns your keezer into a pretty box where you keep your warm. beer. The only real effects of cooling your tank are; it takes up space you could use for beer and it renders your tank pressure gauge into a thermometer. I have seen thermal imaging used to locate the cooling lines( neat picture) . Good luck

Not all fridge/freezers have coolant lines in the sidewalls, moreover the entire sidewall is not 100% coolant lines.

I just drilled my fridge last weekend and a combination of finding drawings online and our infrared thermometer (~$30? at a HW store) to check for hot/cold spots on both the inner and outer walls of the fridge resulted in two holes with beer taps in them!
 
That is so clean looking, good job. I will definitely use this method, should I ever go in this direction.


I just put a hole in the side of my full-size fridge. This should really only be slightly different than what you're doing. I drilled a small hole (1/4") from the inside of the fridge out, just barely going through the inner plastic lining. Then I used a very small straight pick to poke away at the insulation, pulling small pieces out at a time, examining with a flashlight as I went. Once I hit the outer metal skin, with no lines nearby, I drilled through the whole thing with a 1/2" bit... went through the plastic from the inside, then went through the metal from the outside.

As others have said, take every necessary precaution to guarantee that you don't nick a refrigerant line... oftentimes they are adhered to the outer skin of larger fridges, I'm not sure about mini fridges. Otherwise you're paying to dispose of the old one, and get a new one. Not something to be happy about!

I used a 2" threaded brass nipple from Lowe's, along with two 1/4" MPT barb fittings and some stainless steel 1/2" washers on either side to make it a solid, snug fit - it basically sandwiched the side of the fridge between the two fittings/washers. This worked really well for my purposes... Basically have a barbed fitting on the inside, and a barbed fitting on the outside. Hook up your gas lines to that with hose clamps and you're good to go. Also make sure to use teflon tape to seal those threads on the nipple... don't want leaks there. And spray with soapy water to check for leaks.

Right now I've just got 10PSI running through there, but eventually I'll crank it up and put a dual regulator inside so I can serve at different pressures.
 
Thanks! I have been using my CO2 to force carbonate at 30PSI inside the kegerator so I know pressure is no problem using this method. Been working well, just need more time to brew to keep that fridge full of kegs.

Cheers!
 
Back
Top