Best way to use Temp Control probe

Homebrew Talk - Beer, Wine, Mead, & Cider Brewing Discussion Forum

Help Support Homebrew Talk - Beer, Wine, Mead, & Cider Brewing Discussion Forum:

This site may earn a commission from merchant affiliate links, including eBay, Amazon, and others.

LarryC

Well-Known Member
Joined
Jun 27, 2009
Messages
728
Reaction score
12
Location
San Diego, CA
I just finished wiring up my shiney new Ranco single stage temp controller. I am going to be using it to run a FermWrap around my Better Bottle placed inside of a temp controlled freezer. I've modified the freezer's factory temp control switch to the point where it will hold 40° pretty well but that means it's going to be mighty chilly in there. I was thinking I would tape the Ranco probe to the side of the Better Bottle where the FermWrap has a open space.

That seemed like a good idea until I did a simple test with a glass of water. This is sort of backwards but I was in the garage which was 84° and I filled a glass with water and taped the probe to the glass. I then tossed in a few cubes and waited for the temperature to drop and my Ranco to kick on. The surprising part was that the water in the glass was in the high forties but the temp probe never showed it getting below 67° (waited maybe 10 minutes). One thing to clarify, the glass wasn't real glass - it is one of those acrylic things about 1/8" thick.

So my question is, will taping the probe to the better bottle control the temperature as close as I'd like to be or do I have to get the probe into the fermenting wert?

And the experts say?
 
Did you insulate the probe, or was it just taped against the glass container?

Also, I'm confused. Is your plan to have the freezer running at 40F while the FermWrap keeps the beer at fermentation temperature?
 
Did you insulate the probe, or was it just taped against the glass container?

Also, I'm confused. Is your plan to have the freezer running at 40F while the FermWrap keeps the beer at fermentation temperature?

Yes, that's the plan. I'm converting my old chest freezer to a Keezer slowly but surely. The freezer will sit at about 40° F now with it's factory thermostat and the Ranco will be used to keep a FermWrap on the Better Bottle running so the fermentation temp stays around 65ish (depending on the recipe).

At some point I will probably set up a controller for the freezer temp to bring it up a little but for now, this is what I have.
 
As suggested earlier, you need to insulate over the top of the taped probe for the 'probe on wall' strategy to work. It is the best possible location when using a controller to directly control a freezer/fridge when used as a ferm chamber. It works even better than a thermowell in the middle of the ferm vessel.

Your application is a little different, so I would guess you would need to add a bunch (3-4") of insulation for it to work even reasonably well. For your current approach, a thermowell placed near the vessel wall would be a better location, . This is what is meant by "in the wort". You cannot just place the probe in your wort, for sanitary reasons; or in a jug of water, for sensor non-waterproofyness reasons.

Even better, though, would be to just plug your keezer into the controller you do have, and tape its probe to the vessel wall, then insulate. Now your controller is controlling the temp of the ferm. Simpler, less energy, better temp control: win-win, win.

Of course, your keezer would not be suitable for much else while ferming, but that is the nature of trying to control ferm temps accurately. There are some guys who try to control multiple ferms using a single cold chamber and multiple heat wraps, but you really need to know what you are doing.

Getting a cheap/free fridge/freezer and a $25 ebay aquarium controller is a much simpler method, provided you have the room. Get another one of these controllers for your keezer, and you won't have to dismantle your thermostat every time you want to adjust your temps. A search on HBT will produce a link to a lengthy thread on them, but most of the information you need is in the first post. They have proven very reliable, with not a single confirmed failure reported to date. Just make sure you get a 110V version of the true STC-1000 controller.

A word of warning: your Ranco controller almost certainly does not have ASD to protect your compressor. You need to be very aware of this shortcoming, or it could cost you your compressor if used for a fridge/freezer. The information is available with a simple search.
 
I want to do exactly this thing, but not because I can't increase my keezer temps. I want to do it so that I can ferment ales in my keezer, and still leave my kegs at serving temperature, all in the same keezer. I think if I use a fermwrap around my carboy, it might work, but I don't know if a thermowell will be necessary.
 
Even better, though, would be to just plug your keezer into the controller you do have, and tape its probe to the vessel wall, then insulate. Now your controller is controlling the temp of the ferm. Simpler, less energy, better temp control: win-win, win.
I totally forgot about this thread. Glad I looked back. Your quoted text is exactly what I would suggest and the reason I posed the question earlier.

To the OP: I'm not sure I understand why you want to have the freezer and fermwrap working against each other. I agree with the quote above. It's much more efficient to just control the temperature of fermentation with the freezer by attaching an insulated probe to your fermentation vessel.

Good luck!

:mug:
 
I want to do exactly this thing, but not because I can't increase my keezer temps. I want to do it so that I can ferment ales in my keezer, and still leave my kegs at serving temperature, all in the same keezer. I think if I use a fermwrap around my carboy, it might work, but I don't know if a thermowell will be necessary.
It is tricky to do this, and I don't know if I would attempt it without a thermowell placed close to the inner wall. It is surprising how much impact the ambient air has on the sensor when taped to the outer wall, then insulated. No amount of insulation seems to be too much to still have some impact of ambient on the sensor. This is advantageous when using a freezer/fridge to control ferm, since it helps prevent over/under shoot, as well as radial stratification (which is an issue when using a thermowell in the center).
 
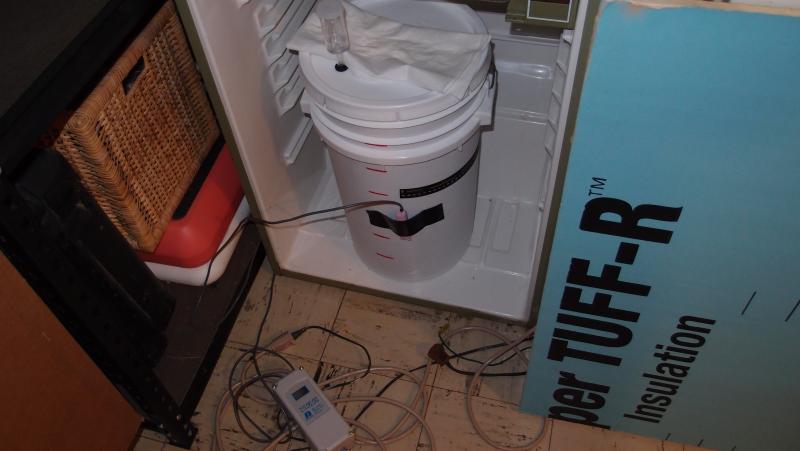
This is how I've been brewing for 2 years now. Probe is buried in insulation, reads the bucket's temperature. I threw out the door and replaced with an insulation panel which makes it easier to move the bucket in and out. The Ranco has a 2 degree offset to prevent over-cycling. Fridge thermostat is at highest (coldest) setting. Notice the avocado color on this garbage day pickup fridge, it is probably 40 years old and still going strong, pulls down to 35 F! National Panasonic Made in Japan fridge!

fridge.jpg
 
The Ranco has a 2 degree offset to prevent over-cycling.
The offset/differential setting is no help against 'short/hot cycling'. This is where it starts up again very shorty (<5 minutes) after it has just finished running. This can kill a compressor in a matter of hours, or less. Short cycling can easily happen as a result of events like door openings, temporary power losses, or the probe coming loose.

A controller with ASD has a built in delay (usually adjustable) to prevent 'short cycling'. With ASD, it is possible to set the temperature differential/swing as low as 0.5F without worrying about short cycling. The mass of the beer keep cycling frequency well within limits.

The Johnson digital controllers have ASD, as do the $15-25 ebay DIY controllers. The $25 one is even dual stage, and will automatically switch between heating or cooling.
 
Back
Top