You are using an out of date browser. It may not display this or other websites correctly.
You should upgrade or use an alternative browser.
You should upgrade or use an alternative browser.
Camco elements?
- Thread starter mux
- Start date

Help Support Homebrew Talk - Beer, Wine, Mead, & Cider Brewing Discussion Forum:
This site may earn a commission from merchant affiliate
links, including eBay, Amazon, and others.
iijakii
Well-Known Member
Incoloy is good stuff.
pvtschultz
Well-Known Member
Incoloy is a material (high temperature, corrosion resistant nickel alloy.
shortyjacobs
Well-Known Member
The Camco ripple elements are incololy sheathed, and that's a good thing. Usually if the element has that matte black look, it's incoloy.
That said, I have no idea how they hold up, I've yet to fire mine yet .
.
That said, I have no idea how they hold up, I've yet to fire mine yet
.the element itself will hold up great. the BASE of the element tends to rust. it can be cleaned off pretty easily, but I suspect that time will take its toll and I will need to replace the thing.
going on 1.5 years though, and it's doing fine.
going on 1.5 years though, and it's doing fine.
Any difference in the finished beer- composited to using gas?
Yeah... it cost me less to make it now.
Seriously, though.... no differences in terms of flavor. i am just more consistent with temps and more laid back when brewing since I don't have to babysit kettles for temp control.
I just use a kitchen sponge/scrubby to clean the crud off the element. It comes clean pretty easily.
This will also get off almost all of the rust with a little barkeeper's friend.
This will also get off almost all of the rust with a little barkeeper's friend.
Any problem with hops pellets or leaf burning on the hot element?
I bag my hops, so I can't directly answer that, but I don't think it would be any problem, simply because of the fact that I know that the nylon paint strainer bags do not melt/burn when they are in contact with the element. (I tested this by actually weighting down a bag and laying it right across the element and turning it on full-blast.)
Walker said:I bag my hops, so I can't directly answer that, but I don't think it would be any problem, simply because of the fact that I know that the nylon paint strainer bags do not melt/burn when they are in contact with the element. (I tested this by actually weighting down a bag and laying it right across the element and turning it on full-blast.)
Wow- I'm surprised it didn't melt. I see that your an EE- did you use ssr's or contractors?
Wow- I'm surprised it didn't melt. I see that your an EE- did you use ssr's or contractors?
Single SSR on one of the hot legs for control of the element during mash/boil.
Double pole contactor as a manual 'kill' switch to cut both hot legs to the element.
I bought a Camco 5500W ULWD element from Home Depot part# 15597 for $17. It's incoloy, has a straight foldback and came with a lifetime warranty. The store people said if it ever fails they would replace it with another, free of charge.
I bought a Camco 5500W ULWD element from Home Depot part# 15597 for $17. It's incoloy, has a straight foldback and came with a lifetime warranty. The store people said if it ever fails they would replace it with another, free of charge.
Cool. I got mine at HD, too.
I wonder if they will balk on that guarantee if they figure out what you were actually doing with it.
Well, at the pace I'm going, It'll probably end up in the water heater before I get the keggle built. The element in the bottom of the hot water tank burns up in about 6 months time. The tank is full of mineral deposits and they are too hard to remove. Maybe the ULWD will solve that problem. Besides, no one homebrews in Alabama - that would be illegal.
bigljd
Well-Known Member
I just went electric recently and bought my elements at HD, and I know the one by me does not have ULWD in stock, just LWD. I bought the Camco LWD and it works great in my kettle, but I don't think HD normally stocks ULWD elements in the store, so I'm guessing the earlier poster meant LWD?Home depot web site states the camco 15597 to be LWD not ULWD.
Home depot web site states the camco 15597 to be LWD not ULWD.
I think their website is just wrong.
If you go to camco's website, it appears that EVERY element that is clad in the black incoloy material is an ULWD element.
I have two Camco 4500W ripple elements that have been going strong for > 2 yrs. Mine came from Ron's Hardware, online.
I rarely clean mine. If I notice plaque forming, I give it a scrub with a nylon brush. After brewing, I don't use any chems, just hose sprayer.
I have a hanging nylon bag that rests against the element. Never a problem.
I rarely clean mine. If I notice plaque forming, I give it a scrub with a nylon brush. After brewing, I don't use any chems, just hose sprayer.
I have a hanging nylon bag that rests against the element. Never a problem.
Home depot web site states the camco 15597 to be LWD not ULWD.
I think their website is just wrong.
If you go to camco's website, it appears that EVERY element that is clad in the black incoloy material is an ULWD element.
Yes, it says Ultra Low-Watt Density on the package.
I will buy one tonight! Just waiting on some switches and Im ready to brew electric.
Take a measurement on your kettle - this one's kind of long. It won't fit my turkey fryer pot but I think it will fit in my sankey keg. The 4500 watt one they have is shorter.
Just to confirm for y'all, I am looking at the package for the 15597 that I bought at Home Depot a few months back for my build:
"Will withstand dry-firing"
"Highest grade nickel and chromium Incoloy sheath"
"Ultra low-watt density"
"Will withstand dry-firing"
"Highest grade nickel and chromium Incoloy sheath"
"Ultra low-watt density"

Diver165
Well-Known Member
Lots of people use the Camcorder 02963 5500W ULWD. That's what I'm gonna use in my setup. ...as soon as I get the balls to punch holes in my Blichmanns. LOL
Sent from my iPhone using HB Talk
Sent from my iPhone using HB Talk
iijakii
Well-Known Member
You mean your Blingmanns?
kal
Well-Known Member
Any problem with hops pellets or leaf burning on the hot element?
No issues at all. I've done dozens of pellet and whole hop batches for 2+ years now from light lagers with 1-2 oz to heavy IIPAs with 23 oz in the kettle.
Kal
kal said:No issues at all. I've done dozens of pellet and whole hop batches for 2+ years now from light lagers with 1-2 oz to heavy IIPAs with 23 oz in the kettle.
Kal
@ kal
I have to say, you and your site inspired me!
bigljd
Well-Known Member
I just went electric recently and bought my elements at HD, and I know the one by me does not have ULWD in stock, just LWD. I bought the Camco LWD and it works great in my kettle, but I don't think HD normally stocks ULWD elements in the store, so I'm guessing the earlier poster meant LWD?
I stopped by HD at lunch today and discovered the reason for my confusion - the product description on the HD price tag they place on the peg for the Camco element reads that it's LWD, but if you look at the back of the package (see Mux's pic in post 27), it says ULWD.
So, HD is doing its best to confuse people as usual. I am happy to learn that my element is actually ULWD though - if I actually read the packaging I'd have known that all along.
Lots of people use the Camcorder 02963 5500W ULWD. That's what I'm gonna use in my setup. ...as soon as I get the balls to punch holes in my Blichmanns. LOL
Sent from my iPhone using HB Talk
Camcorder? Don't you love automatic word completion?
Seriously, I had the same fears about popping a hole in the Blichman. At least I have a drill press and was able to position the pot firmly on it's table. Drilled a starter hole with a 1/4" drill and then used a step drill with lard as a lubricant at about 110 rpm to get it through. I stopped and added more lubricant when I got to the last step that I was planning on using. I spent lots more time psyching myself up to do it than it took to get the job done.
If you don't have a drill press, get someone to hold the pot very steady and go for it.
kal
Well-Known Member
I *highly* suggest using a punch to make the proper hole in the kettle. Even with a step bit and a drill press it's impossible to make a hole that is as clean as you can get with a punch.
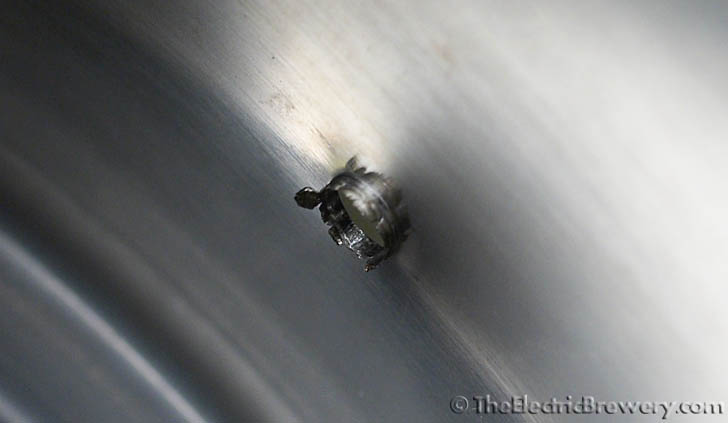
Here's a picture of a starter hole made with a good quality Greenlee step bit in one of my Blichmann kettles - notice how "messy" it is:
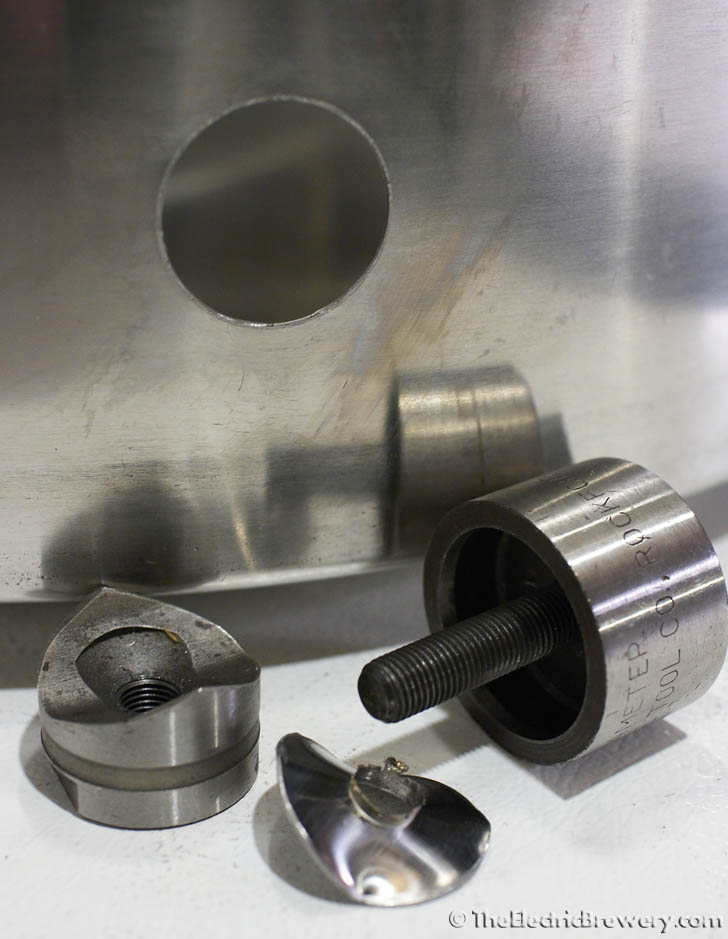
Here's a picture of what you get with with a punch:
Complete step by step instructions can be found here.
Kal
Here's a picture of a starter hole made with a good quality Greenlee step bit in one of my Blichmann kettles - notice how "messy" it is:
Here's a picture of what you get with with a punch:
Complete step by step instructions can be found here.
Kal
Kal,
You're right, a hole punch is the best. I was working with tools on hand and fortunately had no problems. I did check the hole for burrs after the first couple of steps, so I knew that my setup was rigid enough and the drill speed was good.
You're right, a hole punch is the best. I was working with tools on hand and fortunately had no problems. I did check the hole for burrs after the first couple of steps, so I knew that my setup was rigid enough and the drill speed was good.
shortyjacobs
Well-Known Member
Punches are awesome, but expensive. I've always used a hole saw or drill bit, then finished off the hole with my dremel. Takes more time, but if you grind it done with the dremel, (drill the hole smaller than you need, then grind it out to the correct diameter), you get quite pretty holes.
It can take me a good 15-20 minutes to do a keggle well though, so if you are looking for fast, I agree, punch it out.
It can take me a good 15-20 minutes to do a keggle well though, so if you are looking for fast, I agree, punch it out.
I used a cheap-ish step bit and a cordless drill for my 1.2 (or was it 1.5mm?) thick kettle. I used a bit of cutting grease and the hole is just as clean as with punches. YMMV, but I've gotten nice holes and much more use out of the cheap step drill than I ever would have from a punch. I used it for all holes on my kettle, kettles for friends and various plastic things around the house that needed holes
Build pics of my kettle can be found on www.brew.is/blog - No pics of the actual holes tho, unfortunately.
Build pics of my kettle can be found on www.brew.is/blog - No pics of the actual holes tho, unfortunately.
I used a bit of cutting grease and the hole is just as clean as with punches.
Agreed. I can make a perfect hole with a small drill bit and a die grinder. It's not that hard.
Similar threads
- Replies
- 14
- Views
- 1K
- Replies
- 10
- Views
- 668
