The last one I did did the same thing. I just used a hammer & chisel to tap the split as tight as I could get it to the coupling. Then I used a little plumber's putty to seal around the dimple, and the solder did the rest. The putty got a little smokey as I was soldering, but it stayed in place long enough to let the solder harden. Once it cooled, cleaned up with some BKF, and its like it never happened!
You are using an out of date browser. It may not display this or other websites correctly.
You should upgrade or use an alternative browser.
You should upgrade or use an alternative browser.
Soldering Stainless steel
- Thread starter BargainFittings
- Start date

Help Support Homebrew Talk - Beer, Wine, Mead, & Cider Brewing Discussion Forum:
This site may earn a commission from merchant affiliate
links, including eBay, Amazon, and others.
When trying to shape steel with a hammer, it is absolutely critical to have a hand anvil or dolly held behind the work area to absorb the energy and locally deform the metal. Body shops use tools like these...but any hefty piece of steel will do in a pinch, like the head of a small hand sledge.
http://www.eastwood.com/ew-7-piece-...BuBkGt7dIBrOjUlSsuzMHEu7BBXTlVf6hMaAr338P8HAQ
http://www.eastwood.com/ew-7-piece-...BuBkGt7dIBrOjUlSsuzMHEu7BBXTlVf6hMaAr338P8HAQ
OP
OP
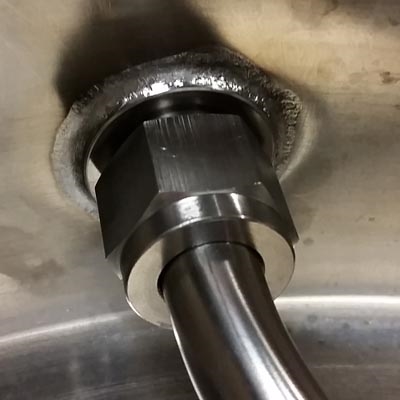
Butt joined a Camlock A and Sanke D coupling nut together.
EDIT - I did this to be able to use a pump to clean and transfer from keg to keg.
I drilled out two sanke couplings for higher flow and use a sump pump to clean / sanitize and a magnetic pump or co2 pressure to rack from keg to keg.

EDIT - I did this to be able to use a pump to clean and transfer from keg to keg.
I drilled out two sanke couplings for higher flow and use a sump pump to clean / sanitize and a magnetic pump or co2 pressure to rack from keg to keg.
wbarber69
Well-Known Member
- Joined
- Oct 13, 2013
- Messages
- 2,191
- Reaction score
- 263
Butt joined a Camlock A and Sanke D coupling nut together.
EDIT - I did this to be able to use a pump to clean and transfer from keg to keg.
I drilled out two sanke couplings for higher flow and use a sump pump to clean / sanitize and a magnetic pump or co2 pressure to rack from keg to keg.
Is there a nipple under that connection? Or is it just solder?
OP
OP
Is there a nipple under that connection? Or is it just solder?
Just solder. Butt joint. The coupling nut that screws on the Sanke connetor is chromed brass. I sanded the face pretty aggresively and did the same to the mating face of the A camlock. Fluxed it well and used silver solder. I applied 90% of the heat to the A coupling and touched the joint briefly just when the the flux began to smoke.
The solder flowed easily and formed a nice join. I put the fittings in a vice and gave them a pretty hard hit to see if they would part.
They did not.
snowman_fs
Well-Known Member
Has anyone tried to solder in a street elbow through a keg wall or bottom? With the female end forming the typical flare we see in this thread.
I'm thinking about a bottom drain to my HLT and the tight turn seems beneficial to let an eHLT sit flat on a surface.
I'm thinking pre drill/punch/draw to the appropriate size and then hook the elbow through and pound the female end into place.
Edit: I just checked and there is not enough bottom clearance to let the keg sit flat with a street elbow. I'll order a 45 and see if I can move up the curve and make it fit.
The last one I did did the same thing. I just used a hammer & chisel to tap the split as tight as I could get it to the coupling. Then I used a little plumber's putty to seal around the dimple, and the solder did the rest. The putty got a little smokey as I was soldering, but it stayed in place long enough to let the solder harden. Once it cooled, cleaned up with some BKF, and its like it never happened!
Thanks for the tip! Apparently it's not my method, I split the MLT in the exact same spot, and I'm assuming I will split the boil kettle as well. I used some plumbers putty to hold everything in, works like a champ! I also used it around my nut for the element to keep the flux and solder from running down the side of the kettle, a bit messy but easier to clean overall.
View attachment 1427545403847.jpg
If you are splitting the stainless, I would guess the diameter of what you are drawing into is too small, or your hole is too small to begin with....by the time your done, you'll have it figured out ")
wbarber69
Well-Known Member
- Joined
- Oct 13, 2013
- Messages
- 2,191
- Reaction score
- 263
If you are splitting the stainless, I would guess the diameter of what you are drawing into is too small, or your hole is too small to begin with....by the time your done, you'll have it figured out
Was about to post the same thing.
Huaco
Well-Known Member
Bobby:
I've got my element to fit into a 1 1/2" TC adapter and ferrule. The issue is... there's contact of the element and ferrule. Is this an issue? I'd hate to burn out a brand new element...

I've got my element to fit into a 1 1/2" TC adapter and ferrule. The issue is... there's contact of the element and ferrule. Is this an issue? I'd hate to burn out a brand new element...
If you are splitting the stainless, I would guess the diameter of what you are drawing into is too small, or your hole is too small to begin with....by the time your done, you'll have it figured out
So far I've done 8 fittings and the only two that have split are the holes along the bottom for the sightglasses. I'm going to blame it on my poor man's draw stud, it's just a 3/4" to 1/2" copper pipe reducer, which was posted in another thread. Probably a combination of that and a not-quite-straight alignment to draw through... Oh well, it works. I just have one more bottom drain left. I wouldn't have done it without the YouTube videos, it's actually pretty straightforward once you have the right flux. I used the staybrite solder for all the couplings and the 1/2" nut, but used some larger silver bearing solder I got from work, which probably has a lower silver content, for the element nuts. With the staybrite flux it works awesome.
pablosbrewing
Well-Known Member
Bobby:
I've got my element to fit into a 1 1/2" TC adapter and ferrule. The issue is... there's contact of the element and ferrule. Is this an issue? I'd hate to burn out a brand new element...
Bobby's site is Brewhardware.com.
Your enclosure appears to be from BrewersHardware.com. The description for the 1.5" version indicates it may touch
in many cases the tip of the element can contact the kettle wall or ferrule
The issue is the length of the ferrule. I think the one in the picture is "long" or a bit over 1". The ones I have are medium which is 7/8" of length. There should be no real issue with slight contact though. If you're overly concerned, you can trim some length off the ferrule before welding it into the pot.
Seems a good a place as any to mention that I now offer a larger silver solder kit with 4oz of stay clean flux and 1 full ounce of stay brite #8. Many people have asked if I'd sell a little bit more flux or a little bit more solder and I never had a way to do that. Now the larger kit is plenty for most jobs and you get the benefit of the 6% silver content solder which has never been offered in less than pound quantities.

Seems a good a place as any to mention that I now offer a larger silver solder kit with 4oz of stay clean flux and 1 full ounce of stay brite #8. Many people have asked if I'd sell a little bit more flux or a little bit more solder and I never had a way to do that. Now the larger kit is plenty for most jobs and you get the benefit of the 6% silver content solder which has never been offered in less than pound quantities.
Huaco
Well-Known Member
Thanks Bobby. Worst case, I'll gently bend the element to an L shape away from the ferrule.
Huaco
Well-Known Member
Bobby's site is Brewhardware.com.
Your enclosure appears to be from BrewersHardware.com. The description for the 1.5" version indicates it may touch
Yep... fully aware of Bobby's site. Thanks though.
I work at my LHBS and could purchase these units off the shelf there. That said, there are still items I purchase from Bobby because I like them and the price point is right...
SilverZero
Well-Known Member
This thread is excellent (at least the 60 pages I've browsed). I'm building my new brewery right now and this has convinced me to ditch the weldless setup. I need a bit of clarification, if somebody can chime in:
1. I'm installing 2" TC ferrules on my HLT and BK for 5500w ripple elements. What is the proper hole size to start with if I want to dimple it? Somebody mentioned that a 1-1/4" conduit punch made a good hole, which I gather is just about 1-5/8" actual diameter. Is that close enough to dimple for a 2" TC? I have a big 1"-to-2" pipe reducer that I'll use to draw the dimple.
2. How about for 1/2" fittings? Is there some variance in the OD of a full coupling, or can anybody say what hole size to start with? Would a 7/8" hole saw or step bit work (I have both) or is that going to be too small for the thickness of the coupling?
3. This is more a fleeting thought and maybe a bit silly: Does anybody worry about orientation of the coupling vs. how a ball valve is going to seat when it's threaded on? I can see myself getting a nipple in the coupling and then running the valve down and having it tighten up 30 degrees too far.
stpug
Well-Known Member
- Joined
- Nov 5, 2012
- Messages
- 3,808
- Reaction score
- 767
1. I'm installing 2" TC ferrules on my HLT and BK for 5500w ripple elements. What is the proper hole size to start with if I want to dimple it? Somebody mentioned that a 1-1/4" conduit punch made a good hole, which I gather is just about 1-5/8" actual diameter. Is that close enough to dimple for a 2" TC? I have a big 1"-to-2" pipe reducer that I'll use to draw the dimple.
A 2" TC ferrule take a 2" hole to fit through. Back the hole size down 1/16" and it gives you some material to dimple. I do not think a 1-5/8" diameter hole will be big enough, but you could then grind it where you want it with a tool I suppose.
2. How about for 1/2" fittings? Is there some variance in the OD of a full coupling, or can anybody say what hole size to start with? Would a 7/8" hole saw or step bit work (I have both) or is that going to be too small for the thickness of the coupling?
Coupling vary quite a bit. Your best bet is to check it's smallest diameter with a pair of calipers and go from there. I've had good success with stepbits but others have moved on to other tools (hole punches, etc).
3. This is more a fleeting thought and maybe a bit silly: Does anybody worry about orientation of the coupling vs. how a ball valve is going to seat when it's threaded on? I can see myself getting a nipple in the coupling and then running the valve down and having it tighten up 30 degrees too far.
Using some generous wraps of teflon gives you plenty of leeway to get that ball valve rotated around to the correct orientation.
GotPushrods
Well-Known Member
This thread is excellent (at least the 60 pages I've browsed). I'm building my new brewery right now and this has convinced me to ditch the weldless setup. I need a bit of clarification, if somebody can chime in:
1. I'm installing 2" TC ferrules on my HLT and BK for 5500w ripple elements. What is the proper hole size to start with if I want to dimple it? Somebody mentioned that a 1-1/4" conduit punch made a good hole, which I gather is just about 1-5/8" actual diameter. Is that close enough to dimple for a 2" TC? I have a big 1"-to-2" pipe reducer that I'll use to draw the dimple.
That's an awfully big dimple. I'm not aware of anyone dimpling these, but rather welding a regular ferrule or soldering the radiused ferrule from BrewHardware. I think he makes a 2" version now too, although a ripple element fits through a 1.5" just fine. I did the latter and it worked perfectly. Bobby has a great video somewhere, maybe someone has a link. If anybody is making dimples for 2" ferrules, I'd like to see that bad boy!
2. How about for 1/2" fittings? Is there some variance in the OD of a full coupling, or can anybody say what hole size to start with? Would a 7/8" hole saw or step bit work (I have both) or is that going to be too small for the thickness of the coupling?
7/8" is a perfect starting size. The couplings I've used range from 1" to about 1-1/32".
I prefer a simple step bit for my pilot holes. A hole saw would also probably work, I've never tried it. I would recommend against a radio punch as it's responsible for my only error in dozens of dimples. It can leave a burred hole that tears when dimpled. Make sure you sand the hole nice and smooth to ensure a good dimple if there are any imperfections.
3. This is more a fleeting thought and maybe a bit silly: Does anybody worry about orientation of the coupling vs. how a ball valve is going to seat when it's threaded on? I can see myself getting a nipple in the coupling and then running the valve down and having it tighten up 30 degrees too far.
I used to think it would be an issue. After much experience, it's not. Remember that you'll have a good 4-5 wraps of tape and you're dealing with 2 threaded joints, 1 on each end of a nipple. If you need another 300 degrees, it's really only 150 on each thread. It's doable.
I got the 1.5 TC radiused fitting from Brewhardware and adjusted the radius on my belt sander to match the 8 gal Megapot. This is just over 12" dia, and the gap was bigger than I was comfortable with. After a few minutes I had it just about perfect. I happened to have the perfect size punch, cleaned up the sharp edges, then pre-soldered the fitting face and the area on the pot. Once that was done I set the fitting in place over the hole, put a couple more drops of flux on it, then heated the fitting evenly with a propane torch until it settled down flat, then ran a bead of solder all the way around. It came out perfect.
I used a high power heat gun in my other 8 gal pot to remove and reflow the solder around my valve fitting (leaked). I cleaned and pre-soldered both like above, but using the heat gun. Worked great too!
For this I used a "1/2 coupling" which I put in a lathe and cut down about the inside end about 1/8 inch to create a lip that would go though the hole, and leave a shoulder on the outside for soldering.
The right solder, flux and a little patience and it's easy to solder all your stainless fittings, if you're so inclined. I tend to take it a little further...
SilverZero
Well-Known Member
I just did two 2" triclamp ferrules in my new Concord 80qt pots. Used a $10 Radnor kit from AirGas and a propane torch. I've got a build thread that has some pics and details. This thread was great for getting me ready. As soon as my couplings arrive I'm going to put a lot more holes in the pots and solder them in as well. This is, honestly, almost easier and definitely cheaper than weldless fittings.
GreenMonti
Well-Known Member
- Joined
- Nov 29, 2009
- Messages
- 1,268
- Reaction score
- 67
Been off the boards for a while now. I gotta say, WOW!
You all have ran with this big time. It's really awesome to see. Keep up the good work all.
Bargain Fittings, very nice work on the butt joint. Super clean.
You all have ran with this big time. It's really awesome to see. Keep up the good work all.
Bargain Fittings, very nice work on the butt joint. Super clean.
I stumbled on something totally by accident today while cleaning up a fresh solder, dunno if it has been mentioned before.
Starsan/water mix literally melts away the black flux residue, no scrubbing needed, although I did finish up the tough bits with a green scrubby, but it just washes the goo right off. Must be something to do with the acid. Just your regular old Starsan mix that you would use on brew day, nothing fancy.
Starsan/water mix literally melts away the black flux residue, no scrubbing needed, although I did finish up the tough bits with a green scrubby, but it just washes the goo right off. Must be something to do with the acid. Just your regular old Starsan mix that you would use on brew day, nothing fancy.
Good timing. I just soldered a bulkhead fitting into my new lauter tun. I' try that to clean it up in the morning. It makes sense that acid would clean it off considering the flux is acid.
Bailey_Brew
Well-Known Member
- Joined
- Mar 22, 2015
- Messages
- 59
- Reaction score
- 6
I got the 1.5 TC radiused fitting from Brewhardware and adjusted the radius on my belt sander to match the 8 gal Megapot. This is just over 12" dia, and the gap was bigger than I was comfortable with. After a few minutes I had it just about perfect. I happened to have the perfect size punch, cleaned up the sharp edges, then pre-soldered the fitting face and the area on the pot. Once that was done I set the fitting in place over the hole, put a couple more drops of flux on it, then heated the fitting evenly with a propane torch until it settled down flat, then ran a bead of solder all the way around. It came out perfect.
I used a high power heat gun in my other 8 gal pot to remove and reflow the solder around my valve fitting (leaked). I cleaned and pre-soldered both like above, but using the heat gun. Worked great too!
For this I used a "1/2 coupling" which I put in a lathe and cut down about the inside end about 1/8 inch to create a lip that would go though the hole, and leave a shoulder on the outside for soldering.
The right solder, flux and a little patience and it's easy to solder all your stainless fittings, if you're so inclined. I tend to take it a little further...
I started brewing fairly recently with a small batch "countertop Brutus" setup that I built too small. I have a hard time getting a full 2.5 gallons into the keg. (And I wouldn't mind a shorter brew day.)
So I am putting together 3 gallon eBIAB using a 6.5 gallon Concord kettle and I made a dumb mistake. I ran one step too far drilling the hole for the element.
This could be my opportunity to use a soldered Triclover. But I am worried that the kettle is too small to use the Brewhardware 1.5 radiused flange. The kettle diameter is about 11 inches. Has anyone tried this? Can I pull the kettle to the fitting using something like the toggle bolt tool shown in the Brewhardware video or is the mismatch just too big?
thanks.
If you make up a clamping tool to pull the flange tight to the pot, the gap won't be all that big.
Bailey_Brew
Well-Known Member
- Joined
- Mar 22, 2015
- Messages
- 59
- Reaction score
- 6
Thanks Bobby_M. I'll have to give it a try.
I've read that you can fill the gap, but the 11" pot will be a pierry big one. Solder does like to flow and fill, to a point.
Maybe you could "persuade" the pot material to get closer to the fitting. ..
A small peen hammer and a little patience can go a long way.
I've had my pots at the stainless shop for 6 weeks now, and they still haven't started on them yet! I'm considering bringing them home and doing it myself with silver solder. I've soldered/brazed refrigeration and plumbing in the past so I don't see too much of a problem, other that wanting some input on a BYO article and on 'dimpling' the holes.
Here's some of what BYO said
"If you're planning on silver soldering, keep in mind a few basics. Silver solder works best when the two surfaces overlap at least three times the thickness of the thinnest metal. If you’re going through the wall of a keg with a full coupling, there would be only the “overlap” of the pot’s wall. But if you were adding a half-coupling to a thin-walled kettle, there would be plenty of “overlap” where the bottom of the coupling meets the pot’s wall.
If you decide to silver solder a coupling or nipple into your pot, start by drilling a very tight hole, one with only .002-.005 (two to five thousandths of an inch) clearance. Harris Welco technician Jeff Heuerman says, “When the silver solder is drawn into the gap, filling it, that’s where you get your strength.” Silver solder should not bead up, like a weld filet. Actually, you could think of silver solder as an extremely hot, hot-melt glue.
Silver solder is expensive, over $30 a pound. But you can buy just a few ounces. The Stay-Clean liquid flux retails for $6.40. The bottom line: Silver solder is simple and effective, but it may crack after a year or two of homebrewing service. While you can do it yourself, it’s just not as rugged or long-lasting as silver brazing or welding."
The hi-lited portion is what concerns me - I don't want to have to replace my pots every year or two - and I don't have any brazing rod (other than some leftover from refrigeration that may/may not be suitable for food-grade brazing). The brand, at the time was Silva-Braze, but I don't know the contents of things like lead, tin, antimony, etc. that may be unusable for my brewpots.
I just looked at an MSDS sheet on SilvaBraze - Doesn't look too promising.
http://www.matweb.com/search/datasheettext.aspx?matguid=4c1777b931a645eca1d1167d0de6f70b
"Silvabraze is used for brazing of copper and copper alloys, brass and bronze. It can also be used on silver, tungsten, and molybdenum. It is primarily used for the joining of copper-to-copper on vibration free joints. It is very effective for joining tight fitting copper pipe and tubing. Silvabraze should not be used on ferrous metals or copper alloys containing more than 10% nickel because of phosphorus embitterment due to reactions with iron or nickel. Silvabraze is extremely fluid at brazing temperatures and will penetrate joint with little clearance."
Any opinions on the longevity and on silver soldering as opposed to welding/brazing?
If you use my pull through fittings and install tool, along with the correct solder kit, you will get the job done in one day and you likely won't feel dread from a crappy welding job either. No, the joints won't crack in a year.
Yes, it says MAY crack. Perhaps if you welded a coupling with minimal surface area for the solder to bond.
He also recommends 3x the surface of the pots thickness for the solder to bond. Flaring the pot with a pull through tool as mentioned above likely provides 10-20 times the surface area as the pots thickness and greatly improved the strength of the joint with the additional surface area.
I would like to see someone take a BFH to a silver soldered coupling, I have a hunch the pot would be all mangled before the silver solder is an issue.
Done properly silver solder is a lifetime job IMHO.
Breathing some life into this thread here...I'm surprised with the popularity of soldering stainless it's faded away.
I have an all electric setup, and I'm planning to re-do my immersion chiller with smaller twin coils to get the IC lower in the kettle, one on each side of the element. My current twin coil IC works amazingly well (1 inside the other), but has to sit above the element and in my new 10gal pot too much of it is above the wort.
I've looked at copper and stainless and for 3/8 x 50 they both come in about $1/ft. Given the cost is the same, stainless is my preference. The down side is that you can't buy solder fitting for stainless. I could do compression fittings, but there's too much hidden areas for stuff to collect, and I don't want to have to open up the fittings and risk leaks in the future.
What I'm wondering is, could I use the copper solder fittings on the stainless? I know it will solder fine, but could there be issues such as electrolysis? Given the short duration that it's going to be wet I would doubt that is a concern. Can anyone think of any other potential issues?
My thought is to use a tee to join the coils at the bottom and top, and use a larger feed & return (copper pipe) for my connections. This is what I did on my other one and it worked out very well, but it's all copper.
OP
OP
Yes copper fittings work fine on the same OD stainless.
The infrequent use will prevent the corrosion issues from electrolysis.
The infrequent use will prevent the corrosion issues from electrolysis.
Should be fine, if it was a problem then plate chillers wouldn't be a thing
Yes copper fittings work fine on the same OD stainless.
The infrequent use will prevent the corrosion issues from electrolysis.
Thanks for the replies. I couldn't imagine there would be any real concern.
Ok, what are some secret tips to installing non-cockeyed half couplings in kegs using brewhardware.com pull through tool and pull through fitting?
The tool and fittings are a slick setup, but it's a real SOB and I've yet to get a coupling perfect.
I know the OD of those things varies, do you just have to buy a bunch and pick the smallest?
The tool and fittings are a slick setup, but it's a real SOB and I've yet to get a coupling perfect.
I know the OD of those things varies, do you just have to buy a bunch and pick the smallest?
wbarber69
Well-Known Member
- Joined
- Oct 13, 2013
- Messages
- 2,191
- Reaction score
- 263
Use a full size coupling to get the dimple size right. then you can come back with the half coupling to get the seat just right. as far as coupling size verses pull through tool. you can take a hammer and lightly pound the dimple back in to reduce the size for a snug fit.
I just added two 1" tri-clamps to my new 20gal Kegco Kettle, and it went just as smooth as silk.
Similar threads
- Replies
- 41
- Views
- 2K
- Replies
- 0
- Views
- 620
- Replies
- 0
- Views
- 580
- Replies
- 0
- Views
- 382

Latest posts
-

-
-
Anyone have a clone recipe for "Nelson in this economy?"
- Latest: Bobcatbrewing42
-

-
