Soldering a heating element mount - Hex vs. Coupling

Homebrew Talk - Beer, Wine, Mead, & Cider Brewing Discussion Forum

Help Support Homebrew Talk - Beer, Wine, Mead, & Cider Brewing Discussion Forum:

This site may earn a commission from merchant affiliate links, including eBay, Amazon, and others.

SmokingDog

Well-Known Member
Joined
Feb 18, 2011
Messages
125
Reaction score
2
Location
Sheboygan
If you were going to do, or re-do your keggle, which mount would you solder to your keggle?

1" hex nut or a 1" 1/2-coupling?
 
I welded a nut to mine, so I can't really answer your question, but I bet a nut would have more surface area contact with the keg. This is good when soldering because it's not nearly as strong as a weld. With the nut, you also get a groove (if you get the right nut) that accepts a silicone o-ring. I would go with the nut for that reason alone.
 
I soldered the nut to my keggle ( which is plenty strong) and tonight I soldered the nut to m HLT for my HERMS kit. They seem great.

unfortunately the second nut on the HLT did not have the groove, but it holds water just fine.

I used 1/2 inch nuts for the magnesium anodes as well.
 
Yeah, I've been thinking about this too - I know the coupling would be easier to mount and solder on than the nut. But I really prefer to get the locknut on there since it has the proper straight thread.

I'm just gonna have to do some practice runs with nuts and some scraps before I go for it on my actual kettle.
 
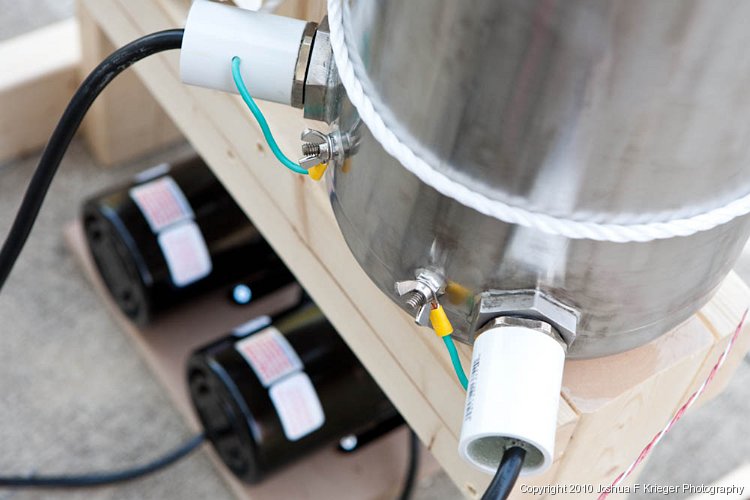
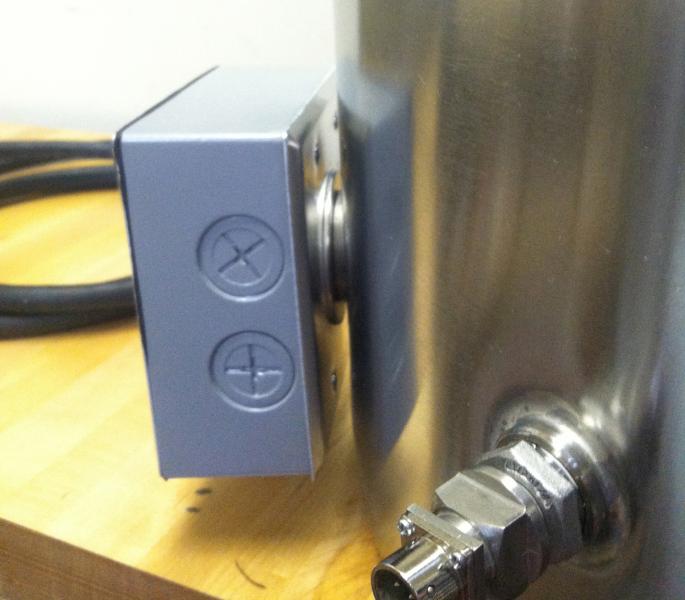
I went with the 1 in. half coupling, dimpled and soldered. I then used a slightly modified version of the Kal method to attach a weatherproof box to house the electrical connections. I'm really happy with the results. The dimpled solder connection is strong as can be, and it hasn't leaked a single drop. It was more work than the soldered nut, but I think over time it will prove to be a better method.

I also like the standoff that the half coupling provides. My last brew got away from me for just a coup[le of seconds, and boiled over a bit. With the box spaced away from the kettle by the half coupling, cleanup was easy.
 
It seems to be pretty much luck that determines how the 1" couplings work with the element threads. I guess with so many different element makers/models out there along with all the different sources of SS fittings, there are a lot of different combinations.
Some people have to use a ton of teflon tape because they can barely get the element in there at all, and others can screw the elements into the coupler all the way down to the rubber gasket.
Maybe I will get some nuts and some couplings and see how they all fit and then decide which one would work best....
 
This seems to come up alot, and I am deciding how to do it right now as well. Has anyone looked into having some half couplers machined with nps threads?
 
I was a little worried that my element wouldn't screw in far enough, so I bought a "cheap" NPS tap off Ebay. I was able to run it into the threads on the half coupling far enough to seat the element firmly. After final assembly, I realized that the thickness of the silicone O-ring and stainless washer (see Kal's site) between the weatherproof box and the half coupling probably would have let it seal without re-threading. The end result, though, is a no-leak, easy-to-change element mount without the inherent problems of the typical weldless installation.
 
This sounds like what I am envisioning:
- locknut/coupling soldered to the kettle
- element base inside an electrical box, 1.25" hole cut in box, element threads come through hole
- exterior of electrical box pushes the gasket against the soldered fitting creating a seal

This way element connections are housed in a box, and if there is any leakage, the liquid will fall between the kettle and the box and not into the actual box....at least that's the way I'm picturing it :)
 
No leakage into the box - that's key! Rather than the standard gasket that comes with the element, I used a silicone O-ring, which is protected from over tightening by a slighly larger stainless steel washer. When the element is tightened it squeezes the O-ring until the washer contacts the half coupling. This allows the box to be in solid contact with the coupling, and therefore the kettle, for grounding, as well.
 
This is what I'm looking at doing (thanks Joshua - "jkfrieke"), except with a dimpled coupling instead of the hex nut:

I like the idea of the silicon o-ring or washer between the outer edge of the coupling and a washer on the element itself though as well.

0011.jpg
 
I have to vote for the coupling here, the dimpled coupling provides an AMAZINGLY strong mechanical connection to the vessel. A soldered hex nut relies completely on solder to hold it on.

I'm also curious as to why you guys think the o-ring is necessary. Every element I've purchased came with a sealing washer... the flat surface of the coupling OR hex nut provides plenty of sealing power.

DON'T OVER THINK IT!!
 
I'm also curious as to why you guys think the o-ring is necessary. Every element I've purchased came with a sealing washer... the flat surface of the coupling OR hex nut provides plenty of sealing power.

DON'T OVER THINK IT!!

That's what I was thinking, the included gasket was made specifically for the element base. Screwing into a kettle isn't really any different than screwing into a water heater - in theory it should be an "easier" connection because water heaters are under pressure.


No leakage into the box - that's key! Rather than the standard gasket that comes with the element, I used a silicone O-ring, which is protected from over tightening by a slighly larger stainless steel washer. When the element is tightened it squeezes the O-ring until the washer contacts the half coupling. This allows the box to be in solid contact with the coupling, and therefore the kettle, for grounding, as well.

Don't you achieve grounding even if the electrical box or washer aren't touching the kettle wall? I was thinking I would ground the incoming ground wire to the electrical box, then the element base is screwed into the soldered fitting which is now part of the kettle itself, right? The solder would conduct electricity to ground the kettle - am I right on this? Even if there is a gasket between the fitting and the element's flat base, the element threads are still in direct contact with the fitting and therefore the kettle.
 
The issue with the black gasket is some have said it gives off a rubbery flavour. Putting it in a cup of boiling water apparently reveals some of its taste

i just went with silicone for peace of mind. its cheap insurance vs hunting for off flavours in my brew.
 
There is also the issue of grounding everything. The original black rubber washer alone would prevent the weatherproof box from making solid contact with the coupling or nut. With the washer and O-ring, the O-ring makes a reliable seal, and the washer does double duty - preventing the O-ring from being compressed too tightly, which would allow it to leak; and it provides a positive mechanical connection for a reliable ground as well.
 
The issue with the black gasket is some have said it gives off a rubbery flavour. Putting it in a cup of boiling water apparently reveals some of its taste

i just went with silicone for peace of mind. its cheap insurance vs hunting for off flavours in my brew.

I can not imagine that the TINY amount of liquid that would make it past the threads to come into contact with the rubber washer could cause any perceptible off-flavor.

I'd liken it to saying I don't use a maple mash paddle because if I boil a chunk of maple for 4 hours, I can taste maple!! I'll stick with oak.
 
Don't you achieve grounding even if the electrical box or washer aren't touching the kettle wall? I was thinking I would ground the incoming ground wire to the electrical box, then the element base is screwed into the soldered fitting which is now part of the kettle itself, right? The solder would conduct electricity to ground the kettle - am I right on this? Even if there is a gasket between the fitting and the element's flat base, the element threads are still in direct contact with the fitting and therefore the kettle.

Because liquid can follow the threads on the base of the element past the O-ring on the outside, there needs to be a gasket or washer (I used the black one that comes with the element) under the base of the element, inside the box. That, and the gasket or O-ring between the box and the coupling would isolate the box. This would leave only the threads of the element, which can rust or corrode, to make the ground connection between the box and the kettle. By using the stainless washer sandwiched between the outside of the box and the coupler, a solid connection, virtually corrosion-proof, is made between all the parts. No external ground wires, no sealants, no JB-weld required. And, the element can be changed in minutes if necessary.
 
It sounds like that most of the couplings that you can purchase are NPT which is a tapered pipe thread; and the heating elements are NPS (straight thread). So fitting isn't exactly dead on. Whereas the hex nut is straight thread.

Although, it definitely seems, after reading and "looking at beer porn", that a coupling set in a dimple would be a stronger fit.

Todd.
 
Are you totally against having it welded? That would remove all doubt and let you chose the proper thread type. It really may not end up costing much more and it would be a much nicer installation.
 
Because liquid can follow the threads on the base of the element past the O-ring on the outside, there needs to be a gasket or washer (I used the black one that comes with the element) under the base of the element, inside the box. That, and the gasket or O-ring between the box and the coupling would isolate the box. This would leave only the threads of the element, which can rust or corrode, to make the ground connection between the box and the kettle. By using the stainless washer sandwiched between the outside of the box and the coupler, a solid connection, virtually corrosion-proof, is made between all the parts. No external ground wires, no sealants, no JB-weld required. And, the element can be changed in minutes if necessary.

I guess that's why I was thinking a gasket (either stock or a new silicone one) would be better than an o-ring - it should seal better and not allow any leaks at all
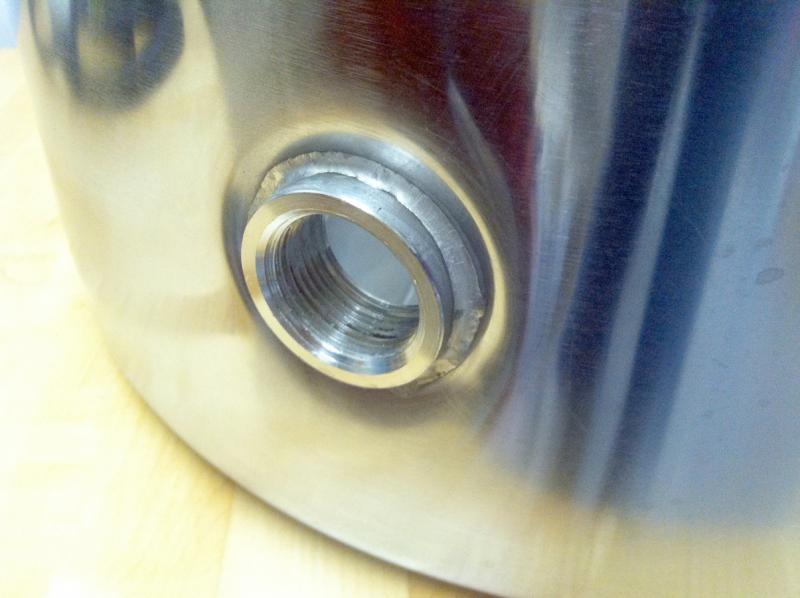
 
I guess that's why I was thinking a gasket (either stock or a new silicone one) would be better than an o-ring - it should seal better and not allow any leaks at all

That's not quite true - while a flat gasket or washer can seal quite well on the two flat surfaces, it can't seal against the threads on the element. Liquid can follow the threads right past the gasket, all the way to the where the threads end on the element base - which winds up being inside the box. That's why a gasket between the element and the box. This seals the last possible path for the liquid, preventing it from making it inside.
 
Ok, so your setup goes like this?:
flat element base > stock gasket > electrical box > o-ring/washer > coupling

Going with that design, I probably wouldn't have to worry about the element threading far enough into the coupling - which I believe you also mentioned earlier. Thanks
 
Thats it! I built my element housing per the instructions here: http://theelectricbrewery.com/heating-elements (Thanks Kal!)

Because one of my goals was to get away from the leaks I experienced with the weldless fittings on my old kettle, I decided to attach the box to the kettle with the dimpled and soldered half coupling. it was a bit of work, but I couldn't be happier with the results. It hasn't leaked a single drop, and its strong as can be. I expect it last a very long time.

I'll try to get some pictures posted soon.
 
So, I took some pictures when I got home last night. The second picture shows how the OD of the O-ring is slightly smaller than the ID of the stainless washer. When compressed between the box and kettle, the washer prevents the O-ring from deforming.

Half Coupling.jpg


Element and washers.jpg


Inside Element Housing.jpg


Close-up of box attached to kettle.jpg
 
epcgordy, excellent pics. Thank you.

So that looks like a 1" half coupling, dimpled "into" the kettle?
 
Right, 1" half coupling, dimpled and soldered. I used a Bayou Classic 62qt. kettle, and making the dimple was a piece of cake. Might be a little more challenging on a keggle, though. What are you planing to use?
 
epcgordy, very nice work! The install looks nice and sturdy. How did you make the dimple? Did you just use a larger version of the classic DIY dimple tool?
 
Going to be using a keggle. Bought an extra 1" full coupling to make a dimple tool. I have some pretty big impact sockets to use as the backer.

You dimpled into the kettle correct?
 
epcgordy, very nice work! The install looks nice and sturdy. How did you make the dimple? Did you just use a larger version of the classic DIY dimple tool?

Ajgeo, I made the tool described in the Soldering Stainless Steel thread. I used the same bolr/nut set-up, and just changed the tapered fitting and the larger receiver.
 
SmokingDog,

Yeah, I dimpled from the outside in. Mainly just because I preferred to do the soldering on the outside, where I could see what what the solder was doing as I was going.

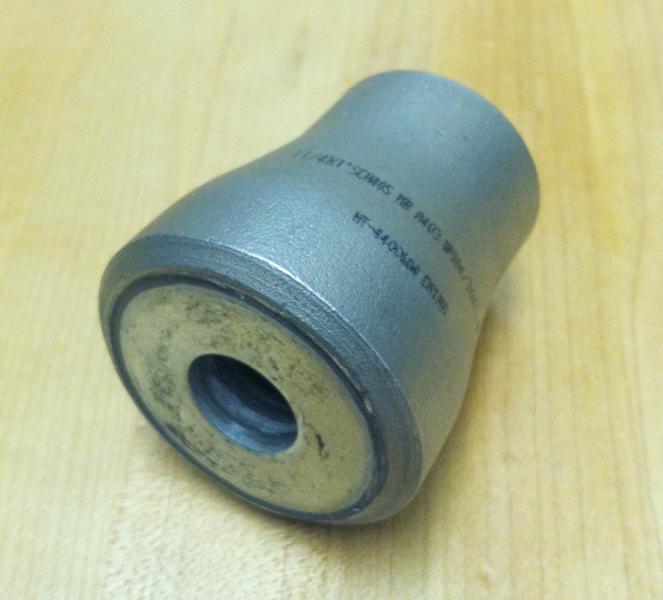
One cool thing I discovered in making the tool was a way to keep the tapered piece straight on the bolt. I pressed a 1/2 in. CPVC to 1/2 in. NPT adapter fitting that I had into the tapered fitting. I used JB Weld to fill the space around it from the large end, then topped it off with a 1/2 in. stainless washer. In the CPVC pipe end, I pressed home a short piece of 1/2 in. copper pipe. It fits my 1/2 in bolt like a glove, and stays in alignment no problem. Maybe you can adapt something like that to keep your coupling straight on the bolt. Without something like that, it wants to wobble all over the place, making it pretty easy to mess up the kettle.
 
epcgordy. What size hole did you make for the coupling? 1-1/4? I did the same thing regarding the dimpling tool, I got a 1"-1-1/4" SS weld reducer and a 2" Black steel coupler. But I have not made the hole in the kettle yet.
 
epcgordy. What size hole did you make for the coupling? 1-1/4? I did the same thing regarding the dimpling tool, I got a 1"-1-1/4" SS weld reducer and a 2" Black steel coupler. But I have not made the hole in the kettle yet.

I used a Greenlee punch, 1 1/4 in hole. It went through the Bayou Classic like butter. On a keggle, 1 1/4 might be a tad on the small side. Seemed like the dimple was pretty deep, had to move a pretty large area of the kettle wall. I'd recommend testing on piece of scrap if you can something. I found an old stainless double boiler insert at the local thrift store for a couple of bucks. Now it looks like a sieve from all the tests I did!
 
Thanks for the tip. Pretty self explanatory, but got a pic of it?
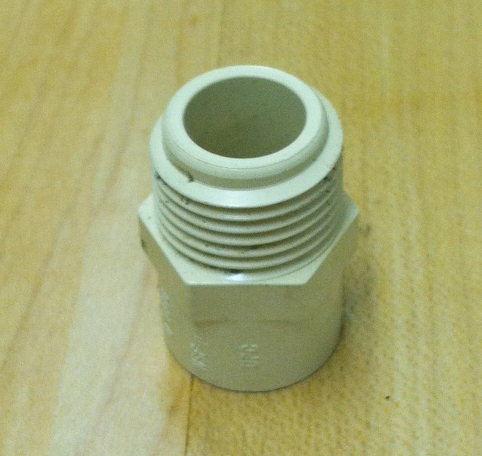
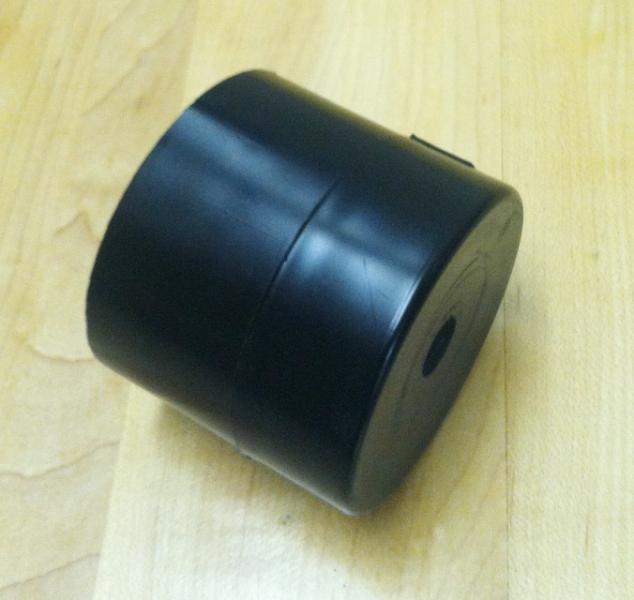
Got a few pix last night. The first one shows the type of CPVC pipe to male pipe thread adapter that I pressed into the tapered stainless fitting. Then, I filled around it with JB Weld from the large end, and topped it off with a couple of stainless washers epoxied in. The next one shows the small end, with a short piece of 1/2 in. copper pipe pressed into the CPVC pipe end. It fit perfectly, I didn't even glue it. For the receiving end, I used a 2 in. ABS plastic pipe coupling, cut down in length. Topped that off with a very short piece of ABS pipe glued into a ABS pipe cap, with a hole drilled for the bolt.

CPVC Fitting.jpg


Tapered fittiing.jpg


Tapered fitting small end.jpg


Receiver.jpg
 
Epcgordy,

Those solder connections look good. Quick question, based on some of the other posts in this thread - the straight threads of the heating element fit the tapered threads of the coupling without an issue?

Thanks


So, I took some pictures when I got home last night. The second picture shows how the OD of the O-ring is slightly smaller than the ID of the stainless washer. When compressed between the box and kettle, the washer prevents the O-ring from deforming.
 
Back
Top