GE 5cu ft Keezer Project

Homebrew Talk - Beer, Wine, Mead, & Cider Brewing Discussion Forum

Help Support Homebrew Talk - Beer, Wine, Mead, & Cider Brewing Discussion Forum:

This site may earn a commission from merchant affiliate links, including eBay, Amazon, and others.

dtorreliog

Member
Joined
Mar 30, 2011
Messages
16
Reaction score
0
Location
Jacksonville
Recently on a visit up to a friends house I got bit by the keezer bug and determined that "I had to have one too!" I came across a brand new GE 5 cu ft chest freezer courtesy from sister in law. After that it was plan plan plan.

I took the measurements, once, twice, three times. I don't know I stopped counting. For the obvious reason "measure twice cut once". The other reason, I don't have a table saw, just 2 rotary saws and 2 home made saw horses. Therefore I was going to have Lowes cut the wood for me. Well I didn't factor in that a 2x10 is not actually 2x10 more like 1 5/8x9 1/4. Minor setback. Luckily I still had some plywood laying around from flooring my attic. I was able to cut fillers for the lack of width missing from my calculations. I went for the overlapping joint as opposed to the 45 joint, primarily because I wasn't going to be able to cut nice 45 deg angles.

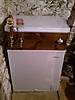
Also stopped by my LHBS to pick up kegging equipment. The only thing I'm missing now are shanks and taps to adorn the front of my keezer and a lip to prevent the collar from falling off the back and a ledge for the drip tray. Below are the pictures that I took today.

I realized as well that I can add another keg into my keezer, so I could possibly be doing that. I haven't cut the holes for the shanks so no rush there.

I can't wait to get the shanks and and have a completed project.

image-2294588901.jpg


image-554164415.jpg


image-3652267173.jpg


image-1575045861.jpg
 
Nice. I'm basically doing this same thing this weekend. Might try the angle cuts depending on the cost of the wood.
 
doctorRobert said:
Nice. I'm basically doing this same thing this weekend. Might try the angle cuts depending on the cost of the wood.

I think the base frame was $5 or $6 and the faceboard was $11
 
Minus a drip tray it's ready for use. I went cheap on the insulation but I'm ok with that. At some point I'll buy some sticky thermometers for the side of the keg.

I am using a Johnson A419 Digital Temperature Controller to keep it at 38F. One problem that I have is the right faucet will shut off completely so I'm getting a replacement in the mail. Right now that's not a problem, if you notice I have a carboy on the ledge containing an Oktoberfest that I brewed the other day. After initial fermentation I moved into the keezer where my 3rd keg will go.

Overall I'm very happy with my work. There are some imperfections but I'm ok with that.

image-1512808468.jpg


image-3145923835.jpg


image-1620559761.jpg


image-1675304934.jpg


image-2412806710.jpg
 
I want to build what you have. Do you know where i can find detailed plans for it?
 
I want to build what you have. Do you know where i can find detailed plans for it?

I could not find any online at all. What i ended up doing is taking the lid off. Measuring the Length and Width and Depth. The length and width give you the frame dimensions and the depth will let you know how wide the wood should be so you will have clearance for the keg and connections. My freezer has a ledge which is where the 3rd keg will be sitting. I think it measured around 18 inches deep. I decided to use 2x10x8 (those are nominal figures, the actual figures can be found on Lowes or Home Depot website) for the frame(collar). I made the width of the wood the same size as the freezer and the length "4 inches" shorter on each side to compensate for the thickness, which created an overlap. I drove 5 screws in the front and 5 in the back for both sides. That completed the frame.

I purchased 2x12x10 piece of lumber for the face plate. I had it cut to match the width up front plus "2 inches" on each side to the thickness of the wood i would use on the length. The length was cut to match the frame length. I glued the width on with wood glue and screwed in 5 screws down each side and 3 screws half way down the middle. I did the same for the sides. I did not add a piece for the back because i wanted to be able to slide it on and off in case I got out of brewing (Fat Chance)

I sanded and stained and polyuerathaned(sp?). After that i put the lid in place on top of my frame and maked the back of the frame with the hinge rested and added i believe 4 wood screws.

I purchase weather stripping for the bottom side of the frame to create a good seal with the freezer. I used cheap roll insulation that i shingle formed and stapled into place on the inside of the frame for additional insulation.


I was able to buy from Midwest Supplies 3 kegerator conversion kits that consisted of handles, faucets, shanks and nipple already assembled. Drilled three 1inch holes in the front with 1inch spade drill bit. Then i inserted the shank faucet combo.

I added a hole in the back of the frame for a CO2 line that way i can keep the CO2 tank outside in warm temperatures of my garage.

At some point i want to add a drip tray.

Obviously you will need some 5 gal kegs, tubing, a regulator, CO2 tank, a 2 3 or 4-way manifold pending how many lines you want and some gas couplings and beer couplings shanks and facets. Everything you need for the beer portion you can buy at LHBS or online. As for the collar(frame) portion supplies can be bought at Lowes or Home Depot.

PM if you have questions or need some help. Ill try my best. Measure twice cut once!!!

Good Luck
Take pics
 
Besides the fridge, CO2 tank and kegs, how much do you think you have into this build. I have a CO2 tank with no regulator and I have 3 kegs.
 
Besides the fridge, CO2 tank and kegs, how much do you think you have into this build. I have a CO2 tank with no regulator and I have 3 kegs.

2x10x8 $ 7.97
1x12x8 $10.94
Wood Screws $ 1.47
Glue $ 3.42
Stain $ 8.36
polyurethane $ 6.99
insulation $ 4.47
Collar Total $43.62 (+/-)

Beer Equipment $600.0 (+/-)

Lets call it around $700.00

thats a round about figure. I have left over stain, polyurethane, glue, and screws.
 
Is the co2 tank and kegs included in that number? 700 is the total for the whole build including everything right? The reason why I ask is because if 600 doesn't include the CO2 tank and kegs then I have no idea what you spent your money on. I can see 700 being the total for the fridge and what I just listed.
 
pola0502ds said:
Is the co2 tank and kegs included in that number? 700 is the total for the whole build including everything right? The reason why I ask is because if 600 doesn't include the CO2 tank and kegs then I have no idea what you spent your money on. I can see 700 being the total for the fridge and what I just listed.

That includes the kegs and full CO2 tank, regulator, piping, connections, shanks, faucets, handles, temp controller, manifold.
 
that is going to be one giagantic drip tray. Any reason why the taps are spaced so far apart?
 
Awesome job, I wish I would have realized I need to keep the taps close together. How did you hinge the collar?

I knew I didnt want to have tubes and taps all over the place, dont want to accidentally hit the the taps either when i'm doing stuff - so I put them off to the side.

I used the original door hinges for the collar, except i took the spring out that was in one of them. And then I used some cheap door hinges that I found at home depot, to attach the original top door to the collar.
 
I built a keezer on the same fridge, also for three kegs. I put the taps on the right side of the collar and was able to fit the cheapo stainless drip tray from barproducts.com on the side of it with some big angle irons and velcro. Works very well. Plus, by putting it on the side i was able to put it into a hall closet where I can access the taps by sliding one of the doors. Very happy with my outcome.
 
Guess i didnt really plan that out. Oops!:drunk: I was going for evenly spaced.. Yeah its going to have to be over 18 inches

Yeaaa I just did the exact same thing. Didn't think about bringing them close together. I drilled the first one directly in the middle, then split the distance between the corners...

Oh well, I don't plan on sticking with my 5.0 to much longer ;-) I actually built my bar to house at least a 7.1!:mug:
 

Latest posts

Back
Top