My Brutus Build

Homebrew Talk - Beer, Wine, Mead, & Cider Brewing Discussion Forum

Help Support Homebrew Talk - Beer, Wine, Mead, & Cider Brewing Discussion Forum:

This site may earn a commission from merchant affiliate links, including eBay, Amazon, and others.

Desert_Sky

Since 1998
Joined
Mar 8, 2006
Messages
4,250
Reaction score
207
Location
Boulder
Wow....its been a long road with this build, but I can finally see the light at the end of the tunnel.

Its nothing fancy. We mostly followed Lonnie's plans and added a few changes as we went along. The frame and the kegs we all TIG welded so it took a bit longer, but the final product looks amazing. Standard 2 x 2 x.120 square tube steel. No stainless steel since it would of been about 1k more for materials alone.

Here it is at being put together. And jigs have been made just in case we want to make anymore ;)

stand_welds_005.jpg


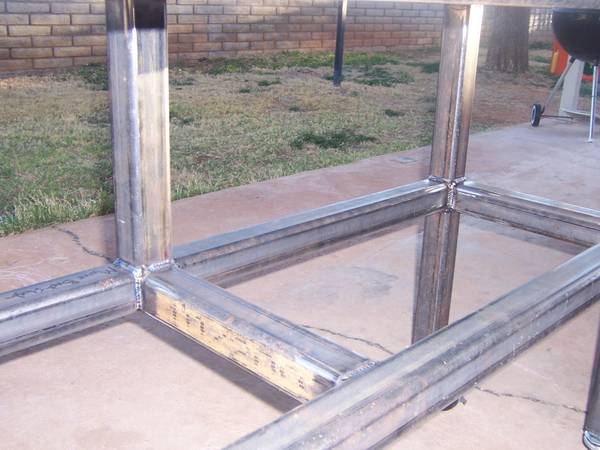
Heres a shot of those beautiful TIG welds. I need a better camera really bad

brutus_005.jpg


Heres a little change we came up with. THe control box arm is on a hinge that can be folded up for storage.

brutus_setup_001.jpg
 
And here it is extended

brutus_setup_004.jpg


Here another change. We added some retaining rings to keep those kegs in place during the process

brutus_setup_003.jpg


Back side gas through tube

brutus_setup_009.jpg


And for the money shot....

brutus_setup_002.jpg


Now for the fun part. I need to find the electrical box Im going to use, then wire this baby up. I have all the components so as soon as I decide on the box assy should go quick
 
Pretty darn sweet! Great Job. Now wheel it down to Austin next month and I'll store it in my brew hut for you. :D
 
mr_stimey said:
That is pretty sweet. Got a cost breakdown without the kegs? (iron, pumps, components, etc)


hmm....its definitely getting up there. Let me get back to you on that.
 
Got the Red Hat valves installed along with the burners after work today. I would like some sort of needle valve for better control of the kettle though. Wasn't that bad getting everything lined up correctly. I do suggest liquid thread sealer instead of the yellow tape. It's so much easier than fooling around with the hassle of the tape.


brutus_setup_013.jpg


Here is the burner for the MLT. 23 burners would be way to much for the tun, so I took it down to what you see here. Thanks for the idea Bobby

brew_0051.jpg
 
You might want to monitor the temperature of the solenoid coils during a boil, the radiant heat from the burner might give you an unpleasant suprise. normal temperature rise is 100F over ambient air temperature when operated for extended periods.
 
kladue said:
You might want to monitor the temperature of the solenoid coils during a boil, the radiant heat from the burner might give you an unpleasant suprise. normal temperature rise is 100F over ambient air temperature when operated for extended periods.


they aren't as close as they appear in that photo. Knock on wood, but they should be ok.
 
Looks Great, Chimone! I wish I was as far along as you are! Just getting started here w/ my Brutus build....

From a thread I started the other day....with no replies...:(

Just a quick question about your welded couplings into a keggle / MLT / HLT:

When installing, it looks like you welded the fitting to the outside of keg? Or do you drill a hole big enough to insert the coupling partially into the keg and welding both sides? O

Maybe this is a non-issue, and I outta just RDWHAHB....:)
 
Chimone said:
Got the Red Hat valves installed along with the burners after work today. I would like some sort of needle valve for better control of the kettle though. Wasn't that bad getting everything lined up correctly. I do suggest liquid thread sealer instead of the yellow tape. It's so much easier than fooling around with the hassle of the tape.


brutus_setup_013.jpg


Here is the burner for the MLT. 23 burners would be way to much for the tun, so I took it down to what you see here. Thanks for the idea Bobby

brew_0051.jpg

Before I go taking credit for any great ideas, I want to mention that I just realized you're trying this "trick" with a pilot. I'm finding that since all the jets are now not firing into each other that it's unlikely that all the jets will catch off the pilot. I don't know if they'll eventually light, but I'd want to try it a few times first. I have to physically go around with my BBQ lighter to like 4 different areas to get them all lit. YMMV. In general I'm becoming more and more frustrated with these wok burners.
 
Bobby_M said:
Before I go taking credit for any great ideas, I want to mention that I just realized you're trying this "trick" with a pilot. I'm finding that since all the jets are now not firing into each other that it's unlikely that all the jets will catch off the pilot. I don't know if they'll eventually light, but I'd want to try it a few times first. I have to physically go around with my BBQ lighter to like 4 different areas to get them all lit. YMMV. In general I'm becoming more and more frustrated with these wok burners.

I had the same concerns. I may just bite the bullet and buy the 40 dollar small burner from B3 for my mashtun. Or hell....I may just go the route you did and do a manual control on all my burners if this automation thing becomes more of a PITA than it's worth.

I should be brewing by now.......
 
That is some mighty fine work you've done.
I like the collars and swing arm for the controls.
Well done! :mug:
 
I just don't understand why so many people want to make this stuff all automatic. This is a hobby, what fun is it to sit there and let something do all the work for you?
I want to be able to say that I made this beer. Not. "I dumped all the grain in and hit go, then 3 hours later I had beer". What fun is that?


Nice work on the build though:rockin:
 
I think that there is a lot more work involved with an automated stystem, than dump and cooler method. The cooler holds temps, thats automated to a degree, but autmated systems need, controllrs set , light the pilots, prime and run the pump...etc more work involved than dump and drain i think.
 
FSR402 said:
I just don't understand why so many people want to make this stuff all automatic. This is a hobby, what fun is it to sit there and let something do all the work for you?


Its not that its automatic in any way. This will allow me to keep a desired temp in my HLT. This will allow me to step mash without having to sit there with my thermometer in the mashtun. The work is still there believe me. This will be just like having an assistant brewer monitoring temps for me.

sorry you dont approve.:rolleyes:
 
FSR402 said:
I just don't understand why so many people want to make this stuff all automatic. This is a hobby, what fun is it to sit there and let something do all the work for you?
I want to be able to say that I made this beer. Not. "I dumped all the grain in and hit go, then 3 hours later I had beer". What fun is that?


Nice work on the build though:rockin:

I've wondered the same thing a time or two and have realized what it's all about for me.

These are obviously my beliefs and no intention to hijack the thread and I'd like to think that I share a similar belief with the OP.

I like to tinker. I like to make things on my own. I like to grow stuff like Hops. I know I can consistently make a good brew now. I still enjoy both brewing and drinking but building stuff for my brewing is in essence an extension of brewing. I know that on my very next brew, I'll be thinking about something I could do to make it better. Then I'll go do it.

In the end man. I'd love to be able to say I brewed my beer on that machine that I built. As in a different post, it becomes even more of a craft. You not only know something about grains and yeast but perhaps TIG welders and plasma cutters and electrical stuff and...well...you get what I'm saying. :ban:
 
What's driving me to a complex rig is the ability to have detailed control and repetition in my brewing.

I have a personality "quirk" that makes me want to do the absolute best I can do whenever I do something I enjoy. For me that means being able to tweak and adjust recipes and have reliable results. It also means working on understanding mash science and yeast science better, which also calls for consistent control of the mash and fermentation.

:)

I'll still be the one picking out and designing and tweaking recipes, still running the pumps (except the ones triggered by float sensors or temperature probes :cross: ).
 
Chimone said:
Its not that its automatic in any way. This will allow me to keep a desired temp in my HLT. This will allow me to step mash without having to sit there with my thermometer in the mashtun. The work is still there believe me. This will be just like having an assistant brewer monitoring temps for me.

sorry you dont approve.:rolleyes:
It's not that I don't approve at all. I guess that when I think of automating a system I'm thinking of AUTOMATING the system. As in I would have a PC hooked up and with switches and servos it would crush the grains, add the right amount of water at the right temps, mix, drain, sparge, boil, add hops, chill and transfer to fermenter. I would just input the parameters, hit go and then sit back and drink beer.
:rockin:

I do love your build so don't get me wrong. Maybe some day I'll sell the Vette and then just turn my barn into a brewery. Then I will build something like you're doing.
 
As in I would have a PC hooked up and with switches and servos it would crush the grains, add the right amount of water at the right temps, mix, drain, sparge, boil, add hops, chill and transfer to fermenter. I would just input the parameters, hit go and then sit back and drink beer.

/me strokes chin starts sketching
 
brewhead said:
/me strokes chin starts sketching
Yeah you could set it up to work with something like Beersmith so it reads the recipe and mash setiings and by it taking it's own temp readings would know what to add, how much and when...

Sorry to hijack...
 
How is the burner ignition testing coming, have you tried moving the inside jets to the outside ring and face them towards the center to help transfer the flame around the ring. It might light off okay as is with the keggle on burner stand as flame would spread across bottom of keggle when solenoid valve is opened.
As for automation ideas mentioned in other posts, already there with phase 2.
 
well I spent all day today getting the kegs ready. Got a fitting welded on to my false bottom and everything leak tested. I think instead of a box of some sort Im going to use a 1/16 thick piece of sheet metal and just make my control panel out of that.

With that said.....I cant do any testing on the burners and pilots until I get power to the solenoids to open the flow.

Been giving some more thought to what kladue said about watching the temp. Who knows, by the time this is all said and done I may just go with some needle valves for a more precise manual control over all three burners.

I haven't gone this long without my beer in the fridge and am starting to get anxious. Boddington's is filling the void tonight though.
 
still slowly but surely knocking one little project out at a time. here is the thermocouple setup i will be using

QD_001.jpg
 
still slowly but surely knocking one little project out at a time. here is the thermocouple setup i will be using

QD_001.jpg

How did you put your thermocouple assy together to prevent leaks? If you have a pic of how it's assembled that would be great as I'm sketchy on what keeps everything leak tight... nice job by the way..
 
Thread tape looks like by the photo. And I think he meant thermoWELL rather than thermocouple. The thermocouple would be on a pilot light to throw a valve open

The thermowell is the end opposite of the quick connect on the "T" fitting. He can then place a probe or thermometer in there to measure temps.

I have the exact 'portable' tee fitting popularized by Lonnie Mac's Brutus Ten build. I have a 4 " thermowell in the end opposite the quick connect very similar to the above photo. I too used thread tape to make it water tight. Thread dope works well too.

In hindsight, I wouldn't have purchase an expensive stainless still threaded thermowell, but rather soldered one out of copper tubing for about $4. But oh well, what I have works.
 
^^^^^

ya what he said

thermowell allows the temp probe to sit right there inside the T junction.

*edit

B3 had the SS qds on deal of the day the other day for 4 bucks a set!!!! And I had to cut down the SS thermowells and have them re welded
 
Back
Top