You are using an out of date browser. It may not display this or other websites correctly.
You should upgrade or use an alternative browser.
You should upgrade or use an alternative browser.
Another fermentation chamber build
- Thread starter stratslinger
- Start date

Help Support Homebrew Talk - Beer, Wine, Mead, & Cider Brewing Discussion Forum:
This site may earn a commission from merchant affiliate
links, including eBay, Amazon, and others.
OP
OP
stratslinger
Well-Known Member
But would that mean that the fridge will run continuously? I think that'd be pretty tough on the compressor over time.
Like I said, I'll be monitoring it today, I'll install ventilation if I think I need it, and, absolute worst case, this time of year I'll know the box can only handle ale temps... A little time will tell.
I just made my first hourly check-in on the box, and it's definitely nice and cool inside and the sides are warming up again. This time around, I put a 5gal better bottle in there full of water (with a fermometer) and a mason jar also full of water with an alcohol thermometer in it. I figure, if the thing works well enough and doesn't run continuously, one of those two will tell me the right temperature, and I might get a good gauge of just how far off the fermometer strip actually is...
OP
OP
stratslinger
Well-Known Member
That is indeed the plan!
Also: I see what you did there. Nice.
Also: I see what you did there. Nice.
stratslinger said:That is indeed the plan!
Also: I see what you did there. Nice.
Thank you. Going to line the inside with solid plastic sheets. Wonder is a glass store can cut the sheets to size for me. Hmmm.
Btw. Like your door framing. Probably going to steal the idea from you. ;-p
OP
OP
stratslinger
Well-Known Member
No, I haven't... The better bottle in there right now is sitting on a small piece of white toweling - I'll have to see shortly if an extended amount of time sitting like that is a problem or not.
As for results so far, they look good. I've been checking hourly - the better bottle is still at about 74, but it's been dropping about 2 degrees an hour. The mason jar of water is at 63, dropping 3 or 4 degrees an hour. Judging by that, I think I'll have no real problem getting ale temps at least. Also, I've been trying to measure the temperature of the sides of the box - poking a digital temperature probe just a little into the plywood - and it's hovering around 86-87 degrees, which doesn't seem too bad.
The only thing that makes me at all nervous is that it's been running 4 and a half hours now, non-stop. Not sure how good that is for the compressor, but I figure I'll bail out of the test later today if it's still running non-stop in a few more hours.
OP
OP
stratslinger
Well-Known Member
7?
I don't have a temp controller yet - that's the next phase of this project. For this test, I've got the fridge cranked up full - to 7 out of 7. All I'm doing now is kind of a dry run to find out the capacity of the chamber, and to determine if I need to do any further modifications. The more I think about it, the more convinced I am that I should install a couple vents on the sides, just to be completely sure the fridge can run to its full capacity.
I don't have a temp controller yet - that's the next phase of this project. For this test, I've got the fridge cranked up full - to 7 out of 7. All I'm doing now is kind of a dry run to find out the capacity of the chamber, and to determine if I need to do any further modifications. The more I think about it, the more convinced I am that I should install a couple vents on the sides, just to be completely sure the fridge can run to its full capacity.
If you turn it all the way down 1 of 7 after these tests are down. Then you can see how often the fridge would turn on during a normal day. Will the fridge tun every 5 min, 15 mins, hour, etc. Maybe that tell us if the cool air is leaking out. I want mine air tight. ")
OP
OP
stratslinger
Well-Known Member
OK, so current status:
After about a 10 hour test, with the fridge cranked up all the way, the mason jar of water reached 56F, the 5gal better bottle, at least according to the fermometer, hit 66F (makes sense to me - the larger volume should take more effort to get cooler - I'm assuming it'll get there eventually if left alone).
On that last check in, I turned the fridge down to its lowest setting (so it'd in theory be warmer - funny thing, thinking in negatives like that)... The fridge immediately stopped cyclying, which I figure can't be an altogether bad thing.
I just checked it again - after sitting at its warmest setting (yeah, we'll go with warmest, less confusing), the fridge still hasn't cycled back on. The mason jar has risen maybe half a degree, the better bottle is pretty much steady from where it was last time. I'll give it overnight on this setting, see where I stand in the morning.
With regards to my remaining tasks... I ordered my STC-1000 today, but sadly, apparently I won't have it for 2-3 weeks! Ouch! My procrastination on that particular task isn't gonna help wrap this thing up any sooner.
I still have to check my inventory of paint and primer, and I'm still thinking of going with vents on the sides, just to be safe. I figure those two tasks will take up at least a little of the time I spend waiting for the controller to show up...
OP
OP
stratslinger
Well-Known Member
See, I was kind of hoping that I'd be able to reach lagering temperatures... I might be able to, but at this rate, it'll take another 10 hours of the thing running solid for the carboy to reach the mid fifties, longer if I want to get to the lower 50's. Not sure how good that is for the fridge - but also, granted, that carboy started out around 80 from what I can tell... If it was a lager that I'd chilled adequately to begin with, maybe it wouldn't have taken that long to reach the desired temp.
OP
OP
stratslinger
Well-Known Member
Yeah, I'm definitely planning on getting a fan in there - have to talk to a couple friends, see if I can't come up with a free old PC fan. If I'd only known - end of last year we replaced the old desktop, and I got rid of it and a couple other desktops lying around the house (I'm an IT guy, we somehow manage to hoard computers over the years - I'm convinced they actually breed, becuase I couldn't think for the life of me of where at least one of them came from...). If I'd only raided a couple for fans, I'd be all set for this and for a stir plate build...
Anyway, I couldn't fight the urge - before I went to bed last night I turned the fridge back up a little bit - to 2.5 out of a max 7. This morning, I checked on it. The fridge had cycled off and the sides were only a little over room temperature (good sign that it'd been cycled off for a while, or at least wasn't cycling on for long periods). Checked the temps inside - the mason jar was at 56F, the carboy fermometer read 58F. Not sure if the fermometer is reading 3 degrees high (in which case, my two most recent brews were maybe not quite as close to any danger zones as I had thought) or if that water was just still cooling.
So, I then cranked the fridge down again to 1 (warmest setting). Gonna let it sit a day or two like that now, see where I wind up. It's possible, though I'm thinking unlikely, I can hit reasonable ale temps even without temperature control. Just not sure I want to rely on that!
On the temp control side, I just received notice that my STC has shipped, so however long it takes to get here from wherever the heck outside the US it's shipping from, the countdown has started. Maybe I'll have it by next weekend, and be able to take a little time wiring it up then. Which gives me about a week to wrap up any testing, cut holes and install vents, then prime and paint. Well, prime and paint the bottom, the edges of the doors, and the sides of the fridge - I suppose most of the rest of the painting can be done anytime, but it's just smarter to do it all in one go...
So what will you get with the coldest setting. My FC when I first got it cooled
the space to about 27 degrees (it has a fan in there.) That was full blast for quite
a while. But I'm going to need a dual zone chamber, so some work to be done.
What is the total # of inches in the walls of the chamber ? 2" insulation + 1.5" air gap ?
the space to about 27 degrees (it has a fan in there.) That was full blast for quite
a while. But I'm going to need a dual zone chamber, so some work to be done.
What is the total # of inches in the walls of the chamber ? 2" insulation + 1.5" air gap ?
OP
OP
stratslinger
Well-Known Member
OK, first to answer questions, then post a little progress...
Adam - In retrospect, I think I would have built this a little bit differently, just to get more insulation in there. Your question makes me think that you built yours such that the frame was outside the width of your fridge. I kind of wish I would have thought to do that. If you look at the earlier pictures in this thread, you'll see that the outside of my frame is just about even with the outside of the fridge. As a result, instead of 1.5" of deadspace in the frame and then insulation inside of that, I have 1" of blue styrofoam insulation tucked into the space inside the frame members, and .5" of dead space. There's also an extra layer of this along the bottom - it was done mostly to bring the inside of the chamber level with the inside of the fridge, but it has the added benefit of an extra R5 on the surface my fermenters will be sitting on. This stuff has an R value of about 5 (of course, reduced a little by the sections of 2x4 interlaced in there). Then, inside that, I have 1" of foil-backed rigid fiberglass - roughly R7.
If I had it to do again, I'd do one or both of two things:
1) Frame with 2x3's to ensure more room for insulation and less wood.
2) Frame it out such that the frame stayed outside the width of the fridge so that I could get in more insulation.
Can't yet answer about the coldest setting... I left it set to 6 of 7 overnight, the mason jar hit 44 and the better bottle is lagging a bit behind at about 46. I just made one of my last tweaks to the fermenter and cranked it up to 7. Gonna let that run about 24 hours, see what happens, then tomorrow I shut it down, empty it out, and prepare to start priming and painting.
So, the picture, which I think speaks for the change I made pretty effectively:
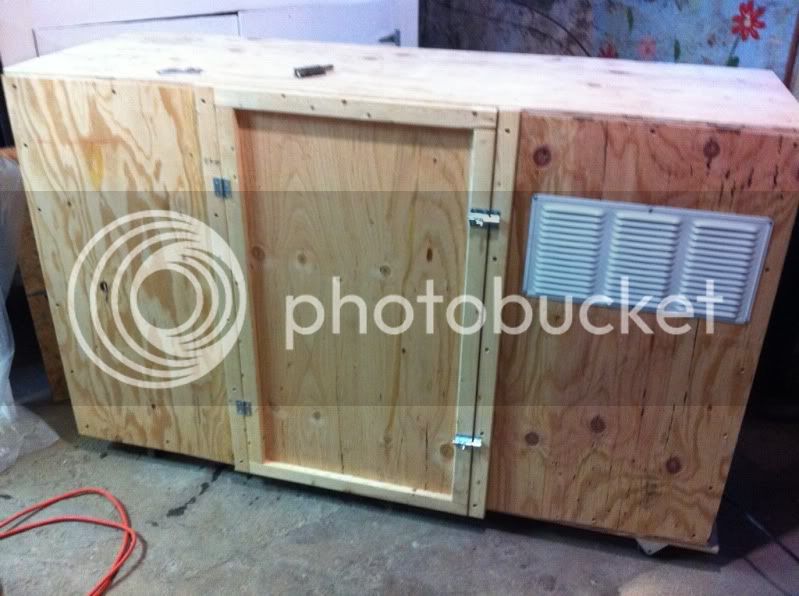
I cut holes in both sides of the box and installed vents to let some of the heat escape more rapidly from the sides of the fridge. Pretty simple tweak, and I hope it's effective. The vents were big-assed soffit type vents - 16"x8" would be a BIG soffit! But hopefully they work for my purposes.
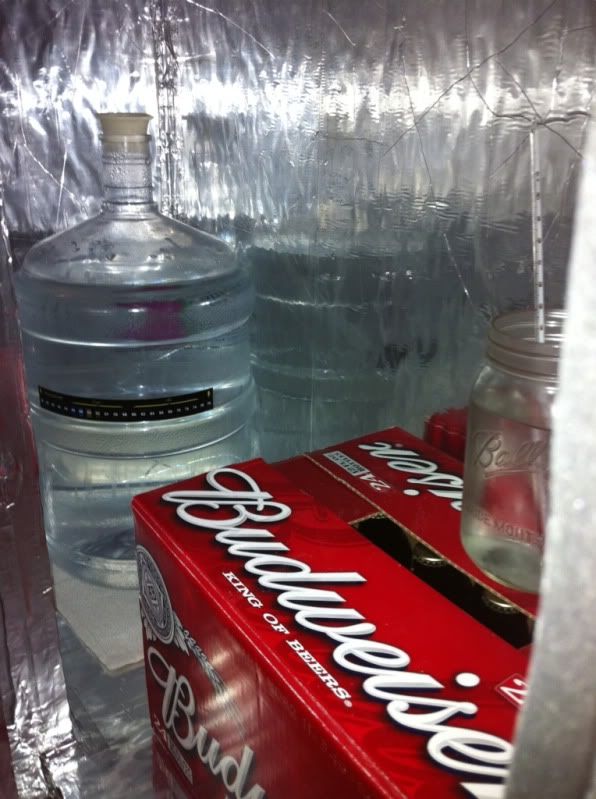
Lastly, a shot inside the box, just to give an idea of scale. And don't be alarmed by the Bud case in there! A buddy gave me a bunch of bottles in said case, and right now that case is full of an American amber ale that I'm waiting for another buddy to show up and pick up.
Adam - In retrospect, I think I would have built this a little bit differently, just to get more insulation in there. Your question makes me think that you built yours such that the frame was outside the width of your fridge. I kind of wish I would have thought to do that. If you look at the earlier pictures in this thread, you'll see that the outside of my frame is just about even with the outside of the fridge. As a result, instead of 1.5" of deadspace in the frame and then insulation inside of that, I have 1" of blue styrofoam insulation tucked into the space inside the frame members, and .5" of dead space. There's also an extra layer of this along the bottom - it was done mostly to bring the inside of the chamber level with the inside of the fridge, but it has the added benefit of an extra R5 on the surface my fermenters will be sitting on. This stuff has an R value of about 5 (of course, reduced a little by the sections of 2x4 interlaced in there). Then, inside that, I have 1" of foil-backed rigid fiberglass - roughly R7.
If I had it to do again, I'd do one or both of two things:
1) Frame with 2x3's to ensure more room for insulation and less wood.
2) Frame it out such that the frame stayed outside the width of the fridge so that I could get in more insulation.
Can't yet answer about the coldest setting... I left it set to 6 of 7 overnight, the mason jar hit 44 and the better bottle is lagging a bit behind at about 46. I just made one of my last tweaks to the fermenter and cranked it up to 7. Gonna let that run about 24 hours, see what happens, then tomorrow I shut it down, empty it out, and prepare to start priming and painting.
So, the picture, which I think speaks for the change I made pretty effectively:
I cut holes in both sides of the box and installed vents to let some of the heat escape more rapidly from the sides of the fridge. Pretty simple tweak, and I hope it's effective. The vents were big-assed soffit type vents - 16"x8" would be a BIG soffit! But hopefully they work for my purposes.
Lastly, a shot inside the box, just to give an idea of scale. And don't be alarmed by the Bud case in there!
A buddy gave me a bunch of bottles in said case, and right now that case is full of an American amber ale that I'm waiting for another buddy to show up and pick up.
Very nice. The 2" insulation covers the top, left and right side of my fridge all the way to the back of the fridge. So I boxed the insulation first then made the frame around that. I guess that was a good thing. 46° ? That's cool.
DakotaRules
Well-Known Member
Looks great! I wouldn't worry about the bud, cheap beer is cheap beer!
OP
OP
stratslinger
Well-Known Member
Well, I think I may shut the chamber down when I get home tonight, and consider my tests a success.
I just checked out Northern Brewer's website, looking at their lager yeast strains. While I know their inventory is in no way exhaustive of all lager yeasts, I'm guessing the temp ranges they list are fairly indicative of most yeast strains. If you look here you'll see that the yeast they sell with the lowest temperature rating is Danstar 2042 - with a temp range of 46-56.
Considering that, set to 4.5 out of 7, I got a carboy down to 46 and a mason jar to 44 (suggesting that, with a little more time, the carboy will also get to 44), I think it's a safe bet that with this thing turned up to full and a temperature controller hooked up, I can ferment both lagers and ales in this box. I'm quite pleased!
Next, to paint this bad boy. Figure I'll leave it powered off overnight (let the compressor cool down and everything), empty it out in the morning, then flip it over so I can start priming and painting the bottom. Guess I should have checked my paint/primer inventory a little sooner. Ah well!
ACESFULL
Well-Known Member
Nicely done sir... Love the sharing of ideas and what works best and what you would do different next time. Helps the rest of us when we decide to make one of these our self's.
Well done!
Well done!
OP
OP
stratslinger
Well-Known Member
Gonna try to pull off a picture from the iPhone app. Cross your fingers!!
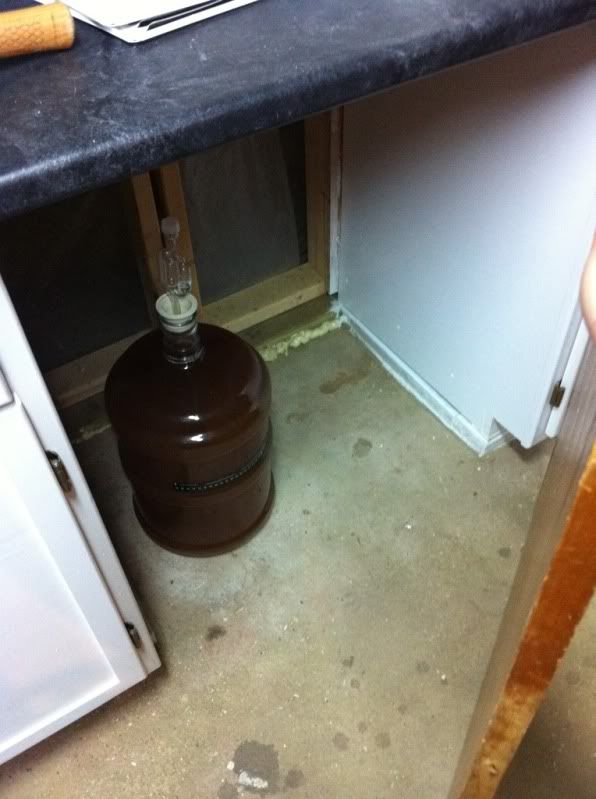
So, I mentioned way back I'd try to post a pic of my current fermenting space, and this is it. So yes, this chamber will be a step up in the world. Basically, I've been leaving my fermenters in my basement between two workshop cabinets with a wood panel covering that space to keep out the light. If it's a little too cool, I keep the fermenters just off the floor and that seems to be "enough". If it's more than a little to cool, I've got a brew belt and a timer I can play around with and get fairly close to target temps. If it's too warm, well, then I build a fermentation chamber!
Seriously though, the batch in this pic was around 67 or so during it's first week, and has slowly gotten warmer since (currently about 72).
This weekend I've primed the chamber and gotten a first coat of paint on most of it. I think I can have the paint wrapped up by the time I have my temp controller... Only snag I've hit so far is this; in my rush to test this thing out, I put weather stripping around the door before painting. This is what I now like to call a "bad idea," as I'm going to need to remove the now-painted weather stripping and replace it. Could've been worse I guess...
OP
OP
stratslinger
Well-Known Member
Well, a little bit of an update...
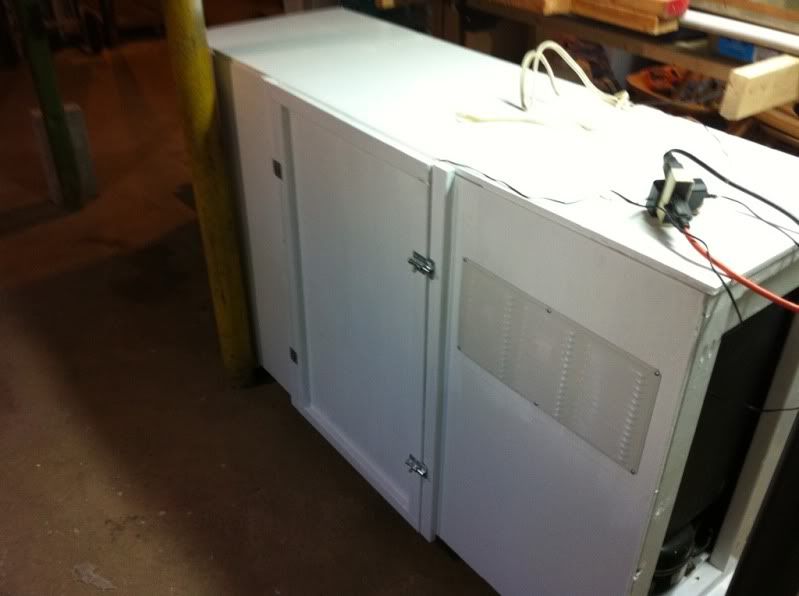
First off, the chamber is painted and up and running, though still no temp controller. One thing has been updated though, above and beyond the paint job - I've got a PC case fan installed and running, sitting right on the freezer coils. As a result, I've got the fridge currently set to 2.5 out of 7 - and the beer pictured above is crash cooling in there and down to 38F after about 48 hours. Not too shabby.
So, I mentioned earlier I'd be building a temperature controller - specifically, the one from this thread.
I'm waiting for the controller itself to show up, but I've gotten all the other bits and pieces together and started putting it together, so hopefully most of the work will be done when the box turns up:
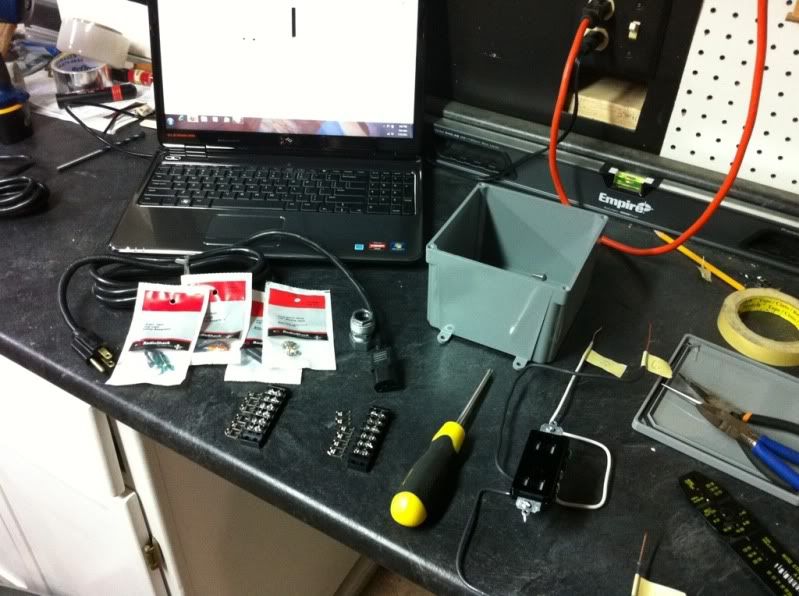
I'm using a few ideas liberally borrowed from the thread I linked to, many in the last 5-10 pages of that thread. I'm using a 6x6x4 outdoor plastic junction box from Home Depot (I'm told this is overkill and that 4x4x4 is doable - but I wanted as much room as I could get so I could see what I'm doing). In addition to the basics from the very first post in that thread, I'm stealing a couple ideas from KrazyDave... One, that should be pretty dang easy, probably pretty dang unnecessary, but I think pretty cool, is a pair of LED lamps to indicate when the heat or cool side of the controller is running. The other idea, and the one that intimidates me a bit, is that rather than directly and permanently connecting the temperature probe to the controller, I'm going to permanently attach a 1/8" mono headphone jack to the controller, and a 1/8" mono headphone plug to the probe. I'm doing this for a few reasons:
1) I'm clumsy, and it's only a matter of time before I snag something on that wire - no matter how carefully concealed - and cause damage. The 1/8" plug should make for a semi-effective break away connection to protect from just that eventuality.
2) It'll force me to do a little minor soldering of electrical components - something I've never done before and want to learn how to do. Hopefully this doesn't go horribly wrong. Even if it does, I have 2 plugs and 2 jacks, so I have 2 tries at either option before I have to re-purchase anything.
3) It just looks cool.
Anyway, here's my current progress - not a whole hell of a lot is done so far:
First off, the chamber is painted and up and running, though still no temp controller. One thing has been updated though, above and beyond the paint job - I've got a PC case fan installed and running, sitting right on the freezer coils. As a result, I've got the fridge currently set to 2.5 out of 7 - and the beer pictured above is crash cooling in there and down to 38F after about 48 hours. Not too shabby.
So, I mentioned earlier I'd be building a temperature controller - specifically, the one from this thread.
I'm waiting for the controller itself to show up, but I've gotten all the other bits and pieces together and started putting it together, so hopefully most of the work will be done when the box turns up:
I'm using a few ideas liberally borrowed from the thread I linked to, many in the last 5-10 pages of that thread. I'm using a 6x6x4 outdoor plastic junction box from Home Depot (I'm told this is overkill and that 4x4x4 is doable - but I wanted as much room as I could get so I could see what I'm doing). In addition to the basics from the very first post in that thread, I'm stealing a couple ideas from KrazyDave... One, that should be pretty dang easy, probably pretty dang unnecessary, but I think pretty cool, is a pair of LED lamps to indicate when the heat or cool side of the controller is running. The other idea, and the one that intimidates me a bit, is that rather than directly and permanently connecting the temperature probe to the controller, I'm going to permanently attach a 1/8" mono headphone jack to the controller, and a 1/8" mono headphone plug to the probe. I'm doing this for a few reasons:
1) I'm clumsy, and it's only a matter of time before I snag something on that wire - no matter how carefully concealed - and cause damage. The 1/8" plug should make for a semi-effective break away connection to protect from just that eventuality.
2) It'll force me to do a little minor soldering of electrical components - something I've never done before and want to learn how to do. Hopefully this doesn't go horribly wrong. Even if it does, I have 2 plugs and 2 jacks, so I have 2 tries at either option before I have to re-purchase anything.
3) It just looks cool.
Anyway, here's my current progress - not a whole hell of a lot is done so far:
OP
OP
stratslinger
Well-Known Member
Thanks - I've kinda stuck with the all-white coloring, with the exception of the countertop, for everything down in my workshop area. It's a rather dark basement, so the white helps to brighten things up and reflect the light around when I'm working down there...
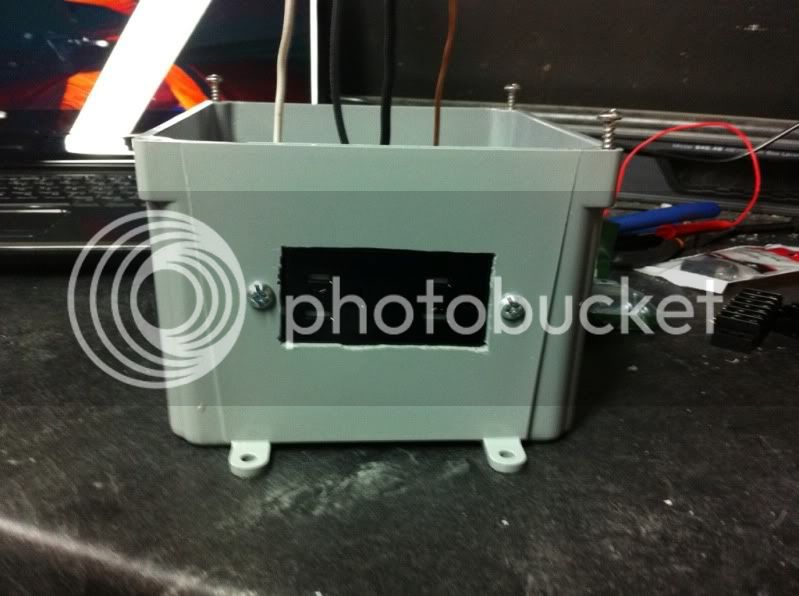
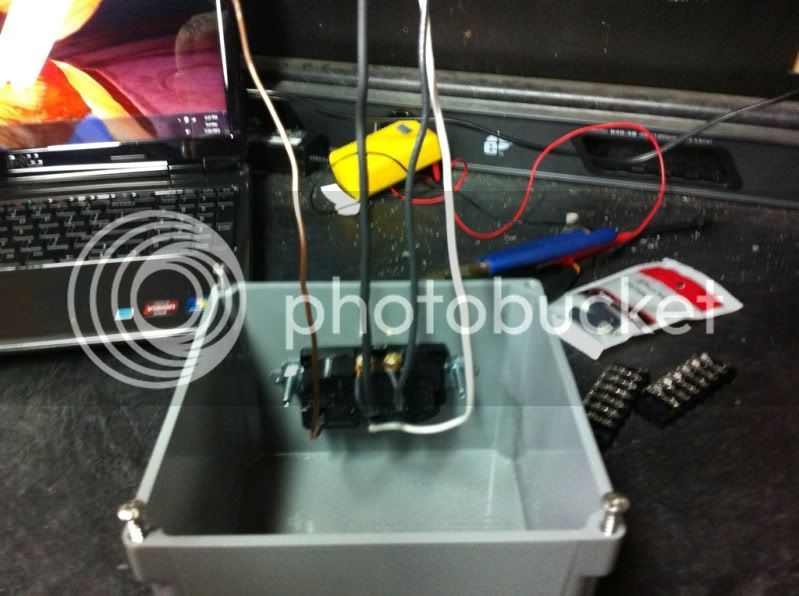
So, Ive worked on the wiring for a little while now, and I'm 90% ready for the box itself to arrive:
I've got all the wiring in place, got the lamps and the 1/4" jack installed in the top (but neither is wired up yet). I actually forgot, last time I ran into Radio Shack, to grab solder, so I'll have to run out tomorrow at lunch to grab some so I can hopefully knock out the solder job on the jack. I also have to get something in there to permanently affix the terminal strips to the sides of the box - but for now I want to be able to get them out of the way.
So, once the wire is soldered in for the jack, I simply have to wait for the controller to show up. At that point, I'll cut a hole for the controller, connect all my wiring, solder the probe to one of my 1/4" plugs, and be more or less ready to rock!
With luck the controller shows up tomorrow, maybe Tuesday. If it's any later, I'll have to wait for sometime next weekend to wrap things up, since I need to get a bunch of my stuff out of the way on Thursday so a contractor can remove my old oil tank...
OP
OP
stratslinger
Well-Known Member
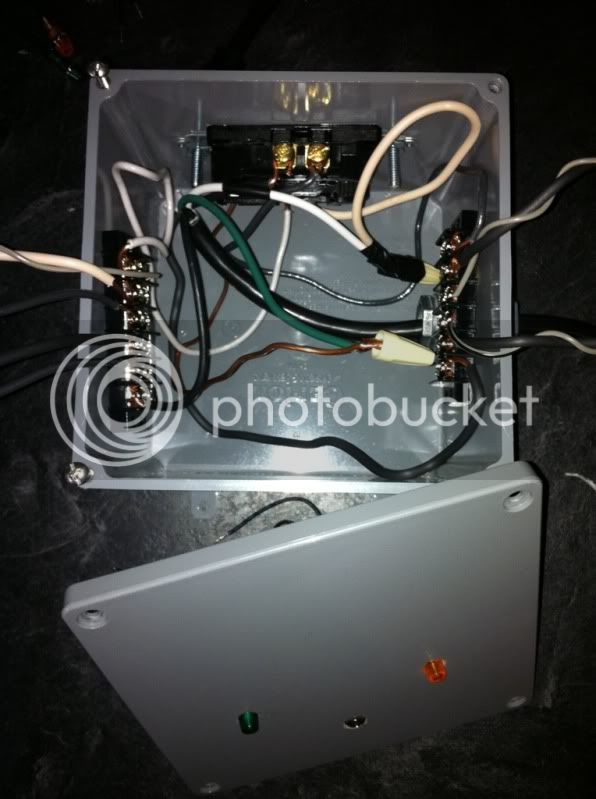
And the last bit is complete!
Got home today to find STC-1000 in my mailbox. So, I cut the hole, mounted the STC, then hooked everything up - including my first ever electrical solder connections.
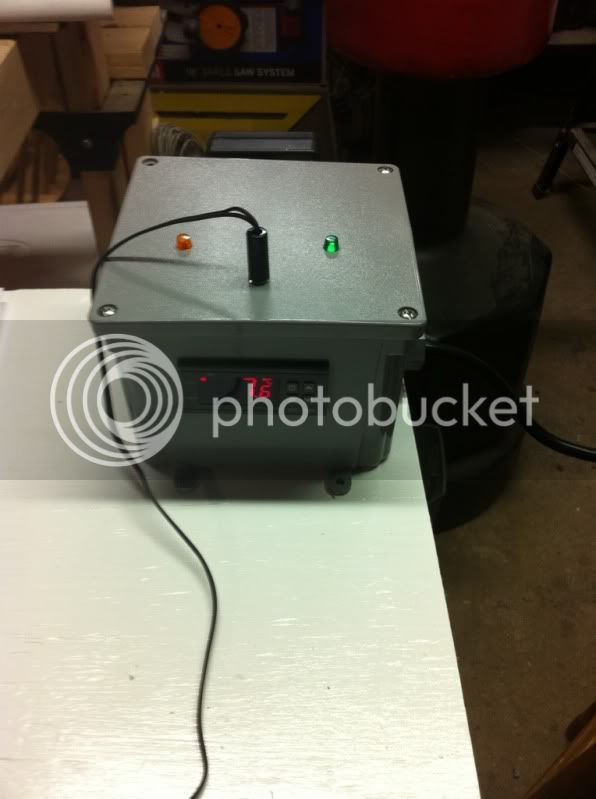
It's holding at a nice 6C right now. I've got my buddy's share of an overcarbed beer in there right now - I can't let that beer warm up or I'll risk (more) bottle bombs. Basically, I need that buddy to pick up his beer, then I'll get a good idea of how much (or how little) work will be necessary to maintain ale temps.
Got home today to find STC-1000 in my mailbox. So, I cut the hole, mounted the STC, then hooked everything up - including my first ever electrical solder connections.
It's holding at a nice 6C right now. I've got my buddy's share of an overcarbed beer in there right now - I can't let that beer warm up or I'll risk (more) bottle bombs. Basically, I need that buddy to pick up his beer, then I'll get a good idea of how much (or how little) work will be necessary to maintain ale temps.
Sweet! ! Mine is set to 67 right now and it actually reads 65-66 most of the time. Holding ale temps well for me. I used 2" foam and glued acrylic sheets to all sides. How many carboys can you fit?
OP
OP
stratslinger
Well-Known Member
I can easily fit two in there, and maybe squeeze in three. If only one or two, I can also get a cornie or two in as well for aging...
I still have to catch the thing when it gets down to the correct temp... I haven't yet watched long enough to find out 1) if I'm overshooting my target temp by much and 2) how long it takes, in total, to reach that temp again once it's warmed up...
I still have to catch the thing when it gets down to the correct temp... I haven't yet watched long enough to find out 1) if I'm overshooting my target temp by much and 2) how long it takes, in total, to reach that temp again once it's warmed up...
So my initial test. Took my bottle of 77 degree water 5 hours to get to 66 degrees. My probe is hanging from the chamber ceiling. The water maintained temp fine. Do I stick probe in water jar or leave it hanging?
OP
OP
stratslinger
Well-Known Member
I hear that the probe hanging in exposed is a "Bad Idea"(tm). I've got mine taped to the side of my carboy with a layer or three of bubble wrap to insulate it from the outside world. I've seen others who place them in a jar of water like you're suggesting, others in a jar (or WL yeast tube) full of some kind of gel.
Also - do you have a fan in there? I definitely saw a major difference in the speed of cooling once I introduced a computer case fan to my setup - I could try to get a picture up tonight, but basically it's a 12v computer case fan, wired to an AC-to-12v DC adapter I had lying around, sitting right on the cooling coil in my freezer section. Keeps the cool air circulating, and seems to work like a charm.
Also - do you have a fan in there? I definitely saw a major difference in the speed of cooling once I introduced a computer case fan to my setup - I could try to get a picture up tonight, but basically it's a 12v computer case fan, wired to an AC-to-12v DC adapter I had lying around, sitting right on the cooling coil in my freezer section. Keeps the cool air circulating, and seems to work like a charm.
OP
OP
stratslinger
Well-Known Member
Just keep the following in mind, with that setup:
1) You'll be monitoring your ambient ferment temperature, not the actual temperature of your fermenting beer. Since fermentation generates some heat, fermenting beer is typically warmer than ambient temps. With the probe stuck to the side of a carboy, you're closer to the temp of the beer. With a thermowell (someone linked to a $14 stainless one over in the ebay temp controller thread that I'm strongly considering adding to my setup), you're getting the actual temp of your fermenting beer.
2) With the probe exposed to air, it's WAY more susceptible to temperature swings when you open the door to your chamber. This may cause your fridge to cylce more often than is necessary. Stuck to the side of your fermenter, or in a jar of water, or a container of gel, the probe will be more insulated against those temp swings.
3) Depending on the size of your chamber, if you don't have air circulating, you have the potential for the temp to be at least a few degrees lower on the fridge side than it is on the end where you've got your probe. This could possibly compensate for 1) above, but it could also cause you problems if you can't accurately measure the temperature your fermenters are at.
1) You'll be monitoring your ambient ferment temperature, not the actual temperature of your fermenting beer. Since fermentation generates some heat, fermenting beer is typically warmer than ambient temps. With the probe stuck to the side of a carboy, you're closer to the temp of the beer. With a thermowell (someone linked to a $14 stainless one over in the ebay temp controller thread that I'm strongly considering adding to my setup), you're getting the actual temp of your fermenting beer.
I just stick a LQT on the side of the carboy and figure out the difference between the ambient temp my probe reports and the relatively reliable indicator of the beer temp from the LQT and adjust accordingly. During fermentation it requires a bit of checking as the beer temp can jump up relative to the ambient temperature, but it's pretty reliable.
kickrjason
Well-Known Member
I would like to know your dimensions. I have a kreg and plan on building a ferm chamber next weekend. I am using a mini fridge in the same Ish size as yours. I would like to know your measurements for framing.
Thank you in advance
Thank you in advance
OP
OP
stratslinger
Well-Known Member
I did almost everything based off the exact dimensions of my fridge;
- Outside width of the frame was the outside width of the fridge + 1/8" or so
- Inside height of the frame was the outside height of the fridge almost exactly (wanted a snug fit)
- Length was 60". If I had it to do again I'd probably go a little bit smaller - but chances are I'll grow into this thing before too long...
kickrjason
Well-Known Member
Update?
Interested to see the finished product
Interested to see the finished product
OP
OP
stratslinger
Well-Known Member
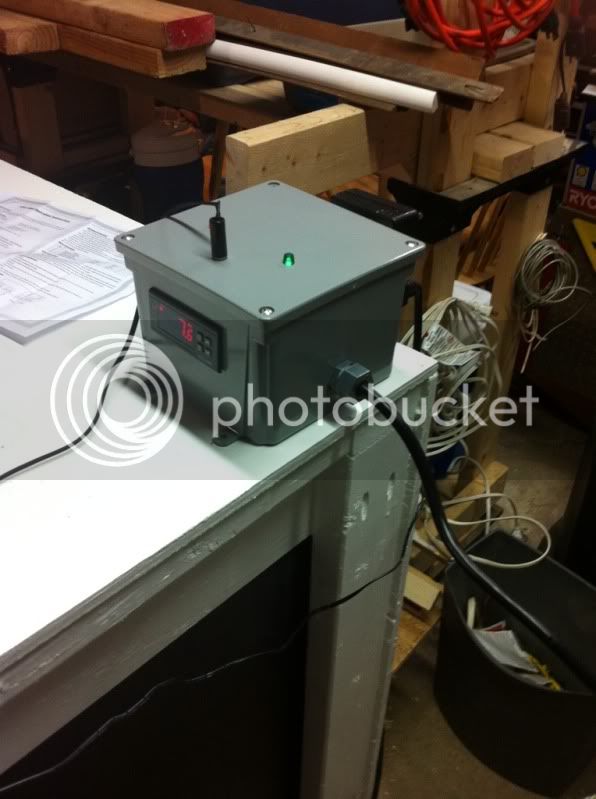
Um, go back a page???
Seriously, there's one or two shots of the chamber fully completed, then another two shots of the temperature controller completed, hooked up, and sitting atop the chamber (granted, only a small corner of the chamber is visible in those two).
As for an update, I've had a pumpkin ale (my own first AG!) in there for about 2.5 weeks now. Kept a nice steady and solid temperature, and the fermentation went great. I racked to secondary (mainly because I wanted to free up a fermenter, thought I was going to be brewing last weekend), and man is that going to be a good beer. Only problem? Since it's my first AG AND my first temperature controlled fermentation, I won't really know how much improvement (assuming there IS improvement) I can attribute to AG or temp control.
I think I sense at least another extract batch or two still in my future. For science, of course.
EDIT: Just the same, when this weekend's brew goes in, or the pumpkin comes out to be kegged, I'll try to snap a couple more shots...
Nice build. I converted my chest freezer ferrmentation chamber into a keezer so i have been trying to decide what to do for a fermentation chamber and this is pretty high on my list.
Thanks for the details.
Thanks for the details.
Similar threads
- Replies
- 0
- Views
- 201
- Replies
- 3
- Views
- 801
