The Gator-ator! Build Thread. (Lots of Pictures)

Homebrew Talk - Beer, Wine, Mead, & Cider Brewing Discussion Forum

Help Support Homebrew Talk - Beer, Wine, Mead, & Cider Brewing Discussion Forum:

This site may earn a commission from merchant affiliate links, including eBay, Amazon, and others.

Ciliorozo

Well-Known Member
Joined
Jul 14, 2009
Messages
162
Reaction score
8
Location
St Petersburg
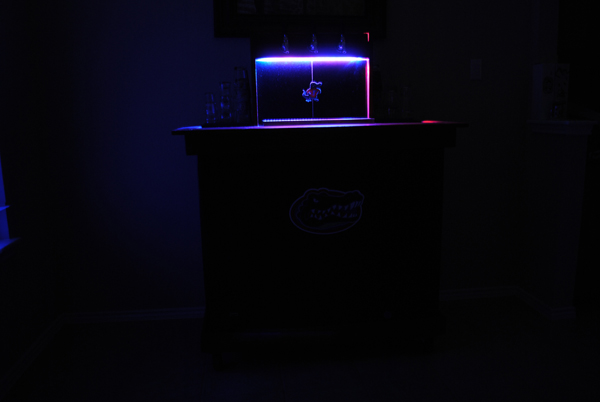
I have been meaning to pull a build thread together and after I had a few requests for one I decided to sit down and finally get it done. I will be posting a lot of photos. So without further ado here is my Jester Inspired Keezer. The Gator-ator!

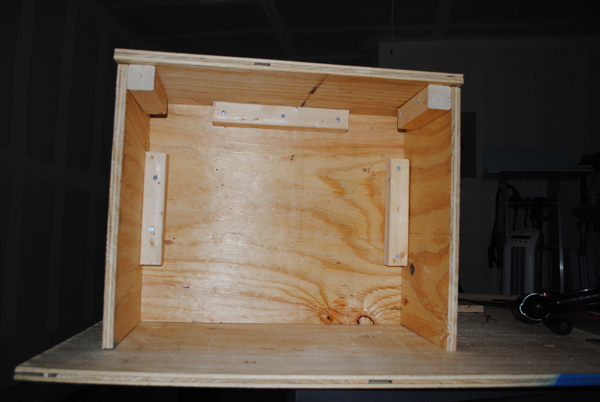
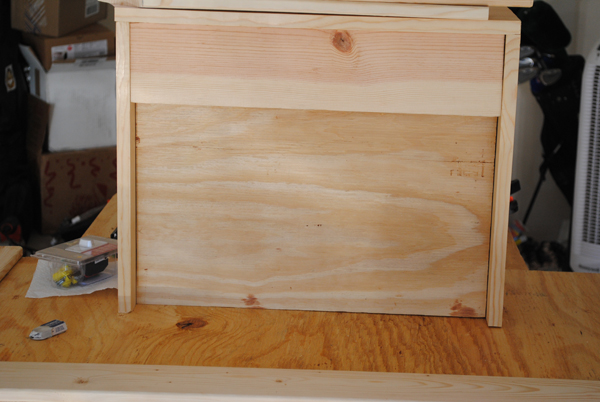
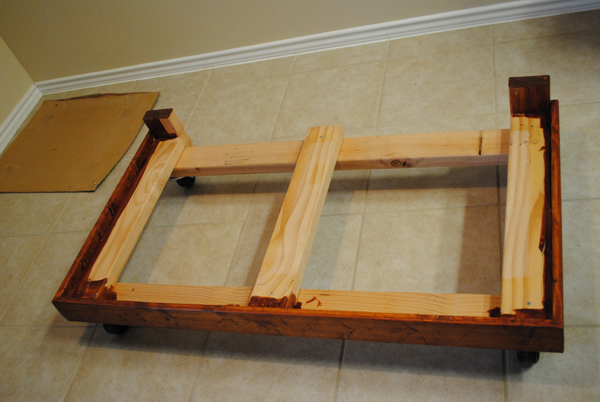
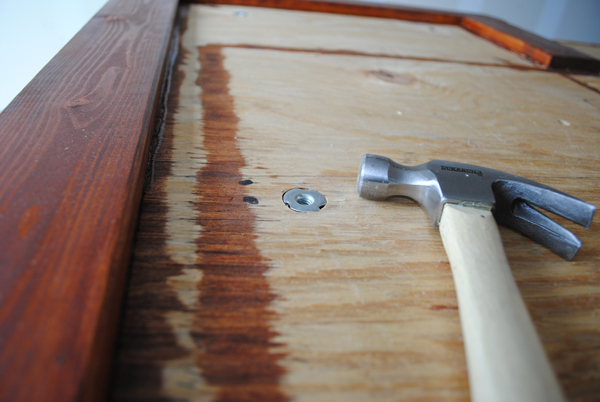
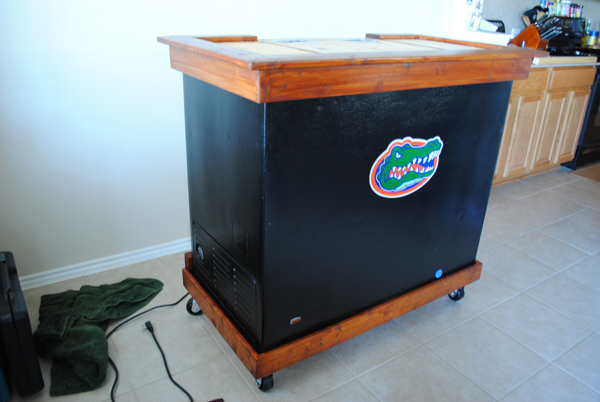
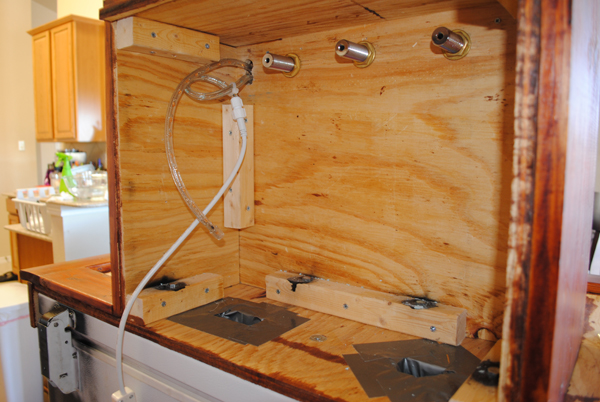
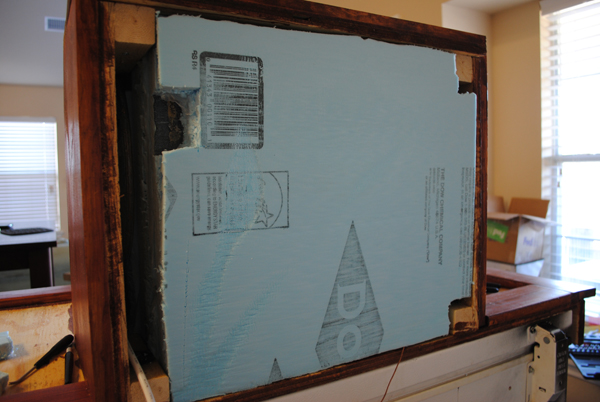
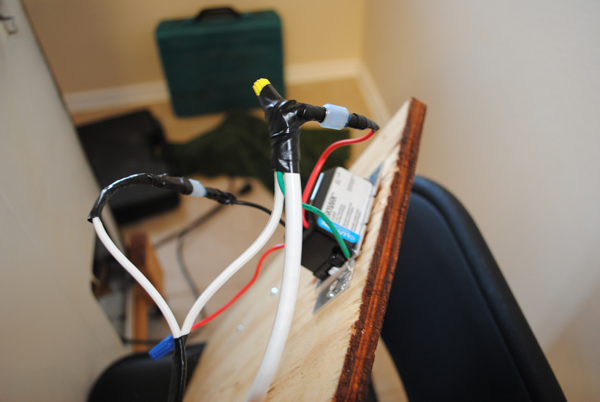
A brief synopsis on materials used: The table top and the tap box are structurally 19/32 Plywood. Then we put a layer of Hardwood (Whitewood) over the tap box and on the trim. Then we finished the top with Granite tile. The tap box is anchored to the table top using t-nuts and bolts, then the table top is anchored to the freezer lid using t-nuts and bolts as well as liquid nails.

All straight cuts were done with a circular saw and all angled cuts with a miter saw.

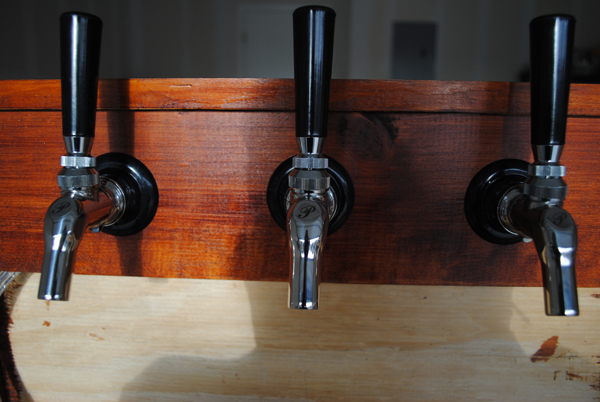
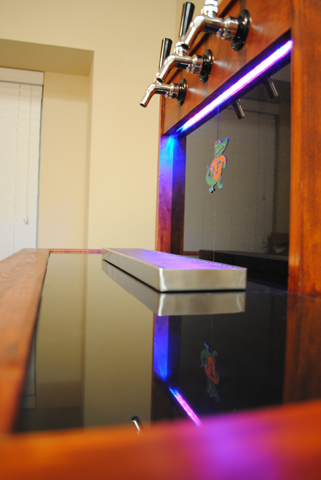
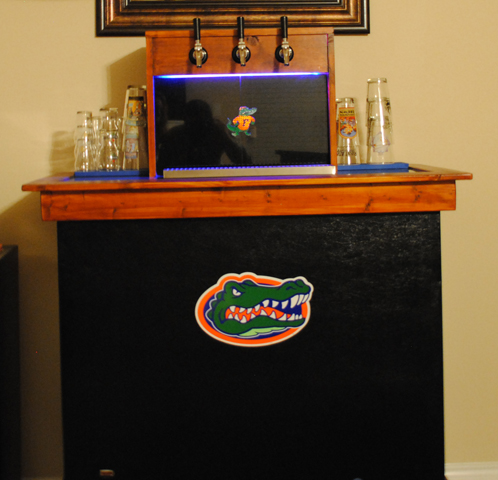
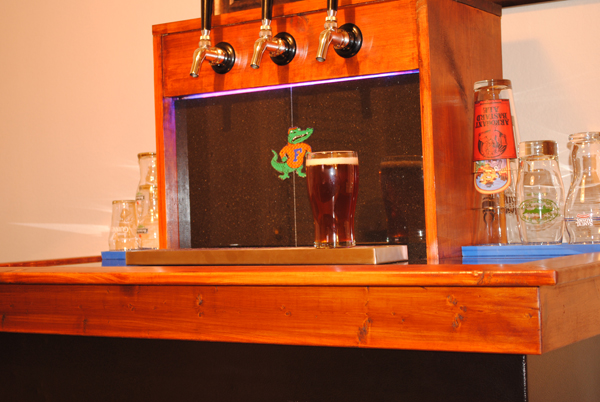
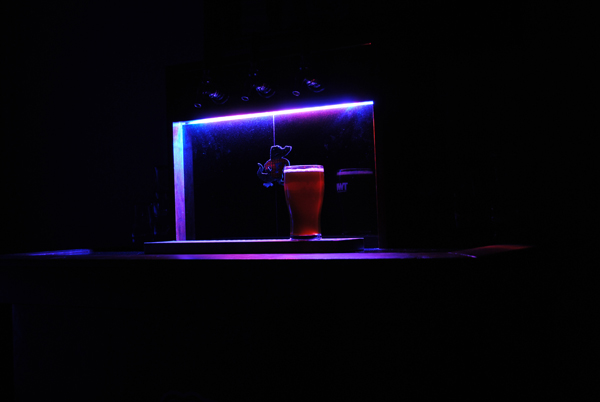
Lets start with a look at the finished product:

DSC_03621.jpg


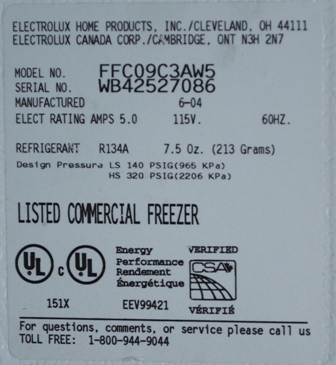
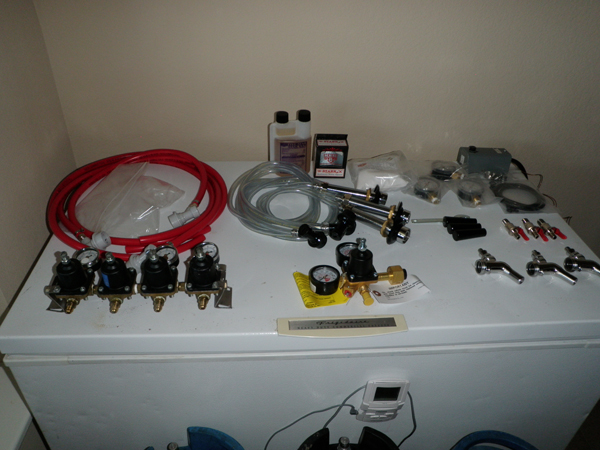
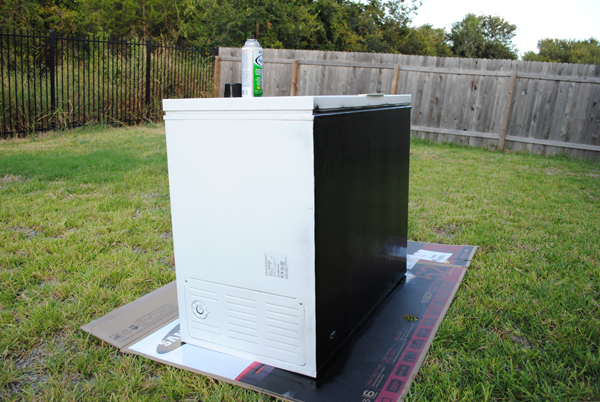
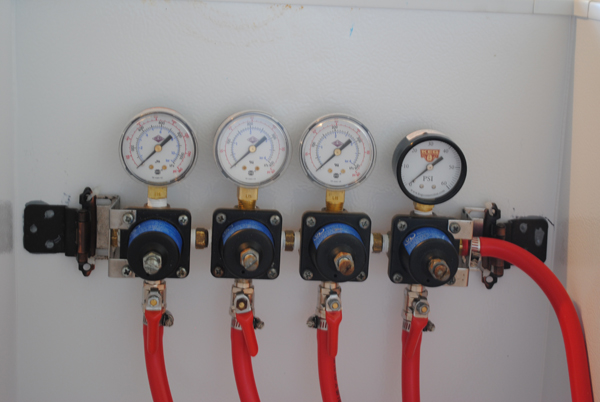
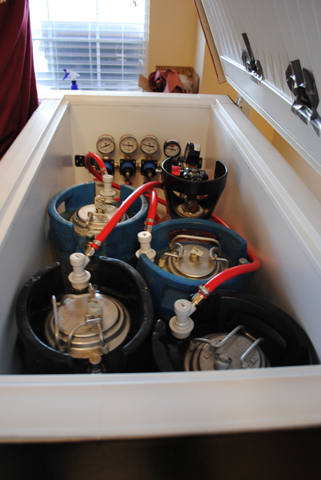
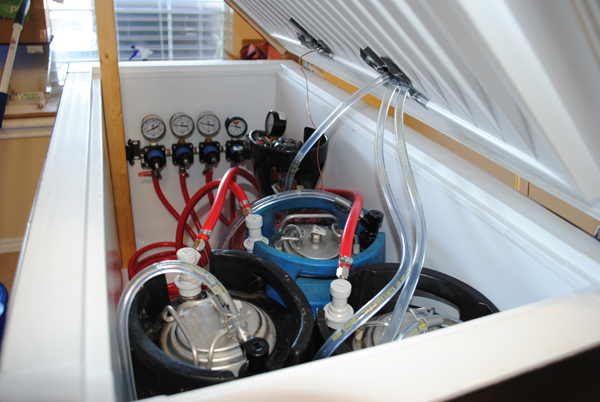
Here is where we started. My wife got me the greatest Birthday present a 3 Keg Kit! Plus a freezer and a bank of regulators.

P6171874.JPG


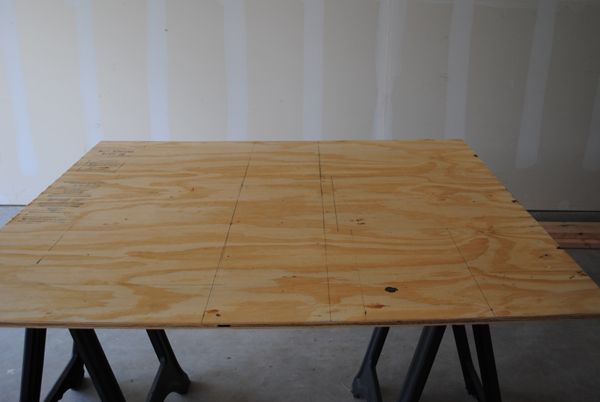
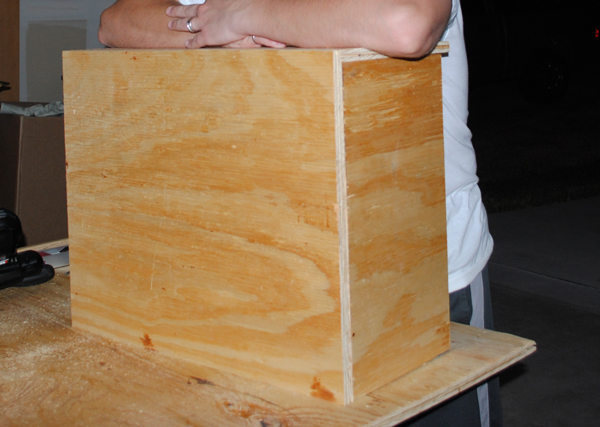
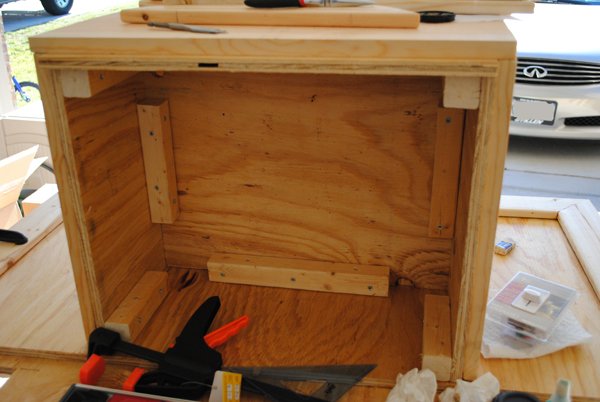
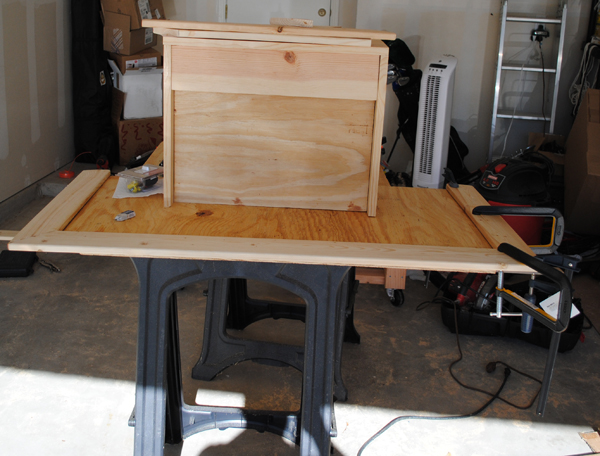
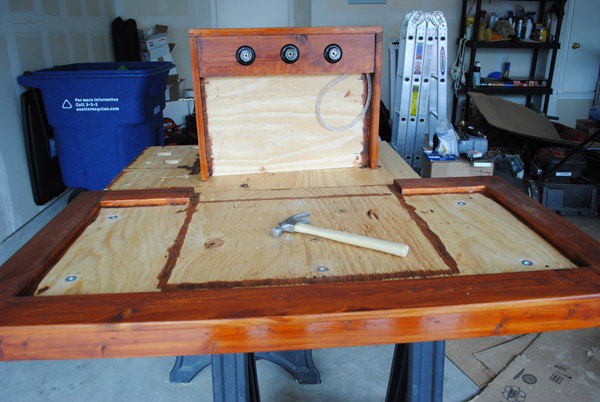
We then started with a single piece of 19/32 Plywood. In which we drew out the table top, plus the 4 sides to the tap box (Top, Left, Right, Front).

DSC_0194.JPG


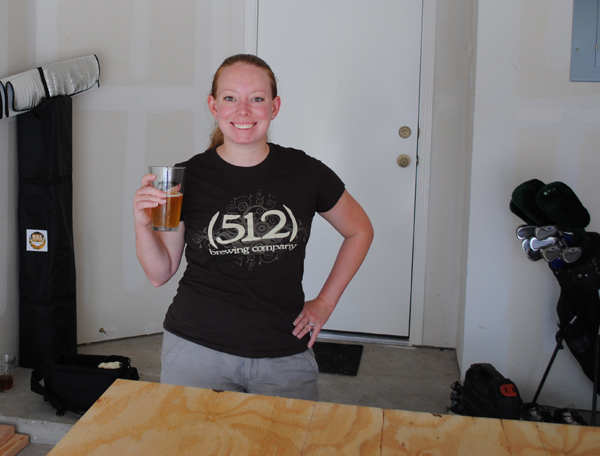
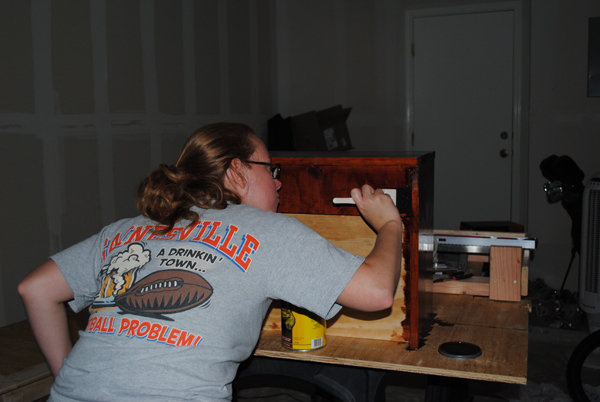
Cheers! Here's my wonderful wife saying "Lets get this thing started!"

DSC_0197.JPG
 
We painted the freezer black using Black Appliance Epoxy

DSC_0220.JPG


For wood working, First we built the tap Box, basically a rectangle

DSC_0214.JPG


Here's what it looks like inside:

DSC_0215.JPG


We then added a 1"x4" strip to the front of the tap box (To give us the space to put the lights behind the taps), though we don't actually have a photo of this step. Onto this we put our hardwood Skin all around.

DSC_0528.JPG


From the back:

DSC_0530.JPG


Then we attached our trim to the table top using Heavy Duty Wood glue and clamps. The tap box is just sitting on the top right now, its not attached yet.

DSC_0527.JPG


Then we filled gaps with wood putty:

DSC_0543.JPG


We assembled the Dolly out of 2"x4" skeleton and then attached the 1"x4" Whitewood to the outside:

DSC_0538.JPG


Then we stained and sealed all pieces

DSC_0554.JPG


DSC_0348.jpg
 
Our wood was chosen based upon character! It watches you!

DSC_0560.JPG


Next we drilled Tap Holes using a 1" hole saw:

DSC_0841.JPG


Then we test fitted the Perlicks:

DSC_0855.JPG


Now that they fit we can install the lights and do the wiring. We installed 2 rope lights, a blue light and an orange light. We will attach them to a Dimmer in a later step.

First we fed them through a (previously cut) rectangle hole from inside the tap box. We then wired them to each other using our wire kit from circuits 1!

DSC_0946.JPG


Here they are with a test light:

DSC_0892.JPG


Next we embedded T-Nuts into the Lid. 4 from the bottom side so the tap box can anchor to them and 6 from the top side so that the freezer lid can anchor to them.

Here is a close up of one:

DSC_0859.JPG


Here is another shot, the 6 on top are to anchor to the freezer. There are 4 which you can't see embedded on the bottom for the tap box to anchor to.

DSC_0864.JPG


Next we removed the lid from the freezer and removed the insulation from the lid. Then jigged out 2 holes in the lid and applied duck tape:

DSC_0886.JPG


Then we applied liquid nails to the freezer lid and clamped and bolted the plywood top to it.

DSC_0891.JPG


Then we put the insulation back into the lid and cut the holes through the insulation and plastic liner.

The next step was freezer assembly. First the freezer went onto the dolly and then we attached the lid back to the freezer.

DSC_0927.JPG
 
Next we attached the tap box and shanks

DSC_0939.JPG


Then we added multiple layers of foam insulation. Here is the layer with the beer line channel carved out (This foam was reused form a fermentation chamber in which I glued a few pieces of the foam together, thats why you can see brown glue traces).

DSC_0940.JPG


Then here is what the last layer looked like. There is a hole cut out for the Dimmer. But this is pretty tight and when the back is screwed on it will be a tight compression fit.

DSC_0948.JPG


Next we marked up the Granite and took it to Lowe's to get it cut. (Took us 3 trips to get all pieces to fit)

DSC_0955.JPG


Then we glued the granite using liquid nails, silicone caulked it (used silicone since it was going to be on a moving surface we didn't want it to crack), and then sealed it. Here are a few photos:

DSC_00294.JPG


DSC_00313.JPG
 
While the granite was being cut we did the plumbing. First we JB welded 2 cabinet door hinges into the freezer body to hold the regulator bank. We then zip tied the regulator bank to these hinges.

DSC_0907.JPG


Test fit, we can hold 3 kegs on tap plus carb one in waiting.

DSC_0934.JPG


Here is a view of the plumbing on the inside:

DSC_0952.JPG


Next we wired the dimmer switch. We cut the plug end off of the cord that connects to the rope lights and attached that end to the dimmer. Then we cut off an extension cord female end and wired to the dimmer so that we can use this cord to plug into the wall. Here is what it looks like:

DSC_0945.JPG


Then we added the faucets, drip tray, Gator stickers, Bar Mats, and Pint Glasses to finish it up.

DSC_01811.JPG
 
Here is the first Pint: (This was actually before we caulked the tile. So there is a noticeable line in the back splash granite.)

DSC_00027.JPG


And the first pint in the Orange and Blue:

DSC_00095.JPG


The Gator-ator in the Orange and Blue

DSC_0984.jpg
 
And to complete the Jester Clone. Here are some extra photo scenes made famous by Jester and Red.

DSC_0179.JPG


DSC_02461.JPG


Man, after writing this thread it kind of makes building one of these look easy. It actually took about 5 months to really get started on the project and then about another 2 months to finish it.
 
I like it.
I would love it if it had a Wildcat on it instead.

Just kidding. Looks great. I always think the hard work put into them and the details are what make them special.
 
I hear ya. It IS simple....but building something you can be proud of takes time. I owe a LOT to this forum; it has driven me to learn woodworking, metalworking, and many, many other skills!
 
Looks awesome you guys! :tank: I'm elbows deep in a keezer build myself. What a blast. I can't wait to finish up and start enjoyinf the fruits of my labor. If you get a chance, jump onto my thread in my signature line and check it out. I have received a bunch of PM's lately indicating that I should have started my Rustic keezer build in the DIY section instead of the kegging/bottling section. Oops! Live and learn. Again....your keezer is fantastic and I hope if brings you many years of enjoyment! :mug:
 
Those Gator logos look vaguely familiar to me. I think there is a college sports team nearby that uses that logo.......................
 
I've been contemplating how I was going to mount my regulators inside my keezer. I thought about liquid nailing a piece of wood to the inside to screw the regs and manifold in place. Never thought about JB welding them. How's it working out?
 
That looks great! I'm looking forward to building a keezer one of these days. I have an old school fridge that I converted to a kegerator w 2 kegs, but I really want a big chest freezer to fit extra taps/kegs.
 
Thanks for all the kudos, I love having my beer on tap. I am now rewarded everyday for the months of work that went into building it! I do recommend that you keep a spot in your keezer for a beer "in waiting". Otherwise you will have an empty tap for a while.

And to all of you Gator-Haters out there you guys are just jealous :) j/k I love good college rivalry. :mug: Go Gators!

Hopefully this thread will help someone working on their Keezer. I tried to put together an informative overview of how we put things together.

I've been contemplating how I was going to mount my regulators inside my keezer. I thought about liquid nailing a piece of wood to the inside to screw the regs and manifold in place. Never thought about JB welding them. How's it working out?

Really well. No problems as of yet. We did sand the spot where we were going to attach it first though. So that may have helped.

i like this look alot; really sharp. I like the t-nut idea

Thanks! I like the dark wood against the black freezer and granite. My wife proudly displays it as a quality piece of furniture.

I actually got the t-nut idea from Jester's build. And they work really well. I do recommend routing out a hole for them to push into (like I did) so that they can be flush in the wood. This will keep them from causing issues when the table top is attached to the freezer lid or when the tile is placed over the top of them.
 
Looks awesome you guys! :tank: I'm elbows deep in a keezer build myself. What a blast. I can't wait to finish up and start enjoyinf the fruits of my labor. If you get a chance, jump onto my thread in my signature line and check it out. I have received a bunch of PM's lately indicating that I should have started my Rustic keezer build in the DIY section instead of the kegging/bottling section. Oops! Live and learn. Again....your keezer is fantastic and I hope if brings you many years of enjoyment! :mug:

I have been silently following your thread. Its looking fantastic, can't wait to see it completely finished. I bet its been pretty difficult working with that raw wood, takes far more skill than I have. I enjoy looking at build threads, people come up with some cool and creative ideas. Good luck on getting it finished and getting to enjoy it. :mug:
 
Well done sir!

I've got to restart my liquor cabinet build so I can be ready when the weather lets me do my keezer build in the garage. I like the simplistic approach of only doing top and bottom with the painted freezer exposed. With as warm as my garage gets in the summer, I'm hesitant to cover the outside with wood, even with space and fans...
 
Looks good, would look better in Orange and Green though...


As tell Coaches Muschamp and Young whenever I get the chance (I see them each 2-3 times a week)... Go 'Canes!
 
Don't be silent, please chime in at anytime on my thread. The more feedback and ideas I get, the better. I'll continue to update it as I progress. Where did purchase your kegging components? I like the individual regulators for better carb. control over each keg. I would like to place an order this week, so that when I get the finish sanding, polyurethaning, and tile set/grouted/sealed over the next couple of weeks, I'll have the components ready to go. I need to get moving on this because I have a Two Hearted Clone dry hopping in a secondary, a Blood Orange Hefe in a primary, and another batch of Amarillo Wheat on the docket for this weekend. I'll be damned if I bottle this stuff!!! :mug:

Actually I find working with raw wood to be much easier. Knifing and milling logs isn't exactly precision work. You can be far less precise, which actually adds to the character of the piece. Thankfully, I have a buddy with a woodmieser milling machine that can mill logs up to 30 ft. in length and 5 ft. in diameter, so the bigger pieces in my basement were milled by his machine.....not by hand. I love the rustic cabin decor, so when my wife gave me the green light to build my basement and bar in this decor...I sort of took it to the extreme.

I have been silently following your thread. Its looking fantastic, can't wait to see it completely finished. I bet its been pretty difficult working with that raw wood, takes far more skill than I have. I enjoy looking at build threads, people come up with some cool and creative ideas. Good luck on getting it finished and getting to enjoy it. :mug:
 
I honestly threw up in my mouth when I saw the Gator logos. Nice build, horrible choice of colleges.:)


_
 
Don't be silent, please chime in at anytime on my thread. The more feedback and ideas I get, the better. I'll continue to update it as I progress. Where did purchase your kegging components? I like the individual regulators for better carb. control over each keg. I would like to place an order this week, so that when I get the finish sanding, polyurethaning, and tile set/grouted/sealed over the next couple of weeks, I'll have the components ready to go. I need to get moving on this because I have a Two Hearted Clone dry hopping in a secondary, a Blood Orange Hefe in a primary, and another batch of Amarillo Wheat on the docket for this weekend. I'll be damned if I bottle this stuff!!! :mug:

Actually I find working with raw wood to be much easier. Knifing and milling logs isn't exactly precision work. You can be far less precise, which actually adds to the character of the piece. Thankfully, I have a buddy with a woodmieser milling machine that can mill logs up to 30 ft. in length and 5 ft. in diameter, so the bigger pieces in my basement were milled by his machine.....not by hand. I love the rustic cabin decor, so when my wife gave me the green light to build my basement and bar in this decor...I sort of took it to the extreme.

I got just about everything from keg connection with the exception of the secondary regulators and CO2 bottle. I got the 20# bottle from CL for $40 and I purchased the secondary regulators from a friend of a friend that owns convenient stores. He was removing soda machines from his stores and he came across 2 banks (4 in each) of the cornelius secondary regs. Being in the market for them at the time I bought all 8 for $20 a regulator. They are great and I was hoping to do a second keezer build to keep in my dedicated brewery, but things have happened and we are actually now in the process of moving. And then I got to thinking that the first project I am going to work on in the next house is a brew rig. So I figured if I can get most of the money I put into these regulators it would help with something on the new rig (and I really didn't want to pack them up to move them). Therefore I actually just sold the second bank of them on here.

I like the look of the natural wood. I guess I was thinking since the natural wood can vary so much that it would be difficult to work with. But I can see what you are saying with it needing to be less precise and that it actually helps give character to the wood. Its a great looking build though. I can't wait to build my own bar. But my brewery will be my next project and my wife is actually looking for houses with a dedicated brew space for me in mind.


I honestly threw up in my mouth when I saw the Gator logos. Nice build, horrible choice of colleges.:)
_

Oh yea? Whats your college of choice?
 
Looks good, would look better in Orange and Green though...


As tell Coaches Muschamp and Young whenever I get the chance (I see them each 2-3 times a week)... Go 'Canes!

My whole family are Canes fans as I grew up just North of Miami in Miramar and Hollywood. I then of course turned and went to school at Florida. What do you do in GVille that allows you to spend so much time with the Football coaches?
 
Exactly what I was thinking! All the pictures show SWMBO and all the caption read "We"

Hey hey I drilled the tap holes! For the other steps someone has to drink the beer and watch the laborers!

haha, I just figured you all would rather see her than my ugly mug :mug:

There are some photos of me that I left out which are actually in my gallery if you wanted to see them to verify that I actually did do some work on this thing. ;)

Besides she was just as excited to get this thing done as I was! And since she said it could go in our house she wanted to be sure it was done right and looked good.
 
Your build looks great and my family loves the gators too. In fact my sons room is painted blue and orange.

I'm in the process of collecting all my parts for my build and would like to do something like yours or Hoppopotomus but one of my goals is not to do anything irreversible to the freezer. I'm thinking I'll have to replace the lid of the freezer with my own and figure a way to get an air tight seal when it closes.

Thanks for posting the pictures,

Scott
 
Nice build. Working on one myself. Quick question, why put the plywood sheet on top of the original lid, and not just use the original lid by itself?
 
Nice build. Working on one myself. Quick question, why put the plywood sheet on top of the original lid, and not just use the original lid by itself?

Sorry its taken so long to reply, I was out of town this weekend. It comes down to a solid foundation. The freezer lid is really thin and flimsy, mine was pretty dimpled already. And I imagine if you attached the tile and tap box (which is extremely heavy) directly to it, it could cause warping and possibly cause the tiles to pop off. So I figured a thicker and more stable foundation would be best. I believe the other keezer builders do the same thing.
 
I love the look & the fact that you didn't have to craft a collar. Would you be willing to provide a make & model of the freezer you used? I showed the pictures to my wife & asked her if I built one that has natural wood like yours, would it qualify as indoor furniture. Sadly, i was denied. Guess it will be shown off in the brewhouse!
 
Very impressive. I can only hope that when I build mine it looks that nice.

To be honest I don't understand the choice of logo, or the comments on the logo though. Must be an American thing eh?

Personally I would like a dragon on mine ;)
 
I love the look & the fact that you didn't have to craft a collar. Would you be willing to provide a make & model of the freezer you used? I showed the pictures to my wife & asked her if I built one that has natural wood like yours, would it qualify as indoor furniture. Sadly, i was denied. Guess it will be shown off in the brewhouse!

Thanks! I didn't care for the collar idea either, though there are some really good looking keezers out there with a collar. I just wanted a tap box/bar top style. And the dark wood goes really well with the black tile and freezer body.

Just promise to keep something she likes on tap all the time! Then if she wants to be sure it matches your current furniture let her help out :)

The freezer is a Frigidaire Commercial Series Chest Freezer
Model #: FFC09C3AW5

Freezer_Model.jpg


I thinks its around 8.8 or 9 cu ft.


Very impressive. I can only hope that when I build mine it looks that nice.

To be honest I don't understand the choice of logo, or the comments on the logo though. Must be an American thing eh?

Personally I would like a dragon on mine ;)

Thanks! Just take the time to plan it out and it will come out really well for you. I never did any wood working prior to this and I just worked through issues as they came up (with the help of SWMBO of course :) ). The logo is my University logo. So of course fans of other teams have to hate on mine and stick up for their own schools. But that's part of what college rivalry is all about! Good luck on your build!

:mug:
 

Latest posts

Back
Top