My Weldless Build Using Strut

Homebrew Talk - Beer, Wine, Mead, & Cider Brewing Discussion Forum

Help Support Homebrew Talk - Beer, Wine, Mead, & Cider Brewing Discussion Forum:

This site may earn a commission from merchant affiliate links, including eBay, Amazon, and others.
Testing firing the new rig after mounting burners! I have 10" banjos for HLT and bk and 6" banjo for MLT. Going to run all three of 30 psi reg from kab4. Still have to build and mount manifold once needle valves arrive, and pumps. Then on to the lids.

How long does it take for this galvanized finish to burn off. I don't see any smoke or smell anything yet...


image-1580299287.jpg


image-3436700308.jpg


image-3783793979.jpg


image-3736288131.jpg
 
Looking good! I just switched to the BG12 for my MT from a jet burner. I have it rigged in there now but want a more permanent mounting solution. Can you take a close up pic or two of how you mounted those? Can kind of tell from the first pic, but can't see the details. I have a few ideas too. Do you like the way your burner mounts turned out? Thanks.
 
gifty74 said:
Looking good! I just switched to the BG12 for my MT from a jet burner. I have it rigged in there now but want a more permanent mounting solution. Can you take a close up pic or two of how you mounted those? Can kind of tell from the first pic, but can't see the details. I have a few ideas too. Do you like the way your burner mounts turned out? Thanks.

Sure give me just a few. It's a piece of strut mounted creatively with 4, 2 hole L brackets. Then the burner is attached using the screw on the bottom. Tried to use what I had.

The burners all seemed to work well but I haven't done any timing of the performance yet.
 
Hi, fellow thread followers. This is an awesome thread with so much great information. I plan to start a build soon. I started a new thread, but thought I'd post here because I am through nearly the whole thing and haven't seen any discussion on choosing a burner style - not a delivery methodology (propane, NG or electric). I'm trying to decide on banjo-style or jet style. I'm going to use bottled propane because that's all I can use where I'll brew. Anyone share their thoughts on that? Thanks.
 
JacquesG said:
Hi, fellow thread followers. This is an awesome thread with so much great information. I plan to start a build soon. I started a new thread, but thought I'd post here because I am through nearly the whole thing and haven't seen any discussion on choosing a burner style - not a delivery methodology (propane, NG or electric). I'm trying to decide on banjo-style or jet style. I'm going to use bottled propane because that's all I can use where I'll brew. Anyone share their thoughts on that? Thanks.

I really like the banjo styles, a lot quieter and I think more adjustable.
 
Testing firing the new rig after mounting burners! I have 10" banjos for HLT and bk and 6" banjo for MLT. Going to run all three of 30 psi reg from kab4. Still have to build and mount manifold once needle valves arrive, and pumps. Then on to the lids.

How long does it take for this galvanized finish to burn off. I don't see any smoke or smell anything yet...

How did you mount the larger banjo? Any part number you can offer? That's exactly what I wanted to do....
 
Gifty - you switched from jet to banjo style burner. Were you tired of wearing noise canceling headphones when brewing or is there another reason you switched to banjo (i.e. efficiency, speed to temp, ease or controllability? I'm curious as I'm ready to buy my burners. Also, you use NG. Any difference with LP.? Thanks again.
 
Here's my take on burners (which I've spent a good bit of time researching myself, and seeing the popular 'models' first hand). I am on NG from my house, so there are differences and some models perform better on propane than NG. My buddy has a Brutus 10 clone with the larger 10" diameter BG14 Banjo burners running on high pressure propane. He has them mounted about 3" below the bottom of the pot. The issue with the larger ones, *in my experience*, is that the diameter is too wide for a standard keggle pot. He cannot run it at wide open throttle because the flames come up around the sides of the keggle and cook his thermometer, ball valve, etc because the heat is too wide spread. Some others on here might have found a way to contain it better, but he still struggles to keep the heat under the keggle. Learning from this experience I went with the 10 tip jet burners, and the smaller diameter (roughly 6") because of reading a lot of posts of people getting the larger 32-tip burners and it being overkill and having similar issues to the larger Banjo burner as far as losing too much heat and flames up around the sides of the pot. I started with the same 10-tip burner on both the MT and BK (I only have a 2 station stand). I found that the jet burners like to run fairly wide open, and when trying to throttle down the one under my direct fired MT I kept fighting the battle between low heat and yellow tipped (soot) flames. So I tried out a BG12 (smaller 6" Banjo) and it appears to be the answer for my setup. Nice blue tipped flames with a huge range of adjustment without them turning yellow. I can keep a nice low steady flame so as to keep the recirculating mash at a nice steady temperature, that slowly raises the temp. For me, this I think is the ultimate setup. I use a Honeywell 8200 NG thermocouple safety valve that is controlled by an Auber 2362 PID (run in on/off mode, not PID) with very accurate RTD temp probe located in a T on my pump outlet. Others with the larger 10" Banjos please chime in. Maybe my buddy is missing something, but he has a lot of issues with flame control and I think it's due to how close the outer burner tips are to the outside diameter of his keggle.
 
gifty74 said:
Ok bd2xu, your "few" are up. Let's see some pics!

I know I'm sorry I suck. Was hustling to pack and now I'm out of town. But here's all I did.

Used 2 hole L brackets I got from strutchannelfittings. Connected one then the second to the first in order to make a place I could attach the strut to.
 
Thanks Gifty. I got it. My BK is about 20" in diameter and my HLT and MT are both keggles. I think that seeing all those guys using NG and talking about jets got me to thinking that the logic behind a banjo (more burners, high pressure, larger FF and cheaper got me to thinking I was making mistake. Evidently not for me. Banjo it is. Great post, Gifty. If I go with a super-strut (found a guy who is willing to weld up a stand for under $200 including material that may work out), I'll send pix. It's not going to be super elaborate, but I love the drawer idea and part shelf idea below.
 
dipole said:
How did you mount the larger banjo? Any part number you can offer? That's exactly what I wanted to do....

I just used the two hole L-shaped brackets that you get from strut channel fittings.
 
gifty74 said:
Ok bd2xu, your "few" are up. Let's see some pics!

Ok so check out this pic, you can see the L brackets, and they are part number THK-132. One side is a little longer than the other. I mounted the short side under the strut, then mounted the short side of another to the long side of the first. Repeat on the other side of the center burner "square". Then just mount a piece of strut across. The burner then fit right on top of the strut and I just secured with a bolt, nut and washer. The bolts that thread into the holes in these banjo burners, btw, are metric 6mm.


image-3427030414.jpg
 
gifty74 said:
Here's my take on burners (which I've spent a good bit of time researching myself, and seeing the popular 'models' first hand). I am on NG from my house, so there are differences and some models perform better on propane than NG. My buddy has a Brutus 10 clone with the larger 10" diameter BG14 Banjo burners running on high pressure propane. He has them mounted about 3" below the bottom of the pot. The issue with the larger ones, *in my experience*, is that the diameter is too wide for a standard keggle pot. He cannot run it at wide open throttle because the flames come up around the sides of the keggle and cook his thermometer, ball valve, etc because the heat is too wide spread. Some others on here might have found a way to contain it better, but he still struggles to keep the heat under the keggle. Learning from this experience I went with the 10 tip jet burners, and the smaller diameter (roughly 6") because of reading a lot of posts of people getting the larger 32-tip burners and it being overkill and having similar issues to the larger Banjo burner as far as losing too much heat and flames up around the sides of the pot. I started with the same 10-tip burner on both the MT and BK (I only have a 2 station stand). I found that the jet burners like to run fairly wide open, and when trying to throttle down the one under my direct fired MT I kept fighting the battle between low heat and yellow tipped (soot) flames. So I tried out a BG12 (smaller 6" Banjo) and it appears to be the answer for my setup. Nice blue tipped flames with a huge range of adjustment without them turning yellow. I can keep a nice low steady flame so as to keep the recirculating mash at a nice steady temperature, that slowly raises the temp. For me, this I think is the ultimate setup. I use a Honeywell 8200 NG thermocouple safety valve that is controlled by an Auber 2362 PID (run in on/off mode, not PID) with very accurate RTD temp probe located in a T on my pump outlet. Others with the larger 10" Banjos please chime in. Maybe my buddy is missing something, but he has a lot of issues with flame control and I think it's due to how close the outer burner tips are to the outside diameter of his keggle.

I've only used banjos and the "jet" style like in the bayou sp10. I agree with the 10" banjo it is best with a keggle to get the burner CLOSE to the keggle and yes you can't run it wide open but I find it heats super fast just running at 30% or so. With a lower flame you're using less gas a d getting a huge surface area heat coverage across the bottom of the keggle. The 6" banjo I think will be awesome for my MLT (3 vessel Config) as its much more controllable and need less heat for the MLT.
 
bd2xu said:
I've only used banjos and the "jet" style like in the bayou sp10. I agree with the 10" banjo it is best with a keggle to get the burner CLOSE to the keggle and yes you can't run it wide open but I find it heats super fast just running at 30% or so. With a lower flame you're using less gas a d getting a huge surface area heat coverage across the bottom of the keggle. The 6" banjo I think will be awesome for my MLT (3 vessel Config) as its much more controllable and need less heat for the MLT.

Also those NG gas jet burners are over 2x cost of a 10" banjo if you buy the "tested" and supported ones vs the Chinese crap ones some sites sell "as is". I was too afraid to buy a burner "as is" when the site says hey we haven't tested these and we got them from china... So about $100 for a good one. Now I'm a firm believer in do it right the first time so if the multi tip jet burners are really the best then its worth the extra money but not sure...

However, next subject, if I want to use NG with my 10" and 6" banjo setup... Not sure how well that will work...
 
Well I got the manifold built and installed today. Tested for leaks and had only one, fixed easily. Just test fired all three burners and they worked great. Using needle valves from bayou classic to control each burner. Seem to work very well.

Here is the front view

image-2221333681.jpg

And back view

image-5109819.jpg

Next is to install and wire the pump...
 
Test run tonight, worked out some bugs. Need some heat shields for my sight glasses. I know I will get some heat wash having the burners this close and the heat shields should do the trick.

Mash tun wouldn't drain even with pump, had to re Teflon tape and screw on the ball valve again.

The smell of galvanization burning off was strong, I feel ok but kept a fan going, hope that dissipates quick. Maiden voyage is Thursday night on a 10 gallon Dunkelweizen.


image-967139110.jpg


image-1365654666.jpg
This is it the MLT 6" burners


image-1271635308.jpg
 
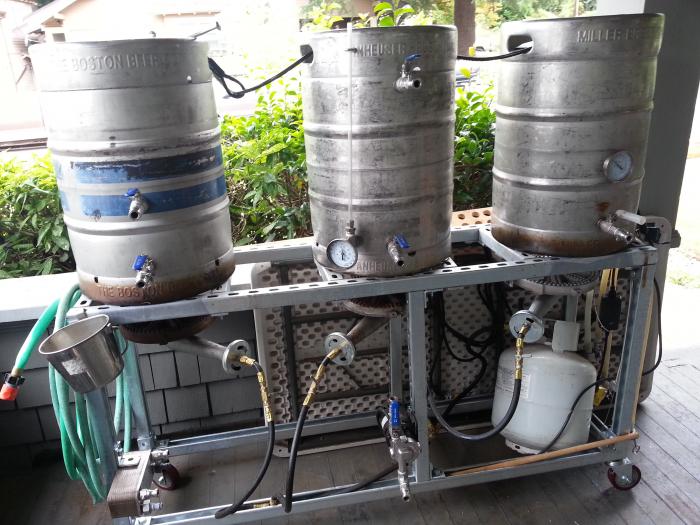
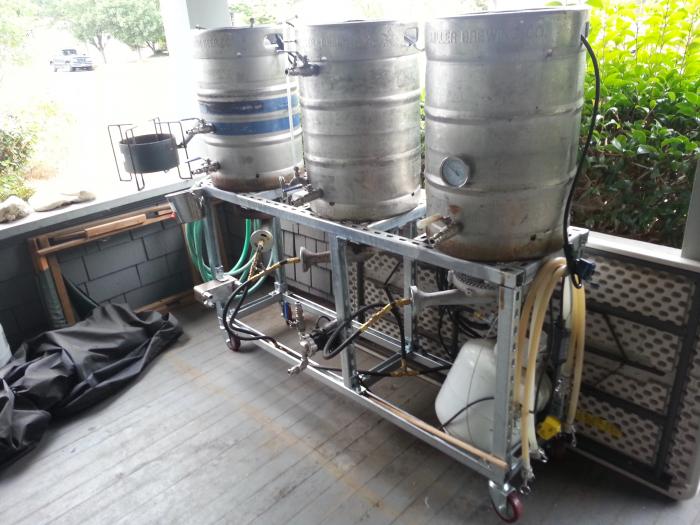
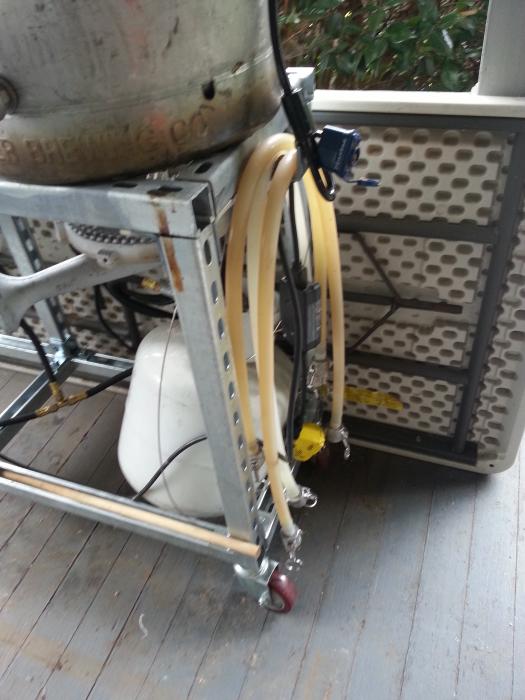
I think I've finally worked the kinks out of my brew stand. I ended up having to lower the burners another inch and a half and move my plate chiller down, since I almost melted a hose. I had some spare 2x1 angle brackets that I turned into handy hooks for hanging hoses, and such. Also, since my brew stand lives on my porch, I cable lock the whole thing together to one of the brackets. As a side benefit, the propane tank stores nicely in the stand when not in use. Here is the result after the testing and tweaking.

2013-08-16 15.23.41.jpg


2013-08-16 15.23.56.jpg


2013-08-16 15.24.39.jpg


2013-08-16 15.24.32.jpg
 
yup, should work fine. suggestions for you:
- instead of a T + cap at the far end, you could just use an elbow.
- instead of T --> needle valve --> flexible pipe, why not do T --> flexible pipe --> needle valve. that way the needle valve is up top: easier for you to get to, instead of having to bend over and/or crawl under your stand to get to it. besides, you'll already be at the burner when lighting it - why not have the valve right there?
- cheaper than yellow flexible pipe: http://www.rvsupplyparts.com/index.php?l=product_list&c=237
- you might consider doing: regulator --> T --> black pipe --> T --> black pipe --> elbow. the idea here is to bring the regulator straight into a T and split off to the first burner from there........

Hey Sweetcell (or anyone who may know), is there a stickie or thread that gives a good overall explanation of this sort of propane build? Not necessarily this configuration but just parts and general how-to so we don't cause any unnecessary explosions in our neighborhood.

Am working on a stand and this is probably the last bit of info I need to piece together before actually setting out to build.

Will of course read through all these posts but thought I'd ask in advance just in case something is avail.

EDIT - I haven't found all the info I'm looking for yet, but this thread has been a little helpful for those that are looking for similar info:

https://www.homebrewtalk.com/f51/understanding-high-pressure-versus-low-pressure-propane-157415/
 
Hey Sweetcell (or anyone who may know), is there a stickie or thread that gives a good overall explanation of this sort of propane build? Not necessarily this configuration but just parts and general how-to so we don't cause any unnecessary explosions in our neighborhood.

i don't know of any stickies.

read up on gas piping in general. if it's good enough to natural gas in the house, it'll be plenty good enough for your propane.

use parts that fit properly (i.e. were made for each other, vs. forcing two incompatible thread types together); tighten well; use gas tape or glue/sealant/cement (or both), and test adequately... booya. although pressurized gas isn't a joking matter, it's really not that difficult to pull off safely. do let us know if you have any specific questions.
 
Ok so check out this pic, you can see the L brackets, and they are part number THK-132. One side is a little longer than the other. I mounted the short side under the strut, then mounted the short side of another to the long side of the first. Repeat on the other side of the center burner "square". Then just mount a piece of strut across. The burner then fit right on top of the strut and I just secured with a bolt, nut and washer. The bolts that thread into the holes in these banjo burners, btw, are metric 6mm.


View attachment 141621

That's a real nice burner mounting solution, especially since there's always leftover strut and fittings. I was on the fence about going this route until I discovered that my HVAC pro next door neighbor a) has four sticks lying around in his basement that he doesn't need and b) has a metal cutting bandsaw in his garage. Sweet!!!! The next day, I ordered 90 bucks worth of fittings from G-P....and am back-ordered on some parts.

If you (or anyone else on this thread) don't mind, a couple of quick questions:

1. Where did you get the flex tube to run from the black pipe to the burners?
2. What regulator/PSI are you running with? I get confused with the variety of regulators/PSI settings/burner combinations.
3. Where did you get your other gas fittings? Could you give me a "dummies" listing of parts from propane source to burner?

Thanks for any help you can provide.
 
I built a giant Chiller last night! That is half inch interior diameter tubing, 50 feet of it!

Maiden voyage tonight with a 10 gallon Dunkel weizen.


image-1035193209.jpg
 
jturie said:
That's a real nice burner mounting solution, especially since there's always leftover strut and fittings. I was on the fence about going this route until I discovered that my HVAC pro next door neighbor a) has four sticks lying around in his basement that he doesn't need and b) has a metal cutting bandsaw in his garage. Sweet!!!! The next day, I ordered 90 bucks worth of fittings from G-P....and am back-ordered on some parts.

If you (or anyone else on this thread) don't mind, a couple of quick questions:

1. Where did you get the flex tube to run from the black pipe to the burners?
2. What regulator/PSI are you running with? I get confused with the variety of regulators/PSI settings/burner combinations.
3. Where did you get your other gas fittings? Could you give me a "dummies" listing of parts from propane source to burner?

Thanks for any help you can provide.

1. Home Depot
2. 30 psi came with my Bayou classic Kick a banjo 4 Burner. I am using needle valves that I bought from Bayou classic to control the flow to each burner. The 6 inch banjo burner goes up to 10 psi, the 10 inch ones go up to 30 PSI. So the needle valves control the flow to the Burners.
3. All of the gas fittings were from Home Depot, except for the needle valves which I bought online from Bayou classic. I am using the regulator and hose that came with my old burner from the propane tank to a brass fitting that adapts it to half inch galvanized pipe. All of my gas manifold is half inch Galvanized pipe. The first fitting is a T which goes up to the needle valve then to the yellow pipe. The needle valves are one quarter inch, so I had to find Brass fittings that would reduce from half inch galvanized pipe to quarter inch needle valve and then back up. Then another brass fitting to go to the 3/8 yellow pipe adapter. Just repeat that same thing for the other two burners. You can see for the third burner I just did a 90° elbow instead of a t
 
Well, I had to use reducers because I used half inch galvanized pipe, and the threads on the needle valves are one quarter inch. So yes, I used a brass fitting that went from half inch to 1/4 inch into the needle valve. Then, from the needle valve I did a brass fitting that went from one quarter inch to 3/8 inch for the gas pipe (the yellow flex) to screw on to. All of the propane fittings and the yellow flexible gas pipe fittings are 3/8.
 
Off topic but the uses for strut are amazing
image-2332414646.jpg
Safety rail for swing staging
 
So I'm in process of moving to a new house with NG so I envision a build in my near future. i will be utilizing the PliovVac/QD system ala Gifty. Has anyone tried incorporating one of those retractable air hose reels to store the hose while in use?

Also is there a consensus metal To use for heat shield? I work for a masonry contractor so I have access to sheet copper and stainless although the SS is tough to work. I'm wondering if there is something better.

Finally thanks for Great info in this thread. Someone should compile all the useful links and organize tby category like strut fittings/burners/health concerns from zinc poisoning....just sayin
 
Sheet copper would look nice!
What kind of stainless are you talking about?

And roof flashing will work as a heat shield, and probably used quite frequently in masonry work as a "drip shield".
 
Yeah exactly drip edge, thru wall flashing, we use lots of different materials depending on the design. Mostly 20 - 24 gauge stuff so it can be bent with a brake. Stainless is such a pain to work with we usually farm out the fabrication but I have piles of scrap material that could be used for heat shield applications. I have seen how badly the stainless discolors ins this thread with flame exposure so I'm not sold its he best choice.
 
Anyway I found the galv strut at home deeps for $16 a length along with the strut nuts ($1 each)and bolts. Do you use the nuts with the integral springs?

They also had the two hole and four hole L-brackets and pipe clamps up to 3". I'm thinking I could make this work but I really like the thk-225 or 233 fittings for the three way connection so I may order these.

My basic 2-tier design will incorporate my existing ghetto burner (bass pro turkey fryer) until I can get onto the house NG. I use a cooler tun but only have one 15 G pot for now. I was doing 5 gal batches until my last one, my first 10 but I was so sketched out by the weight on the cheesy turkey fryer I lashed some rope to the handles and an overhead beam in case the thing gave out.

After drooling over all the single tiers i just dont have the loot to invest in a pump at the moment so I'm thinking gravity drain the cooler into the pot and lift it back onto the burner. I thinking I will definitely need a heat shield between the cooler and burner as these will be on the same tier.
 
Maiden voyage last night went well. Did a 10 gallon Dunkel Weizen and hit my numbers almost dead on. Only issue was my MLT ball valve wasn't on tight and I couldn't get the MLT to drain even with the pump. Started to freak out but tightened it up and was fine. I usually fly sparge (old three tier rig) but I double batch sparged this batch and the efficiency was great!

Also built this chiller a couple nights ago out of 1/2" ID Tubing, this thing is a beast! Went from 212 to 90 in 15 mins with 80 degree ground water.


image-2021691009.jpg


image-773043492.jpg


image-1040200667.jpg


image-4095669877.jpg
 
After drooling over all the single tiers i just dont have the loot to invest in a pump at the moment so I'm thinking gravity drain the cooler into the pot and lift it back onto the burner. I thinking I will definitely need a heat shield between the cooler and burner as these will be on the same tier.

That's the great thing about the strut! You can reconfigure it later. I'm using my single tier as a 3tier just by standing it on end and adding my verticle supports as shelves in the right spots.
 
bd2xu, looking good. As for the burner mounts, I ended up doing mine a little different. I wanted them further away from the bottom of the kettle than two L brackets worth so I put a piece of strut on two sides with a beam across between the two. This way I can raise and lower the burners as needed. Also makes for a pretty solid support.
 
gifty74 said:
bd2xu, looking good. As for the burner mounts, I ended up doing mine a little different. I wanted them further away from the bottom of the kettle than two L brackets worth so I put a piece of strut on two sides with a beam across between the two. This way I can raise and lower the burners as needed. Also makes for a pretty solid support.

Sounds good would like to see a pic. I read that the kab4 with the 10" banjo was updated to be farther away from the kettles and was done to be more effective with flat bottomed vessels. Someone on the forum said that with keggles you want them closer. I'm happy with my distance (haven't measured but prob 3") so far but I haven't tried different distances. I definitely can't crank them all the way or I get flames around the sides but I don't think I need to. My thought is that when the burner is close, you can save gas by keeping the flames lower, you get more radiant heat from the burners themselves, and I'm hoping I can get away with no wind guards. I had an issue first test fire with the heat on my HLT coming up through the front left corner and boiling the water in my sight glass. For my first brew day I just put a piece of flashing over the corner opening and it solved it. So I may look at adding some kind of triangles in the corners of my HLT and bk to protect from the wash. I've seen this done on some welded stands. I was thinking I could use pieces of the diamond ss cut to triangles and screw them on maybe.
 
image-107496753.jpg. Thanks to this thread we had a strut stand brew day last weekend. After I built my single tier my buddy just had to have a stand too so we built him a double tier. We were finally able to get together and brew on both stands at once. 11 gallons of Lemon Blonde and 11 of Firestone Walker DBA clone. Woohoo!
 
Fourth batch on the new rig, this one is a five gallon batch of Denny Conn's Vanilla Bourbon Imperial Porter. Plan on doing a secondary with vanilla beans and then onto 2 oz whiskey barrel chips I've been soaking in bourbon.

Finally got this dialed in I think. My biggest issue so far has been a loose connection of the ball valve on my MLT which kept it from draining. I think I'm finally past that. I'll say, it sure would be nice to have welded fittings one day...

With only one pump right now I've been doing double rinse batch sparges and getting 70%+ efficiency, not bad.

image-487640119.jpg
 
Thought I'd share a little on propane and regulator experience. I'm using a reg that goes up to 30 psi. The two ten inch banjo burners take 30 psi and the six inch banjo for my MLT takes 10. I adjust each burner from there with a needle valve. If I have the reg open too much I can't light the six inch, even with the needle valve barely open. It will light and then blow right away. What I do is at the start of the brew session I light the six inch and open the needle valve all the way, then open the reg until the flame blows out, then back off a half turn. From there the six inch will work great and the ten inchers still get plenty of gas. Love this new system!!!!
 
Back
Top