Haier Kegerator Fridge Mod

Homebrew Talk - Beer, Wine, Mead, & Cider Brewing Discussion Forum

Help Support Homebrew Talk - Beer, Wine, Mead, & Cider Brewing Discussion Forum:

This site may earn a commission from merchant affiliate links, including eBay, Amazon, and others.

user 47131

Well-Known Member
Joined
Nov 21, 2009
Messages
112
Reaction score
2
I thought that some of you may be interested that a guy named Chris is selling the refrigerator only of a Haier kegerator at varied levels of distress. I purchased the Type "A" which is supposed to have the least amount of distress and there are a few small dents on the side, but the kegerator is overall in great condition... It comes with the tower hole pre-drilled, a shelf, the top rail and casters or feet. Here is the link - http://cgi.ebay.com/ws/eBayISAPI.dll?ViewItem&item=120513947862&ssPageName=STRK:MEWNX:IT#ht_3424wt_941

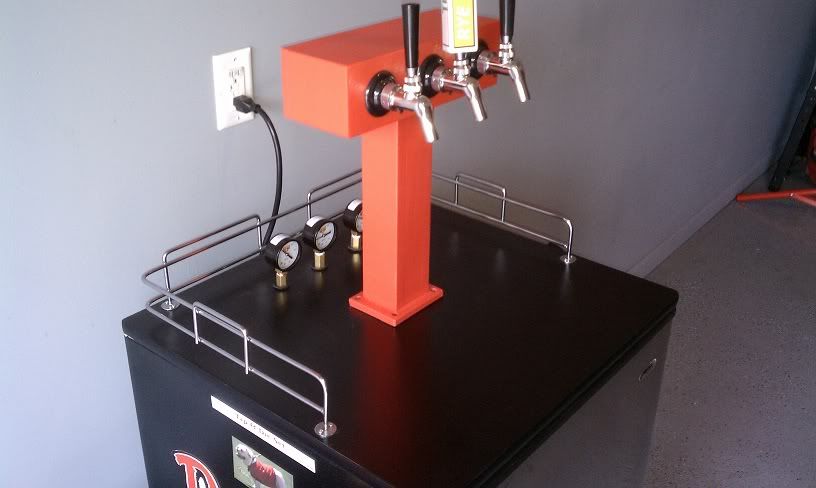
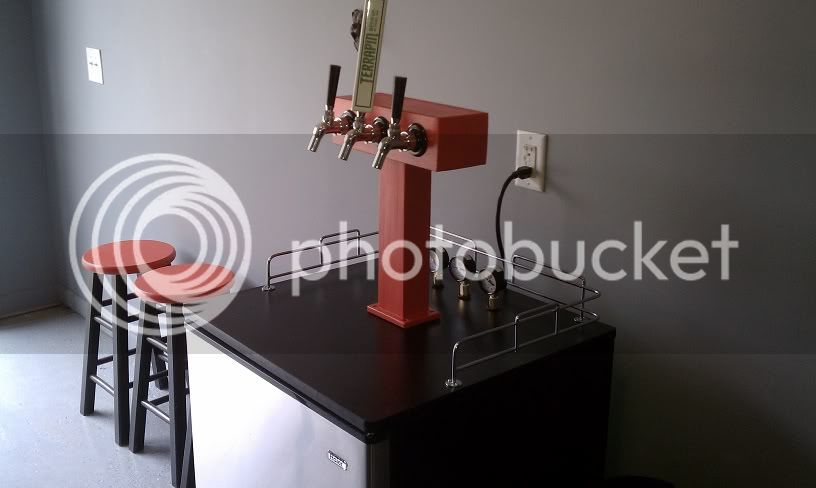
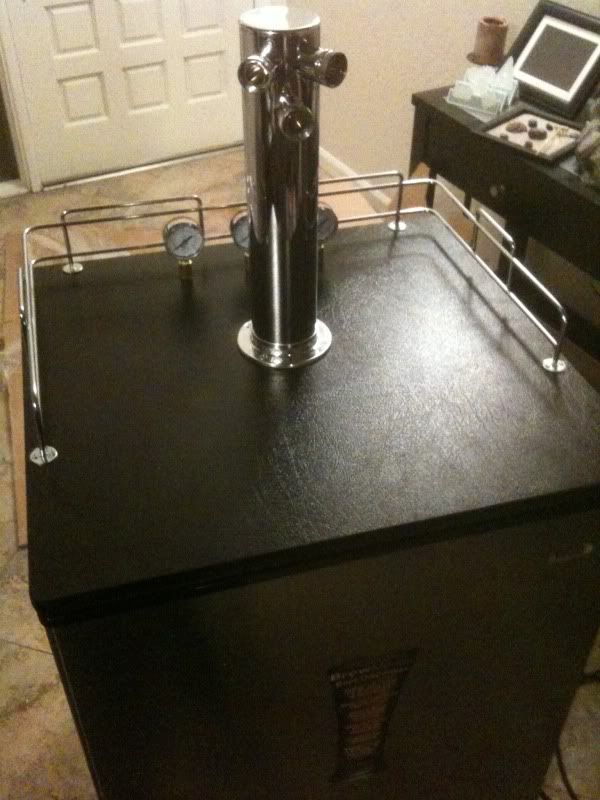
I took my older Haier kegerator that I got on CL a few months back and am now converting it into a fermentation chamber. I couldn't pass up the deal on this beauty and so far it is cooling well on Normal. I decided that I wanted a kegerator setup that would allow me to be versatile and do three 5 g cornies when I start kegging and at least one commercial sanke. I got the tower and three gauge secondary from Beverage Factory. Here are some of my notes and pictures on the conversion in case some are interested.

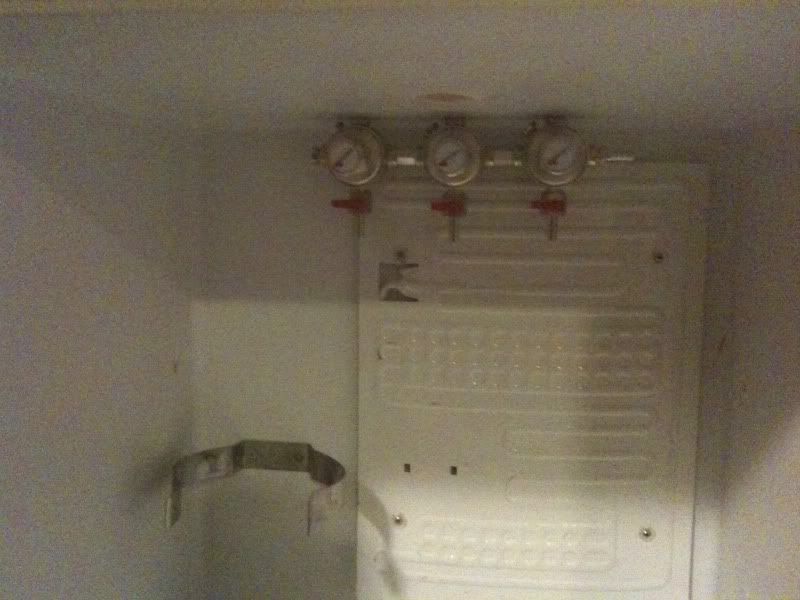
I realized that the three gauge secondary was going to make it a lot tighter in the kegerator and may interfere with a keg if the fridge was full, so came up with an idea of mounting the gauges on top. So, I got three 1/4" x 3" brass nipples and couplings, drilled three 5/8" diameter holes 6" back from the edge of the tower hole.

IMG_0836.jpg


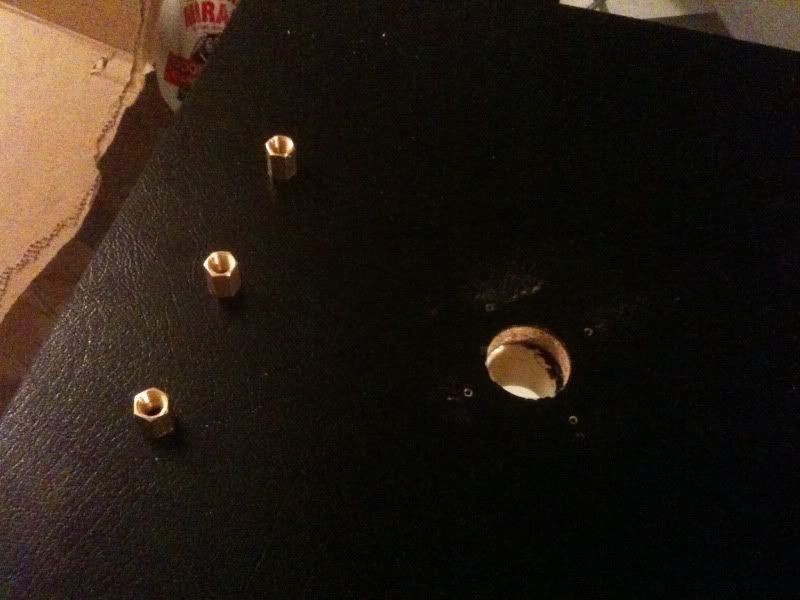
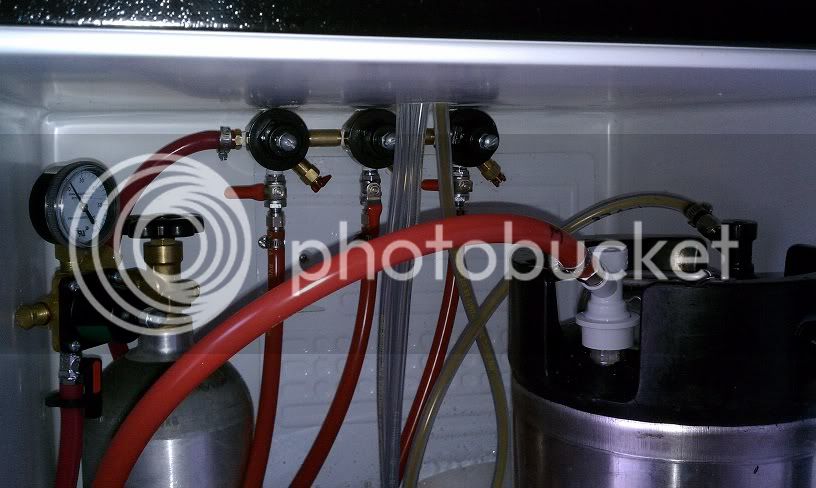
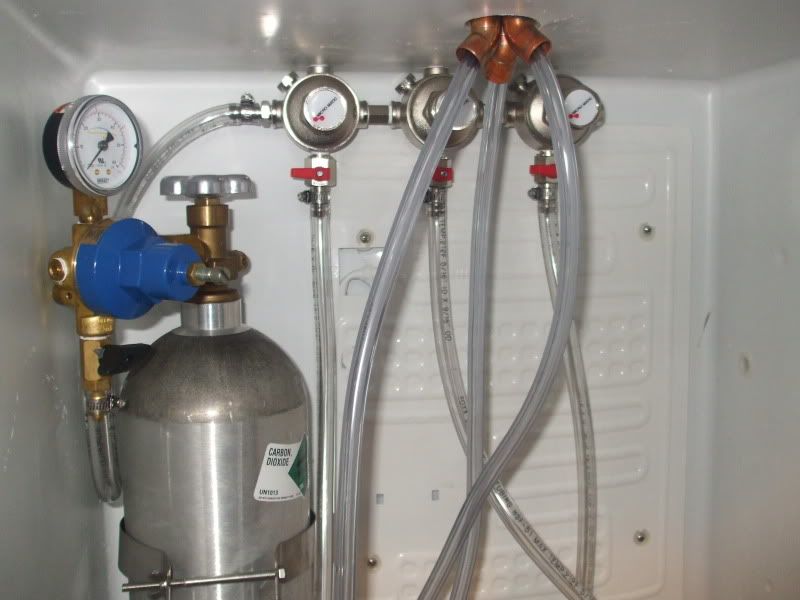
I applied a small amount of clear silicon between the coupling and top of the kegerator and then screwed the nipple into the regulator.

IMG_0835.jpg


I really liked the idea of cooling the lines with copper, so went out and got a 1" piece of foam pipe insulation to house the copper in. I sweated some 45's on three 12 1/4" pieces of copper (a little rusty with it nowadays, but at least it doesn't have to hold water) and wrapped them tightly in the insulation with foil tape.

IMG_0839.jpg


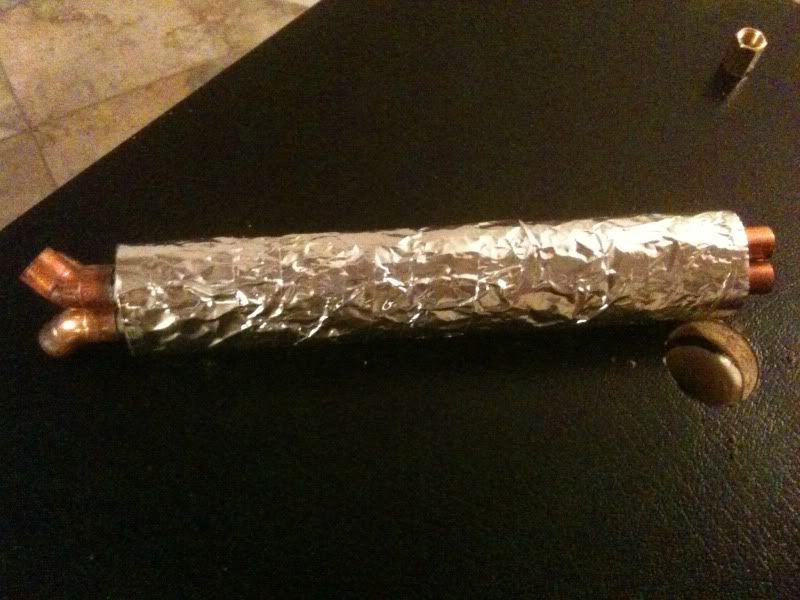
After getting this together and trying to fit it into the hole and tower, I quickly realized that it wouldn't be able to go through the pre-drilled hole, so just trimmed the insulation slightly so that it would be mounted above the hole and strictly in the tower. It took some jostling to get all three copper pipes through the original tower hole and a lot of hand feeding of the beer lines, but managed to get them through. I cut up a few extra strands of the insulation and wrapped them around the last 1" or so of line that was uninsulated.

IMG_0841.jpg


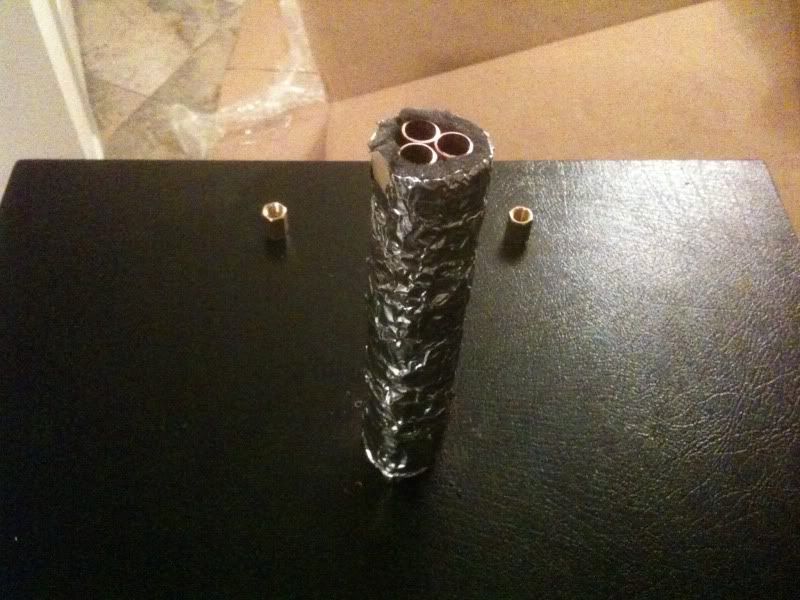
I drilled four new holes and mounted the 3" tower and the rail.

IMG_0845.jpg


Finally, last night I completed the co2 hookup. One note is that the unit for sale on ebay does not come with the co2 tank bracket, so unless you have another laying around (I used the one from my other Haier kegerator), you'll have to come up with something. Added a keg of beer and fired the co2 tank up. Everything is seeming to work well. I'm very happy with my new baby and the versatility that will allow me to grow into it! We'll see how happy the woman is about it when she gets back....:eek:

DSCF1750.jpg


DSCF1743-edit.jpg


DSCF1748-edit.jpg


DSCF1752-edit.jpg


DSCF1756-edit.jpg
 
Thanks for the heads up on this... We're moving from a condo to a house in a couple months and will have A LOT more room... So I hope to build a 3 tap kegerator and this is what I'm hoping to find to build... I'm still going to hope I find one locally but will consider one of these if they continue to sell them.
 
Thanks for the heads up on this... We're moving from a condo to a house in a couple months and will have A LOT more room... So I hope to build a 3 tap kegerator and this is what I'm hoping to find to build... I'm still going to hope I find one locally but will consider one of these if they continue to sell them.

You're welcome. The seller of the units is the best ebay seller I have ever encountered.... He even called me over the phone and helped me troubleshoot issues with my other Haier kegerator. I'm also extremely happy with the Micromatic three gauge secondary; it's very well built. Let us know what you come up with!
 
I hate to dredge up an old thread like this, but is there really enough room in there to fit three 5 gallon cornies? It sure doesn't look like it. In fact I'm not even sure two cornies will fit in there from the pictures.
 
I hate to dredge up an old thread like this, but is there really enough room in there to fit three 5 gallon cornies?

Yes, it holds three corny kegs, two 1/4 barrel kegs, or one 1/2 barrel keg. I also have a three body regulator inside mine, similar to the OP but with the gauges inside.

The only problem I've had is it will occasionally ice over. I've since put it on a timer that cuts the power for two hours every morning to defrost.
 
The only problem I've had is it will occasionally ice over. I've since put it on a timer that cuts the power for two hours every morning to defrost.

Any info on how you did this? I'm having the same problem with my converted kegerator.

TIA
 
Any info on how you did this? I'm having the same problem with my converted kegerator.

Purchase a grounded wall timer from Walmart, Amazon, etc. and set it to kill the power for a couple of hours every morning. Mine goes to sleep from 4am - 6am every morning, which is sufficient to defrost the evaporator plate.

518AA4QRH2L._SL160_AA115_.jpg
 
Purchase a grounded wall timer from Walmart, Amazon, etc. and set it to kill the power for a couple of hours every morning. Mine goes to sleep from 4am - 6am every morning, which is sufficient to defrost the evaporator plate.

518AA4QRH2L._SL160_AA115_.jpg

Great, thanks. I love simple solutions.
 
What's happening to all the water when it's defrosting?

Also to the OP - was your 3 tap tower originally a 2 tap with the third middle one added on later? Is it actually taller than a normal 2 tap so all 3 have sufficient room underneath?
 
Presumably going into the drain tray.

Duh, sounds pretty obvious you when say it...:eek:

Looking at the pics above and thinking of my own units (identical to above) I couldn't remember seeing a drain hole. But now that you say it, I do remember seeing a drain tray that mounts to the top of the compressor. I think the drain is actually behind the CO2 and only catches drips from the chiller panel and doesn't catch liquid from the bottom of the refrigerator.
 
Yeah, I can fit a commercial 5 G (1/6th barrel), a 5 G corny and 2.5 G corny or two 5 G cornies with the 1/6th barrel, but you have to really do precise maneuvering at times to make sure the door shuts...

Yes, it holds three corny kegs, two 1/4 barrel kegs, or one 1/2 barrel keg. I also have a three body regulator inside mine, similar to the OP but with the gauges inside.

The only problem I've had is it will occasionally ice over. I've since put it on a timer that cuts the power for two hours every morning to defrost.
 
No, my tower is a brand-new tower that I purchased from Beverage Factory - http://www.beveragefactory.com/draftbeer/towers/triplefaucet/D4743TT_chrome_three_faucet_beer_tower.shtml
Yes, I believe it is actually 5" taller than the original tower. I thought about doing that, but didn't like the look and honestly, my other tower was looking pretty crappy...

What's happening to all the water when it's defrosting?

Also to the OP - was your 3 tap tower originally a 2 tap with the third middle one added on later? Is it actually taller than a normal 2 tap so all 3 have sufficient room underneath?
 
I have the Haier Stainless kegerator that my wife got me for my 30th. I love it, but I really like what you have done with the gauges. I have two taps now and plan on buying a third tap on an extension. I can fit 1 - 1/6th bbl of commercial, 2 cornies, and several bombers stuck in the nooks and crannies. I might have to copy your design for the regulator when I get the extra tap, it really does get in the way when you are moving things around... plus with some custom gauge faces they would look pretty sweet...

Nice build!
 
Thanks BrewSpook... I never thought about trying to stick some bombers in there, but should as it would get the woman off my case about using so much fridge space for my precious'. Now you're on to something - custom gauge faces; I like it! Post your pics if and when you go ahead and make the changes.

I have the Haier Stainless kegerator that my wife got me for my 30th. I love it, but I really like what you have done with the gauges. I have two taps now and plan on buying a third tap on an extension. I can fit 1 - 1/6th bbl of commercial, 2 cornies, and several bombers stuck in the nooks and crannies. I might have to copy your design for the regulator when I get the extra tap, it really does get in the way when you are moving things around... plus with some custom gauge faces they would look pretty sweet...

Nice build!
 
I don't have a Haier, but just bought what appears to be a Chinese knockoff...it's almost exactly the same fridge, only it's already got a fan and some duct work installed at the factory.

My question to you is, did that clamp for the regulator come pre-installed, and if not, where did you find that? I am interested in installing something similar, but cannot find a source.
 
Cool; I assume that has helped the beer pour better....

I'm not really sure what clamp you are referring to. Did you mean the bracket for the co2 tank? The secondary regulator is basically hanging there and being held up by the brass couplings and a little silicon on the top of the kegerator. Please advise what you meant and I'll try to help.

I don't have a Haier, but just bought what appears to be a Chinese knockoff...it's almost exactly the same fridge, only it's already got a fan and some duct work installed at the factory.

My question to you is, did that clamp for the regulator come pre-installed, and if not, where did you find that? I am interested in installing something similar, but cannot find a source.
 
That's what I thought after looking at it... The bracket came with my previous Haier kegerator that I am using as a fermentation chamber now and I just pulled it from there and installed it in the new kegerator with a few sheet metal screws. I am not sure where you would find one; maybe someone on here can provide some input or another bracket that would work just the same. I would contact Chris on ebay who I purchased the kegerator from and see if he has one he can sell you for a few bucks; here is the link to his ebay page - http://myworld.ebay.com/beverator/ . Let us know what you figure out.

To anyone who needs one still, he is still selling the kegerators on there.

Yeah I meant the bracket. I have no idea why I said clamp.
 
Hey just wanted to chime in on this thread saying that I recently copied your idea. Modded my crazy knockoff Chinese kegerator almost exactly like this one because I liked the idea so much.

Three regulator bodies in the fridge connected to the three gauges on top via 3" brass pipe nipples with female couplers. Also bought some 1/2" copper tubing and ran 15" of tubing from a couple inches into the fridge up until just below the bottom hole in the tower, and wrapped it in some insulation I bought in the HVAC section of Home Depot. I stuck some additional insulation to fill in the gap between the top of the tower and the top of the copper pipes. Works great!

The kegerator I bought actually came with a fan assembly with a duct going up into the tower to cool it, but it didn't do a very good job IMO, and the copper seems to be working better.

Great; glad to hear it. Would love to see pictures of how yours looks as well... I'm surprised that the fan didn't work well, as it seems that most people like that better than this concept, but I didn't want to have another component to deal with on the interior and the power part, etc. Congratulations on your new mod; hopefully you have it full and producing a lot of great homebrew! :mug:
 
Are there lines that run through the top of the haier kegerator? I need to cut a larger hole but don't know if I will hit a line?
 
Are there lines that run through the top of the haier kegerator? I need to cut a larger hole but don't know if I will hit a line?

Not that I'm aware of, as I drilled new screw holes for the tower and drilled all of the holes for the gauges at the back without any issues... There are ways to locate the refrigerant lines if you are really concerned, but I don't recall reading anything about them on the Haier...

You putting a 3" tower on and drilling a hole for it? I can understand as it was really tight with mine and the standard 2 1/2" but I didn't want to mess with it. I also know that there are schematics out there showing the refrigerant lines of various refrigerators, but am not sure about the Haier kegerator. Good luck and let us know if you get a better definitive and how it goes!
 
I am putting a 3" tower on it with three taps so I want to be able to run three beer lines and a line to blow cool air to the tower as well. I think I will have to cut a larger hole to accomplish this. You cut a larger hole on yours with out any issues correct? Also, I really want to do my gauges like yours and I am about to buy a 3 way secondary regulator. I am extremely ignorant when it comes any hardware ect. so can you help me out on what exactly I will need. When you say 1/4"x3" nipples and female couplers is that 6 total parts? Are the nipples female threaded? What is holding the gauge up? Does just a little silicon on the top really hold all that weight?

Thanks!

Great, yeah I'm really happy with the gauge setup... Yes, that is 6 total parts - (3) 1/4" nipples and (3) 1/4" couplings. The nipples are male on both sides and the couplings are female. The nipples fit through the 5/8" holes that you will drill near the back of the kegerator and stick out enough on the top and bottom to thread into the couplings on the top and the regulator at the bottom. Then the gauges screw into coupling on the top of course... Just go to Home Depot and find these in the plumbing department (typically made by Watts); make sure that you pull one of each out of the bag and confirm that you have the correct sizes and that they will fit into your new regulator (I took my regulator with me into the store and made sure that all fit together well). Here is a link to the nipples on Watts' site - http://www.watts.com/pages/_products_details.asp?pid=6484 and here is a link to the couplings - http://www.watts.com/pages/_products_details.asp?pid=6460 .

When drilling, make sure you drill as straight of a hole as possible. Also, depending on how you drill it, you may have to resize a few times to get the nipples to fit through. The crucial part is making sure that the holes line up with the exact locations of the female couplings on your regulator so that you don't have any hiccups. Well, technically gravity and the couplings are holding the regulator up and the silicon seals the fridge off from the outside and keeps the gauges in place. I made sure that I screwed the nipples into the couplings nice and tight before slipping through and connecting to the regulator. As I said, it can be tough to make sure that all is in line and you need to be vigilant; you will definitely know once you start to connect to the regulator! I was concerned about the regulator moving around when I went to adjust the psi, but I kept the holes that I drilled as tight to the nipples as possible and I think this helped with any possible swaying.

Hope this helps and let me know if I can be of any further assistance!
 
This is EXACTLY what I was looking for. Thank you! One more thing, did you say that you did or didn't drill a larger hole for the beer lines?
 
For what it's worth, I didn't drill a bigger hole for my beer lines, and they fit just fine.

Me neither... But if you're trying to fit a blower line then you may have to crlova2. If it were me, I'd try to see if I could make it work without boring the tower hole larger before doing it.
 
I know this thread is a few months old... man this is EXACTLY the type of solution I needed for my upgraded setup. I got a 3 way secondary regulator in and was scratching my head trying to figure out how to mount the regulator in the kegerator with 3 kegs in it. (I have the same kegerator)

Anyway, this solution is PERFECT and exactly the route I am going to take. OP, were can I find these 1/4" x 3" brass nipples? Have you had any issues with this conversion since it was implemented? Thanks.
 
I know, my buddy got the same kegerator and we tried every which way to make them fit... I was sure that we could somehow mount them to the left or right inside of the kegerator, but you could not fit all three kegs in. Unfortunately, his wife does not want him to drill holes in the top in case they want to turn it back into a fridge, so he has the 3 way regulator just hanging in front of his kegs. :(

You can actually get them at Home Depot; mine carried the Watts brand. I took my entire regulator in to be safe and made sure that everything fit together. But, remember, you need a total of 6 parts - (3) 1/4" x 3" nipples and (3) 1/4" couplings. No, everything has worked very well; I adjust the gauges frequently and have no movement, but as I said, I kept the holes that I drilled really tight... I think it's a great solution for limited space and it looks really sharp. Good luck and let me know if you have any other questions.
 
Thanks again Keesimps... this is how mine turned out. The only thing I really did differently was instead of putting silicon under the coupling, I put a rubber washer to create a seal between the top of the kegerator and the coupling. I dont love the washer solution but it looks pretty good for now. Now I just need my other 2 beers to finish up so I can keg them... Thanks again.

NewReg1.jpg


NewReg2.jpg


NewReg3.jpg
 
Thanks Mikey_Dawg; I'm glad it worked out well for you! It looks really good and honestly if it was as tight as mine was, we probably don't need washers or silicone... That's a cool tower; did you make it custom? It looks like it can handle these changeable tap handles that I bought a lot better than mine - http://www.northernbrewer.com/brewing/kegging/tap-handles/changble-tap-handle-black.html . I measured and was sure that they would all fit, but got them and they hit each other. So, now I've got to figure out a solution for that!!!

Also, really like the Terrapin tap; as you can see, I live in AZ so only get to have some when I am out east, but am in love with their Rye Pale Ale! :mug:

Yep, custom T Tower that I just finished up a few weeks ago:

https://www.homebrewtalk.com/f51/my-diy-3-perlick-t-tower-232487/

I went with a T solely so I didnt have to worry about my handles getting too crowded. Building it with wood was a lot of work and if I had to do it all over again, I might go with an option like this....

https://www.homebrewtalk.com/f35/diy-4-tap-kegerator-tower-7656/

My buddy is about to build a 3 tap tower and I think he is going to copy this design.

Terrapin... yes, my favorite microbrewery...and yes the Rye Pale Ale is also my favorite beer of theirs. The brewery is in Athens where I went to school (UGA) so yea... Terrapin rocks. They also have a Rye squared, Hopsecutioner, Big Hoppy Monster, Sunray Wheat, etc. that are all very good. All this talk of beer is making me thirsty...:tank::tank:

I am thinking about trying this Rye PA clone.... just got a few other batches I need to get done first.

http://www.brewmasterswarehouse.com/recipe/558fc750/
 
Just wondering why you have the gauges above the top of the fridge? Never seen that before. Looks great!

I THINK the OP and I did it for the same reason... but for me it was solely due to lack of space in the kegerator when you have 3 cornies in it. The only place to put the 3 way regulator would be to lay it on top of the kegs and I really didnt want to do it that way... so i found this great idea and it implemented it this weekend. I really like the solution a lot.
 
Back
Top