You are using an out of date browser. It may not display this or other websites correctly.
You should upgrade or use an alternative browser.
You should upgrade or use an alternative browser.
RIMS for Dummies
- Thread starter Sawdustguy
- Start date

Help Support Homebrew Talk - Beer, Wine, Mead, & Cider Brewing Discussion Forum:
This site may earn a commission from merchant affiliate
links, including eBay, Amazon, and others.
OP
OP
Sawdustguy
Well-Known Member
Well, I agree the element is gonna get really hot really quick, but I don't know if the air in the tube would transfer the temp to the probe quick enough to save the element?
I agree if you got it you might as well use it... just not sure I would depend on it to do the job.
I don't think it is as much of a function of the probe as much as it is a function of how fast can the pid respond to the change in temperature as read from the probe. The probe reads the change in temperature. It doesn't know whether it is in a liquid or air, nor does it care.
I tested mine as if I had a stuck mash by closing the valve and completely stopped the flow...
I use a BCS460 and the control, caught the temp before it reached 170f. (It spiked about 10f above the setpoint) That is out of the box setup (I can't take credit fur tuning), I'm not sure an Auber PID would do the same, the other thing is that my tube is 2" in diameter so it has a fairly large volume to "dampen" the temp spike.
The Auber Instruments PID responds very quickly. It may be a bit more robust for the application being it is designed explicitly as a PID instead of a processor running PID software. This is a hunch on my part though.
The flow switch works well with wort so far but I have done only 7 brews since installing it. I do however clean it thoroughly after every brew (love those triclovers, makes disassembly a piece of cake)
- Joined
- Nov 18, 2008
- Messages
- 2,058
- Reaction score
- 25
I don't think it is as much of a function of the probe as much as it is a function of how fast can the pid respond to the change in temperature as read from the probe. The probe reads the change in temperature. It doesn't know whether it is in a liquid or air, nor does it care.
...
I know the PID responds to the probe, but the temp of the probe has to change before the PID will react.
As an example;
If a heating element is submerged in water and the surface of the element is 212f, you won't be able to put you hand in the water (it will all be 212f). However, in open air, you can put your hand relatively close to a red hot element that is way hotter than 212f.
The Auber Instruments PID responds very quickly. It may be a bit more robust for the application being it is designed explicitly as a PID instead of a processor running PID software. This is a hunch on my part though.
The Auber PID will respond based on it's tuning. If it was Auto Tuned with a high volume of liquid flowing across the element then when/if the flow stops, there may be an issue.
OP
OP
Sawdustguy
Well-Known Member
I know the PID responds to the probe, but the temp of the probe has to change before the PID will react.
As an example;
If a heating element is submerged in water and the surface of the element is 212f, you won't be able to put you hand in the water (it will all be 212f). However, in open air, you can put your hand relatively close to a red hot element that is way hotter than 212f. The Auber PID will respond based on it's tuning. If it was Auto Tuned with a high volume of liquid flowing across the element then when/if the flow stops, there may be an issue.
That is a proximity issue. The sensor and PID will respond quick enough but the issue is if the sensor is close enough to the element to sense the heat rise. If the water is at 212f and the sensor is in the water it will measure the rise easily. The only time I see this being a problem is when the inside of the RIMS tube is completely dry. With a stuck mash there should be some fluid left in the tube that will absorb heat and turn to steam and that will definitely be responded to by the PID. This is exactly why I mount my RIMS tube horizontally with the outlets facing upwards. The tube will never be dry when experiencing a stuck mash and the protect relay will kick in because it will be submerged.
EarthBound
Well-Known Member
I think it would be easier to use a CROSS and simply put a valve on the 4th side. After the brew session, open the valve and drain. But that is me.
I know you can't hear this Pol,
 , but THANK YOU for being someone else who's saying this. Crosses should be used so much more. Maybe they aren't because they're more expensive than two tees... *shrugs* but I think it's way better. In this case, it's with an E-RIMS tube, but there are man yother applications. For instance, I was thinking of drilling two holes (like most people) near the bottom of the kegs - one for the sightglass/thermowell combination and one for the ball valve. However, I can combine that elbow and tee into one cross using only one hole. It looks better and is easier to use because I have the ball valve on the bottom of the cross. Yeah.
erikrocks
Well-Known Member
First of all, thank you. Everyone. This thread is awesome.
I'm not sure, though, how people are connecting the tubing to the RIMS tees. Are you using hose barbs and hose clamps? Since I'm using QD's on all my tubing, can I just screw two QD's into the tees on the RIMS pipe?
I'm not sure, though, how people are connecting the tubing to the RIMS tees. Are you using hose barbs and hose clamps? Since I'm using QD's on all my tubing, can I just screw two QD's into the tees on the RIMS pipe?
First of all, thank you. Everyone. This thread is awesome.
I'm not sure, though, how people are connecting the tubing to the RIMS tees. Are you using hose barbs and hose clamps? Since I'm using QD's on all my tubing, can I just screw two QD's into the tees on the RIMS pipe?
Yup. I'm in process of building this right now and I will be screwing in male QD's on both tees.
klyph
Well-Known Member
First of all, thank you. Everyone. This thread is awesome.
I'm not sure, though, how people are connecting the tubing to the RIMS tees. Are you using hose barbs and hose clamps? Since I'm using QD's on all my tubing, can I just screw two QD's into the tees on the RIMS pipe?
I have the McMaster brass quick connects on mine.
erikrocks
Well-Known Member
Cool. Thanks.
Bru
Well-Known Member
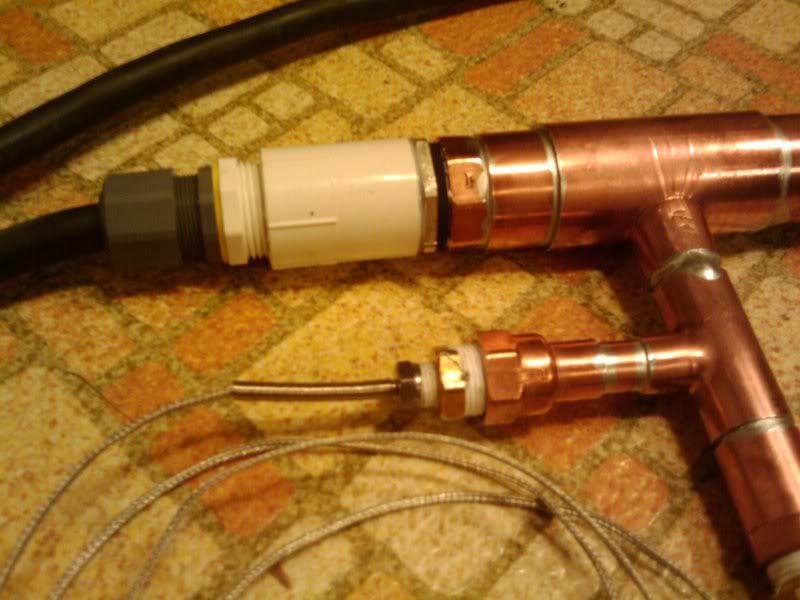
Whats the purpose of having a T-peice on both ends ? In other words run the wort straight in from the opposite side the element is installed.
Whats the purpose of having a T-peice on both ends ? In other words run the wort straight in from the opposite side the element is installed.
Probably one end for thermocouple, one end for element. Tees are for wort in/out.
Bru
Well-Known Member
In this case the thermocouple is installed on the same side as the element. The wort could enter from the end. Unless theres another reason for the t-peice straight flow would be better.
Anyone have a basic how-to explanation on how this all works. It is kinda confusing to look at this all and figure out what all everything does.
Hopefully this isn't too dumb of a question.
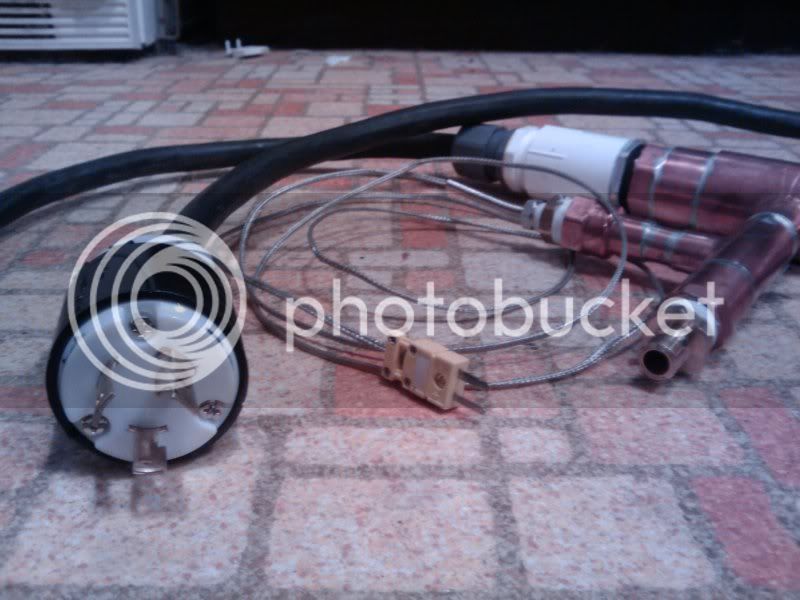
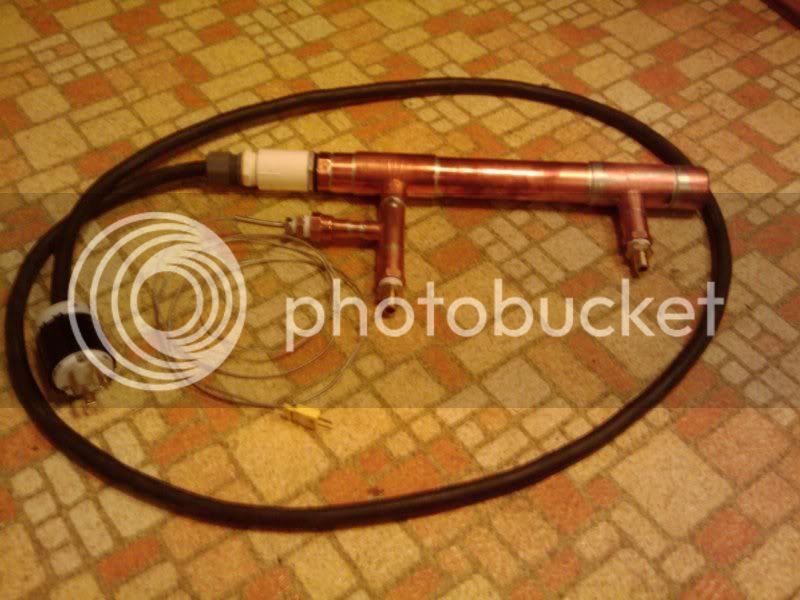
I'll be your Huckleberry: Basically you have a mash tun with a valve at the bottom. That MT can be a keggle or a cooler. A pump recirculates wort from the bottom and that passes through a heating tube (RIMS tube like the copper one a few posts up) and gently back to the top of the grain bed. Most people use a PID of some sort with a K-type probe inserted into the wort or into the RIMS tube. That tells the heater when to cycle on and off for maintaining the mash temp. The pump recirculates the wort for the entire mash. Never allow the heating element to run dry or you'll be replacing it.
A lot of guys build their own PID but you can buy a ready made one like I did from Auber Instruments. Also, the RIMS tube parts are not available at your local Home Depot or Lowes. The weldless parts are what most guys have used and you will spend around $100 for those in stainless. However, there is a vendor on this forum who is manufacturing a ready to use welded tube for $75! http://brewersequipment.com/SSRimsTube.html
You will also need the electric element that screws into the tube and hose barbs for your tubing. The elements are typically water heater elements and they can be bought at HD or Lowes. Everyone recommends a low watt density element so your wort will not scorch. There are some threads here about which ones to use and how to wire them.
You could also do this:
https://www.homebrewtalk.com/f51/introducing-lazy-mans-rims-195790/
In this case the thermocouple is installed on the same side as the element. The wort could enter from the end. Unless theres another reason for the t-peice straight flow would be better.
Yes, on closer inspection I see that. Seems counter-intuitive to have the temp probe so close to the element. I would want it measuring the flow from the outlet.
Bru
Well-Known Member
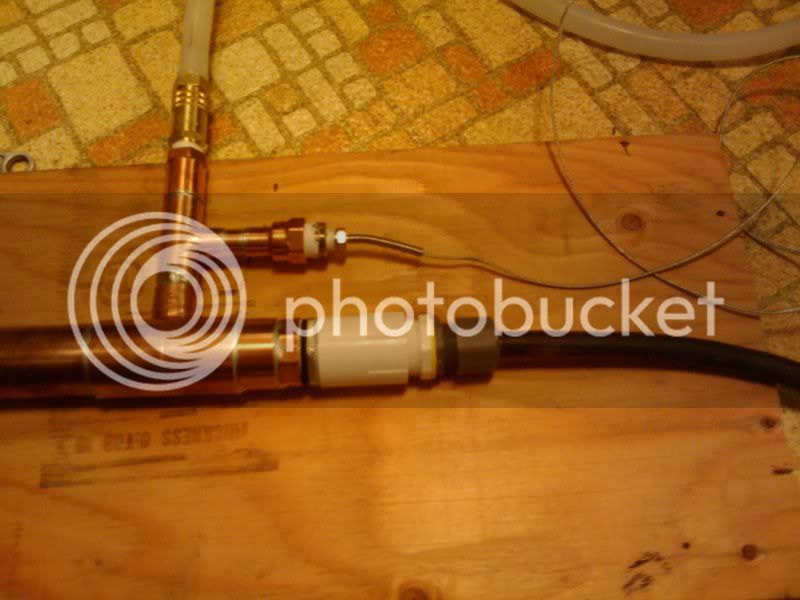
I suspect the probe is at the outlet but that doesn't explain why there is a T at each end. Hopefully klyph will tell us.
Yes, on closer inspection I see that. Seems counter-intuitive to have the temp probe so close to the element. I would want it measuring the flow from the outlet.
It is rather close to the element, but looking at his pump orientation, I would say it is monitoring the outlet.
I'll be your Huckleberry: Basically you have a mash tun with a valve at the bottom. That MT can be a keggle or a cooler. A pump recirculates wort from the bottom and that passes through a heating tube (RIMS tube like the copper one a few posts up) and gently back to the top of the grain bed. Most people use a PID of some sort with a K-type probe inserted into the wort or into the RIMS tube. That tells the heater when to cycle on and off for maintaining the mash temp. The pump recirculates the wort for the entire mash. Never allow the heating element to run dry or you'll be replacing it.
A lot of guys build their own PID but you can buy a ready made one like I did from Auber Instruments. Also, the RIMS tube parts are not available at your local Home Depot or Lowes. The weldless parts are what most guys have used and you will spend around $100 for those in stainless. However, there is a vendor on this forum who is manufacturing a ready to use welded tube for $75! http://brewersequipment.com/SSRimsTube.html
You will also need the electric element that screws into the tube and hose barbs for your tubing. The elements are typically water heater elements and they can be bought at HD or Lowes. Everyone recommends a low watt density element so your wort will not scorch. There are some threads here about which ones to use and how to wire them.
You could also do this:
https://www.homebrewtalk.com/f51/introducing-lazy-mans-rims-195790/
Thanks.
So this is basically all for the mashing processes to be easier? You don't have to sparge or anything with a recirculating mash since your entire water volume is already gonna be in there?
I found this and thought I'd share...
http://www.vandelogt.nl/htm/rims_herms_uk.htm
Helps explain it for use newbs.
Limulus, why do you use a no sparge system? Just ease of use or you have a bigger, better setup so you don't have?
http://www.vandelogt.nl/htm/rims_herms_uk.htm
Helps explain it for use newbs.
Limulus, why do you use a no sparge system? Just ease of use or you have a bigger, better setup so you don't have?
I found this and thought I'd share...
http://www.vandelogt.nl/htm/rims_herms_uk.htm
Helps explain it for use newbs.
Limulus, why do you use a no sparge system? Just ease of use or you have a bigger, better setup so you don't have?
To save time and out of general laziness. I did a couple of Brew In A Bag (BIAB) sessions last year and it worked pretty well (search for BIAB and you will see a lot of threads here and on other forums).
I had brewed back in the 90s and stopped when the kids came along. I already had a pump from those days and just decided to go with a no sparge RIMS. There are others on HBT who also use similar systems (bakins for one). He uses a real RIMS heater and not the bucket heater I have. If my lazy man RIMS does not work, I will buy a real RIMS tube but will stick with the no sparge method...at least for now.
klyph
Well-Known Member
Whats the purpose of having a T-peice on both ends ? In other words run the wort straight in from the opposite side the element is installed.
Well, the original design was to have the element at one end, and the probe at the other, for no reason other than that's how most of the one's I've seen were built. So, I bought all the parts I needed, figuring instead of using a 1.5" to 1" reducer to a 1" to 3/4 reducer (limited selection) I'd just solder that brass fitting into the 1.5" end cap. I soldered up the 1.5" pieces and then got to thinking about it (usually a bad idea) and I didn't like that the probe wire was going one direction, and the element wire the opposite. I guess I wanted to tidy it up by having all the electrical going one direction, and the hoses all going one direction. It wasn't perfectly planned or executed, but it works very well.
Short answer: there is no good reason to have T's at both ends, I changed the design halfway through.
newrbrewer
Active Member
- Joined
- May 28, 2008
- Messages
- 30
- Reaction score
- 0
I have a RIMS tube on order and I am trying to decide on the element. I will be running 120v and need to stay around 1500w or so. I can get a low density 5500w 240v element locally and was wondering what you guys thought about running at 1375w vs 1500w?
Most 1500w low density elements appear to be zinc plated and I am just not sure if I'm comfortable with that.
Most 1500w low density elements appear to be zinc plated and I am just not sure if I'm comfortable with that.
I found this and thought I'd share...
http://www.vandelogt.nl/htm/rims_herms_uk.htm
Helps explain it for use newbs.
Thanks for that link. Helped explain it to this noob.
If you use a RIMS system could you essential make it a no sparge if you start with the full boil volume of water,and after the normal mash time you set the PID to the higher sparge temp and the recirculate for the remaining sparge time?
I could be way off here. But havent seen this answered elsewhere. If its found anywhere else please feel free to show me where it is

klyph
Well-Known Member
Thanks for that link. Helped explain it to this noob.
If you use a RIMS system could you essential make it a no sparge if you start with the full boil volume of water,and after the normal mash time you set the PID to the higher sparge temp and the recirculate for the remaining sparge time?
I could be way off here. But havent seen this answered elsewhere. If its found anywhere else please feel free to show me where it is
Yes, you do this even with a sparge, it's called mashing out.
Thanks for that link. Helped explain it to this noob.
If you use a RIMS system could you essential make it a no sparge if you start with the full boil volume of water,and after the normal mash time you set the PID to the higher sparge temp and the recirculate for the remaining sparge time?
I could be way off here. But havent seen this answered elsewhere. If its found anywhere else please feel free to show me where it is
If i'm following your logic correctly, you would have a very, very thin mash. Not an ideal situation.
I may not have asked this in the best way.
And Im going to just toss out some numbers as an example
lets say I need ~6 gallons for my full boil.
If I would normally mash with 4 gallons, 1 gallon absorbed by the grains, leaving 3 gallons from the 1 hour mash, then sparge with another 3 gallons to get my 6 gallons
Could I in theory use a RIMS setup with 7 gallons, with the same 1 gallon lost to grains, after first mash of 1 hour just up the temp to what it would be after a normal sparge?
I have many thoughts, most of them are not good ones......
Thanks for that link. Helped explain it to this noob.
If you use a RIMS system could you essential make it a no sparge if you start with the full boil volume of water,and after the normal mash time you set the PID to the higher sparge temp and the recirculate for the remaining sparge time?
I could be way off here. But havent seen this answered elsewhere. If its found anywhere else please feel free to show me where it is
No problem. I am a total noob and that helped explain a lot of it to me too.

Yes, you do this even with a sparge, it's called mashing out.
If you are planning on using a 120v element, don't plan on hitting mash-out temperatures very quickly. I tried this on Monday, recirculated for 45 minutes thinking that I could set the PID to 168 for the last 15. It didn't work. I was only able to get it to 158 in 15 minutes. From my experience, you need a way to boost the temperature other than RIMS. In my set-up, that would be direct-firing the BK which I use as a grant. But since I no-sparge, I really don't see the need for mash-out anyway. I'm starting the boil as the MLT is draining into the BK.
EDIT: This reply was to Shackled's question. I see from your pictures you are using 220VAC.
If i'm following your logic correctly, you would have a very, very thin mash. Not an ideal situation.
Why? That is the whole premise behind no-sparge.
I may not have asked this in the best way.
And Im going to just toss out some numbers as an example
lets say I need ~6 gallons for my full boil.
If I would normally mash with 4 gallons, 1 gallon absorbed by the grains, leaving 3 gallons from the 1 hour mash, then sparge with another 3 gallons to get my 6 gallons
Could I in theory use a RIMS setup with 7 gallons, with the same 1 gallon lost to grains, after first mash of 1 hour just up the temp to what it would be after a normal sparge?
I have many thoughts, most of them are not good ones......
Yes you can. But you can't expect the RIMS to heat it up that fast. It's real utility is to keep mash temperatures constant during recirculation. You'd need an additional boost of heat if you planned on mash-out in a reasonable time.
craigsphillips
Well-Known Member
Nice thread, Sawdustguy! It has been very informative and I've learned a lot.
Could you use Auber PID Model #SYL-2342, instead? It has a built-in relay that can handle 10A at 120VAC. That means a 1200 watt load can be connected directly to the controller without the need of an external relay or SSR. It would save the cost of the 1/4 DIN PID and 25A SSR. Thanks in advance for commenting.
Could you use Auber PID Model #SYL-2342, instead? It has a built-in relay that can handle 10A at 120VAC. That means a 1200 watt load can be connected directly to the controller without the need of an external relay or SSR. It would save the cost of the 1/4 DIN PID and 25A SSR. Thanks in advance for commenting.
craigsphillips
Well-Known Member
I guess this thread is dead...
OP
OP
Sawdustguy
Well-Known Member
On a forum like this you can't expect answers immediately. It can take a couple of days. Sure you can do that, and if you read the auber website for that particular PID, you would have known that it is designed to eliminate the need for an SSR with a low draw device.
From the Auber Website:
1200 watt, 120 volt, low watt density elements are not common. After a quick Google search, the first page yielded only one: 1200 watts @ 120 Vac Water Heater Element
From the Auber Website:
One of the unique features for this controller is that the built-in relay can handle 10 A of current at 120VAC. That means 1200 watts of load can be connected directly to the controller without the need of an external relay or SSR. That is a very convenient for applications that only a small heater is used.
1200 watt, 120 volt, low watt density elements are not common. After a quick Google search, the first page yielded only one: 1200 watts @ 120 Vac Water Heater Element
You could use a 240 volt rated element and feed it 120 volts for 1/4 the rated wattage.
craigsphillips
Well-Known Member
On a forum like this you can't expect answers immediately. It can take a couple of days. Sure you can do that, and if you read the auber website for that particular PID, you would have known that it is designed to eliminate the need for an SSR with a low draw device.
From the Auber Website:
1200 watt, 120 volt, low watt density elements are not common. After a quick Google search, the first page yielded only one: 1200 watts @ 120 Vac Water Heater Element
No worries, Sawdustguy. I'm electrically slower than most. I did read that on Auber's website, but justed wanted to run it by some other to see if there was something I was missing. It appears I was missing something, the size of the element.
So, if I understand correctly, the 1500 watt low density element has too high wattage for the model PID I want to use. Is there a way to still use the 1500 watt low density element and limit the wattage so it doesn't go over 1200 watts? If not and I manage to find a 1200 watt low density element will it heat the wort enough.
Thanks for your help.
It won't heat the wort in any time soon. It is designed to maintain heated wort at a steady mash temperature, which is does very well. If you want to heat to substantial temperatures, 1200 watts probably won't do it. I know that 1500 watts won't. To heat, you probably need 220v elements. At least that is my experience.
craigsphillips
Well-Known Member
You could use a 240 volt rated element and feed it 120 volts for 1/4 the rated wattage.
Kladue, maybe you could help me understand this idea. I get confused, because my house is 120V power. What size element would you use and how do you calculate to 1/4 the rated wattage. You guys must be electrical engineers or something.
klyph
Well-Known Member
Kladue, maybe you could help me understand this idea. I get confused, because my house is 120V power. What size element would you use and how do you calculate to 1/4 the rated wattage. You guys must be electrical engineers or something.
If you take a 4500w 240v element, and run it at 120v, it will run as 1125w. That is my understanding anyway.
craigsphillips
Well-Known Member
It won't heat the wort in any time soon. It is designed to maintain heated wort at a steady mash temperature, which is does very well. If you want to heat to substantial temperatures, 1200 watts probably won't do it. I know that 1500 watts won't. To heat, you probably need 220v elements. At least that is my experience.
Thanks, Reelale. I was only looking for this element to maintain wort temperatures, and curious to know if it will accomplish this task. I expect to direct fire the mash tun when needing to raise the temperature of the mash any substantial amount, although I don't expect to have to because I don't step mash.
Similar threads
- Replies
- 1
- Views
- 514
- Replies
- 110
- Views
- 4K
- Replies
- 7
- Views
- 464
- Replies
- 9
- Views
- 788
Latest posts
-

-

-
-

-

-

-
 Why didn't anyone ever tell me to buy a grain mill sooner
- Latest: madscientist451