
Stankonia
Well-Known Member
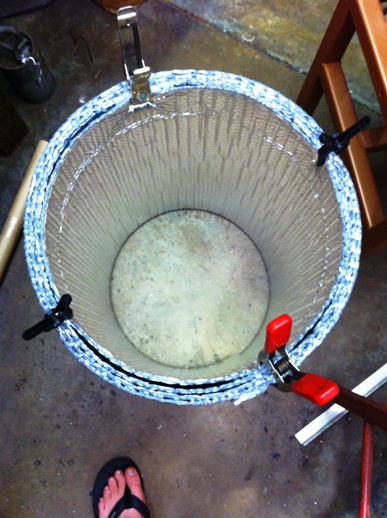
Just got done fashioning together an insulation "jacket" for my keggle MLT.
I have read Bobby_M's MLT insulation thread over a few times, and actually have all the materials to mimic what he did, and I eventually probably will...but I'm brewing Sunday and didn't want to undertake his project in the meantime..this took 1-2 hours and was kind of spur of the moment.
My system is a direct-fire recirculating mash, so that presented problems of how to insulate my keg. I couldn't have reflectix on with the flame going. I had used reflectix a couple times when doing all-grain BIAB, and it was a pain rolling it off and on when I needed to turn the flame on.
So, I went a bought a new roll today and came up with a plan to have 4 layers of reflectix insulating the MLT, while making it super-easy to remove when (hopefully IF) I need to take it off.
I appreciate any feedback and advice you guys have. Also, I hope some of you guys find it helpful!
First thing I did was wrap the Reflectix around the keg 4 times and cut it. Then I put some clamps on it to hold it in place so it could keep its shape when I slide it off the keg.
So, where the beginning end, and ending part overlapped I poked holes, and bolted them together with fairly large washers on each side to prevent the bolts from ripping through. I put the flat part of the bolt on the inside, with the nut on the outside, and the bolts I got were just barely long enough.
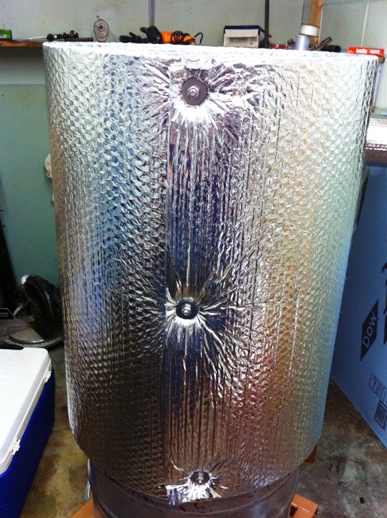

Now, this could be the final step, but with my fittings (outflow ball-valve, inflow ball-valve at the top, and a thermometer) I can't design it where I can simply slide it on and off.
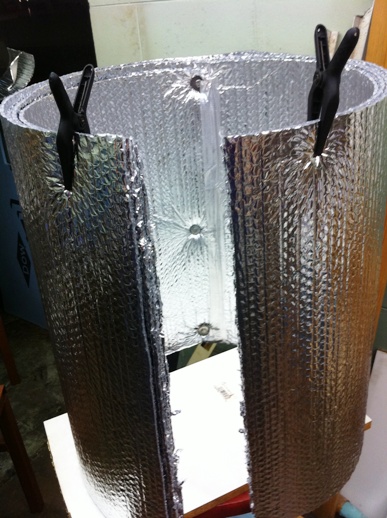
I went to the opposite side and cut all 4 layers straight down the middle..I could have used the same nuts and bolts set-up on this side to attach the layers together, but I opted for aluminum tape.
With the tape...
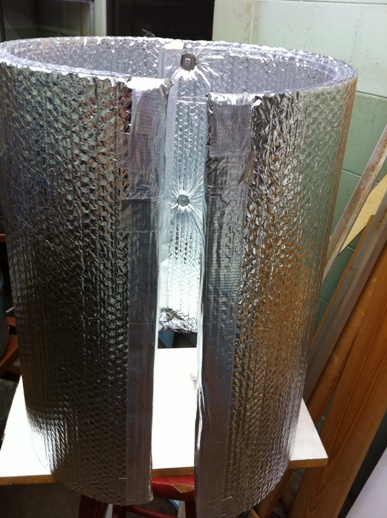
So now I have 4 layers all held together as one piece that can open up easily rather than unwrapping 16ft of this stuff. I held it together with some straps that are easily removed when I will need to turn the flame on.
Here is what it looks like, along with a fitted cap I made for it.

Tomorrow I'm going to cut the holes for my fittings. I'll post some pics with everything put together after that.
I have read Bobby_M's MLT insulation thread over a few times, and actually have all the materials to mimic what he did, and I eventually probably will...but I'm brewing Sunday and didn't want to undertake his project in the meantime..this took 1-2 hours and was kind of spur of the moment.
My system is a direct-fire recirculating mash, so that presented problems of how to insulate my keg. I couldn't have reflectix on with the flame going. I had used reflectix a couple times when doing all-grain BIAB, and it was a pain rolling it off and on when I needed to turn the flame on.
So, I went a bought a new roll today and came up with a plan to have 4 layers of reflectix insulating the MLT, while making it super-easy to remove when (hopefully IF) I need to take it off.
I appreciate any feedback and advice you guys have. Also, I hope some of you guys find it helpful!
First thing I did was wrap the Reflectix around the keg 4 times and cut it. Then I put some clamps on it to hold it in place so it could keep its shape when I slide it off the keg.
So, where the beginning end, and ending part overlapped I poked holes, and bolted them together with fairly large washers on each side to prevent the bolts from ripping through. I put the flat part of the bolt on the inside, with the nut on the outside, and the bolts I got were just barely long enough.
Now, this could be the final step, but with my fittings (outflow ball-valve, inflow ball-valve at the top, and a thermometer) I can't design it where I can simply slide it on and off.
I went to the opposite side and cut all 4 layers straight down the middle..I could have used the same nuts and bolts set-up on this side to attach the layers together, but I opted for aluminum tape.
With the tape...
So now I have 4 layers all held together as one piece that can open up easily rather than unwrapping 16ft of this stuff. I held it together with some straps that are easily removed when I will need to turn the flame on.
Here is what it looks like, along with a fitted cap I made for it.
Tomorrow I'm going to cut the holes for my fittings. I'll post some pics with everything put together after that.

")

