Selecting an Air Conditioner for Glycol Chiller

Homebrew Talk - Beer, Wine, Mead, & Cider Brewing Discussion Forum

Help Support Homebrew Talk - Beer, Wine, Mead, & Cider Brewing Discussion Forum:

This site may earn a commission from merchant affiliate links, including eBay, Amazon, and others.

Sark

Supporting Member
HBT Supporter
Joined
Sep 5, 2010
Messages
30
Reaction score
0
Location
Long Island
I'm planning to build a glycol chiller for two brewhemoths. I've done a LOT of research and have the bulk of my build squared away, but I'm unclear on how I should go about selecting the air conditioner.

I've found several old threads discussing builds that use a 5000 btu a/c to power multiple conicals, so I think I've got that part settled.

More confusing, though, are vague references that one should go with an a/c where the "copper lines go up and over to the evaporator from the compressor" (whatever that means) -- how can I figure this out without first having a chance to disassemble the a/c?

Also, can anyone confirm whether it's easier to install a non-digital a/c?

Bottom line, I'm not all that handy, so all suggestions are welcome if you know of a specific unit that's easier for this project than others. Much appreciated! :mug:
 
An analog unit is your best bet. I use a 6kbtu for one brewhemoth. It works fine. Definitly room for more fermenters. It is important to size your glycol bath size appropriately. I have 9 gallons of glycol at 25ºF. I'm going to build a new bath and make it fit about 12 gallons.

The reference to the copper lines is a good thing to check, if you can... The copper that goes from the compressor to the evaporator and then back to the condenser is what you are referring to. The more conducive those are to reaching your glycol bath the less bending and manipulating you will need to do.

I'd find the cheapest unit you can on craigslist and build away.
 
Thank you! Any way to gauge if the coils are configured that way without taking apart the a/c? I'll scour amazon for pictures of the back body of various units if there's something easy to look for.
 
Not really. If you go to lowes or home depot you could probably look at the floor models and peek through the vents. I'd recommend buying the cheapest 5k unit you can off CL.
 
If you buy new, disassemble carefully so that you can put it back together and return it, if it wont work. Home depot and WalMart are pretty east with returns.
 
I've built one for me and one for a friend. Mine was analog, friends was digital, both easy to convert with that regard. You won't know how much line you have until you get in there. Mine was very tricky to get it to fit in a cooler, while my friends took all of 2 min. On both I took an angle grinder and cut the frame and case back closer to the compressor and fan so I could get the cooler in easier, it will make everything easier to fit and much more compact.
 
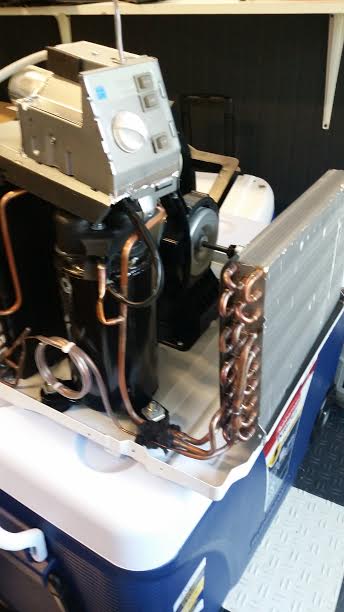
I ended up getting the 5k btu LG model from Home Depot. It's been pretty manageable to work with so far. Below is a snapshot of how much coil the evaporator has to work with -- it seems like it will be pretty simple to just turn it on its head (clockwise) and drop it into the cooler vertically.

glycol.jpg
 
Can anyone offer some quick feedback with the re-wiring. I've attached the image below. My understanding is that I'll need to bypass the analog controls so that the fan (on high speed) and compressor turn on when power is triggered by the ranco. My ranco is pre-wired so I just need to deal with re-wiring on the a/c end. Any help would be appreciated.

wiring.jpg
 
Just to be sure, you are planning on bending the evaporator coil down correct? I'm not sure how well the compressor would like being on its side. If you are using a ranco to power it, I would try wiring the thermostat wire together. When the unit gets powered on it see's that it is "warm" and will run nonstop until the ranco kills the power. The schematic looks more complex than mine did, but I don't think it had the motor and compressor listed separately. It probably will take a few minutes before the compressor will kick on (warm up phase), but it should work. One more thing, some ac's have a second sensor to check for ice on the evaporator coil, which you will want to disable if it does.

Check to see if that will work, if not there is another way to try, but I would like to see a couple of pics of the wiring. Where the switch(3) is the diagram is a little confusing. I think mine was a little easier to decipher because it had 1 cap instead of 2.
 
Thanks, Spellman. I had initially planned to put the compressor into the cooler on its side vertically, as that seemed to be the easiest and most natural way to do it without a lot of bending. I thought I had had seen it done that way in certain builds, but now I'm glad I haven't bent it yet. So it should be kept horizontally as positioned in the a/c?

Appreciate your feedback on the wiring as well. I'm not sure I follow exactly how to wire the thermo to the ranco, but I'll take a picture of how the inside of the a/c is wired when I get home from work. Much appreciated.
 
The compressors are designed to be oriented the way they are in the devices they come in to function properly, not to say they won't, but I doubt you want to take a chance after all this work. There should be a wire going to the thermostat and one coming out, wire those so it is always engaged. We aren't using that anymore because your ranco will be the brains of the operation. I wrote a lengthy message and when I hit post it lost it all :mad:, so here is a picture. The skinny of it I used an angle grinder to trim the ac unit down so I could get the cooler closer to the coil. The way your coolant line is it is going to be tricky to get the coil in, but it will work if you get creative. You may be able to get that large portion of the line in the cooler.

Untitled-1.jpg
 
Awesome, thank you! That's very helpful. I didn't have a chance to grab a picture of the wiring last night but I'll do so later today. Is the red line (for cutting) referring to the bottom base of the unit? I'm assuming a hacksaw can handle that?

Thanks again for the great feedback.
 
The compressor has to be upright as it is currently installed or it will not get oil and fail.
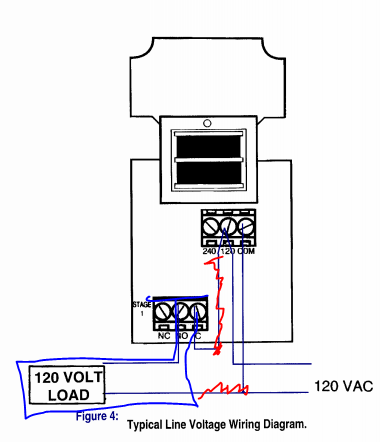
That schematic looks pretty simple and it might be easiest just to pull the wires off the ac thermostat and run them to the ranco NO and Common terminals. That way you could just plug the ac into the wall and turn it on like normal. The ranco would then act as the ac thermostat and you wouldn't have to worry about jumping anything out in the ac controls. The 120v load in the ranco diagram would be the thermostat. Do not apply any voltage from the ranco to the ac or you'll fry something which is why I scribbled out the power wire from the ranco to the load.

http://www.etcsupply.com/manuals/ranco_etc_instructions.pdf?osCsid=f28e86124bbee093f7054abc2d5750a3

Capture.PNG
 
Awesome, thank you! That's very helpful. I didn't have a chance to grab a picture of the wiring last night but I'll do so later today. Is the red line (for cutting) referring to the bottom base of the unit? I'm assuming a hacksaw can handle that?

Thanks again for the great feedback.

Yes, red line is where to cut. You'll probably need to cut the shaft down on the fan too. While a hacksaw will technically work, do yourself a favor and pick up a cheap angle grinder to make the cut. I don't even want to think about how long that would be to cut by hand. Remember you will need to cut the top cover down as well.
 
Spellman and WPStrassburg -- thanks for the continued great feedback! I've been slammed at work and haven't had a chance to take a final run at this, but I plan to do so this weekend. I also picked up a cheap angle grinder to ease the cutting process. :mug:

Thanks again!
 
Hey Sark,
I'm also building a glycol chiller right now and was wondering how you decided to pump your glycol to your fermenters?

1. Independent pumps for each fermenter?
2. 1 big pump + solenoids for each fermenter?
 
I thought about this too when I was building mine. Either will work great. In the end I decided that independent pumps had an advantage of being cheaper and easier to set up. Using 1 big pump method really doesn't have much advantages for the homebrew size. If you were constantly running large batches through 24/7/365 like even a micro does, it could have some advantages, but not at the rate we do. Most of the solenoids are 12v or 24v, so you would have to get that voltage wired in, which is not terribly hard but kind of a hassle. You will also need to add a pressure gauge and manual shutoff valve. In the end I felt #1 was a better/easier/cheaper option that gives me the exact same results.
 
Hey, Michael. Great question. I'm going with 1 independent pump for each fermenter, along with 1 pump to keep the glycol recirculating inside of the cooler, so it will be 3 pumps total. Like Spellman, I had considered solenoids, but this design seemed cheaper and simpler and, quite frankly, I lack the technical know-how to build the solenoid setup without a lot of hand-holding.

Also, just to keep this thread up to date, my build has been inching along but regrettably still isn't complete. I finally got around to cutting down the metal shaft and the base frame of the a/c -- and successfully bent the coils -- in all the spots indicated in Spellman's mark-up (thanks again!!). Fortunately the coil bent easily, and the angle grinder cut everything easily enough, so all (hopefully) went well there.

Now all that's left is to complete the re-wiring. I'll post up a pic or two to reflect the updates soon enough. And then finally onto that re-wiring!
 
I chose the 1/2" solenoid (12V) approach + an automatic shut-off pump for when all solenoids are closed. I will also be running a very cheap submersible aquarium pump inside the glycol reservoir to keep things moving.

I've been fermenting 15 gallon batches in blue HDPE barrels and will test my system on it. Have you thought about your coil size and length? I was wondering if a 20ft 1/2" SS coil will be sufficient since I only have access to that length and I don't really trust my local welder to weld in an extension because last time he did leave a minor leak in my HERMS coil and I don't want to be drinking PG!
 
Sounds like a great setup! I'll be using the dual coil chiller/heater that Brewhemoth sold. It's 3/8" but I'm not sure about the total length of each set of coils. I'll likely use both the hot and cold coils to chill if I need more cooling power in the warmer months.
 
Back
Top