DIY Tap Handles

Homebrew Talk - Beer, Wine, Mead, & Cider Brewing Discussion Forum

Help Support Homebrew Talk - Beer, Wine, Mead, & Cider Brewing Discussion Forum:

This site may earn a commission from merchant affiliate links, including eBay, Amazon, and others.

hughes_brews

Supporting Member
HBT Supporter
Joined
Feb 16, 2008
Messages
84
Reaction score
3
Location
Washington Twp.
I have been wanting to make tap handles that are easy to switch out the labels. Here is what I came up with.

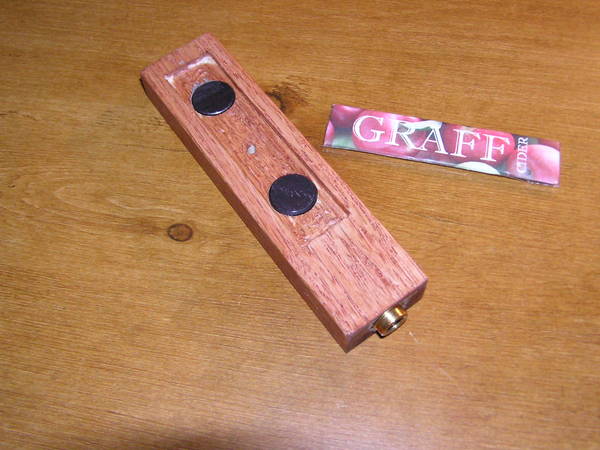
I started out with some 1x2 oak, cut into 6" lengths. Then, I carved out the face of the handles in the shape of some mending plates that I picked up. I drilled out the end and used 3/8-16 threaded inserts in the bottom of each handle. Finally, I drilled out some holes to glue in disk magnets inside the carved out area.

P1010175.JPG


For the labels, I printed out my images and wrapped them around the mending plates. To prevent damage to the labels, I wrapped them in clear packaging tape. There is a small hole in the center of the handle drilled all the way through. This is so I can stick a nail through to push the metal plates off the magnets when I want to remove the label.

P1010179.JPG


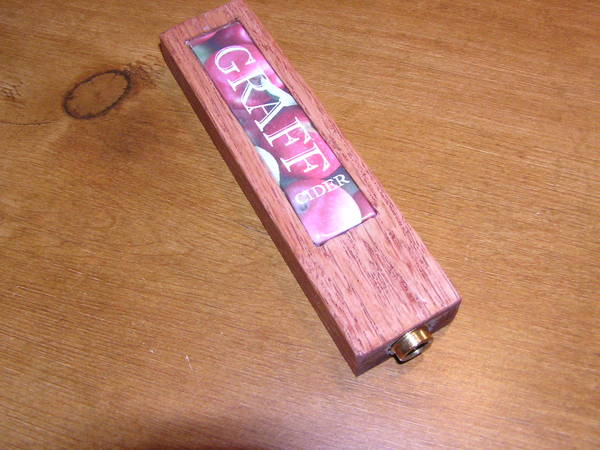
A label inserted into the handle.
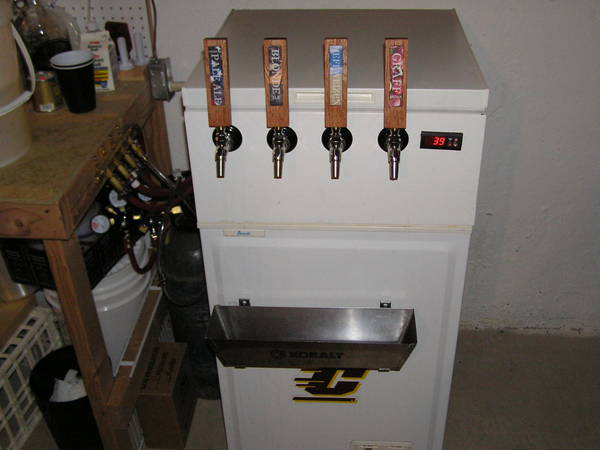
P1010176.JPG


Finished handles.

P1010174.JPG
 
Sweet! I'm going to at least copy parts of that. I think I might use a ferrule at the bottom and a finial at the top to further dress it up but the method of using the metal mending plates to attach is very creative and well done.
 
In addition I think I'll glue some magnets to each keg, that way when I keg the batch I can put the appropriate insert on the keg and when I tap it I'll simply remove the insert from the keg and place it on the tap handle.

My previous plan had been tap handles that take a business card sized insert, and luggage tag holders on the kegs to hold the business card prior to taping, but I like these handles better!
 
In addition I think I'll glue some magnets to each keg, that way when I keg the batch I can put the appropriate insert on the keg and when I tap it I'll simply remove the insert from the keg and place it on the tap handle.

You can probably just zip-tie a donut magnet to the keg handle so you won't have to glue anything if you'd prefer.
 
Those are cool, but I think it would be cooler if instead of oak you used the thigh bones of fallen enemies...imho.
 
Nice work! Might have to enter copycat mode for this.

Question about ye olde threaded insert tho. I bought a bunch of them, and made a few "test" handes all of which end poorly. It *seems* like a half inch hole is just too small for them - I drill it without problem, but can never get the insert more than a third of the way in before it splits the handle?
 
Question about ye olde threaded insert tho. I bought a bunch of them, and made a few "test" handes all of which end poorly. It *seems* like a half inch hole is just too small for them - I drill it without problem, but can never get the insert more than a third of the way in before it splits the handle?

I didn't have any problems with the wood splitting, but no matter how many times I tried, I could not thread them straight. :mad: So, I ended up drilling the holes a little bigger than the threads so I could just set the insert in the hole. Then, I just epoxied the insert in place while keeping the handles upside down until dry. I drilled the holes on a drill press to ensure the holes were drilled straight.
 
Can I ask what you are using for a kegerator in that shot? It looks like maybe a small footprint chest freezer with a collar?

Yes, this is an old Avanti mini chest freezer that I had for about ten years before I started brewing. The nice thing with this freezer was that there is no "hump" on the inside. The entire floor of the freezer is raised about 10-12 inches and the compressor is underneath with a lot of empty space. To allow for the height of the kegs, I built the collar with 2x10 lumber.

I can fit 4 ball lock cornies in there with pretty much no room to spare. Kind of a pain when I need to change out the ones in front since the shanks hang over the kegs, but I can certainly live with it. ;)

PICT1629.JPG
 
... no matter how many times I tried, I could not thread them straight. ... I drilled the holes on a drill press to ensure the holes were drilled straight.

chuck an appropriate sized piece of threaded rod (or cut the head off a bolt) into the drill press. Screw the insert onto the threaded rod. BY HAND turn the drill press to drive the insert into the hole straight. For safety consider unplugging the drill press from the wall first.
 
Yeah, if there's one unexpected side effect of homebrewing, it's coming to the conclusion that my tool collection is REALLY lacking... although SWMBO has a hard time believing that I need a welder, plasma cutter, drill press, laser etcher, lathe...
 
Yeah, if there's one unexpected side effect of homebrewing, it's coming to the conclusion that my tool collection is REALLY lacking... although SWMBO has a hard time believing that I need a welder, plasma cutter, drill press, laser etcher, lathe...

Don't forget a Bridgeport mill as well the "New Yankee Workshop" equipment plus his building.
I picked up a complete ShopSmith 4 in one tool a curbside find the motor was wired up wrong and now works. Granted not a quality tool but can swing 15.5 kegs. It will make deep drilled holes with 12" drill bits.
All Thread with a brass knob on top with a disc for the top cap of the tap handle threaded on would look trick.
 
Side of the road? Beemer, you suck.

In other news - drilled a 6 inch piece of 2x1 maple with a half inch bit, jiggled bit around a little to increase diameter slightly, clamped the thinner end to reinforce it, and slowly threaded the insert in. And guess what? It SPLIT THE DAMN WOOD AGAIN!! :mad:
 
Gaz; you'll like me better if I tell ya about this Craigslist item for "free you haul away". This mega buck studio ordered three brand new ones at the end of the year a tax write off as well an expanding art exhibit business.
I was on the phone and in Berkeley within 16 minutes.
I have the model 1000 fully loaded with 48" stop arms and all accessories.
This now costs $3,100 to replace as I talked with the manufacture. He knew my serial number just from where it came from. I took the floor stand off and fit the saw into my Discovery, grinning all the way home. It's trick, the ShopSmith is a POS my opinion even with it complete and running, sits outside under a tarp. Walker Turner and Rockell power tools in the shop.
Below is a machine that eats wood, made many Christmas custom frames for presents. Hey i'm app 20 miles due east of ya on an "island"
http://www.frame-square.com/page2.html
 
I said east (due) your heading north east.
I made a wood plate that screws to the small steel face plate. This locks into the keg bottom, the top is centered by the live center with a machined step sleeve. This way I can use a auto transformer with the ShopSmith vari drive for below 60 rpm's and buff a keg with the 9" Milwaukee grinder / buffer.
I have the tool rest for use as a wood lathe also on the ShopSmith.
It's a do all not good at all type of tool, JMO.
 
Side of the road? Beemer, you suck.

In other news - drilled a 6 inch piece of 2x1 maple with a half inch bit, jiggled bit around a little to increase diameter slightly, clamped the thinner end to reinforce it, and slowly threaded the insert in. And guess what? It SPLIT THE DAMN WOOD AGAIN!! :mad:

I would cut the insert threads down until they're about 3/4 gone almost to the root of the thread for epoxy to bite with only a snug press in fit into a straight clean drilled hole then insert with epoxy. My opinion these brass thread inserts are too short to begin with. I would make them 2" to 3" long out of brass then tap the end to screw onto your taps threads. No working loose being longer or splitting the wood handles plus added grooves to these inserts for the epoxy to bite and hold better. Just an idea.
 
I made this out of an old wooden candlestick I found at goodwill. I glued a wine cork into the spot where the candle goes and drilled that out for the threaded insert. The soft cork worked great with no splitting (I've had trouble in the past with that.

http://picasaweb.google.com/101164913650925281723/Beer#5477273031862028898

Then my wife found this guy on a shelf of knick knacks at goodwill and said "This will make a good taphandle, and behold! Fu Man Brew, dispenser of beer!

http://picasaweb.google.com/101164913650925281723/Beer#5477273027492891698


The candlestick is good, but the Fu Man Brew is inspired!! :mug:
 

Latest posts

Back
Top