3 Tier Tree Sculpture Plans?

Homebrew Talk - Beer, Wine, Mead, & Cider Brewing Discussion Forum

Help Support Homebrew Talk - Beer, Wine, Mead, & Cider Brewing Discussion Forum:

This site may earn a commission from merchant affiliate links, including eBay, Amazon, and others.

HenryHill

Well-Known Member
Joined
Mar 9, 2007
Messages
3,039
Reaction score
13
Location
Perry, MI
I've got a length or two of 2" x 2" sq. tubing. A friend has small mig.

I think I've got the 2 horizontal legs/casters/cross-member and spine straight in my head. Can someone point me to a set of various views of a 3 tier tree style sculpture so I can look at the platform configuration? Actually, I am being convinced to use a cooler to mash/lauter, so what shape does that actually dictate? :confused:
 
A cooler MLT really doesn't dictate the shape. You could go with something like mine, desertBrew's, or Dude's, or any other various shapes.

Here's my finished product. The dimensions are really simple. There's 24" between the levels and 10" between the forks of each tier. The base is ~ 3' x 4'. I had never welded before and it was really simple to put together.

brew_stand_complete.JPG


Here's a schematic for desertBrew's.

gif_1.gif


And his finished product.

574-3-tier.JPG


Here's Dude's. He used to use a cooler MLT, but I thought I remember reading that he may be going to a SS MLT instead. Anyway, here's a pic of his.

636-stand2.jpg
 
Here's the deal. I've been torn and going back and forth on a folding, unobtrusive wood type for the garage where I only ever put one car anyway; where I have floor drains and a hose bibb for water, and just folding it up and stashing it and the keggles in a corner, under tarp.

Or, just committing the space to a full blown fabricated heavy steel frame, multi-tier, to be set up in the 'Barn'. It's a 50 x 60 insulated and finished out building with water, single utility sink, floor drains, electric, cable, and phone, that is currently just the hot rod and hot boat workshop. Their are 3 separate rooms; 1 for the boat, 1 for the mower, ATC, lawn equipment, etc, out back, and the main room that has about 30 x 40 with a 42" x 70" x 27' pit (complete with electric for lights and tools, and a sump pump at one end).

I've considered dedicating the area by the outside wall of the near bay (the one without the pit of course), and using about 16 feet of wall space for sculpture, shelving and storage of equipment, with grain going into sealed blue plastic barrels, and hops stored in the freezer.

While I have 2 kegs for brewing now and 1 more available, I have been told to just M/L in a cooler and KISS. I think I will no doubt move to at least single pump, QD dedicated-hoses type system in the future, but not to try to get to every aspect of a plumbed system in the short term. So, I was planning on suing an old 34 Q cooler and a copper manifold ( I DO have the 1/2" copper pipe now to use, but dread sawing the slits) or SS braid which is quick and easy to set-up, but I 'd have to buy plumbing connection hoses and salvage the braid from them; I don't want to scavenge my good hot rod SS braided hose!).

Okay, so I don't NEED 2" x 2" steel tube to set a cooler with 3-4 gallons of water in it onto, but just the same, I DO need the elevation and cascading steps of tiered system to avoid jumping straight to a pumped plumbing system.

I'm just trying to get a look at what options I have; as I don't want to commit to a big old rectangular tier sculpture and then have needless elevations when I go to using a pump.

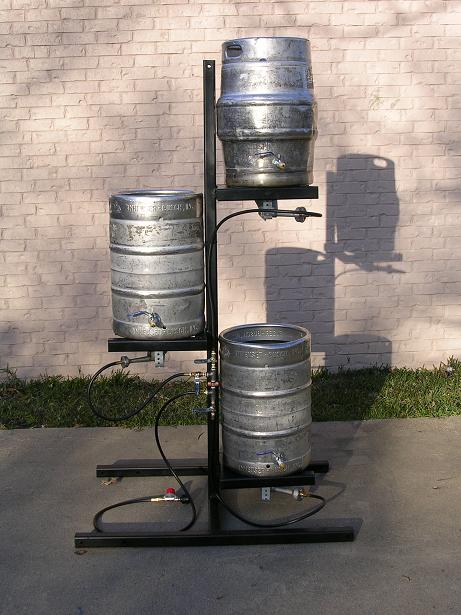
THIS guy is making me think I'm smarter for just waiting on ANY type of brewing-dedicated bench or rig, and just stay red-neck kinda style until I can just build an inline stand with a pump system with valves and hoses. :(
 
What material did you use for the three tiered step down shown above? The one with the scematics?

Aluminum, think it's 1" square; hollow in the middle but don't recall the thickness. Some guy at my work did all the welding for me which he does for his job. Materials were from work as well. Lighter in weight but still plenty strong. It's been pimped up a little more since that pic with pump and diamondboard.

3-tier_pump_fly_sparge.JPG

What is the pump for ? Is this a RIMS system ? Could you batch sparge with this setup ?
 
What is the pump for ? Is this a RIMS system ? Could you batch sparge with this setup ?

To control sparge flow for one. Input to the pump from the mash is pushed into the boil kettle with the pump. Flow is controlled from boil kettle ball valve. And when it's time to put to fermenter I pump it thru chiller / aeration tube by changing quick connects.

I don't do batch sparge. It's one of those you do one or the other kinda things :). Plus I was told of a shorter rest approach (30min) with 90 min sparge @ same rest temp from a brewpub brewer and just kind of stuck with it. I'm in no hurry when I brew ;)

PS - it wouldn't have to be any tier if I bought a second pump where I could pump HLT to mash but gravity is fine for me... and gravity is how I started with this setup and don't feel like rebuilding the frame. But gravity locks up sometimes where the pump gives the umpfff to keep the flow going from mash to kettle.
 
Thanks -

I may be getting a 3 tier system and some other items from a dearly departed brewer..have never used a gravity system or done fly sparging ..

the pump makes sense now.. do u fill the hlt on a ladder or use a pump/hose ? Sounds like your fly-sparge time is abt equal to a typical batch sparge session..

I use a 10g cooler as HLT now, and fill using food grade hose..heat w/bucket heaters..another cooler is mash tun..gravity fed to BK it made such a difference not having to slog all that water - just turn the faucet then turn it off..
 
To fill HLT I use an RV hose (the white ones, for drinking water) from outside water faucet that also runs through a carbon filter. I do hop on the ladder to look at where the water level is at since I haven't had the motivation to add sight glasses to my kettles yet.

New hobbies have deferred brew gear expenditures ;). And what I got works for me now.
 
I never thought of the RV hose - good idea....is the carbon filter required ?

when you drain from the HLT to the MLT for the mash, how do u tell how much has been drawn off with no sight glass (maybe it is on the MLT ?)
 
I never thought of the RV hose - good idea....is the carbon filter required ?

when you drain from the HLT to the MLT for the mash, how do u tell how much has been drawn off with no sight glass (maybe it is on the MLT ?)

Because of no glass, I actually remove the sparge arm, measure the h20 into the MLT with a 1g pitcher, stir etc to get to rest. During sparge I measure @ the boil kettle with sharpie marks on it.

As for the carbon filter, depends on your water but they're about $15-20 at an RV store that screw right onto garden hoses (male/male on filter). So I have the filter in-line with two hoses via splice of 1 20' rv hose.
 
DesertBrew,
How is hte aluminum holding up? I have been looking into building my own brew stand but debating between Steel, SS, and Aluminum. My uncle has a welding shop so I have a choice of what to use.
 
DesertBrew,
How is hte aluminum holding up? I have been looking into building my own brew stand but debating between Steel, SS, and Aluminum. My uncle has a welding shop so I have a choice of what to use.

Holds up great and it's not a tank to move around. Was thinking about putting a small 4 cyclinder engine on it with a steering wheel and take it on the road. :cross: Really though, zero problems with thickness of material used holding 12+ gl. A pro with aluminum welding would confirm no probs
 
A cooler MLT really doesn't dictate the shape. You could go with something like mine, desertBrew's, or Dude's, or any other various shapes.

Here's my finished product. The dimensions are really simple. There's 24" between the levels and 10" between the forks of each tier. The base is ~ 3' x 4'. I had never welded before and it was really simple to put together.

brew_stand_complete.JPG


Here's a schematic for desertBrew's.

gif_1.gif


And his finished product.

574-3-tier.JPG


Here's Dude's. He used to use a cooler MLT, but I thought I remember reading that he may be going to a SS MLT instead. Anyway, here's a pic of his.

636-stand2.jpg


Really old post - but lil sparky do you have any plans or a cut sheet for your tree system?

Thanks
 
Back
Top