You are using an out of date browser. It may not display this or other websites correctly.
You should upgrade or use an alternative browser.
You should upgrade or use an alternative browser.
Closed-system pressurized fermentation technique!
- Thread starter WortMonger
- Start date

Help Support Homebrew Talk - Beer, Wine, Mead, & Cider Brewing Discussion Forum:
This site may earn a commission from merchant affiliate
links, including eBay, Amazon, and others.
1.010 sounds reasonable. Once those suckers drop I bet it tastes pretty darn good! What did you do for a recipe?
haeffnkr
Well-Known Member
I try to carb up some naturally and transfer under CO2.
I still have to force carb some to get it to serving pressure.
Good idea
I will even try to split a batch into a carboy and a keg, both with stoppers/air locks and push both out with CO2 to serving corny kegs.
thanks Kevin
I made batches of Kolsch and Fat Tire clone, both light balanced beers and would easily show any flaws.
I split the batches, 1/2 in a carboy and 1/2 in a sanke keg.
Both had stoppers and bubblers on them (no spunding valves used)
Bottom Line -
I could not taste any difference between the carboy and the Sanke keg fermented beers.
So it does indeed seem the source of my lacto/acid infection did come from my spunding valve assemblies.
This was a painful lesson learned.
Good luck to all
Haeffnkr
OP
OP
I made batches of Kolsch and Fat Tire clone, both light balanced beers and would easily show any flaws.
I split the batches, 1/2 in a carboy and 1/2 in a sanke keg.
Both had stoppers and bubblers on them (no spunding valves used)
Bottom Line -
I could not taste any difference between the carboy and the Sanke keg fermented beers.
So it does indeed seem the source of my lacto/acid infection did come from my spunding valve assemblies.
This was a painful lesson learned.
Good luck to all
Haeffnkr
Quick question, do you have access to a pressure cooker/pressure canner? If so, remove your pressure gauge from the PRV and pressure cook it for a good :45. That will sanitize it and then you know you are good. I do this ever so often on all the equipment I have that fits in it. I even do my Therminator in mine to make sure I don't get any bugs in my brew I didn't put there myself. Glad you know your source now, I just hate it is the thing that makes this technique possible.
Sent from my iPhone using Home Brew
I hate to ask this but, anyone got a part list with the latest best parts for the spunding valve setup? I just came across 4 sanke kegs of various sizes and I'm ready to jump in. I've been wanting to do this for the past year. Thanks!
I hate to ask this but, anyone got a part list with the latest best parts for the spunding valve setup? I just came across 4 sanke kegs of various sizes and I'm ready to jump in. I've been wanting to do this for the past year. Thanks!
This may not be the best parts list, but here is what I used. I ferment my 5 gallon batches in corny kegs and 10 gallon batches in sanke kegs so I went with a ball lock conversion kit for a sanke coupler so I can use the same setup on both.
sanke coupler - owned
corny ball lock conversoin kit for sanke coupler - ball-lock-conversion-kit-for-sanke-couplers
1/4" beverage hose with flare fittings - owned
1/4" mpt to 1/4" Flare adapter - flare_adapter
1/4" fpt tee - tee
1/4" mpt nipple - nipple
1/4" fpt to 1/8" mpt adapter for valve - adapter
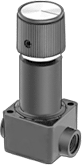
1/8" fpt pressure relieve valve 0.5-30psi - PRV
1/4" mpt 0-30psi gauge - gauge
I like this PRV because 1/2 turn is ~2psi change so it is quite easy to dial it into the pressure you want. I tried the one morebeer sells before buying this one and it was extremely sensitive and after you set it it would change pressure if you bumped it or the keg. I have not had this long enough to experience any issues with clogging and cleaning it.
Last edited by a moderator:
Here are some pictures


Thanks Crane. That is exactly what I ended up doing. I have a 15.5 gallon sanke and a 7 gallon one as well, i will be splitting to make 5 and 10 gallon batches for. Also thanks to 1MadScientist for providing a very similar build.
1MadScientist! The four major parts came from McMaster-Carr.com 4089K12 - Gauge said:http://www.northernbrewer.com/shop/gas-connector-kit-bl-ball-lock-version.html[/url]
I had some stainless from a previous build so to complete the pipe, I got a;
4464K264
You also need;
2 each 1/4" bushings to 1/2"
So here is my take on the spunding valve. Plumbing is wrong just for testing purposes. My only question is, how do I know how many turns (or what fraction of a turn) equals to 1 psi? Do you just blindly set it and adjust as you go?

haeffnkr
Well-Known Member
So here is my take on the spunding valve. Plumbing is wrong just for testing purposes. My only question is, how do I know how many turns (or what fraction of a turn) equals to 1 psi? Do you just blindly set it and adjust as you go?
IIRC 2 turns was about 4 psi on mine from completely open from the stop.
I assume you have a CO2 setup or Air compressor?
Fill a keg with air or CO2 at say, 10 pounds, then apply the valve and start testing how many turns it takes to get X pounds relief pressure.
good luck
haeffnkr
1MadScientist
Well-Known Member
Can you kill a complete attenuation from happening with too much pressure? I properly re-hydrated 3 packets of US-05 split 2 ways on my last brew, July 11, 2014...
Pitched: 8-1-2014 at 3:30 PM
Day 1 - 0 PSI @ 59 F
Day 3 - 1 PSI @ 59 F @ 6 PM
Day 4 - 18 PSI @ 59 F @ 9:30 AM
Day 4 - 21 PSI @ 59 F @ NOONTIME
Day 4 - 21 PSI @ 59 F @ 9 PM
Day 5 - (turned knob 4 turns) @ 10 PM
Day 6 - 29 PSI @ 59 F @ NOONTIME
Day 19 - started crash chill @ 10 PM
Day 24 - pressure transferred to serving kegs
(pressure was 23 PSI @ 35 F, 3.72 volume of CO2)
I didn't take any samples and did not do a diacetyl rest.
Wish I had a re-do.
83% Rahr 2 row (3.5 EBC = 1.8 SRM)
10.6% Bress Bonlander Munich (25.2 EBC = 12.8 SRM)
3% Belgian Biscuit (49.2 EBC = 25 SRM)
3.5% Great Western C 15 (29.6 EBC = 15 SRM)
My average mash temperature was... 67.5 C = 153.5 F
To reach a mash-out temp of 76-78 C (169 - 172 F) took (mins)... 16 mins
After reaching mash-out temp, before pulling the bag, I waited (mins)... 15 mins <=== 'crystal added'
Added GW C15 after the 90 mins. mash
Fermentation& Conditioning
Fermention: Safale US-05 for 4 days at 18.5 C = 65.3 F
Fermention: continued... for 2 days at 19.5 C = 67.1 F
Diacetyl Rest: 10 days at 21.8 C = 71.2 F
Crash-Chilled: 17 days at 00.5 C = 33.0 F
OG: 1.068
FG: 1.016
Apparent Attenuation: 77.61%
ABV: 6.9%
80.2% Rahr 2 row (3.5 EBC = 1.8 SRM)
13.3% Bress Bonlander Munich (25.2 EBC = 12.8 SRM)
3% Belgian Biscuit (49.2 EBC = 25 SRM)
3.5% Great Western C 15 (29.6 EBC = 15 SRM)
My average mash temperature was... 65.3 C = 149.5 F
FOUR DEGREES LOWER SHOULD HAVE ATTENUATED MORE, NOT... :argh:
To reach a mash-out temp of 76-78 C (169 - 172 F) took (mins)... 21 mins
After reaching mash-out temp, before pulling the bag, I waited (mins)... 1 mins
Fermentation & Conditioning
Fermentation: Safale US-05 for 18 days at 15 C = 59.0 F
Crash-Chilled: Yes, for 6 days at 2 C = 35.6 F
OG: 1.071/5
FG: 1.020
Apparent Attenuation: 73.05 %
ABV: 6.8%
Fermentation Temperature and Pressure schedule:
Pitched: 8-1-2014 at 3:30 PM
Day 1 - 0 PSI @ 59 F
Day 3 - 1 PSI @ 59 F @ 6 PM
Day 4 - 18 PSI @ 59 F @ 9:30 AM
Day 4 - 21 PSI @ 59 F @ NOONTIME
Day 4 - 21 PSI @ 59 F @ 9 PM
Day 5 - (turned knob 4 turns) @ 10 PM
Day 6 - 29 PSI @ 59 F @ NOONTIME
Day 19 - started crash chill @ 10 PM
Day 24 - pressure transferred to serving kegs
(pressure was 23 PSI @ 35 F, 3.72 volume of CO2)
I didn't take any samples
and did not do a diacetyl rest. Wish I had a re-do.
Attenuation analysis of my two brews
***********
First Brew
***********
Mad Scientist - I Heart Me IPA - For Brewday July 12 2013***********
First Brew
***********
83% Rahr 2 row (3.5 EBC = 1.8 SRM)
10.6% Bress Bonlander Munich (25.2 EBC = 12.8 SRM)
3% Belgian Biscuit (49.2 EBC = 25 SRM)
3.5% Great Western C 15 (29.6 EBC = 15 SRM)
My average mash temperature was... 67.5 C = 153.5 F
To reach a mash-out temp of 76-78 C (169 - 172 F) took (mins)... 16 mins
After reaching mash-out temp, before pulling the bag, I waited (mins)... 15 mins <=== 'crystal added'
Added GW C15 after the 90 mins. mash
Fermentation& Conditioning
Fermention: Safale US-05 for 4 days at 18.5 C = 65.3 F
Fermention: continued... for 2 days at 19.5 C = 67.1 F
Diacetyl Rest: 10 days at 21.8 C = 71.2 F
Crash-Chilled: 17 days at 00.5 C = 33.0 F
OG: 1.068
FG: 1.016
Apparent Attenuation: 77.61%
ABV: 6.9%
***********
Second Brew
***********
Mad Scientist - I Heart Me IPA - For Brewday July 11 2014Second Brew
***********
80.2% Rahr 2 row (3.5 EBC = 1.8 SRM)
13.3% Bress Bonlander Munich (25.2 EBC = 12.8 SRM)
3% Belgian Biscuit (49.2 EBC = 25 SRM)
3.5% Great Western C 15 (29.6 EBC = 15 SRM)
My average mash temperature was... 65.3 C = 149.5 F
FOUR DEGREES LOWER SHOULD HAVE ATTENUATED MORE, NOT... :argh:
To reach a mash-out temp of 76-78 C (169 - 172 F) took (mins)... 21 mins
After reaching mash-out temp, before pulling the bag, I waited (mins)... 1 mins
Fermentation & Conditioning
Fermentation: Safale US-05 for 18 days at 15 C = 59.0 F
Crash-Chilled: Yes, for 6 days at 2 C = 35.6 F
OG: 1.071/5
FG: 1.020
Apparent Attenuation: 73.05 %
ABV: 6.8%
1MadScientist
Well-Known Member
>>> OPERATOR ERROR <<< on my post above...
Oops, I attempered the yeast wrong.
I believe I did everything right, except for the yeast re-hydration, the most important step.
I attempered in the wrong direction, I slowly added 35C yeast into 15C wort, instead of
15C wort into hot 35C yeast.
Found this bit for what I mentioned above;
" We also recommend that you attemperate the rehydrated yeast to with in 15F of the wort before adding to the wort. Warm yeast into a cold wort will cause many of the yeast to produce petite mutants that will never grow or ferment properly and will cause them to produce H2S. The attemperation can take place over a very brief period by adding, in increments, a small amount of the cooler wort to the rehydrated yeast. "
1MadScientist
Well-Known Member
Why 59F?
How are you measuring this?
59F was my pitching temperature and 95F was the re-hydrated yeast temperature.
GNBrews
Well-Known Member
- Joined
- Mar 24, 2007
- Messages
- 674
- Reaction score
- 23
So here is my take on the spunding valve. Plumbing is wrong just for testing purposes. My only question is, how do I know how many turns (or what fraction of a turn) equals to 1 psi? Do you just blindly set it and adjust as you go?
At the beginning of fermentation, I usually just close the valve quite a few turns and then check the gauge on a regular basis until it reaches my target (usually a bit more). Then, I squirt sanitizer into the exhaust hole and kinda cup my hand over it to keep the hole covered with liquid. With the other hand adjust the valve open until you just start to see bubbles exhausting. It should then maintain slightly less than what the gauge is currently reading.
Has anyone found a better pressure release valve than the McMaster one? My McMaster PRV still leaks, and I don't like that it can't be dissasembled so I don't really want to buy another one. Kinda frustrating since its been nearly a year and I still am not pressure fermenting.
Has anyone used this williams one? At $20 seems too good to be true. http://www.williamsbrewing.com/0-60-ADJUSTABLE-PRESSURE-RELIEF-VALVE-P3453.aspx
Has anyone used this williams one? At $20 seems too good to be true. http://www.williamsbrewing.com/0-60-ADJUSTABLE-PRESSURE-RELIEF-VALVE-P3453.aspx
JuanMoore
Getting the banned back together
The standard 99045K11 one
Here's the one I use. It's also the one used in the first spunding valve thread I found here several years ago.
http://www.mcmaster.com/#48935k25/=ukxwnj
It's not super accurate and only goes up to 20 psi with the stock spring, but has worked well enough for me. I've changed the spring out to be able to reach higher pressure, although I've only actually used a higher pressure once.
Has anyone found a better pressure release valve than the McMaster one? My McMaster PRV still leaks, and I don't like that it can't be dissasembled so I don't really want to buy another one. Kinda frustrating since its been nearly a year and I still am not pressure fermenting.
Has anyone used this williams one? At $20 seems too good to be true. http://www.williamsbrewing.com/0-60-ADJUSTABLE-PRESSURE-RELIEF-VALVE-P3453.aspx
I haven't used this one but I have used the one from morebeer which looks the same. The problem is it doesn't work below 15psi and it's really hard to dial in a specific pressure.
I now use the one from McMaster shown above but I'm not thrilled about not being able to take it apart. I do like it's adjustability.
Crane:
If you put a circle of copper wire under the spring on the Morebeer valve it will bring it up to about 24 PSI. Advantage is that it can be fully disassembled to clean.
(This is important, I did not clean it for a few batches and it got pretty scummy)
Tom
If you put a circle of copper wire under the spring on the Morebeer valve it will bring it up to about 24 PSI. Advantage is that it can be fully disassembled to clean.
(This is important, I did not clean it for a few batches and it got pretty scummy)
Tom
Crane:
If you put a circle of copper wire under the spring on the Morebeer valve it will bring it up to about 24 PSI. Advantage is that it can be fully disassembled to clean.
(This is important, I did not clean it for a few batches and it got pretty scummy)
Tom
You misunderstood what I was saying. I start out fermentation at 3 psi and slowly ramp to 10 over the second day. The morebeer valve can't go below 15psi reliably.
Crane:
Sorry, I got it backwards.
I have no trouble getting mine to rest at 3 or 5 and then tweak it up a couple psi each day.
I then like to max out about 22 as the 5 gallon head space seems to be just about enough to end up with 10 psi after cold crash.
I am thinking I will hook up my serving kegs, daisy chained, between the gas port and the valve near the end of the ferment. This will then purge them using the "free" co2 and they will be all set for the transfer under pressure.
Tom
Crane:
Sorry, I got it backwards.
I have no trouble getting mine to rest at 3 or 5 and then tweak it up a couple psi each day.
I then like to max out about 22 as the 5 gallon head space seems to be just about enough to end up with 10 psi after cold crash.
I am thinking I will hook up my serving kegs, daisy chained, between the gas port and the valve near the end of the ferment. This will then purge them using the "free" co2 and they will be all set for the transfer under pressure.
Tom
These seem to me to be made rather poorly. The threads per inch is lower than the PRV that wortmonger uses and the threads seem rather sloppy. At lower psi like 3 psi the thing is only screwed in less than a full turn. With so little thread engagement and the sloppy cuts on the threads themselves I have found that if I set it and walk away it will reach equilibrium of say X psi. Then if I come back and lightly tap on the dial gauge it will start leaking pressure and reach a new equilibrium of some lower pressure.
It could be that my valve is at the extremes of the manufacturers tolerances and that's why mine performs so poorly where yours works reliably. Either way I would recommend the one wortmonger uses over this one as its much better build quality and more threads per inch. It also has a locking nut to prevent any movement and readjustment by accident. My only catch with that one is that it's not stainless although I do have one on hand as a backup in case the McMaster one fails on me
I just happened to have the Morebeer one and thought I would try it rather than buying more stuff. It has worked for me for fermenting and also for pressure transfers.
I have the Black Box to automate the fermentation temp and just need some way to do the same with pressure.
Tom
I have the Black Box to automate the fermentation temp and just need some way to do the same with pressure.
Tom
itinerantbrewer
Active Member
would this one work from amazon? Looks to be adjustable 0-20psi (30"hg), 1/4"npt--would screw on to end of morebeer/williams premade unit? or do we think the 0-20 psi control is optimistic?
http://www.amazon.com/Control-Devices-Series-Vacuum-Relief/dp/B0081TJPEE/ref=sr_1_4?ie=UTF8&qid=1420586126&sr=8-4&keywords=Pressure+Adjustable+Brass+Relief+Valve
http://www.amazon.com/Control-Devices-Series-Vacuum-Relief/dp/B0081TJPEE/ref=sr_1_4?ie=UTF8&qid=1420586126&sr=8-4&keywords=Pressure+Adjustable+Brass+Relief+Valve
Last edited by a moderator:
FredTheNuke
Well-Known Member
No. that is a vacuum breaker. You want the opposite - a pressure relief.
itinerantbrewer
Active Member
dang, was hoping they were the same, just depending on how you place them.
Doesn't look like amazon has anything then besides this one, that is about twice the price as the recommended M-C unit, and with an apparent level of dissatisfaction.
http://www.amazon.com/Control-Devices-Series-Pressure-Adjustable/dp/B007GDY3CU/ref=sr_1_1?s=industrial&ie=UTF8&qid=1420652832&sr=1-1&keywords=pressure+relief+valve+adjustable
I'm using thefrost-referenced Williams unit and also find that (admitedly, as advertised) PSI control below about 18 is sketchy. Can anyone confirmt that the M-C unit is good at 0-20?
EDIT: this M-C: http://www.mcmaster.com/#48935k25/=vd5b08 which, incidentally, FredTheNuke, claims to address vacuum and pressure…?
Last edited by a moderator:
dang, was hoping they were the same, just depending on how you place them.
Doesn't look like amazon has anything then besides this one, that is about twice the price as the recommended M-C unit, and with an apparent level of dissatisfaction.
http://www.amazon.com/dp/B007GDY3CU/?tag=skimlinks_replacement-20
I'm using thefrost-referenced Williams unit and also find that (admitedly, as advertised) PSI control below about 18 is sketchy. Can anyone confirmt that the M-C unit is good at 0-20?
EDIT: this M-C: http://www.mcmaster.com/#48935k25/=vd5b08 which, incidentally, FredTheNuke, claims to address vacuum and pressure ?
I'm not sure about the amazon one but I have one of the McMaster ones you listed here as a backup, but haven't used it yet. It works for both vacuum and positive pressure depending on how you set it up. It comes setup for vacuum with the ball located on the thumb screw end. All you have to do is unscrew the thumb screw all the way and reverse the position of the spring and ball. With the ball pressed against the bottom 1/4" npt side it works for positive pressure. This valve has a lot more threads per inch and they are cut better so there is very little slop unlike the morebeer/williams unit. I think this will help dialing in pressures. I was able to unscrew it enough to blow air threw it with my mouth so I suspect it will work fine down to low pressures.
The McMaster one looks very similar to the amazon one you posted earlier so I would suspect it works the same and can be configured for both vacuum and positive pressure.
Last edited by a moderator:
dang, was hoping they were the same, just depending on how you place them.
Doesn't look like amazon has anything then besides this one, that is about twice the price as the recommended M-C unit, and with an apparent level of dissatisfaction.
http://www.amazon.com/Control-Devices-Series-Pressure-Adjustable/dp/B007GDY3CU/ref=sr_1_1?s=industrial&ie=UTF8&qid=1420652832&sr=1-1&keywords=pressure+relief+valve+adjustable
I'm using thefrost-referenced Williams unit and also find that (admitedly, as advertised) PSI control below about 18 is sketchy. Can anyone confirmt that the M-C unit is good at 0-20?
EDIT: this M-C: http://www.mcmaster.com/#48935k25/=vd5b08 which, incidentally, FredTheNuke, claims to address vacuum and pressure ?
I have two of the Amazon valves and they work fine. The numbering on them is worthless, and fine tuning is a constant process, but overall they work and I am happy with them. They do not dismatle so soaking is the only way to clean them. When one gets clogged I have to hook it up to CO2 or my city water to break up the gunk before soaking.
Last edited by a moderator:
I'm using thefrost-referenced Williams unit and also find that (admitedly, as advertised) PSI control below about 18 is sketchy. Can anyone confirmt that the M-C unit is good at 0-20?
?
Fost, not frost

I eventually got the unit a while after posting and had the same issue. I took the spring out and trimmed it a little bit with my dremel, and now it seems to be working much better. I just finished my first fermentation with it and am holding 15psi pretty well. A few days ago it was holding 7psi well. I don't have enough experience to fully endorse it yet, but before giving up on it you might want to try trimming the spring.
If it wasn't for the leak I have though, the mcmaster one holds the desired psi much more steadily, its no contest really
itinerantbrewer
Active Member
Thanks everyone, sorry thefost. must have had my beer goggles on. and it is cold, so frost is on my mind!
Ok, for the moment I'm going to officially NOT recommend the Willliams Brewing one. Just not working consistently at low psi, even with a reduced spring.
I've got an idea for building a spunding valve, but if that doesn't work I guess I'll just have to buy another mcmaster one.
I've got an idea for building a spunding valve, but if that doesn't work I guess I'll just have to buy another mcmaster one.
My parts just came in the mail! One step closer to trying this out! 15min DIY!
View attachment ImageUploadedByHome Brew1422671518.963009.jpg
View attachment ImageUploadedByHome Brew1422671518.963009.jpg
I'm so happy to use this that I wait to ferment in other kegs until the assembly is available.
splendidus
Well-Known Member
I'm sure this has been addressed in this thread by now, but I haven't been able to find it with searching.
I've been using this technique for the last 4 or so 5 gal batches I've done and I love what I consider a simplified, controlled, and repeatable process. One aspect I like is the relative ease of taking samples for gravity readings and tasting (hey the beers already partially carbed...). However, I usually start taking samples after at least a week or two of fermentation when it is under 15PSI or more. When I take the samples, they tend to foam excessively. I've tried line lengths of up to 6', but I hesitate to use longer lines and potentially waste more beer during samples. Any thoughts?
I've been using this technique for the last 4 or so 5 gal batches I've done and I love what I consider a simplified, controlled, and repeatable process. One aspect I like is the relative ease of taking samples for gravity readings and tasting (hey the beers already partially carbed...). However, I usually start taking samples after at least a week or two of fermentation when it is under 15PSI or more. When I take the samples, they tend to foam excessively. I've tried line lengths of up to 6', but I hesitate to use longer lines and potentially waste more beer during samples. Any thoughts?
I'm sure this has been addressed in this thread by now, but I haven't been able to find it with searching.
I've been using this technique for the last 4 or so 5 gal batches I've done and I love what I consider a simplified, controlled, and repeatable process. One aspect I like is the relative ease of taking samples for gravity readings and tasting (hey the beers already partially carbed...). However, I usually start taking samples after at least a week or two of fermentation when it is under 15PSI or more. When I take the samples, they tend to foam excessively. I've tried line lengths of up to 6', but I hesitate to use longer lines and potentially waste more beer during samples. Any thoughts?
First could you tell us about your process? I have been using pressure but have yet to get a good process. Interested on what is working for you.
Now to your questions, you problem is the beer is likely 68F which means it will be very hard to pour without foam. Going from high pressure to low the CO2 will want to rush out of solution. This is only heightened as your get warmer. Other than cooling do the beer to 34F or going from high pressure to high pressure you will likely get foam.
Actually now that I think about it, if you used the method for filling bottles from a picnic tap (under pressure) then poured that sample to your measuring device it should work!
Given the fact that you need to remove all the carbonation to get an accurate gravity reading I don't mind all the foam when taking a sample as it helps speed up the process. Also seeing how I spent 10 years tasting completely flat gravity samples before switching to pressure fermenting, I don't mind that it isn't fully carbonated. Is it really worth the effort/extra loss of beer to be able to taste fully carbonated samples?
One option would be to use epoxy stir sticks. I use them in the dip tube of the keg that I use for soda water. That way I can use a 12 foot line like the rest of my taps and get a decent pour at 30psi. You might be able to fit a couple of them in the beer line.
One option would be to use epoxy stir sticks. I use them in the dip tube of the keg that I use for soda water. That way I can use a 12 foot line like the rest of my taps and get a decent pour at 30psi. You might be able to fit a couple of them in the beer line.
May be my person thoughts, but, you can get a refractometer on eBay for $20 that uses a couple drops for a test. I have a box of straws I use to sample and discard. Granted there is always the conversion to do but the time, mess and the saved beer will pay for itself after the first few batches.
Can measure boiling, chilled and carbonated.
Never going back!
Tom
Can measure boiling, chilled and carbonated.
Never going back!
Tom
Similar threads
- Replies
- 13
- Views
- 620
- Replies
- 34
- Views
- 729
- Replies
- 8
- Views
- 1K
