My kegerator

Homebrew Talk - Beer, Wine, Mead, & Cider Brewing Discussion Forum

Help Support Homebrew Talk - Beer, Wine, Mead, & Cider Brewing Discussion Forum:

This site may earn a commission from merchant affiliate links, including eBay, Amazon, and others.

notrealdan

Supporting Member
HBT Supporter
Joined
Dec 3, 2010
Messages
21
Reaction score
5
Location
Denver, CO
Hi everyone,

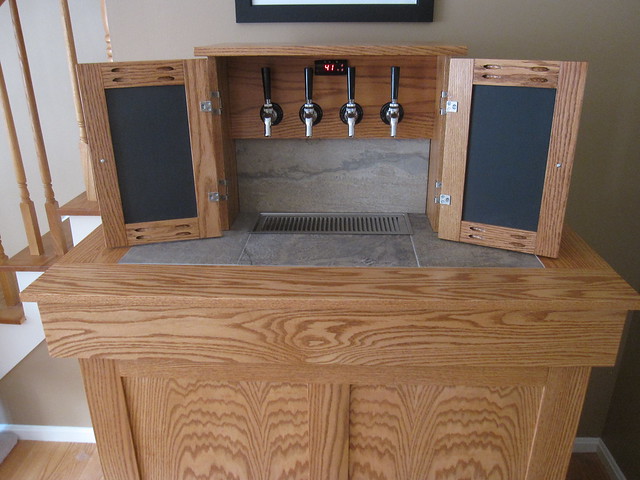
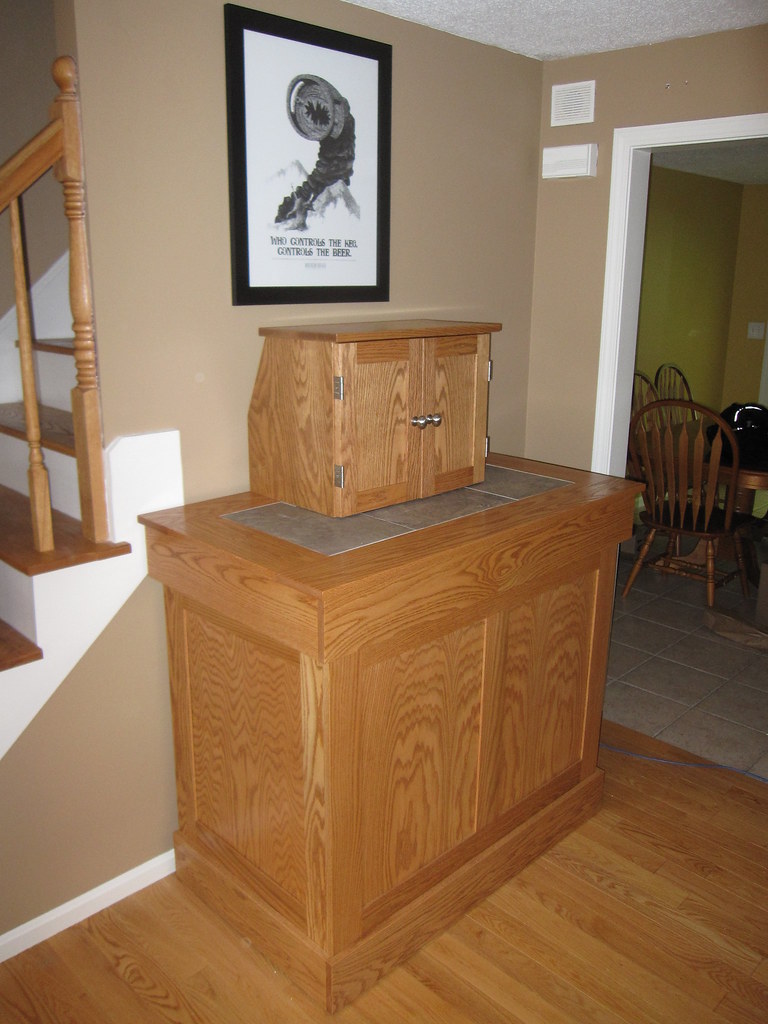
I've been working on this project for about 6 months now and I've been itching to show it off, but I decided to wait until it was done. Well, it's done! Here's my kegerator/keezer:

5906680562_7740491963_b.jpg


To access the taps, open the small cabinet doors on the tower and you'll see this:

5906682060_0231865601_z.jpg


The black panels on the inside of the doors have chalkboard paint on them, for a menu. The doors are there not just for aesthetics, but to keep my two cats from "accidentally" opening the taps. I think it adds a nice touch to the thing, though. It does limit what I can use as tap handles, but I like the simple black handles.

I owe a lot of inspiration to several of you on this forum. I spent some good, long evenings reading hundreds of threads here, soaking up info as I designed this. Thank you for all the ideas!! I'll add some under-the-hood pics and technical info next.

So, what do you think?
 
Goddamn cats!! I wait for the day that do that to me...

and WOW! Very nice!
 
The wood (the wood that shows, anyways) is all red oak stained with Cherrywood gel stain from Minwax. The tiles, including the backsplash, are porcelain and have a nice texture to them. I originally wanted to go with natural stone, but it would have been much heavier and MUCH more expensive.

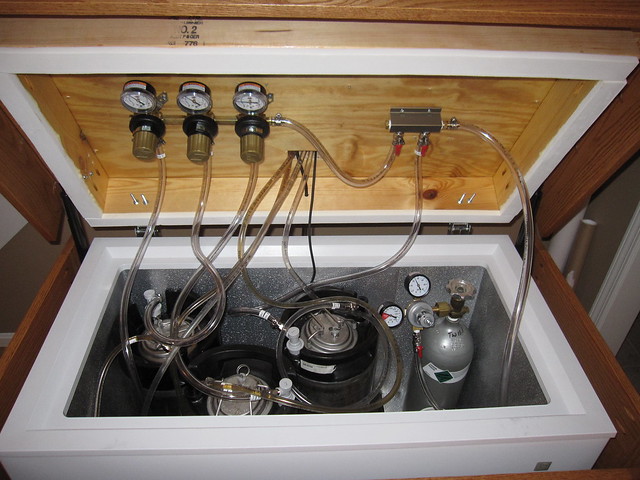
The freezer is the 7 cubic foot GE from Home Depot and sits on a 2x6 dolly with casters. The freezer *just* fits 4 corny ball lock kegs on the floor (though only 3 are in the pics) plus the CO2 tank on the bump. Its controlled by a Love Controls device, visible behind the tap handles. Here's a pic of the inside of the freezer with the tubing, regulators, etc.

5906687568_1c814a224d_z.jpg


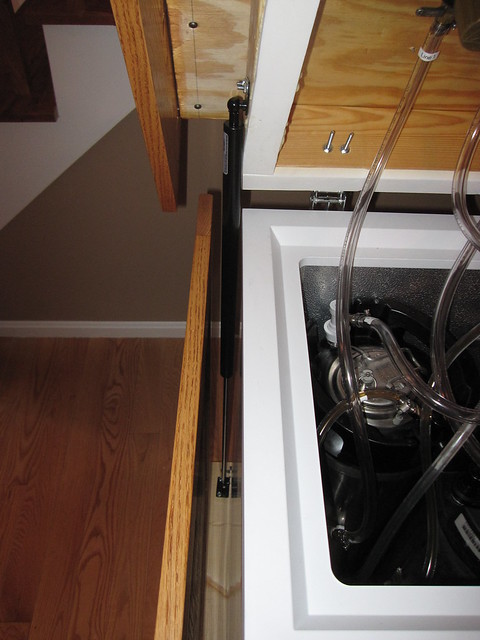
The lid is really heavy, so when it was all assembled, I decided I needed a safe way to keep the lid open, ensuring that the whole thing wouldn't fall backwards (it very nearly did, twice) or fall closed on me. I got two lift-assist gas springs, one for either side. Now the top is easy to open and will not open too far. They were custom made by Lift Support Technologies in Canada (http://www.customgassprings.com/) and were pretty affordable considering (about $150 total, delivered).

5906687944_756d3d548f_z.jpg


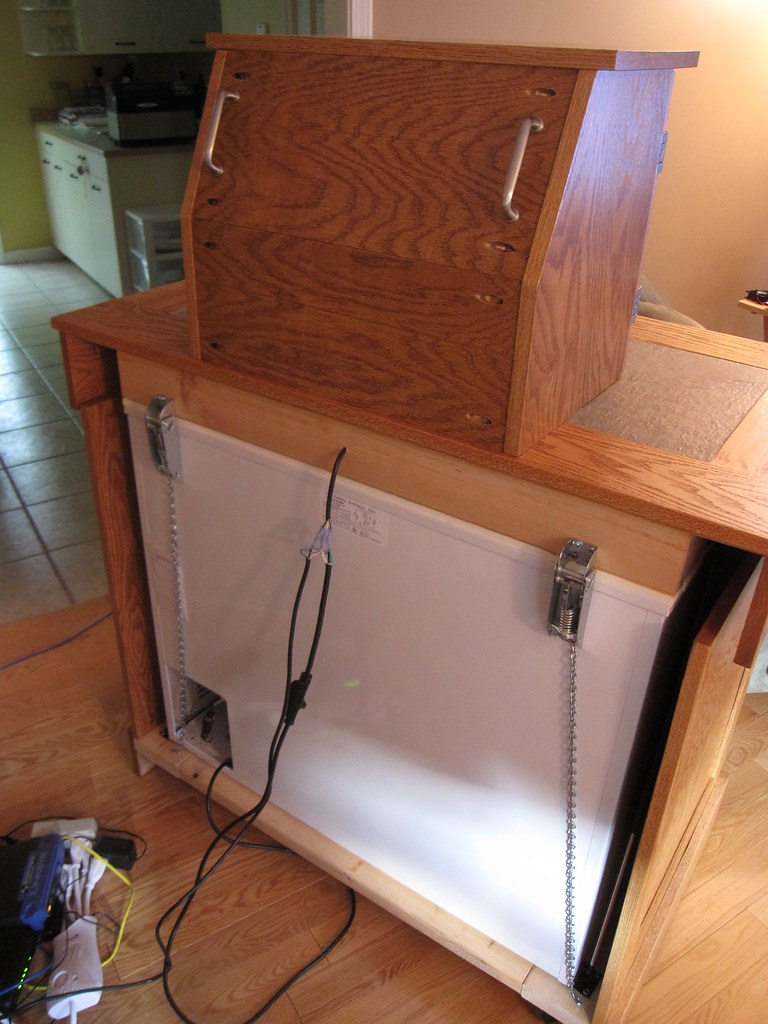
The only catch with the gas springs is that they were so strong that they were able to lift the freezer straight up in the back and tipped it forward. It would only do this with the freezer empty, and solving this problem was pretty easy. I attached small chains from the freezer hinges to the base that the freezer sits on. Here's a pic of the back of the unit:

5906132059_402808f1d6_b.jpg


More to come. If you have any questions about the build, let me know!
 
Wow to the 10th power! Nicely done, indeed!!!

I'm assuming the condenser coil for the freezer is beneath the outer metal skin of the unit. Since you've enclosed 3 sides, is the airspace between the wood and the unit enough or did you have to add a small fan somewhere to push the warm air away?
 
Wow to the 10th power! Nicely done, indeed!!!

I'm assuming the condenser coil for the freezer is beneath the outer metal skin of the unit. Since you've enclosed 3 sides, is the airspace between the wood and the unit enough or did you have to add a small fan somewhere to push the warm air away?

Thanks! The unit has 2 inches of airspace on each side. So far the outside of the freezer itself is warm to the touch, but not any more than it would get before I put it inside. The wood of the cabinet is cool, as is the air in the gaps. It doesn't seem to be causing a problem.
 
I would give my left arm for one of those. I have the same freezer, so let me know if you're ever in the market for an arm...

Cheers dude, that is one awesome keezer.
 
Really, really nice! The doors a a cool added touch and incorporating the chalkboard paint on the back of the doors was pure genius....genius I tell you! Great work and welcome to the "coffin" keezer club! :mug:

P.S. I need to look into the lifts for the top, because mine weighs a fickin' ton! Jester (Erik) also gave me a great idea of incorporating linear actuators, so that the lid can be opened with the press of a button. I looked into them a while back and although a bit pricey, not too bad. If I spend too much more on mine, it's not gonna go over well with my wife.
 
Well done. This is exactly the type of elegance I have been looking for. I don't have cats but I do have a SWMBO. Something of this design can convince her to put it in the living room and not in the garage!!!
 
Just wondering if you had any pictures of the process and a list of materials used. Looking into building something similar and any extra information would be greatly appreciated. Thanks
 
Just wondering if you had any pictures of the process and a list of materials used. Looking into building something similar and any extra information would be greatly appreciated. Thanks

I have lots of pictures of various stages of the build process on my Flickr page, here:
http://www.flickr.com/photos/22117429@N08

They're not in any particular order, but I tried to take pics at each major stage. Basically anytime I made significant progress, I snapped a few pics. If you'd like a close-up of a particular part, let me know and I'll see what I can do.

I don't have any plans or instructions made up for building this. It was the product of research I did on this forum and me sitting down with some graph paper and scratching out some designs. Much changed through the process, so even those basic designs aren't really what I ended up with.

However, I can tell you a bit about the materials. This is sort of going to be a brain dump from memory. Hopefully it makes sense. Let me know if I missed something or you have any questions. Here goes!

The freezer is the 7cf GE freezer from Home Depot. I recently picked up a 7cf Holiday freezer from Lowe's and it's identical except for some cosmetic changes. No, I'm not building another kegerator. The 2nd one will be a fermentation chamber. For the kegerator, I removed the original lid, built a new one out of 2x4s and plywood as the base of the top of the kegerator, and used the original hinges from the freezer. I used some Gorilla Glue to attach some foam strips to the 2x4s to seal with the freezer. The foam strips are made for filling gaps between windows and air conditioner units and I found it at Lowe's in the weather stripping section for a few bucks. The temp controller is a Love Controls TS2-010 (http://www.dwyer-inst.com/Products/Product.cfm?Group_ID=149).
The freezer itself sits on a dolly made of 2x6s and has casters (I think about 3" casters). The paneled side sections create a cabinet surround and attach directly to the dolly. The panels don't attach to or touch the freezer or the lid at all. All of the wood parts that show are 1x4 and 1x6 (nominal, so really 3/4" thick) red oak boards, mostly from Lowe's, some from Home Depot. The panels are 1/4" oak plywood from Home Depot. I cut slots into the boards that framed the panels with a dado attachment on a table saw. The plywood panels simply slid into place.

The tiles are porcelain and are mortared onto cement board, which is screwed onto the plywood base of the top. When I was looking for grout for the tiles, I didn't need to look very long. I found a color called "DeLorean Grey" and knew it was meant to be! It looks great with this tile, too. The lift-assist gas springs are from Lift Support Technologies, Inc. (http://www.customgassprings.com or http://www.lstechnologies.ca). The completed lid is really heavy and those gas springs are a life-saver! They were custom made for this. If you're thinking of using these, give them a call and have your plans ready. They'll work it all out and give you a design drawing showing how to attach them. f course, this isn't a common use for their products, so be prepared to explain everything and send them some pics and measurements. They were very easy to work with.

The stain is Cherrywood Gel Stain from Minwax. The taps are Perlicks with basic black plastic handles. One downside of having the taps enclosed in a cabinet is that I can't use big, fancy tap handles, but I like it the way they are.

The doors gave me some trouble. The panels are 1/4" oak plywood, and the frames are 1x3 red oak boards, trimmed down to 2". Some of the boards split when I was trying to screw the pocket screws into them. I had to make a couple extra trips to Lowe's. The outside-facing panels are finished the same way as the rest of the unit, but I put a few coats of black chalkboard paint on the inside-facing side. In hindsight, I would have done something to smooth out the wood grain on that side a bit more. The grain is obvious even after 3 coats of the paint and makes writing on it a little harder. Not a big deal, and I'm not going to redo it, but just worth noting. Also, the hinges took some adjusting to close properly. Make sure you get all of the screws in all the way, or they'll rub up against the wood, scratching the finish, and the hinges won't close properly.

I think that's it. Sorry it was so long, but I wanted to be thorough. I hope it helps! Good luck with your build!
 
Thanks the pictures were a big help and you've given me lots of great ideas for my own build. I'll let you know if I have more questions in the future which I'm sure I will.
 
I was wondering how tight of a fit it was to get all 4 kegs into the freezer. I see you have ball lock kegs and I was just wondering if there was any extra space because I have pin lock kegs.
 
The lid is really heavy, so when it was all assembled, I decided I needed a safe way to keep the lid open, ensuring that the whole thing wouldn't fall backwards (it very nearly did, twice) or fall closed on me. I got two lift-assist gas springs, one for either side. Now the top is easy to open and will not open too far. They were custom made by Lift Support Technologies in Canada (http://www.customgassprings.com/) and were pretty affordable considering (about $150 total, delivered).

5906687944_756d3d548f_z.jpg

notrealdan, What are the spcecs on your gas springs? i.e length, lbs of force, etc. I copied your lid on my keezer build and am nearing the point of having to address the heavy lid (if I ever want to get inside the freezer). Also is it attached to the base at the bottom?
 
notrealdan, What are the spcecs on your gas springs? i.e length, lbs of force, etc. I copied your lid on my keezer build and am nearing the point of having to address the heavy lid (if I ever want to get inside the freezer). Also is it attached to the base at the bottom?

I don't recall the exact specs, but they were tailored to my build based on the exact dimensions and the weight of the lid. I called the sales dept of the gas spring company and after explaining what a kegerator was and what I wanted to do with the springs, they asked for pictures/diagrams of the kegerator and needed to know the weight of the lid. With this info, they send me professional diagrams of exactly how and where to attach the springs and they charged the springs to exactly the right pressure for my setup. It will vary with each different application, so I encourage you to contact them and let them spec it out for your build. Of course, you'll need to know the weight of your lid first, so you'll probably need to assemble it to that point first. I didn't consider using gas springs until I had already built mine, so I was already at that point.

I hope this helps. Good luck, and let me know if you have any more questions!
 
I love this build. I would like to be able to lock the taps up using some sort of cabinet like this.
 
I love this build. I would like to be able to lock the taps up using some sort of cabinet like this.

Thanks! I'm pretty proud of it.

One thing, I'm really glad I didn't use glue to join any of the pieces on this build, as I recently moved across the country (MA -> CO). I was able to quite easily disassemble the whole thing before the movers touched it and reassemble it after the move. I was terrified it would get damaged along the way, but it survived without a scratch!

Nice. I'm building a regular collared keezer next week the only way I can get my wife agree to get it out of the garage is to make it like yours and stain it so it matches the dining room stuff.
 
I don't know if I could be any luckier I spent the evening figuring out how I wanted to do my Keezer and pulling photos from Hoppopotomus's thread and I was looking for this one but I was not having too much luck. When I get home tonight here is it right up front. I plan on merging the 2. I like the look of Hoppopotomus's rustic style but need to have doors to close there by keeping the children from playing with the taps. Instead of using knotty pine I am going to salvage a bunch of pallets for most of the wood. The older and more stained up the wood is the better.
 
Back
Top