Kegerator build-along part deux - the INSIDE!

Homebrew Talk - Beer, Wine, Mead, & Cider Brewing Discussion Forum

Help Support Homebrew Talk - Beer, Wine, Mead, & Cider Brewing Discussion Forum:

This site may earn a commission from merchant affiliate links, including eBay, Amazon, and others.

nostalgia

Well-Known Member
Joined
Feb 9, 2008
Messages
2,397
Reaction score
114
Location
Port Murray, NJ
This continues Kegerator build-along part 1. I thought I'd start a new thread to be at least a little dialup friendly :)

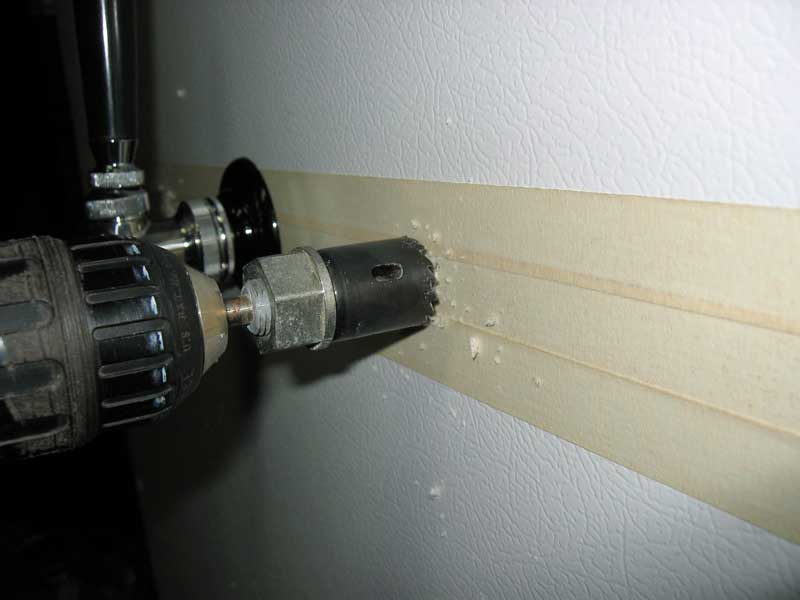
It starts with laying out the positions of the taps. I used masking tape so I could mark up plenty of mistakes and just peel off when done.

tap_locations.jpg


Then drill a 1/4" pilot hole through the outside and inside of the door.

pilothole.jpg


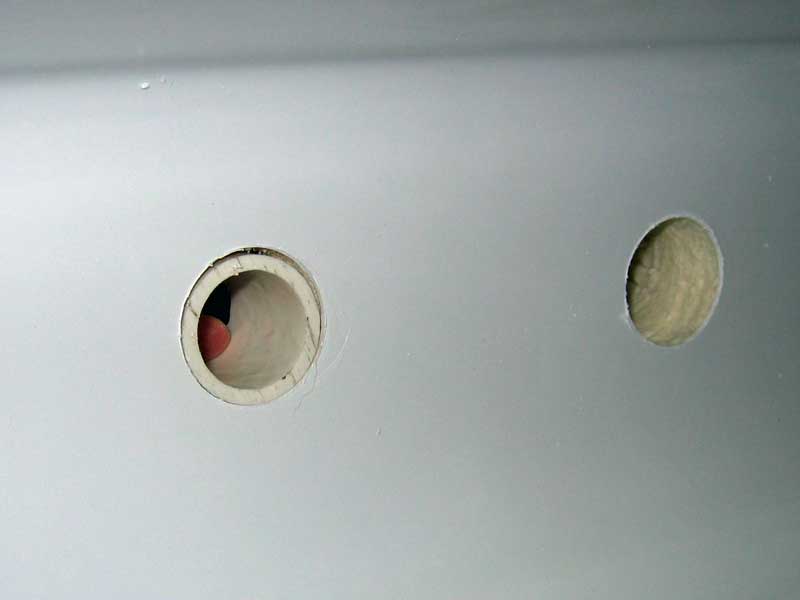
Followed up with a 7/8" hole saw only through the outside for the faucet shank.

shankhole.jpg


More to come...

-Joe
 
Next task is to measure the thickness of the foam in the door. To do this I used a story stick - in this case a disposable Chinese take-out chopstick. I pushed the chopstick against the plastic inner wall of the door and marked the inside of the steel outer wall.

storystick.jpg


I used this distance to cut three pieces of 1" PVC pipe. If you haven't guessed already, you'll see what those are for shortly.

tubes.jpg


Then I used a 1 3/8" drill bit to open the holes on the inside of the door and cleared out the foam. Yes, my aim apparently sucks.

insideholesdone.jpg


The tubes are then inserted. These are here for the shank nut to bear against so the fragile door plastic and foam doesn't get crushed.

holewithtube.jpg


More...

-Joe
 
Then it's just a matter of installing your faucets! Easy-squeezy. Don't forget to use your faucet spanner wrench to tighten the faucet on the shank. Oh and if the keg is pressurized, make sure the faucet is OFF! See the beer halfway up the line? :)

insideview.jpg


Hook up your keg (black to 'OUT' for beer, white to 'IN' for gas) and you're ready to pull a pint!

kegconnections.jpg


Video of first pint on the way.

-Joe
 
Alright, here it is. I realized after I finished the video that the gas was OFF! I had set it to 12psi and turned the tank off. The only thing pushing the beer is the residual pressure in the lines and keg. When I went back to the CO2 tank there was still about 6PSI at the regulator.

[youtube]A4eqQ4npa2g[/youtube]

Enjoy! I know I did :D

-Joe
 
Thanks for the build threads. I like to read as many different build threads as I can, since people have different ideas and ways of doing things and solving problems. I like your 1 inch PVC pipe sleeves for the shank to bear on.

It would be nice if you'd keep it all in one thread though. I don't think there are all that many dialup users anymore, and I'm sure they won't mind the delay if they are interested in the build pics.
 
What is dial up? I think my cell phone even connects at 600kbs.

Nice looking kegerator, I am going to be jealous until I can finally build my own.
 
Thanks for the kind words.

I was just talking to a HBT member today who has satellite broadband, but they limit his speed for some reason. So I figured why not be nice and starta new thread :)

-Joe
 
Joe, great thread. Hey, is that a TRIUMPH SPITFIRE on your avatar? You, my friend, have great taste. I drive a '73 MGB-GT when it runs ...would actually rather have a Spit, they get much better gas mileage.

Cheers! Viva Lucas!

--Finn

p.s. My kegerator pic can be found here: http://www.mgexperience.net/view/journal/pictures/19119,0.jpg

Nice fridge :) Gotta love that Lucas electrical. My alternator is being rebuilt as we speak, in fact! To be fair, it was my own fault. The car itself has been quite reliable, surprisingly enough.

She's a '78. I just got her a year ago. I do love motoring around with it :) Lots of other pictures here.

-Joe
 
Moving on to the drip tray. The cardboard boxes were nice and all, but I decided to class it up a bit by adding a floating drip tray.

Two pieces of walnut are the side supports. They still need to be finished with some oil-based polyurethane.

floatingdrip.jpg


You can see here how the drip tray is let into the supports.

driptraycloseup.jpg


It's fixed in by thumbscrews on the bottom so it can easily be removed for cleaning. Here you can also see the plumbing for the drool bucket. Those are 3/8" plastic push-lok fittings. I drilled a 3/8" hole in the bottom of the drip tray and used epoxy putty to glue a fitting on there. This will make the lines simple to disconnect for cleaning. I also used rubber grommets to go through the door.

driptrayconnections.jpg


And finally the drool bucket itself. The placement of the shelves in the door forced me to use a very shallow bucket. A test with a liter of water showed that it drains just fine.

droolbucket.jpg


-Joe
 

Latest posts

Back
Top