My (FINALLY) finished keezer!!!!

Homebrew Talk - Beer, Wine, Mead, & Cider Brewing Discussion Forum

Help Support Homebrew Talk - Beer, Wine, Mead, & Cider Brewing Discussion Forum:

This site may earn a commission from merchant affiliate links, including eBay, Amazon, and others.

cimirie

Well-Known Member
Joined
Feb 10, 2009
Messages
799
Reaction score
20
Location
Orlando, FL
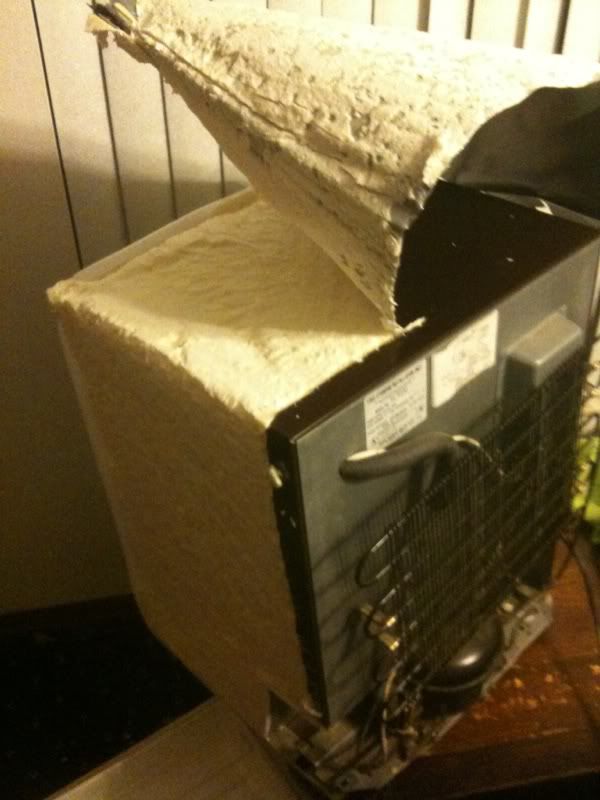
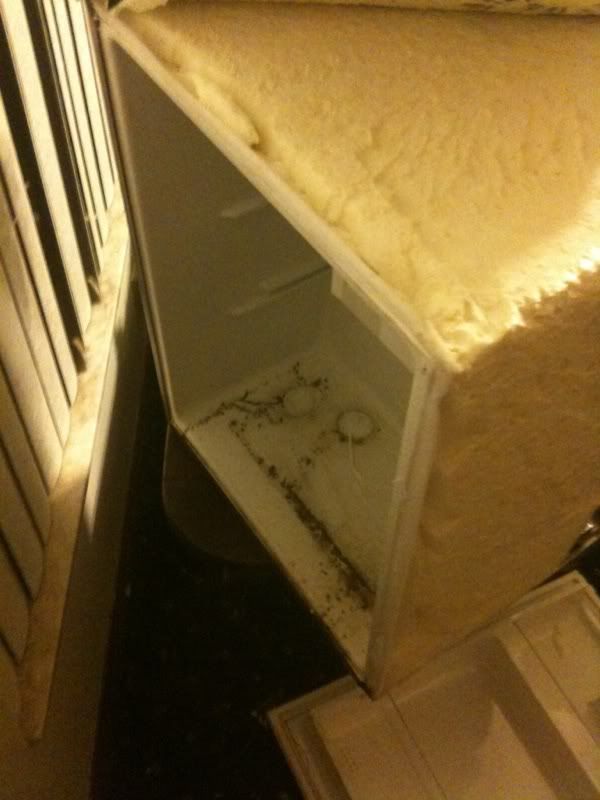
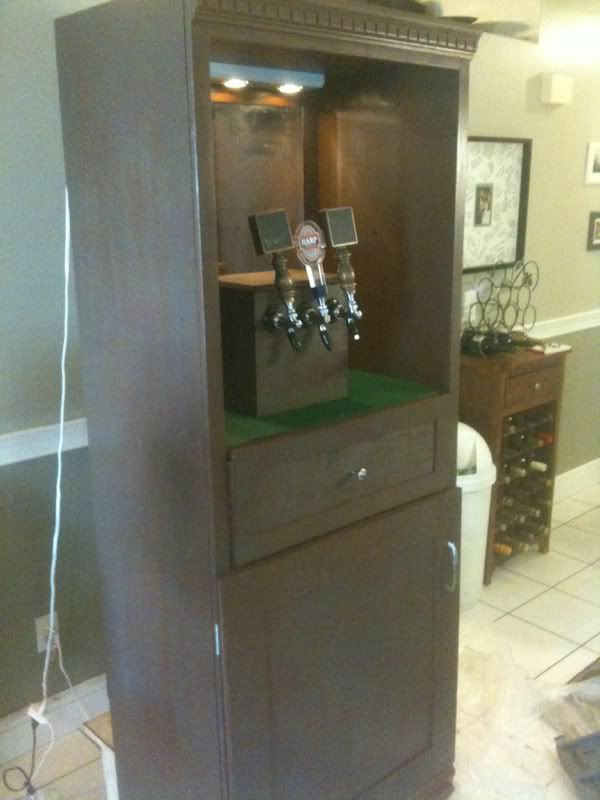
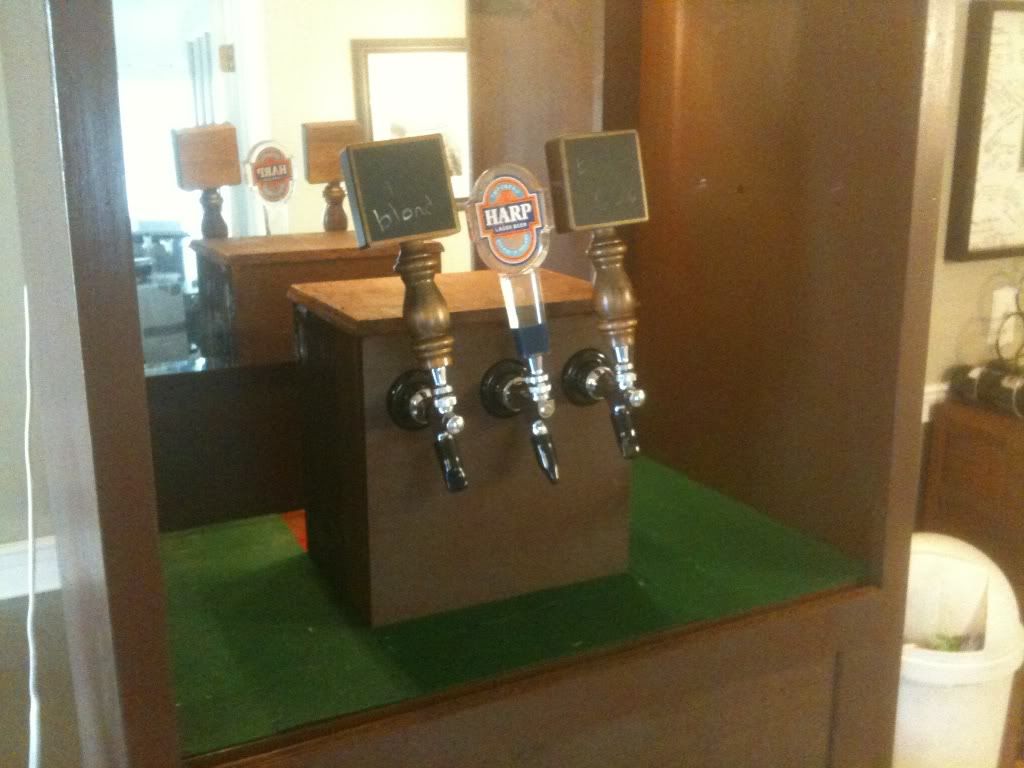
Truth be told, I've been waiting for months to write this thread and now I'm excited that I finally can! After years of pondering, a year of planning, 6 months of tinkering, and 1 harsh weekend of assembling and troubleshooting, I'm very happy to say I have a great keezer I'm super proud of.

Here is a documentation of my build.

-------
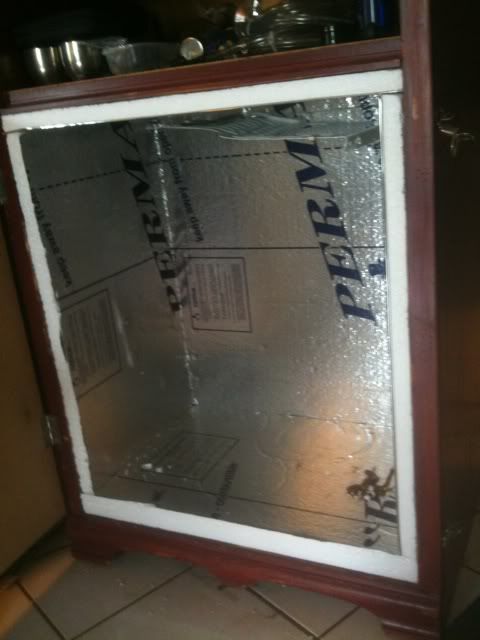
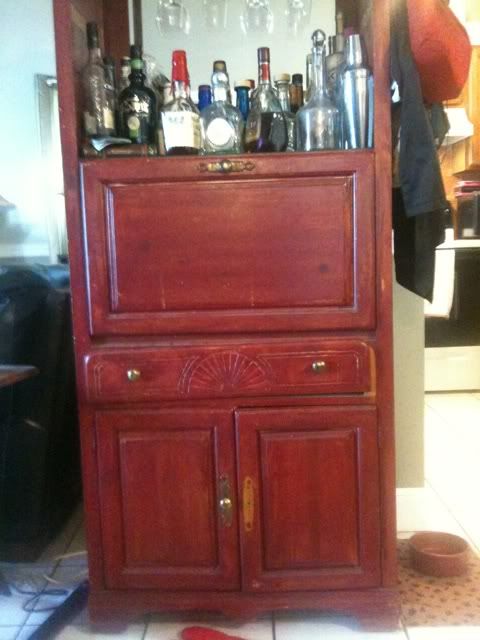
Here's what I started with. It was an old armoire my wife bought at a garage sale en route to furnishing her dorm room her freshman year. It has been a tv stand, clothes storage locker, art display, dry bar, an now, keezer!

1000000810.jpg


-------------------


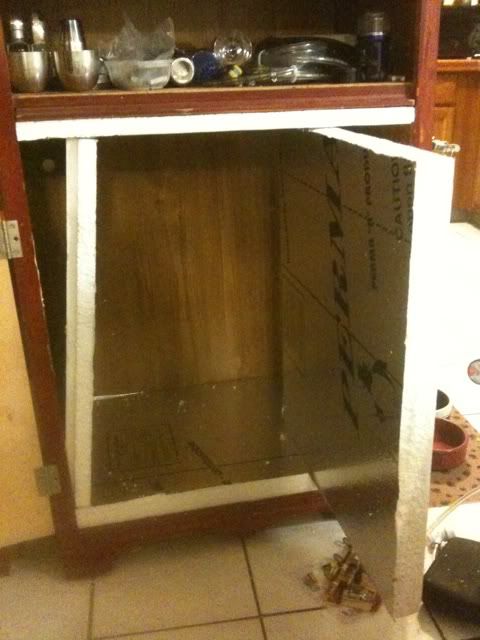
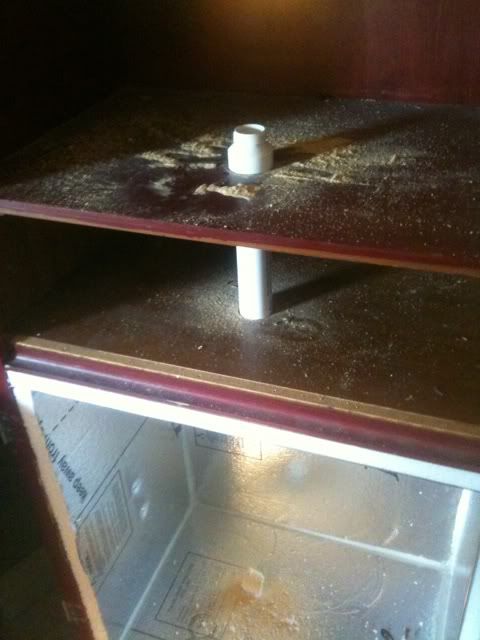
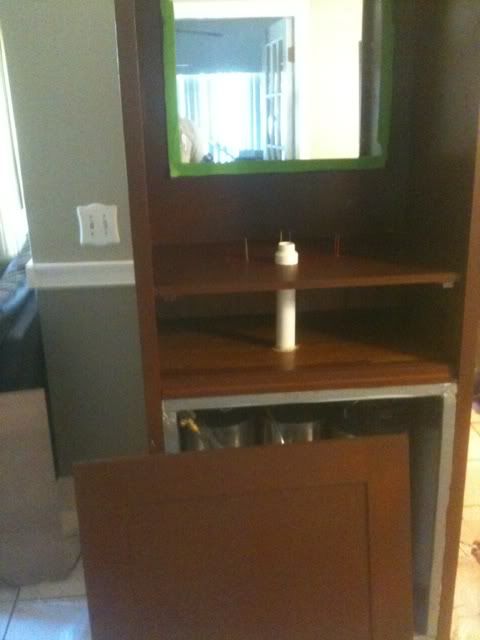
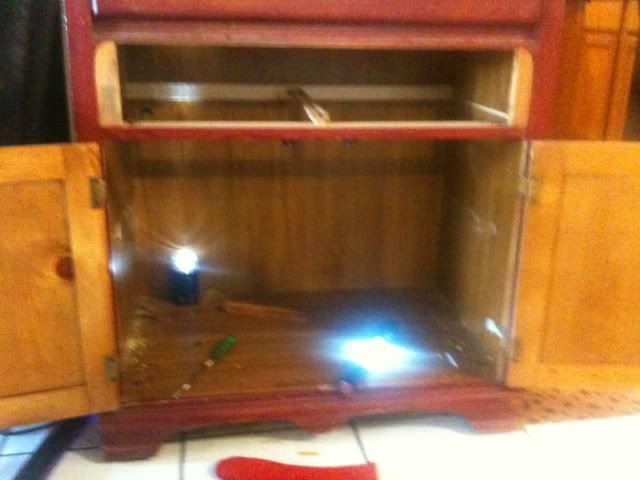
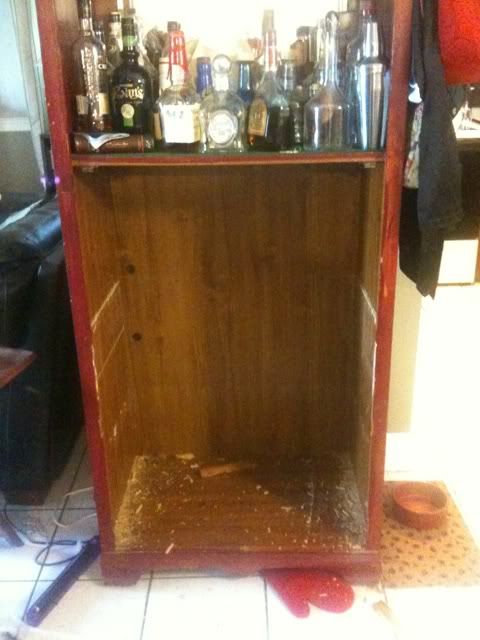
I removed the front door, removed the drawer supports, raised the drawer "floor," and secured the drawer "floor" 5 inches higher.

1000000809.jpg


1000000812.jpg
 
I lined the inside of the main "cooling chamber" with 2" r7.2 styrofoam insulation all the way around. I caulked the creases all around and once dry, covered each crease with duct tape.

1000001666.jpg


1000001669.jpg
 
Next, I had to tackle the cooling unit. I used my 13 year old "dorm fridge" from college that hasn't been used in many years. It served me well and because it has had a long hibernation, it still works extremely well. The shell had to sacrifice, but the soul of the cooling coils live on!

I started by peeling back the aluminum skin with some fancy new tin snips and digging through the foam to pull out the cooling "guts." It was not difficult, but extremely time consuming. The biggest difficulty was starting the cut and making sure not to snip anything accidentally.

1000001647.jpg


1000001648.jpg


1000001649.jpg
 
Here is the completely removed compressor, coils, and condenser.

1000001653.jpg


I built a platform and attached and installed the condenser coils inside the cooling chamber. The only thing I was unsure about during this entire process was what to do with the original thermostat. I didn't feel comfortable rewiring this unit as I have no electrical experience. This is not the thing I wanted to learn on. So, place the thermostat inside the cooling unit or keep it outside. I kept it outside, so it adds to a mess in the back, but it's out of the way.

1000001668.jpg
 
Next, I had to build a door to cover the cooling chamber. I also mounted the same insulation foam on the back of the door that I had used in the chamber itself. I tapered the door foam on a ~60* angle so that it could easily open and close without foam grinding on foam.

1000001675.jpg


Because I was running a pipe from the chamber to the tap box, if I wanted to have a drawer, I needed to build it to custom dimensions to accomodate the piping.

1000001685.jpg
 
In order for the beer lines to run from the kegs up to my tap box, I needed to devise a "contained" path for them to follow. I decided on a 2" diameter PVC pipe to run directly from the cooling chamber to the top complete with cap.

1000001672.jpg


1000001674.jpg
 
Here you will see most of the final pieces after the first coat of paint.

1000001686.jpg


I decided not to use a stain for two reasons: 1) stain takes longer and I'm generally impatient. 2) This basic structure had been painted multiple times before. I had less than zero desire to strip it down to the bare wood as that would have been more trouble than it was worth.

I decided to go with a two-color paint job. The base coat was a medium brown with the slightest hint of red affectionately called "fudge." The top coat was done with super light strokes without much paint to allow the bottom coat to show through with a very dark brown color called "sasparilla." The idea being, that if nobody looked too carefully, the slight variation of colors from light to dark would be enough to give off the impression of actual wood stain. Not a perfect effect, but pretty darn good.

1000001691.jpg


Here you can see the fully assembled and painted final product. You may be able to see the paint effect I am talking about, but if you can't, I think I did my job!
 
Here you can see a closeup of the tap box that I built using cedar project planks. The face is removable by way of posts in the face and slots drilled into the roof. As long as the post slide into the slots, it stays put very firmly! I thought the green felt looked really nice around the box.

1000001692.jpg


I have no idea what make the faucets are. I bought them off craigslist: 3 kegs, 3 faucets, 3 shanks, 3 sets of replacement o-rings, 3 sets of QDs for $100.

The problem I'm having with the faucets is that 2 of the 3 leak a ton (one leaked a full pint overnight). I'll tinker this weekend but I may end up grabbing some perlick's soon.
 
Here is my profile shot of the finished product, complete with the requisite liquor bottles, top-down light source, felt, brushed-nickle drawer knob and door handle. I used two bottom-mount slide rails for the drawer unit and built the drawer itself in a "U" shape to work around the beer line tube.

1000001694.jpg


I finished the cooling chamber with a digital Johnson Controls plug-in temp controller and re-sourced an old PS2 power cord to a 4" AC crate fan, to install into the chamber for air movement. The fan displaces about 65 cubic feet per minute and really helps the kegs get down to temp. I've got the temp set at 48* and used weather stripping around the edges of the door to keep in as much cold as possible. It took about 3 hours to get all three kegs down to there from room temp, but it's now holding that temp with about 2-3 cycles an hour of about 5-10 minutes a piece. I'm not sure exactly how good or bad that is, but the compressor hasn't gotten too hot.

I'm super proud of finally getting this idea out of my head and into the real world. I hope you all like it! Fire away with any questions or suggestions you have. I think this is pretty much done (except for the leaking issue), but I'm always up for tinkering!

And this is how I reward myself for a job well done: a pork picnic smoked for 12 hours!

1000001695.jpg
 
Very very nice! that's some pretty impressive furniture repurposing! I dig it.
 
Really beautiful work here. I love repurposing old (and in some cases meaningful) items like this!

Are you doing anything to cool the coffin box up top? I worry that the PCV and box will get warm without proper air circulation and you may have a foaming problem. If you find this to be the case, you can replace the 2" PVC with a larger diamater and run an air duct up to push cold air up there. Better yet with your design you could just add an extra PVC duct that is for air only and mount another computer fan to gently pull cold air up into the box.

I almost don't want to mention it because this project is soo damn cool... but it's not really a keezer (converted chest freezer).. what it is is a totally kickass custom built kegerator.

Great job, definitely keep us posted with how it performs for you over the long run. If you have any problems, you've got a bunch of new fans on here (myself included) that'll be glad to offer suggestions.
 
It's a beautiful piece of furniture. Good job! I'd be concerned about screwing up the felt with drippings though. No drip tray?
 
This is fantastic. I'm going to now be on the lookout for a similar piece of furniture to try and duplicate this. I have no room for an actual kegerator but something like this would be perfect for our house.
 
Re: felt and drip tray... With all my concerns of how it looks and making it chill and pour beer, I totally forgot about a drip tray. That will be remedied this weekend. Especially with the leaky faucets I have to fix this weekend!

Re: lines and box getting warm... I know that an additional pipe up to the coffin box paired with another fan would help with that. However, I just don't have the space. I placed the pipe off center as I did because it was literally the only location that was remotely centralized that wasn't covered by the condenser plate. Plus, I only have about 1.5 inches of clearance between the top of kegs and the ceiling. Another fan I don't think is in the cards. But I'll look into it if I'm too foamy.
 
Ah that makes sense. Yeah you'll just have to feel it out. Another option you can consider is inserting coper pipe in the PVC, letting them stick out into both the cooling chamber and the coffin box, and running the beer lines through them. If there is no room (2" would be tight), you might even be able to replace the PVC with copper, and then insulate it well in the dead space behind the drawer (pipe insulation from the hardware store works well). Copper conducts heat so well, it can help draw the cold up in to the box.

If clearance above the kegs is an issue as you mentioned, putting a 90º elbow on the end in the cooling chamber may help. The goal is just to get the end of your copper exposed to the cold air as much as possible.

The best of luck to you, this thing is super cool.
 
Hang Glider said:
to address the warm tower, tap, foam issue -

pour two beers, hand one to your wife....:D

Unfortunately, unless I handed her the properly poured pint, I'd be wearing it. She doesn't play around where beer is concerned.
 
fall-line said:
Ah that makes sense. Yeah you'll just have to feel it out. Another option you can consider is inserting coper pipe in the PVC, letting them stick out into both the cooling chamber and the coffin box, and running the beer lines through them. If there is no room (2" would be tight), you might even be able to replace the PVC with copper, and then insulate it well in the dead space behind the drawer (pipe insulation from the hardware store works well). Copper conducts heat so well, it can help draw the cold up in to the box.

If clearance above the kegs is an issue as you mentioned, putting a 90º elbow on the end in the cooling chamber may help. The goal is just to get the end of your copper exposed to the cold air as much as possible.

The best of luck to you, this thing is super cool.

The copper pipe surrounding the beer lines idea sounds pretty good. I was hoping to not incur any additional costs as this thing already ran over budget.

I did, however, purchase a small bag of foam insulation. I figure if I stuff the PVC pipe full, it will hold temps much better than as is. It won't be nearly as effective as copper, but it should at least reduce the temp swings and thus, the foam.

Although, I'll be honest, I'm not really having a foam issue.
 
Although, I'll be honest, I'm not really having a foam issue.

That's the most important thing. If you aren't having an issue, you don't need to fix it! :) If it does come up another thing I thought of was running a PVC air duct with fan out the back (this avoiding the chiller plate) and then up and into the back of the coffin. You've got options, but hopefully you won't need them at all.

+1 on the bottle. I'm a big fan of Laphroaig. BTW, try out their 'quarter cask' if you haven't already. It's only a few bucks more than the standard 10 year, but it was aged in smaller barrels. Good stuff.
 
This is fantastic. I'm going to now be on the lookout for a similar piece of furniture to try and duplicate this. I have no room for an actual kegerator but something like this would be perfect for our house.

I'm by no means an expert, but if you have any questions about the build or assembly (once you find your "starter" piece), I'd be happy to help or answer questions you may have.
 
I'm by no means an expert, but if you have any questions about the build or assembly (once you find your "starter" piece), I'd be happy to help or answer questions you may have.

Thanks. I think the hardest part is going to be finding a piece of furniture that will actually work for me. I've been scouring craigslist but I haven't found anything that would even be close to working.
 
Back
Top