Show us your sculpture or brew rig

Homebrew Talk - Beer, Wine, Mead, & Cider Brewing Discussion Forum

Help Support Homebrew Talk - Beer, Wine, Mead, & Cider Brewing Discussion Forum:

This site may earn a commission from merchant affiliate links, including eBay, Amazon, and others.
This thread inspired me... way back in the "old days"
to move to electric, and move indoors.
Here is my Electric Basement Brewery

Thanks to everyone at HBT for the inspiration !
And all the technical help
brewery2.jpg
brewery1.jpg
 
Thanks for the link. I use the BG14s as well. Q: on a normal propane tank am I at low pressure?
"Low Pressure" is 11" WC which is roughly .4 psi - most propane gas grills run that low. But the typical brew burner will come with a 10 psi or greater regulator, so the answer is most likely No...

Cheers!
 
"Low Pressure" is 11" WC which is roughly .4 psi - most propane gas grills run that low. But the typical brew burner will come with a 10 psi or greater regulator, so the answer is most likely No...

Cheers!
the BG14s come with a high pressure orifice which is what you use for a normal propane regulator and tank so you are good to go!! You would only run low pressure if you were connecting it to NG from your house, or if you were adding automation using a furnace valve. In which case you would need to ream out the orifices.
 
The are Tejas Smokers CVO250 . they are for high pressure propane I have two for my mash and boil kettle, my mlt is controlled using a honeywell so I have a two stage regulator to drop 35lbs to 11 inches of water because of this I called them and they opened the orifice for me. These are all connected to Bayou Classic BG14s. They are a really nice feature
https://tejassmokers.com/Brass-Fittings-Valves/22#brass9

They replace your orifices

How many turns do you have from full closed to full open? Do they fall back a little when you adjust them or do they stay exactly where you put them(if that makes sense)?
 
How many turns do you have from full closed to full open? Do they fall back a little when you adjust them or do they stay exactly where you put them(if that makes sense)?
I would have to check, when setting up I shut them, the I turned the regulator full up, then I cracked the needle valve till i could light burner, then I turned an eighth, then messed with the air, then did this again till I found the sweet spot. Since then, I just nudge them either way when i turn it on. Not sure you would have to do this at sea level but at 6400 feet and the type of day you will always have a little nudging. They will stay exactly in place if you do not touch them
 
4396D565-54F1-4315-8BDB-4F5526D17C20.jpeg
Here is an image of our ever evolving brewery. Brutus inspired single tier, E-herms with KAL style 50A panel, propane boil and back up burner under hlt, 30gal pots = 20gal typical batch size. Therminator with inline O2 stone. Double batch yields 40-42 gal fermented in plastic Conicals. Oh and an instant H2O heater facilitates instant dough ins :) In this image we are boiling batch #1 while recirculating/holding mash #2.
E07F4D61-1597-4978-8270-2C2813B93F10.jpeg
Yeast starter at left, recipe notebook, hop additions, hydrometer etc. lower right
 
Here’s my E-HERMS setup, with extra goodies. Brewpi and chamber to the right.
 

Attachments

  • EF556CA0-A213-41C1-9D73-377506A0E0F8.jpeg
    EF556CA0-A213-41C1-9D73-377506A0E0F8.jpeg
    805.1 KB · Views: 272
  • 3A006EEA-AE68-40DA-9112-26F3A342FFE4.jpeg
    3A006EEA-AE68-40DA-9112-26F3A342FFE4.jpeg
    804.3 KB · Views: 265
20180515_095919.jpg
This has evolved over the last couple of years. It runs like a champ now.
There are a lot of photos scattered over many threads of brewing set-ups.I looked all over the web for pics and ideas for a simple sculpture.Maybe it'll help someone to see a bunch in one place.


This was a fairly simple project.
11-247.jpg


Cheers:mug:
20180515_095919.jpg
 
View attachment 570418 This has evolved over the last couple of years. It runs like a champ now.

View attachment 570418

holy huge a$$ counterflow chiller batman!

is the smaller coil in the pot under the stand a HERMS/temp control thing? I notice you have a temp probe directly on the output side of it going back into the mashtun (I assume it's a mashtun).. how do you modulate the temperature in that? (is there a coil/heat stick in there I can't see?)

how much heat-loss do you get from recirculating through all that copper?
 
It’s actual brewers and vintners hose, only half inch id. Probably should have gone 3/4, but the flow rate is way more than adequate with our little giant pumps. I recall it being really difficult to get onto the barbed fittings. It was $7 per foot from McMaster. Here’s the link: https://www.mcmaster.com/#catalog/53715K41
It’s really durable stuff, never kinks, and our 3 original hoses are approaching 10y old and still going strong!
We used that fittings from Pro flow dynamics. No regrets other than ordering from pro flow twice, over a year apart. They switched suppliers so the fittings from the second order are compatible but slightly different. It bothers me a tiny bit but no leaks though!
 
holy huge a$$ counterflow chiller batman!

is the smaller coil in the pot under the stand a HERMS/temp control thing? I notice you have a temp probe directly on the output side of it going back into the mashtun (I assume it's a mashtun).. how do you modulate the temperature in that? (is there a coil/heat stick in there I can't see?)

how much heat-loss do you get from recirculating through all that copper?
The smaller coil is my original herms coil set up from back when I had 2-10 gallon coolers( mash tun , hot liquor tank) . There is a 4500 watt element in that 5 gallon pot and the controller on the left controlled that. The heat loss is about 10 degrees from one end to the other if you were not reheating it back up at the herms coil. I still use it as I like only heating 5 gallons of water to control temp, and my 20 gallon HLT is heating sparge water independently. HLT and BK both have 5500 watt ripple elements. The counter flow chiller takes you from boiling to whatever temp you incoming water is in one pass with Chugger pumps running full blast, in winter I have to slow the flow of incoming water or you will end up with wort in the high 40's or low 50's.
 
IMG_2219.jpg
IMG_2201.jpg
IMG_2202.jpg
Finally completed my electric mini brewery. Controller built, all small leaks corrected, thermometer and probe calibrated and Monster Mill up & running thanks to the very powerful American Aleworks motor. I customized the Autosparge in the hopes of avoiding channeling during the recirculation. Time now to brew. My cost per pint just went way up but what the heck.
 
Last edited:
That’s a schweeet setup.

Can you roll your mill outside to crush grain? I’ve read you should mill and brew in the same space.
 
Last edited:
[[...]I customized the Autosparge in the hopes of avoiding channeling during the recirculation. [...]

Neat looking system.
fwiw, I've been using the same Blichmann autosparge valve for a couple of years in a 20g mlt and ime if you use the product the way it was designed there will be no channeling, and no need for all that copper in your mash...

Cheers!
 
Neat looking system.
fwiw, I've been using the same Blichmann autosparge valve for a couple of years in a 20g mlt and ime if you use the product the way it was designed there will be no channeling, and no need for all that copper in your mash...

Cheers!
Thanks! I just thought that the whirlpool action of the Autosparge might tend to dig a channel around the perimiter of the MT based on their recommendation to "rake" the top third of the mash every so often. I thought this might eliminate that step and leave the mash undisturbed during the recirculation. The copper will be above the liquid level and just suspend the plastic diffuser which I can set just slightly below the liquid level. If it proves to be too much of a pain, I'll revert back to the original setup.
 
The raking advise really isn't a function of the sparge "arm" regardless of design, it's an aspect of any recirculated mash that you get that "gray" layer of sludge atop the bed given enough time. Before I start fly sparging I slice that layer up with my spoon then let 'er rip, nbd.

If you allow ~ 1.5" of wort atop the bed and position the float ball so the end of the silicone tube lays flat, there's no channeling even with ~3 gpm flowing, and you'll cut down the oxygen pickup...

Cheers!

[edit] Speaking of O2 pickup, it wasn't long after I had installed the autosparge that I noticed if I didn't maintain adequate flow in the recirculation loop the valve would suck air which was visible in the silicone tube. Pretty much the opposite of the whole LoDO intent, but I just had to up the flow rate and the wort would run clear in the tube with no evident bubbles. Turned out I was just being paranoid about sticking the mash and once I got comfortable running 2-3 gpm all was well...
 
Last edited:
The raking advise really isn't a function of the sparge "arm" regardless of design, it's an aspect of any recirculated mash that you get that "gray" layer of sludge atop the bed given enough time. Before I start fly sparging I slice that layer up with my spoon then let 'er rip, nbd.

If you allow ~ 1.5" of wort atop the bed and position the float ball so the end of the silicone tube lays flat, there's no channeling even with ~3 gpm flowing, and you'll cut down the oxygen pickup...

Cheers!

[edit] Speaking of O2 pickup, it wasn't long after I had installed the autosparge that I noticed if I didn't maintain adequate flow in the recirculation loop the valve would suck air which was visible in the silicone tube. Pretty much the opposite of the whole LoDO intent, but I just had to up the flow rate and the wort would run clear in the tube with no evident bubbles. Turned out I was just being paranoid about sticking the mash and once I got comfortable running 2-3 gpm all was well...
Interesting. When I was doing a trial run testing the whole system I did notice micro bubbles flowing through the tubing. Once I pinpointed and fixed the very small leaks at the elbows/camlock connections, all bubbles seemed to disappear. I set my flow rate @ 1GPM. I didn't consider the Autosparge an issue as any o2 picked up at the AS valve would just discharge into the mash and not transfer to the drain/output of the mash allowing it into the system. What GPM do you consider optimum assuming no air leak issues?
 
I'm going to guesstimate I needed a full gallon per minute to keep the autosparge valve from obviously sucking air into the returning wort. It may still be sucking air at the 2-3 gpm I actually recirculate at but it isn't visually evident at all.

fwiw, if you believe in "LodO Think" introducing air into the mash is to be avoided. I'm a bit less concerned about the possibility of pulling air into the sparge liquor once I start the fly sparge at one quart per minute - much slower flow than recirculation. I actually don't think I've looked at the silicone tube while I'm fly sparging to see what's going on there...

Cheers!
 
Are the Banjo BG14 burners still the default for someone building a Brutus style 10 gallon keggle rig on propane?
 
Pretty much, unless you want something loud ;)
Beyond that, if you're automating with the typical Honeywell gas control valves thus stuck with ~11" WC (roughly 0.4 psi) to work with there are precious few burner elements that will tolerate that low a flow. Which is why you'll usually see bg14s in automated gas rigs...

Cheers!
Which Honeywell control valves are typically used? I'm planning to automate the burners and mash control on my rig this summe as well as convert to natural gas. Not really wanting to go electric at the moment. I'm sure this has been covered elsewhere.
 
Beautiful systems - here's my setup.

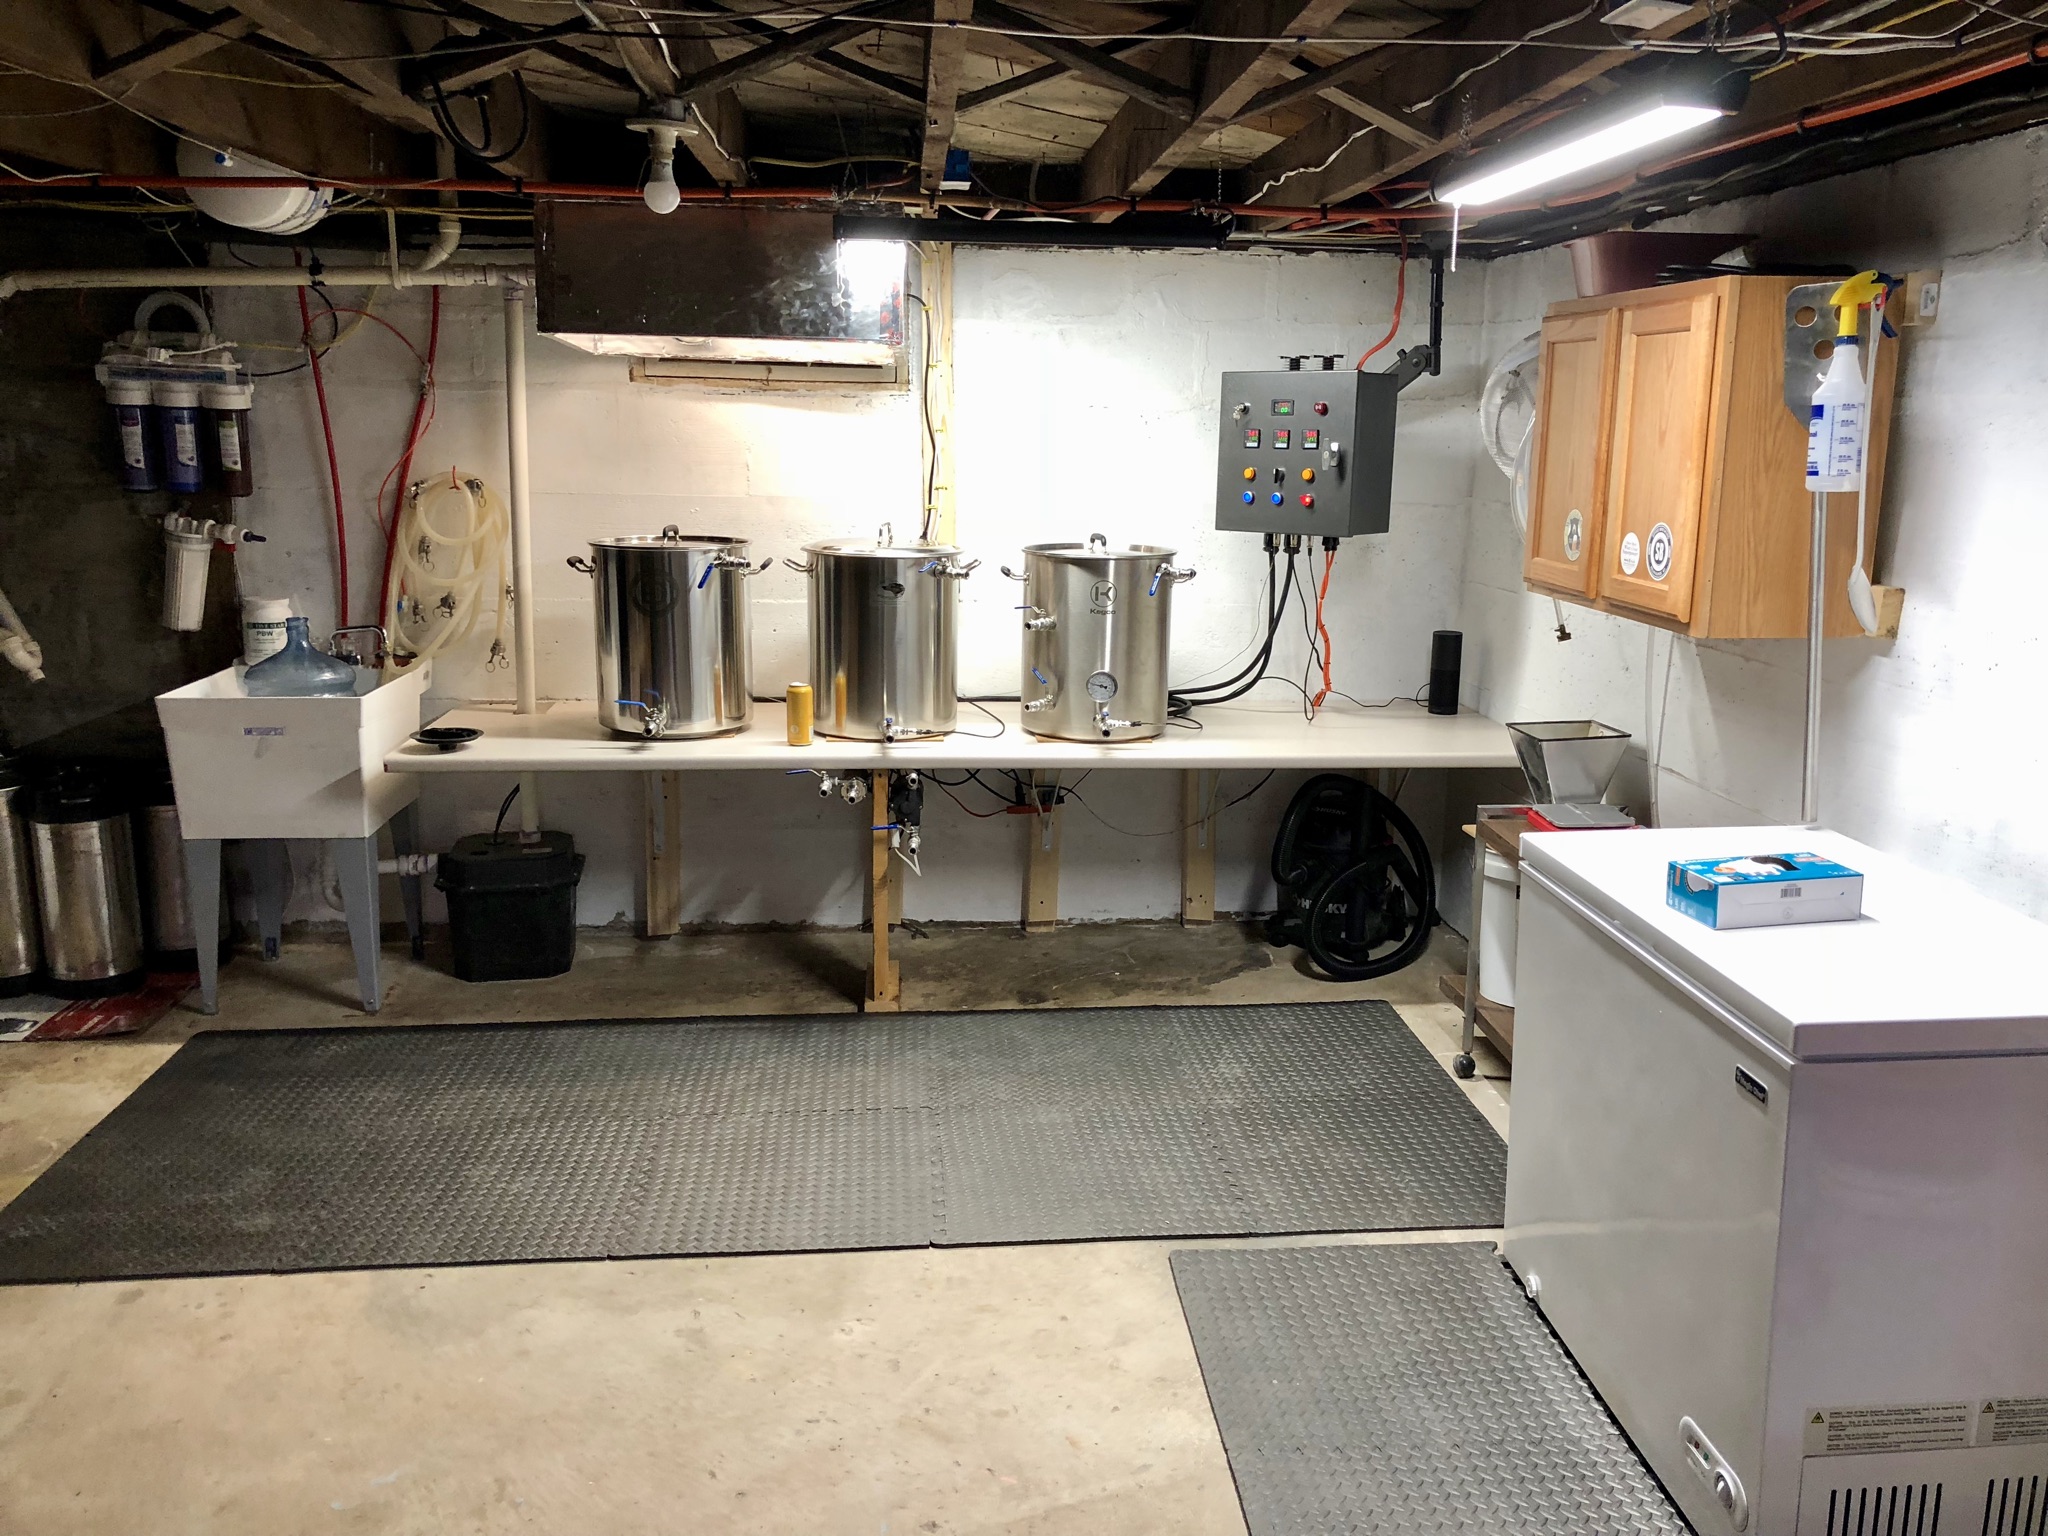
Sorry for the awful mess, too many hobbies. Here's a quick look at The Brew Shed. On the left is the brew rig, fermentation happens in the middle, and then conditioning and serving happens on the right.

Resized_20180421_080841_626.jpg

-the whole place-

The brew rig consists of a 30 gallon Hot Liquor Tank and two converted kegs for mash tun and boil kettle. This is configured as a Heat Exchange Recirculated Mash System.

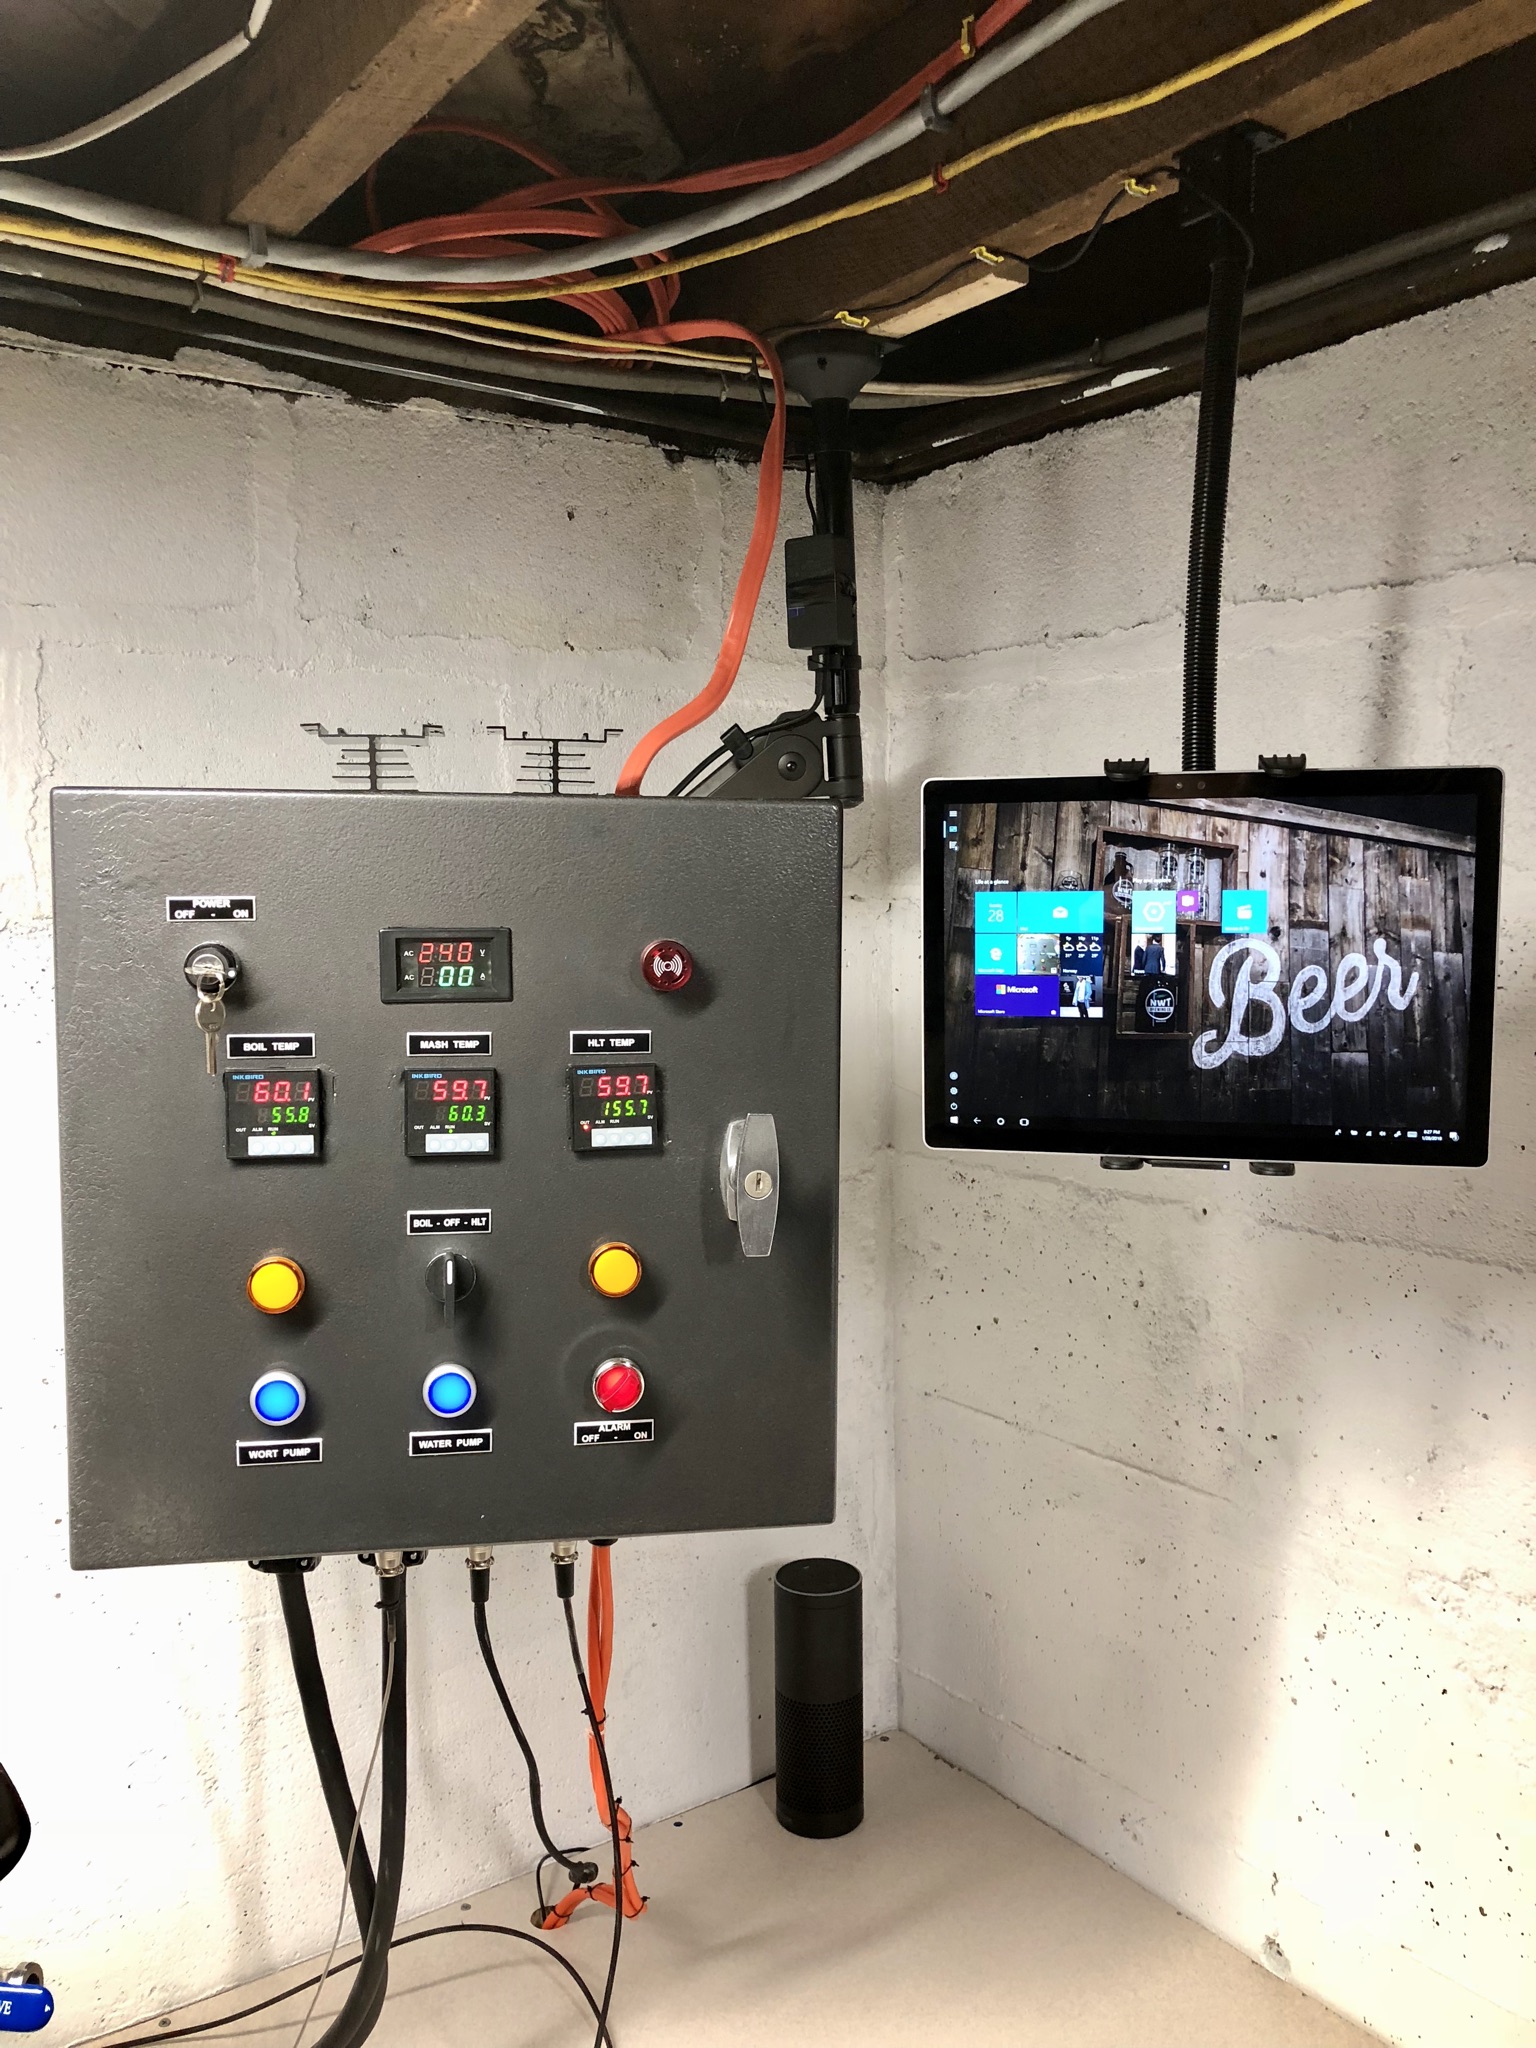
The brain of the brew system is a BrewTroller which allows for automated temperature control of each brewing vessel. The brain manages control circuits connected to relays to engage two 240v circuits for heating elements and four 120v circuits for things like pumps, grain hoppers and so forth. It also has a web server running on it so you can control the brew process from a PC, tablet or even create your own monitoring system which queries the API.

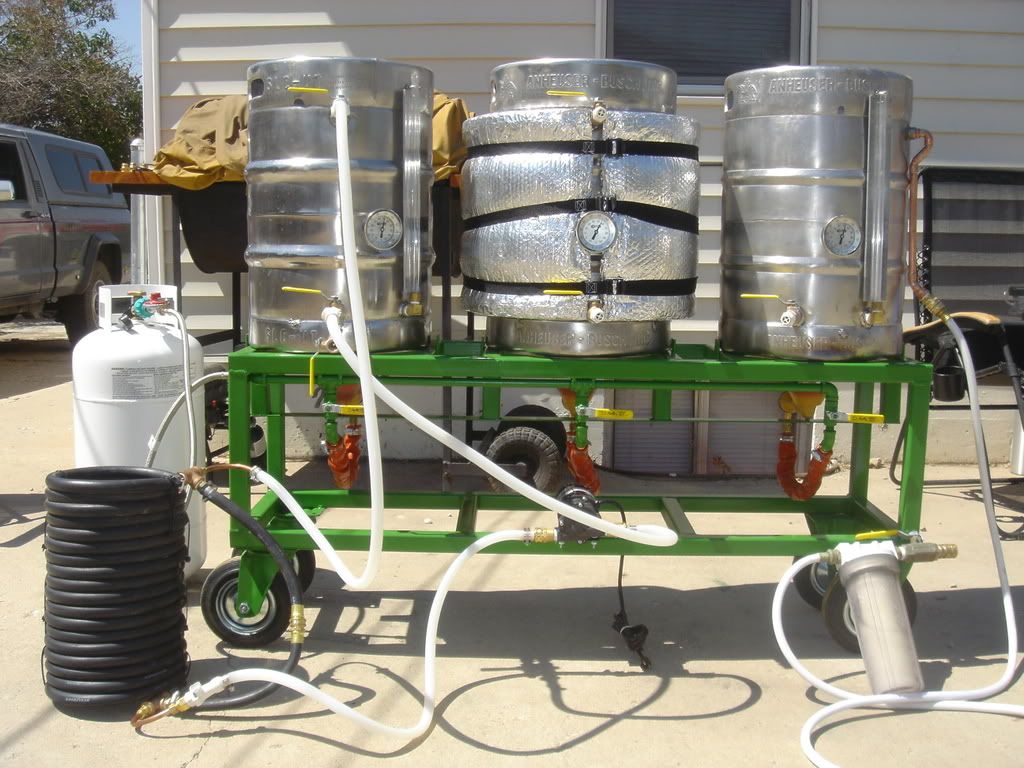
The HLT has two 6500W elements in it as well as a copper HERMS coil. There is a selector on the brew system to allow me to fire one or both of the elements when the HLT temperature goes below the target. During the pre-heat phase, both elements are turned on in the HLT, and a pump recirculates the hot water to ensure even heating.

I put a selector on the brew system to enable both elements to fire at the HLT's temperature request, or have one enabled for HLT control and the other for Boil Kettle heating. During the mash or boil, only one element in the HLT is needed to maintain temperatures.

The Mash Tun has a stainless steel false bottom to separate grain from wort. To control mash temperature, there are a few options.
-You can set the HLT temperature to match the target mash temperature and constantly recirculate the wort for the entire mash duration
-You can set the mash pump to only recirculate wort through the heat exchanger when the mash temperature drops below the target mash temperature. This is essentially auto-temperature control on a standard infusion mash.
-You can step-mash, where your mash temperature is variable over the mash duration and will automatically advance after the set number of minutes.

The boil kettle has a 5500W ultra low watt density element and a smaller false bottom to help contain hop particles and what not.

It may be difficult to see in the picture, but there is a counter-flow chiller on the left side with an inline oxygenation system. I transfer the boiling wort directly to the fermenter and oxygenate at the same time. There is a valve on the outlet to make sure no liquid back-flows to the oxygen regulator.

20160527_174707.jpg

-four fermentation chambers with tablet display before stain was applied-

Fermentation occurs in the four mini-fridge sized boxes in the center of the image. Wort is pumped through the chiller into the fermentation vessel, yeast is pitched and the resulting bubbling goodness sits in a temperature controlled environment until the yeast is done working. I found used mini-fridges and added heaters to make temperature controlled environments for each batch of beer I brew. The brain of the fermentation system is a Brewery Control System (BCS-460) which monitors the temperature of each chamber and can turn on the mini fridge to lower temperature, or turn on a small heater to raise temperature in each chamber independently.

32313102_10216478853786328_5753035150266990592_o.jpg

-kegorater with tap list-

23596352_512008019169189_3463181174719905792_n.jpg

-broken tools and extra hardware as tap handles-

Conditioning and serving takes place in a converted chest freezer. Once fermentation has completed, the mini fridges are set to lager for whatever amount of time is desired. When the majority of yeast and trub has settled, beer is transferred to corny kegs and moved to the kegorater where they are carbonated and ready to serve.

The kegorater has one nitro tap and eight standard taps for a maximum of 9 beers on draft at any time. I often re-use broken tools as tap handles. The kegorater follows the standard design, collar on top of the chest freezer and STC-1000 temperature controller. There is a pair of manifolds with valves to distribute the CO2 to the kegs.

The tap-list display is a pretty neat project as well. It's an old TV I had sitting around the basement that we never really watch any more. I connected a chrome cast to it, and can stream videos or web pages to the TV from the shop computer. I'm also playing around with the idea of using a mini-pc or raspberry pi for display, but that hasn't been finalized yet. The short explanation here is my beersmith data files are consumed by a web application that generates the tap list on the fly based on the data entered in beersmith. All I have to do is update the web server with the XML file and the webpage is automatically updated with what's on tap.

If you made it this far, thanks for taking the digital tour of the brew shed! Feel free to message me with questions or comments!
 
Mocked up a rough idea for a mobile brew cart. I'm still compiling all the various bits and bobs to convert 3 kegs into an electric HERMS system, but I've been using Google SketchUp to mock up some other wood working projects and thought I'd give a mobile brew cart a go.

The cart itself will have 4 heavy duty castors on it, with the front 2 having locks. It will be 57" long, 21" wide and 40" at the back. I figured having the kegs sit a little bit lower to the ground would make it easier to move them around, and especially dump out the MLT of its grain. I'll house 2 pumps on the lower shelf section, and find some way to mount a control panel off of the upper backing section, with some storage on the small shelf above. All 3 shelves are made of plywood, but I'll probably skin the bottom 2, or at least heavily coat with a waterproof epoxy or poly.

Any recommendations are greatly appreciated!
 

Attachments

  • Screen Shot 2018-05-23 at 8.40.57 PM.png
    Screen Shot 2018-05-23 at 8.40.57 PM.png
    86.8 KB · Views: 178
View attachment 570284 Here is an image of our ever evolving brewery. Brutus inspired single tier, E-herms with KAL style 50A panel, propane boil and back up burner under hlt, 30gal pots = 20gal typical batch size. Therminator with inline O2 stone. Double batch yields 40-42 gal fermented in plastic Conicals. Oh and an instant H2O heater facilitates instant dough ins :) In this image we are boiling batch #1 while recirculating/holding mash #2.
View attachment 570285 Yeast starter at left, recipe notebook, hop additions, hydrometer etc. lower right
Isn't your oxygen tank a bit close to the burner, or is it just there to have it in the pic? Very nice setup though.
 
Back
Top