Up for a laugh? Here's my 2 vessel single tier ag setup, for now

Homebrew Talk - Beer, Wine, Mead, & Cider Brewing Discussion Forum

Help Support Homebrew Talk - Beer, Wine, Mead, & Cider Brewing Discussion Forum:

This site may earn a commission from merchant affiliate links, including eBay, Amazon, and others.
Joined
Feb 17, 2010
Messages
14,612
Reaction score
3,600
After too long planning, buying, etc... I couldn't wait any longer. I'm still waiting to order the 23 tip burners, my 10g cooler has yet to arrive, and I have been too busy to convert my other keggle and build a stand, so I decided last weekend that I WAS going to brew an AG batch. Today is my third batch, and it's boiling away as I type, so I thought I'd give everyone a chuckle at my creation.

ghetto-ag.jpg


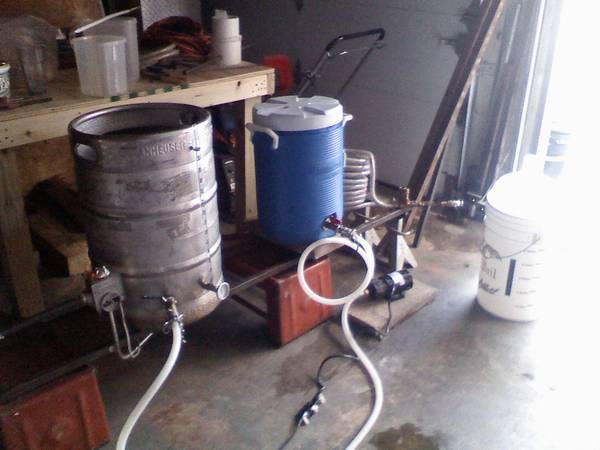
It consists of two car ramps, two jack stands, two 6' pieces of 1-1/4" steel tubing, a 38k btu water heater burner/gas valve brazed onto one of the pieces of steel tubing, a 5g cooler mash tun with ss braid, march pump, and homemade cfc, misc other parts, and a "bobby_m" gas supply line. ;)

Enjoy!
 
Hey, that's advanced to what I'm brewing with. I've got a sawhorse, 12 gallon cooler mash tun, a banjo burner, keggle, and a turkey fryer pot. Oh yeah, I forgot to say a spoon and some randon hoses. As for a pump, I'm au naturel, gravity.
 
Everyone must start somewhere! My first AG was done on a salvaged turkey burner from trash week in my neighborhood with an aluminum pot I picked up at walmart for $10. BUT, I did in deed make a beer and yes it was tasty.

Congrats on your progress. Keep us posted on the results.
 
mine isnt much better. I finally got a third keggle... now i need a damn brew stand lol
 
Save some grief , ditch the 23 tip burner idea and buy the 10" cast burners from AG supply. The 10" banjo burners are much better for the job as they have a wide adjustment range and are easy to convert to low pressure propane or NG operation by drilling gas fitting on burner, instead of replacing all the tips on the 23 tip burners.
 
This is the setup you used on your 3rd batch? Thats rocking.

I brewed extract on the stove for the first 50 or so batches.

20 AG batches and my rig still has no pump or converted keg.
 
You up for real laugh?

I've invested thousand in rigs (brewing and chilling), tubes, fridges, probes, and meters.

And haven't brewed a batch in a year.
 
I like to be more than just involved in my brewing process. That's why the thought of sitting and pushing buttons (or automating even that) turns me off. I do have a converted keggle because it was free and allows me to brew 11 gal batches. I have no pump and have to lug things around. But I LOVE IT!
 
Save some grief , ditch the 23 tip burner idea and buy the 10" cast burners from AG supply. The 10" banjo burners are much better for the job as they have a wide adjustment range and are easy to convert to low pressure propane or NG operation by drilling gas fitting on burner, instead of replacing all the tips on the 23 tip burners.

I actually found the 23 tip burners already setup for NG for $25, and replacement tips are only $0.99/ea.

This is the setup you used on your 3rd batch? Thats rocking.

I brewed extract on the stove for the first 50 or so batches.

20 AG batches and my rig still has no pump or converted keg.

I should clarify, this is my 3rd AG batch. I'd say I've done about 25 extract batches on the stove before going AG. I've still been brewing extract batches to keep the flow going while I was aquiring parts, and didn't plan to go AG until I had my single tier setup complete. I couldn't wait any longer. :)

You up for real laugh?

I've invested thousand in rigs (brewing and chilling), tubes, fridges, probes, and meters.

And haven't brewed a batch in a year.

That makes me want to cry more than laugh. Tell me it's because you became at least partially disabled a year ago? :cross: If you need a place to store it, I've just about got my garage cleaned out. ;)
 
The setup progressed a bit for yesterday's brew. It was my only day off for a couple weeks, and I have been wanting to brew a pumpkin ale for Thanksgiving, so it was a "must brew today" day. We also had an early Thanksgiving/Christmas dinner for a nephew who's getting sent to Iraq on 11/7, so my time was short.

I started early and since the wobbly 2 pieces of steel wasn't cutting it for me, I decided to put the welder to use. It only took me a couple hours to weld this up, mount the burners, and plumb the gas lines. I even surprised myself how quick I got it done. It's not going to be used on my final stand, since the longer runs of steel have a little warping to them, but it works much better. Plus I have 2 burners now that put out significantly more heat than the water heater burner did.

Here's the welded frame and burners mounted.

stand14.jpg


jetburner3.jpg


Gas lines ready to go.

stand51.jpg


And it's up and running!

stand7.jpg


The burners ended up being WAY to close, even with the spacer I had welded in to drop them another inch. I ended up repiping the burner on the BK while mashing since it took over 1.5 hours to heat my strike water. I could only turn the HLT burner on about 10%, but after lowering it on the BK, I could go almost wide open. That was not necessary once it came to a boil. Maybe 25% to keep a hard rolling boil.

Here's the lowered burner, which got things up to a boil from 160° in about 15-20 minutes.

bk-1.jpg


Once I lower the HLT burner, and my 10 gallon cooler arrives on Thursday, I will have a decent setup to use while I aquire all of the parts to make a real brewstand. This way I can still brew AG and take my time on the build. One good thing is it breaks down easy and can lean against the wall out of the way.

:mug:
 
Back
Top