texasgeorge
Well-Known Member
- Joined
- Apr 6, 2006
- Messages
- 193
- Reaction score
- 1
I know there are some folks out there who want to venture into all-grain brewing, but don't think they have the space. The fact is, that's false, and I've put some pictures together to show my homebrewing setup. The pictures below are from my Bridgeport ESB Clone v1.0 brew on 12/10/06.
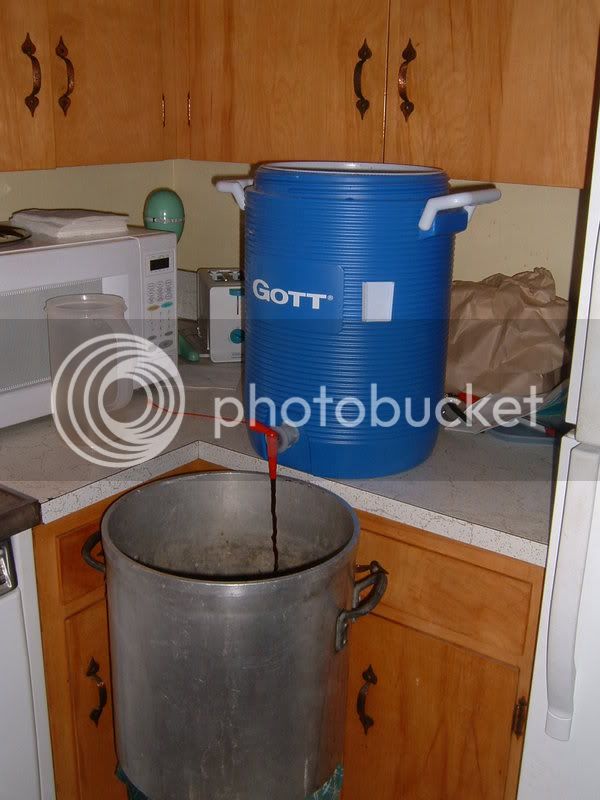
The first picture below (Figure #1) is of my setup. Here's how I use it:
On the counter across from the stove:
1) My cooler mash tun. Mine's a rectangular cooler, and I've fitted it with AHS's bulkhead, brass ball valve, and nipples on both ends. I have a stainless braid crimped to the inner nipple (taken from a toilet inlet pipe I bought at Home Depot for ~$6.... they sell some other type that looks like stainless but is actually plastic-coated something. Make sure you buy the stainless.) Notice that I have wrapped a blanket over the cooler, to help reduce heat loss. I wrap it tightly and use clothespins to make sure it stays tight.
On the stove:
1) 30qt boiling kettle. I use this to bring 1.25 qt/lb to about 20F higher than my target mash temp (generally to 174F to mash in at 154F). Once I mash in, I get my sparge water up to about 195F to sparge at 175F. This is where my collected wort goes too, obviously.
2) A smaller, ~8qt pot... I think it came with a strainer for pasta or crab or something. I don't remember, but it's a good vessel to heat about 6qts of water to near boiling, so I can make temperature adjustments if my mash loses too much heat, etc. Whatever's left, I dump in the mash for mashing out.
Not shown: my bottling bucket. When I'm ready to take my first runnings, I empty the sparge water from my kettle into the bottling bucket, so that the kettle is ready to take the wort. With batch sparging, you don't have to worry about running off slowly, so I can open the valve full blast and get all the first runnings out in about 5 minutes generally. The water loses a few degrees in the bucket, but if you hold it at 195F until you have to empty it into the bucket, it's fine.
Technique:
1) Start heating strike water to 174F. 1.25 qt/lb of grain. Start heating 6 qt of water in the smaller pot to 174F also. Tip: Put the lids on the pots to help get it heated faster. Add any water treatments / salts at this time (for me it's lactic acid to neutralize a lot of my excess CO3 alkalinity). I do not use any water treatment in the small pot at any time.
2) When the smaller pot hits 174F, make sure the ball valve on the cooler is closed and empty it into the cooler to heat it. Leave it, covered with the blanket, until you're ready to mash in. Fill the pot back up with another 6 qts and bring it up to a boil.
3) Once your strike water hits 174F, drain the water in the cooler, add your strike water, and add your grains to your water (not the water to the grains). Stir well ensuring that you don't have any dough balls. Be sure you stir the bottom of the cooler as well as the top. Take a temperature reading and add hot/cold water to get your temp right. Stir well to ensure your temp change affects the entire mash and not just where you added the water. Cover, and set your timer for 30 minutes.
4) Start heating sparge water... you won't lose as much water to the grains in the sparge as you will with the mash. My system says that .9qt/lb is right... but your system may show different mileage. The goal is to run off equal amounts of wort from the first runnings and the sparge runnings.Add any water treatments at this time. When your sparge water hits 195F, maintain that temperature. (My stove gets 4 gal of cold tap water to 195F in 45-50 minutes).
5) When your 30 minute timer goes off, check the temperature of your mash and add hot water from the small pot if necessary to bring your mash back to the right temp. I like to stir here as well, just to loosen some sugars. I get better efficiency when stirring at the 30 minute mark than when I don't, for what that's worth. Set your timer for another 30 minutes.
6) When the timer goes off again, take a small sample (I open the valve and take a tiny bit of wort into a small saucepan) and check the pH. I use pH 4-6 papers from AHS. Quickly dip the corner of the paper into the wort and let air dry. If it falls in an area less than 5.5, you can run off. My mashes typically take ~80-90 minutes, and a longer mash isn't going to hurt anything. Darker beers, like stouts and porters, will generally take less because the darker malts contribute more acidity than lighter malts. If necessary, set your timer for another 20 minutes.
7) When your mash is complete, empty the remaining water from the small pot into the mash and stir in well. Cover it back up for 5-10 minutes. Your mash-out should be in the 168-170 range, even from boiling water. Stir once your sparge time is complete. Picture #2 below is after mashout
8) Run off time: Empty your sparge water into your bottling bucket. Be Careful!!! This S#!t is F#$*!@g hot!!!!
9) Run off some wort into a small saucepan... it'll have some grain particles in it. Empty these runnings gently back onto the top of the grainbed. Repeat until wort runs clean. Once you have clean wort, open the valve full-blast and empty into your kettle. Put a lid on it and place it back on the stove. Empty the sparge water from the bottling bucket into the cooler and stir well. Your temp should be 175F or below. If it's too hot, add some cold water. You don't want to start extracting tannins from grains. Remember, everyone's system is different, including temps and times!!! Let the sparge water go for 15 minutes. Figure #3 below is my sparged grains
10) Run off as before... into a small saucepan until you have clean runnings. Empty these right on top of the wort you collected about 15 minutes ago. Figure #4 shows what 6.5 gallons of wort should look like.
11) Brew as normal. I bring my beers up to a boil with the lid mostly on, keeping a very close eye on it once it gets over ~190F. Once my thermometer reaches ~205F, I will remove the lid every minute or so to let it settle down some, and put it back on the pot. If you don't cover it, it'll never get to a boil on the stove.
Any questions... please feel more than free to ask!