You are using an out of date browser. It may not display this or other websites correctly.
You should upgrade or use an alternative browser.
You should upgrade or use an alternative browser.
How To Make A Beer Crate For 12oz Beer Bottles
- Thread starter UncleDavid
- Start date

Help Support Homebrew Talk - Beer, Wine, Mead, & Cider Brewing Discussion Forum:
This site may earn a commission from merchant affiliate
links, including eBay, Amazon, and others.
Subscribed for later use. Need to make a couple for my bottles.
Iceman6409
Well-Known Member
Just my two cents here. I have built 3 of these so far and it is such a great, simple very cheap idea. I was going to make the dividers as well but by accident I happened to put four 6 pack carriers in one and they fit perfectly. No moving around at all. I have dozens of those 6 pack carriers all over the place and obviously they are free ")
Iceman6409 said:Just my two cents here. I have built 3 of these so far and it is such a great, simple very cheap idea. I was going to make the dividers as well but by accident I happened to put four 6 pack carriers in one and they fit perfectly. No moving around at all. I have dozens of those 6 pack carriers all over the place and obviously they are free
They fit great, but are not water proof. I have some dividers I made from free old election signs that are waterproof and great for when I am cleaning or bottling and the bottles are wet. But I also use the 6 pack containers in some of my boxes. Because, well, i'm lazy, and that's really easy to do.
These are the numbers I come up with to make a carrier for 12 16oz bottles:
Bottom Slats = 14"
Vertical Ends = 10 1/4"
Shorts Sides = 9 1/2"
Long Sides = 15 1/2"
That is with the bottle dividers. and 1/2" head room for the bottles on top.
I calculated the inside of the original 24ct 12oz box as L - 15 1/2", W - 10 1/2", H - 9 1/4"
Thoughts?
I made these, and the only thing I would change is to make the Vertical ends 10 1/2" - 10 3/4" instead of 10 1/4" just to give the bottles a bit more clearance.
loud1
Well-Known Member
This is a great starting point, I'm planning on using deconstructed pallets for the wood, all I have to pay for are the brads and glue.
Thanks for the dividers too.
Thanks for the dividers too.
brewinginnc
Well-Known Member
- Joined
- Dec 1, 2012
- Messages
- 292
- Reaction score
- 41
Just built my first one and it fits sn bottles sweet. Now i just need to make about 10 more
mikerobrewer
Active Member
Here's a picture of a crate I built today. Got the 6' 1x3s from Home Depot on sale for $0.75/ea. Went back to get more afterwards and they were all gone. Dammit.

Spinrathen
Well-Known Member
- Joined
- Jan 27, 2013
- Messages
- 145
- Reaction score
- 5
Used some wood I had and made a few modifications. I did a quick round over to the exposed edges and put the vertical pieces on the inside to make the whole thing more appealing to look at. That change required making the the long pieces of the dividers different sizes.
Have not decided yet if I'm going to stain and clear coat, let it go natural or etch a logo onto it.
When I make more I think I'll increase all measurements by 1/16" or so. The squatter bottles fit, but it's tighter than I would like.

Have not decided yet if I'm going to stain and clear coat, let it go natural or etch a logo onto it.
When I make more I think I'll increase all measurements by 1/16" or so. The squatter bottles fit, but it's tighter than I would like.
Spinrathen
Well-Known Member
- Joined
- Jan 27, 2013
- Messages
- 145
- Reaction score
- 5
fixed.
Huaco
Well-Known Member
Looks fine on this end... Tile is at the bottom of the picture.
Good looking stuff!! I'm a subscriber to this wood working site you might like to see. Here's something you might like In the crate direction.
http://woodgears.ca/milk_crate/index.html
There's great info there and a video at the end.
http://woodgears.ca/milk_crate/index.html
There's great info there and a video at the end.
Clicked the link. First picture I noticed had finger joints, next picture had mortise and tennons.
That's pretty cool as milk crate porn. But very few of use here the equipment and patience for that project. I think I might, but that depends on if my table saw wants to cooperate that day.
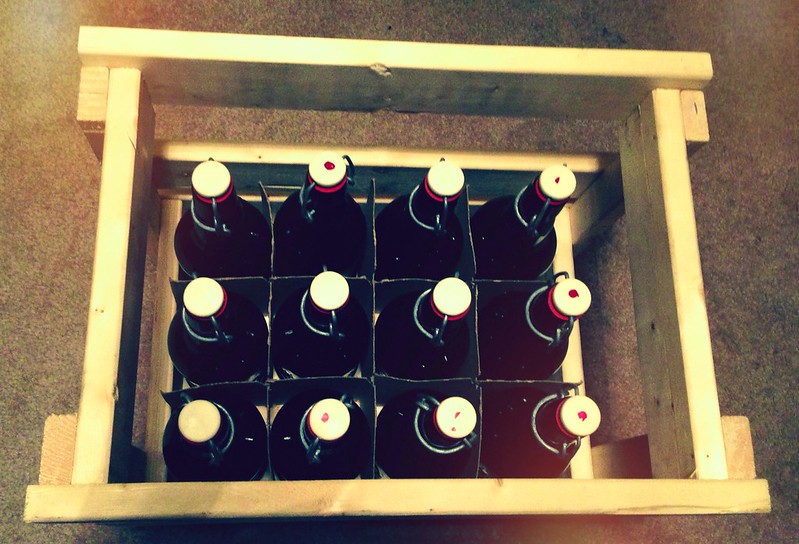
Thanks OP. I bought materials and 'em up last night for a dozen crates to your exact measurements. Have some leftover wood because I was able to squeeze some pieces out of tailoffs, so I might just attempt the bomber crate you guys are talking about.
That's pretty cool as milk crate porn. But very few of use here the equipment and patience for that project. I think I might, but that depends on if my table saw wants to cooperate that day.
Thanks OP. I bought materials and 'em up last night for a dozen crates to your exact measurements. Have some leftover wood because I was able to squeeze some pieces out of tailoffs, so I might just attempt the bomber crate you guys are talking about.
revco
Well-Known Member
Just wanted to pass on my appreciation to the OP for the design. I've made up about 12 of these in the last month and plan to make more, along with some other sizes for my bombers and Belgian style bottles. I want to make a travel case too that'll hold 12-12's.
A few minor mods. Like a previous poster, I dropped the long side rails to make them easily stackable. I felt this was a superior solution to raising or lowering the vertical supports since there's more surface area in contact with the crate above and below. I also opted to raise the vertical supports from the original 10" to 10.5" and am glad I did. After creating a few, I decided it was worth the extra step to stain them too and I think it really brings out the grain of the furring strips. (Used a walnut at first, but preferred red mahogany....probably won't finish them.) I use standard six pack holders in them instead of going through the effort to create the dividers, but I'll probably have to do dividers on my odd-size crates since I don't have packing for them.
I see the point about furring strips not being of high quality, but with a wee bit of care, you can make sure they're not too far out of whack without creating a lot of waste. A little bit of sanding at the interlocking joints and you can get a perfect fit, without being concerned about being perfectly square. And for $4-5 each, that can't be beat.
Thanks again! Very handy, functional and the girlyfriend approves!
Good looking stuff!! I'm a subscriber to this wood working site you might like to see. Here's something you might like In the crate direction.
http://woodgears.ca/milk_crate/index.html
There's great info there and a video at the end.
Check out his YouTube channel: http://www.youtube.com/user/Matthiaswandel
He has tons of woodworking videos and sketchup tutorials
Yeah he does lots of neat stuff. You can subscribe too for an update email every week. There's lots of good ideas on stuff. I know him pretty well. He started work at this little known company then called Research in Motion. He was one of there top brains. Made enough money doing that job that he gave it all up to make videos about woodworking. A really down to earth guy, also his family makes cider in pretty large batches.
vogtenstein222
Well-Known Member
- Joined
- Dec 24, 2012
- Messages
- 145
- Reaction score
- 14
Planning to build a couple of these tonight. May do a couple 6 pack style as well
mikerobrewer
Active Member
I've been drawing up some ideas for six packs as well. Thought it would be cool to put one of those wall-mount style bottle openers on the end of it too.
Like the ones here: http://imgur.com/a/ULohS
Like the ones here: http://imgur.com/a/ULohS
mikerobrewer said:I've been drawing up some ideas for six packs as well. Thought it would be cool to put one of those wall-mount style bottle openers on the end of it too.
Like the ones here: http://imgur.com/a/ULohS
Those look great. I like the that you attached bottle openers.
vogtenstein222
Well-Known Member
- Joined
- Dec 24, 2012
- Messages
- 145
- Reaction score
- 14
mikerobrewer said:I've been drawing up some ideas for six packs as well. Thought it would be cool to put one of those wall-mount style bottle openers on the end of it too.
Like the ones here: http://imgur.com/a/ULohS
I really like that concept. Especially envious of the DFH openers....can't even get that stuff in Kansas....I have a friend that smuggles it back for me when he goes to jersey.
mikerobrewer
Active Member
You can get the DFH openers on their website. Also, I'm enjoying a 60 Minute IPA right now.
vogtenstein222
Well-Known Member
- Joined
- Dec 24, 2012
- Messages
- 145
- Reaction score
- 14
mikerobrewer said:You can get the DFH openers on their website. Also, I'm enjoying a 60 Minute IPA right now.
Bummer is they won't send me the beer I want to use them to open. Haha.
No biggie, makes it that much more special when I do get it.
I'm moving to using these for most all of my brewhouse storage.
I need to make several crates for mason jars. I have hundreds of them now.
Some inside dimensions off the shipping boxes that mason jars come in, which I'll convert to plan dimensions later:
(12) Wide-mouth Pints: 14-3/8" Wx 10-5/8" x 5" H
(12) Wide-mouth Quarts: 15-1/4" W x 11-1/4" D x 6-3/4" H
(6) Half-Gallons: 15-1/8" W x 9-1/4" D x 9-1/2" H
"Regular" or "narrow-mouth" pints and quarts have a smaller case. I'll try to get these case sizes next time I head to Wally World, along with Pint-and-a-Half cases, Quilted Pint cases, 8oz Jelly cases, and a few other cases.
vogtenstein222
Well-Known Member
- Joined
- Dec 24, 2012
- Messages
- 145
- Reaction score
- 14
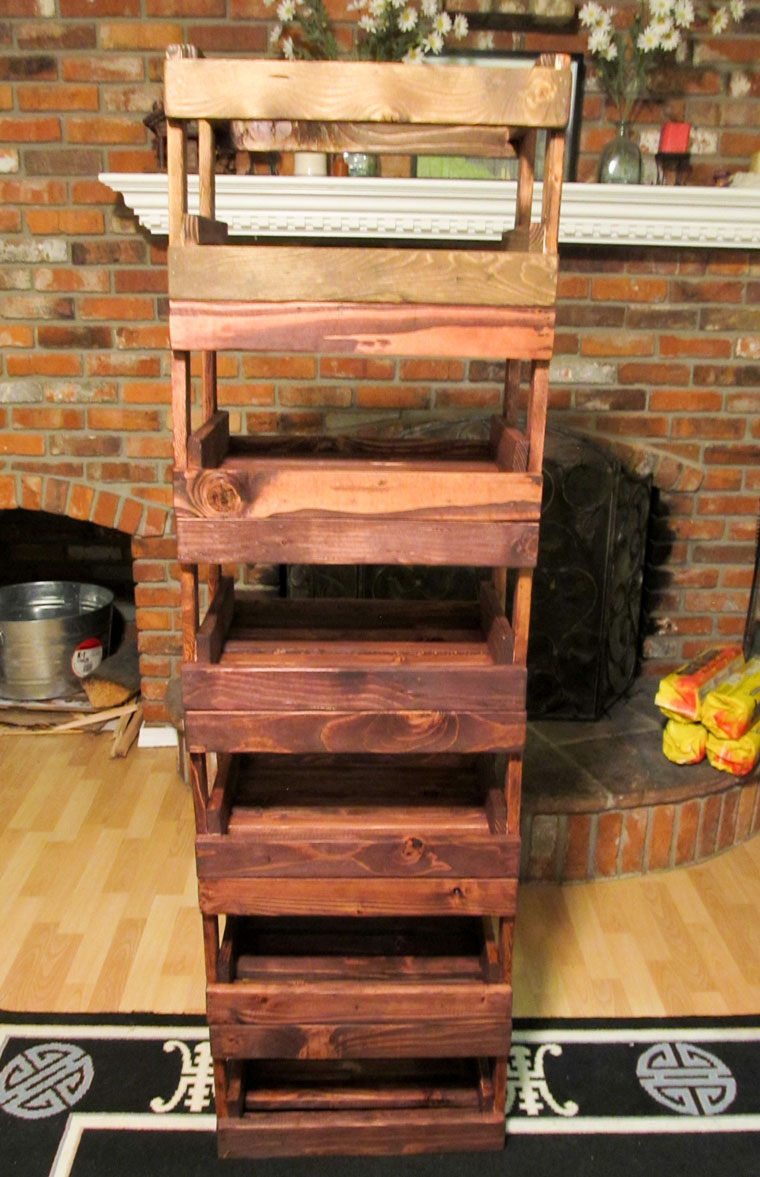
Built this a week or so ago. Got my old wood burner out and realized I've forgotten all the tricks to that trade. Thrilled with the crate though.


I too figured I would have a stab at these.
I modified the plans a little bit to make them more stackable, and to hold 12 x 500mL bottles (swing cap) which is what I use to bottle my brews. I haven't finished these yet, (still need to sand, plane, round, and burn my logo into them) but the basic shape is there.
I raised the top rail, so that the bottom of the crate on top stacks into the top of the crate on the bottom.

I purposely chose wood that isnt' very refined in order to "weather" them and give them a faux old-timey feeling. I'll post pictures of those once they're done.
I modified the plans a little bit to make them more stackable, and to hold 12 x 500mL bottles (swing cap) which is what I use to bottle my brews. I haven't finished these yet, (still need to sand, plane, round, and burn my logo into them) but the basic shape is there.
I raised the top rail, so that the bottom of the crate on top stacks into the top of the crate on the bottom.
I purposely chose wood that isnt' very refined in order to "weather" them and give them a faux old-timey feeling. I'll post pictures of those once they're done.
Had some lumber left over from the 12 crates I cut parts for. Still only have 7 assembled. Planned to go to the brew store for grain, but turns out they're closed today. Oops. Ended up making some bottle racks so I don't have to buy a bottle tree. Unlike a bottle tree, these don't go in the bottle, so there's very little chance of contamination.
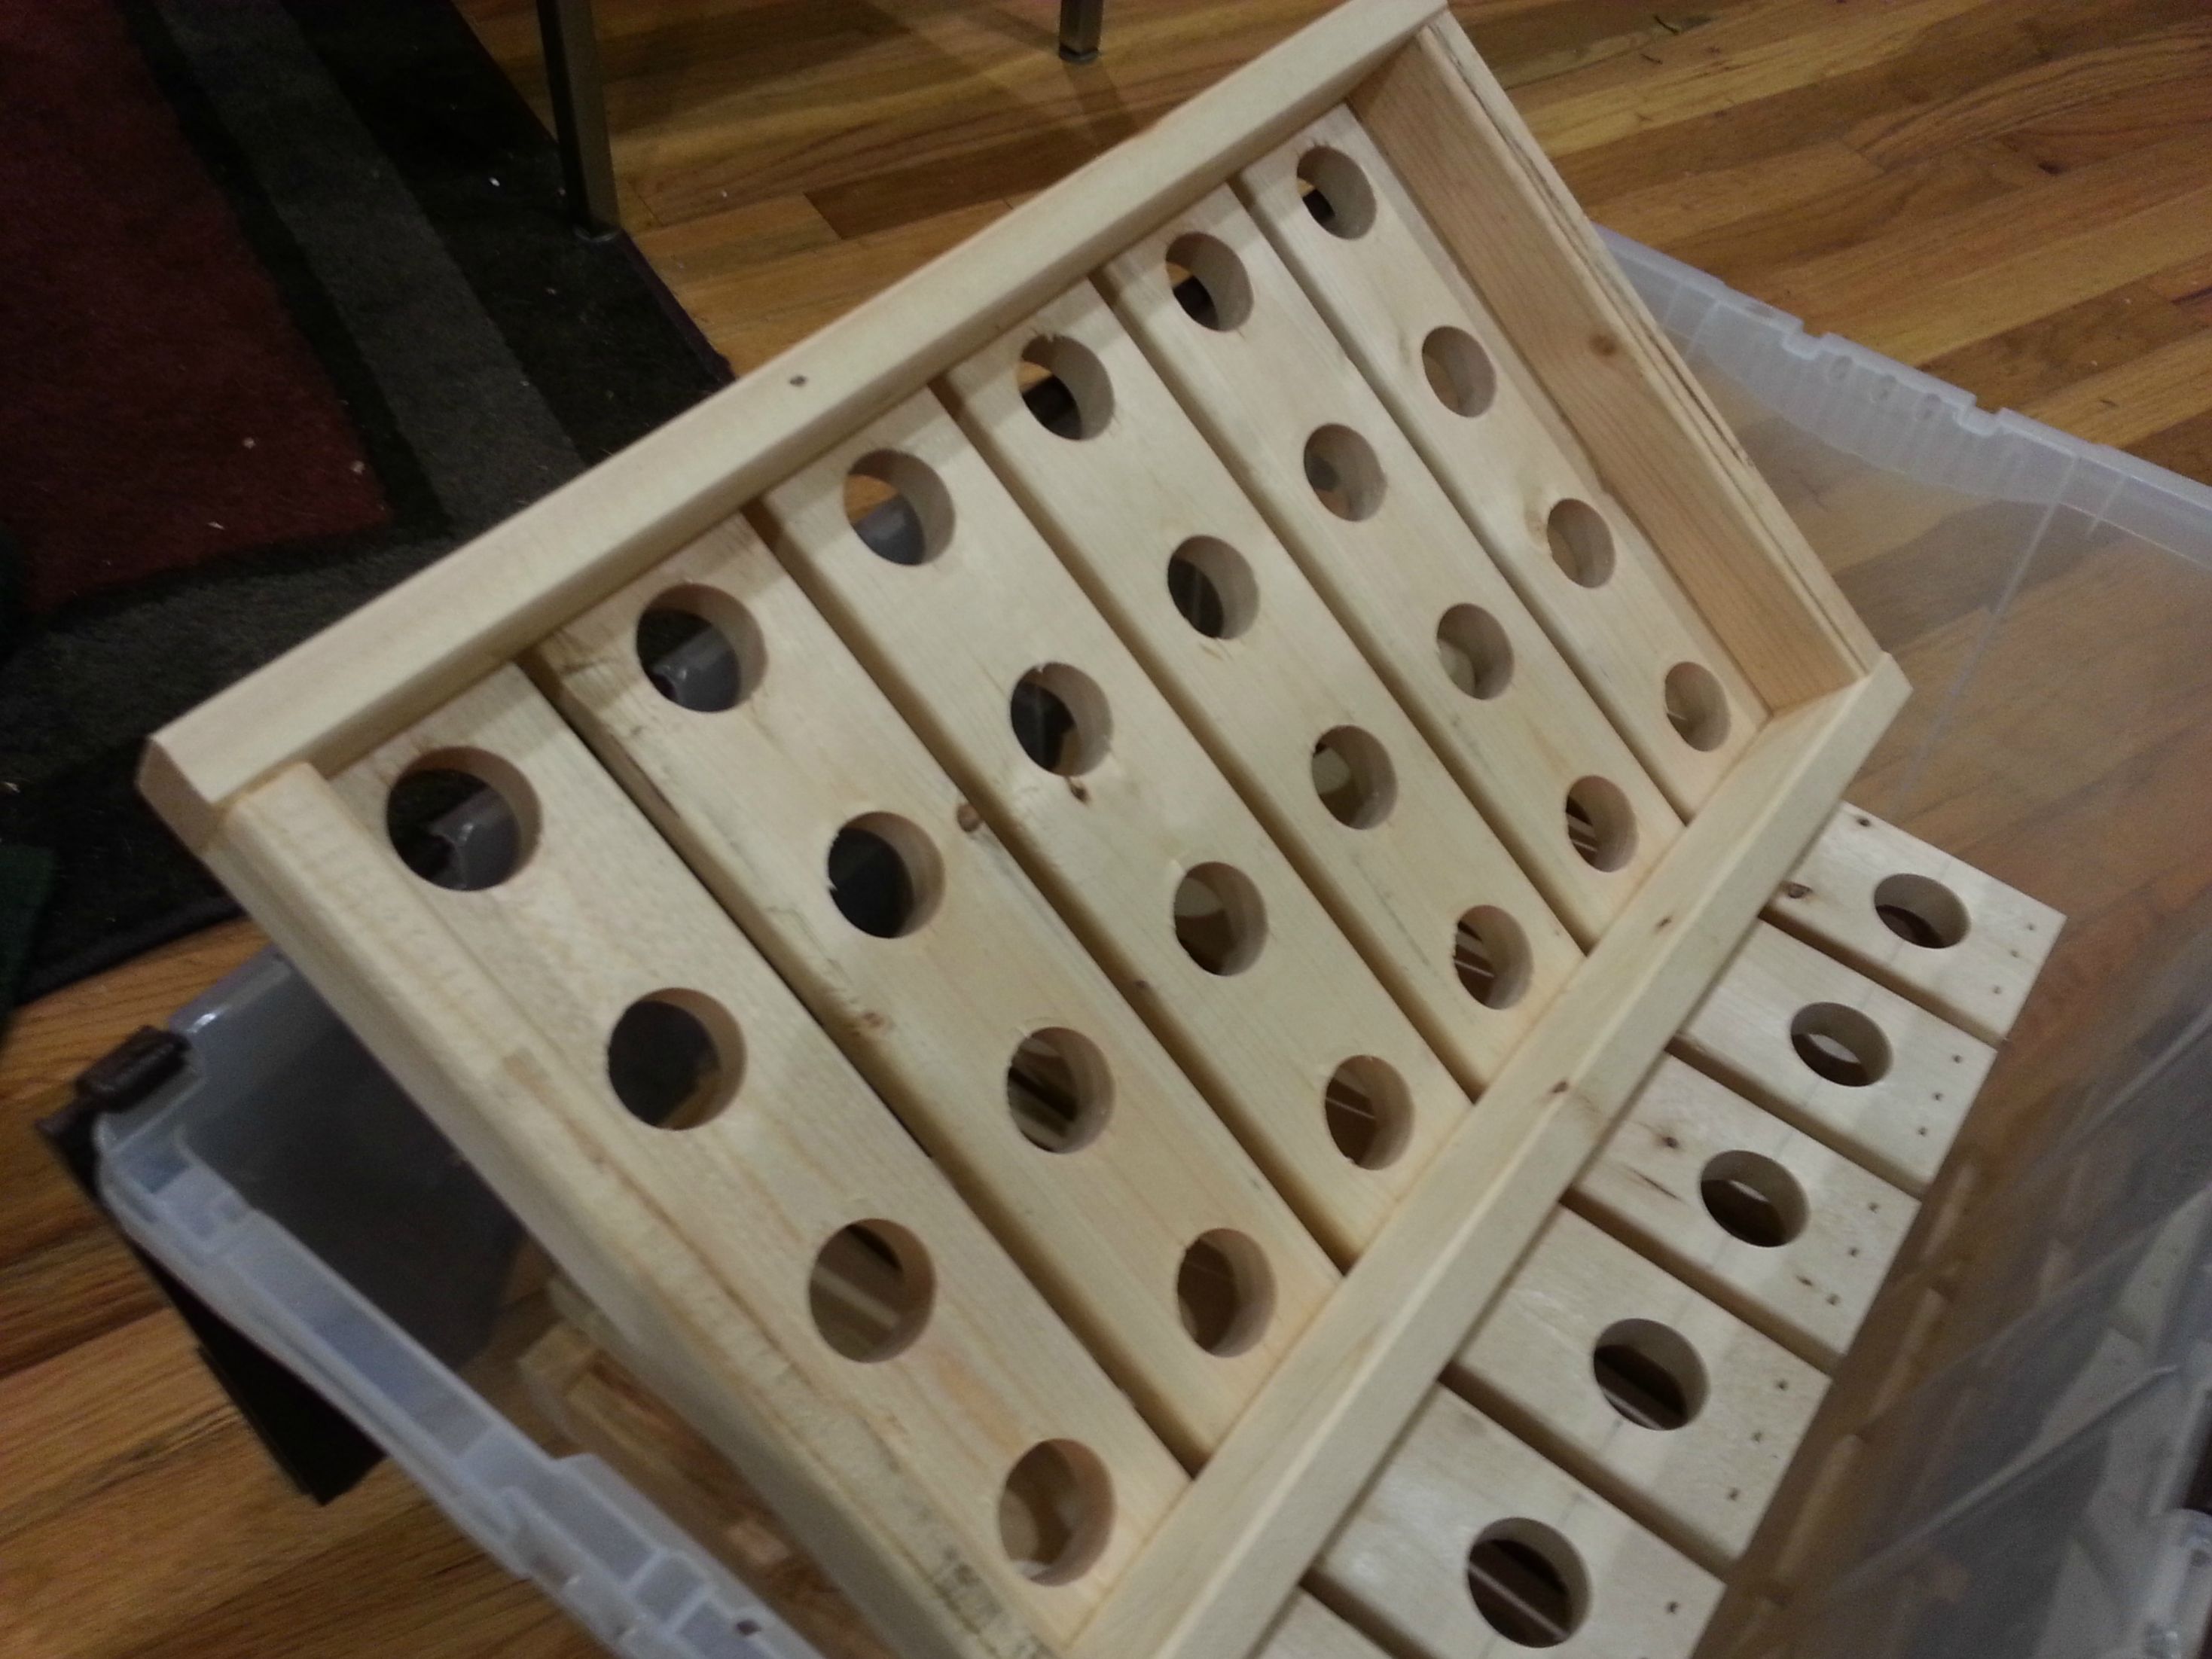
They're 11½" D x 17½" W x 2½" H. The outside perimeter is 1x2 and the slats are 1x3. The holes are 1¼" diameter, made with a forstner bit in a mini drill press and allows little play for them to tilt as pictured. The holes are spaced 2¾" apart on-center (1-5/8" OC to the outside edge from the last one) and the slats are 1/4" apart. The perfect hole size would be 1-1/8" which locks the bottles in very solidly. Unfortunately Ace was out of all types of 1-1/8" bits and I wasn't going to do 96 holes with a dull, bent spade bit or drive 30 miles into town, so 1¼" it is!
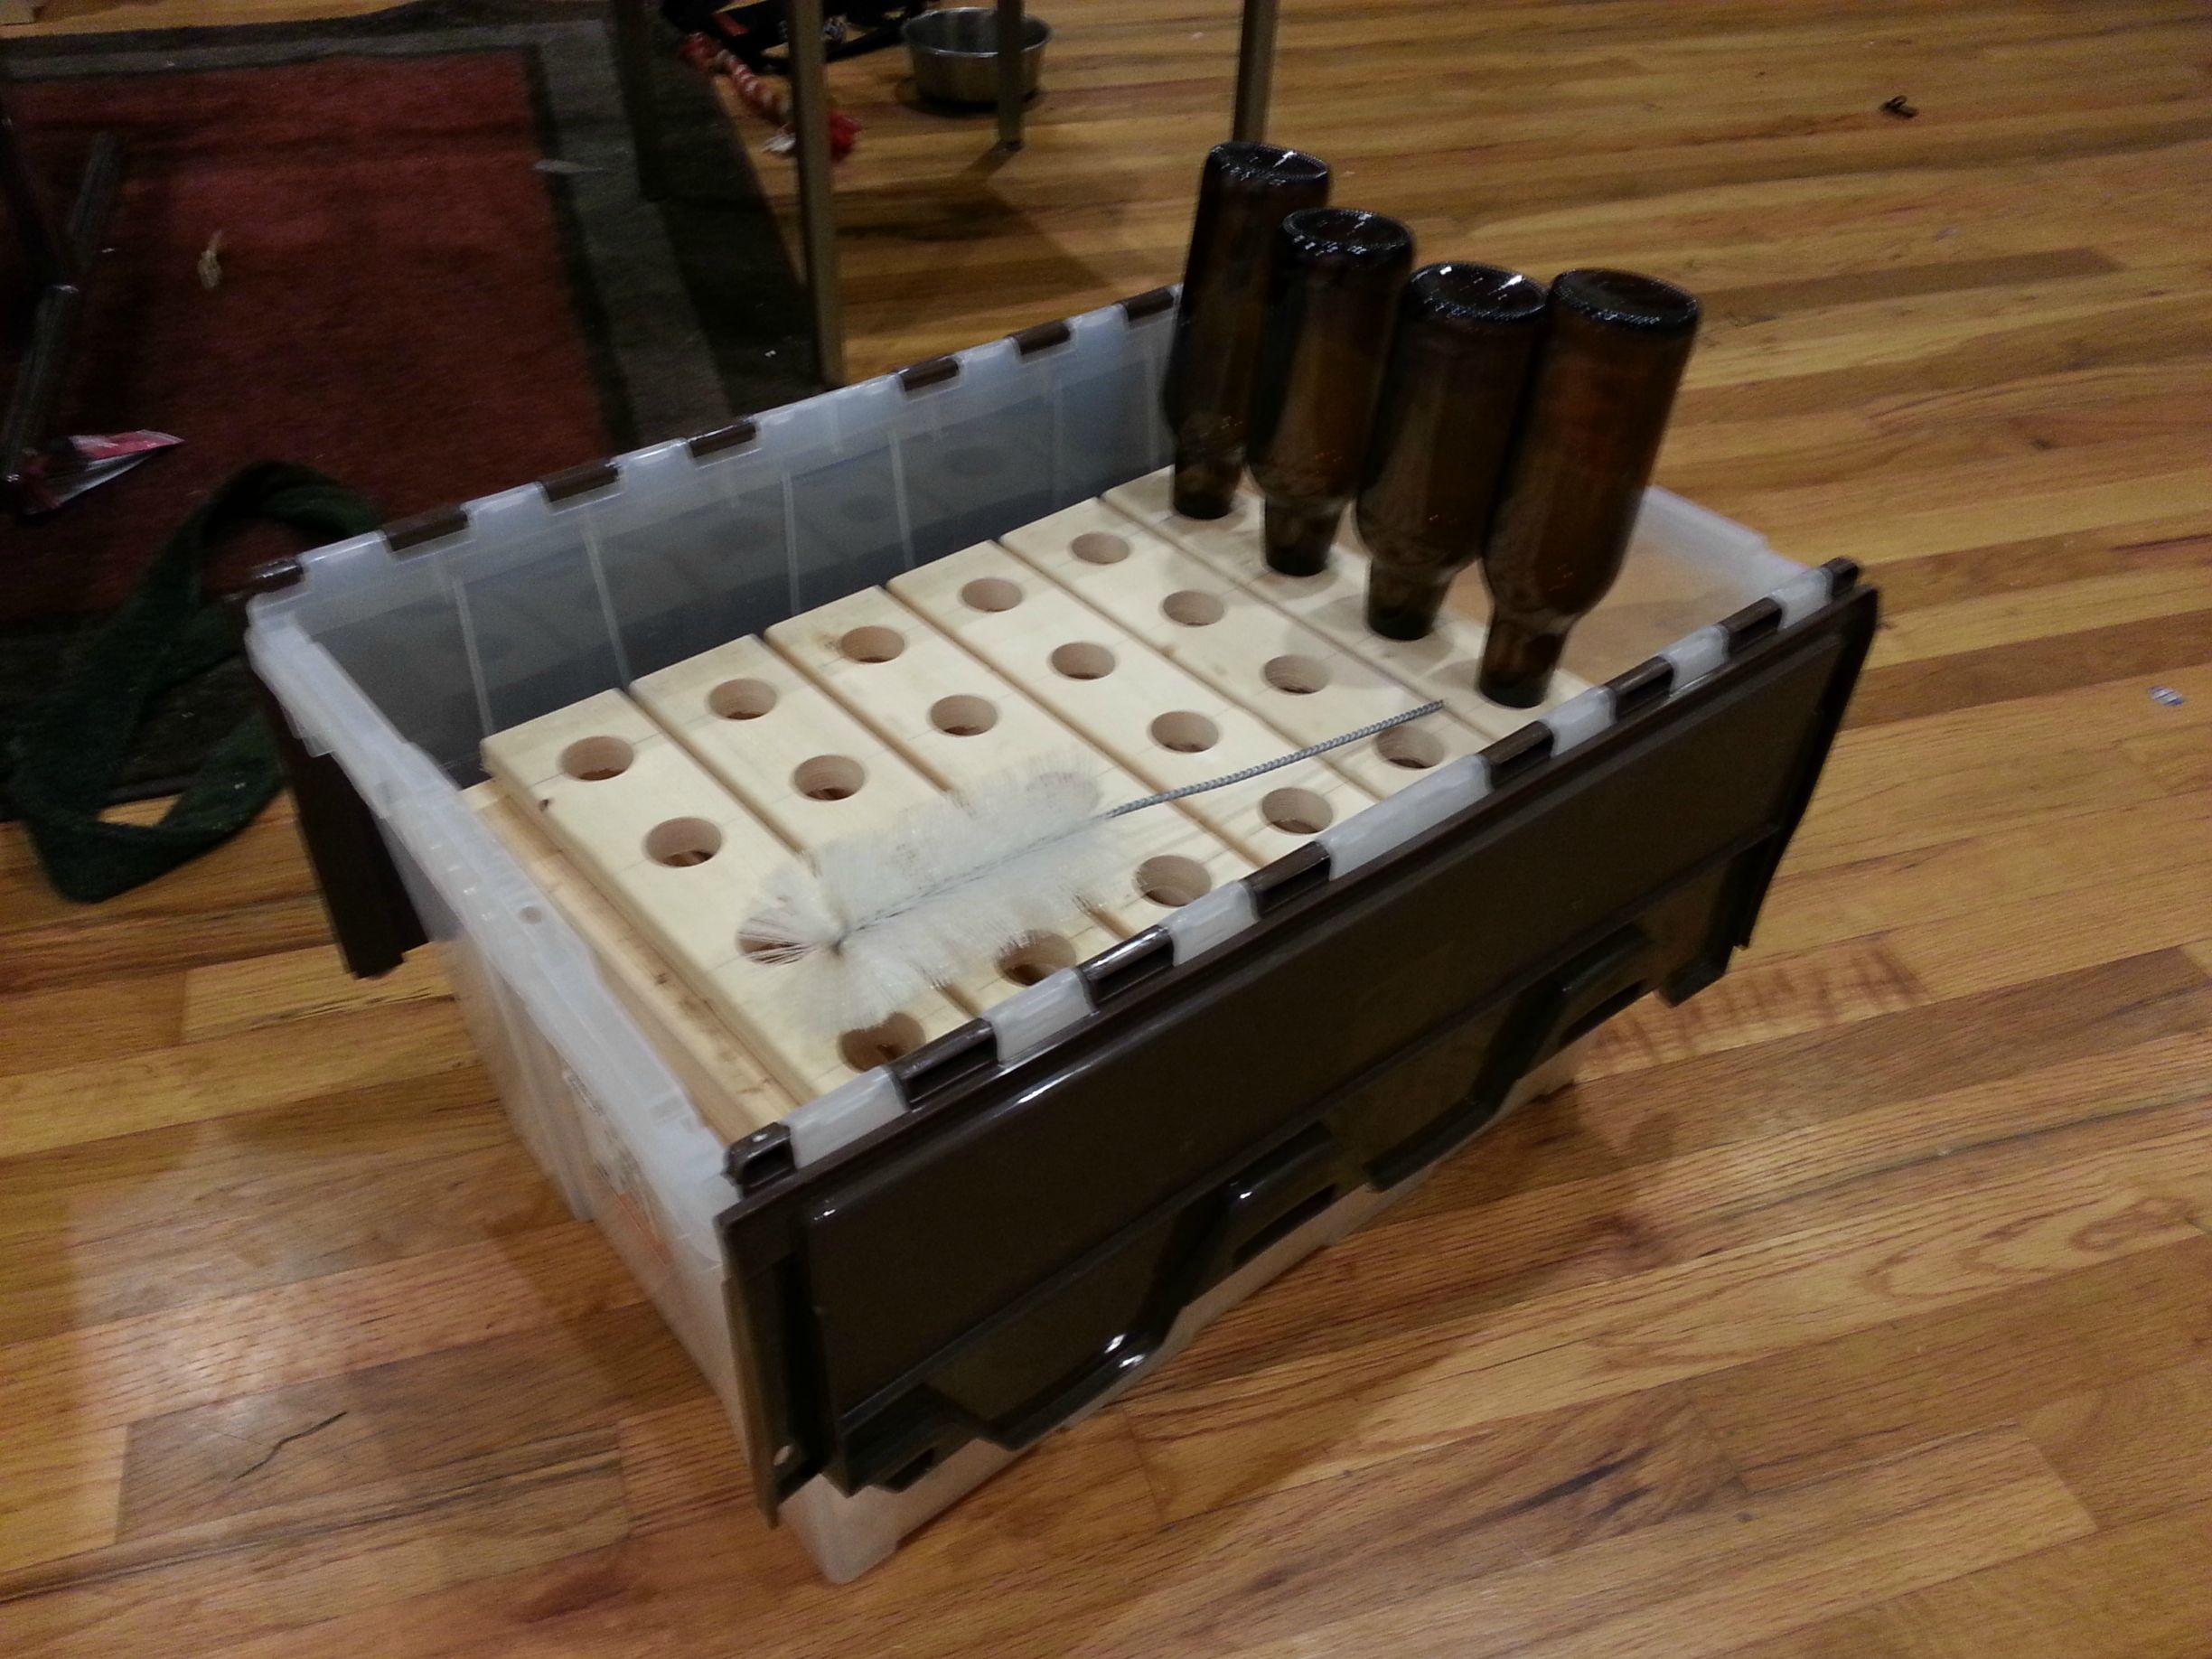
Four of them fit perfectly into this tote I found on clearance at Home Depot a week back. It will store them and also act as a drip tray when the bottles are dripping. I left enough space at the top for bottle brushes, bottle washer, etc. The first tote will slip into the second (not pictured) for easy, compact storage.
I still need to sand, stain and seal. Luckily, I have lots of finishing materials lying around.
They're 11½" D x 17½" W x 2½" H. The outside perimeter is 1x2 and the slats are 1x3. The holes are 1¼" diameter, made with a forstner bit in a mini drill press and allows little play for them to tilt as pictured. The holes are spaced 2¾" apart on-center (1-5/8" OC to the outside edge from the last one) and the slats are 1/4" apart. The perfect hole size would be 1-1/8" which locks the bottles in very solidly. Unfortunately Ace was out of all types of 1-1/8" bits and I wasn't going to do 96 holes with a dull, bent spade bit or drive 30 miles into town, so 1¼" it is!
Four of them fit perfectly into this tote I found on clearance at Home Depot a week back. It will store them and also act as a drip tray when the bottles are dripping. I left enough space at the top for bottle brushes, bottle washer, etc. The first tote will slip into the second (not pictured) for easy, compact storage.
I still need to sand, stain and seal. Luckily, I have lots of finishing materials lying around.
mcangeli
Well-Known Member
- Joined
- Dec 26, 2012
- Messages
- 371
- Reaction score
- 58
Made one of these last night for around $10. I used small deck screws and drilled pilot holes. It didn't come out as perfect as I had hoped as I rushed it but it gave me a good idea of what to do next time. I moved the end 1x2's up half an inch to give a little overlap and allow for locking when stacking.
I like the design and ease of build.
I like the design and ease of build.
AVLbrewing
Well-Known Member
- Joined
- Jan 16, 2013
- Messages
- 173
- Reaction score
- 19
I've officially added this to the list of things to do... I'll report back in a few (weeks?) with pictures!
As promised, I worked the measurements about half a page back into plans.
Will be building one of each today to test for fit before I start cranking them out tomorrow.
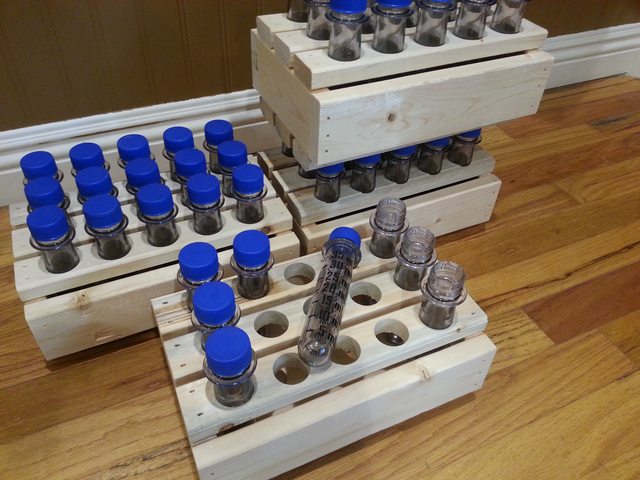
Also, built a few White Labs vial / 2L soda preform / baby soda bottle / test tube (many different names, I know) rack. Once I upgrade to the dedicated chest freezer for the brewery, at least one of these will be used for the yeast bank. I may make modifications.
Code:
Lumber for Beer Crates (24x 12oz)		Lumber for Beer Crates (12x 22oz)
=================================		=================================
Interior: 15-1/2" W x 10-1/2" D x 9-1/4" H	Interior: 11-3/4" W x 8-3/4" D x 11-1/2" H

Five 1x2 @ 17" (bottom slats)			Five 1x2 @ 13-1/4" (bottom slats)
Four 1x2 @ 10" (vertical ends)			Four 1x2 @ 12-1/4" (vertical ends)
Four 1x3 @ 10-1/2" (short sides)		Four 1x3 @ 8-3/4" (short sides)
Four 1x3 @ 18-1/2" (long sides)			Four 1x3 @ 14-3/4" (long sides)


Lumber for Beer Crates (12x WM Pint)		Lumber for Beer Crates (12x WM Quart)
====================================		=====================================
Interior: 14-1/8" W x 10-5/8" D x 5" H		Interior: 15" W x 11-1/8" D x 6-3/4" H

Five 1x2 @ 15-5/8" (bottom slats)		Five 1x2 @ 16-1/2" (bottom slats)
Four 1x2 @ 5-3/4" (vertical ends)		Four 1x2 @ 7-1/2" (vertical ends)
Four 1x3 @ 10-5/8" (short sides)		Four 1x3 @ 11-1/8" (short sides)
Four 1x3 @ 17-1/8" (long sides)			Four 1x3 @ 18" (long sides)


Lumber for Beer Crates (6x .5-Gal)		Lumber for Beer Crates (12x 1L Teddy's)
==================================		=======================================
Interior: 13-5/8" W x 9-1/8" D x 9-1/2" H	Interior: 13-7/8" W x 10-3/8" D x 10-1/2" H

Five 1x2 @ 15-1/8" (bottom slats)		Five 1x2 @ 15-3/8" (bottom slats)
Four 1x2 @ 10-1/4" (vertical ends)		Four 1x2 @ 11-1/4" (vertical ends)
Four 1x3 @ 9-1/8" (short sides)			Four 1x3 @ 10-3/8" (short sides)
Four 1x3 @ 16-5/8" (long sides)			Four 1x3 @ 16-7/8" (long sides)
Will be building one of each today to test for fit before I start cranking them out tomorrow.
Also, built a few White Labs vial / 2L soda preform / baby soda bottle / test tube (many different names, I know) rack. Once I upgrade to the dedicated chest freezer for the brewery, at least one of these will be used for the yeast bank. I may make modifications.
brewinginnc
Well-Known Member
- Joined
- Dec 1, 2012
- Messages
- 292
- Reaction score
- 41
I used the plans for beer crate from a picket. It holds 12 22oz bombers and i think it was 1-2 bucks. Just another tool for your toolbox.
brewinginnc
Well-Known Member
- Joined
- Dec 1, 2012
- Messages
- 292
- Reaction score
- 41
It also looks nowhere near as good as thadius' stuff though
We made 21 tonight. Here's my share, 10, including 2 extra tall to fit 22oz bombers.
We sized to fit long necks height and Sierra Nevada width concurrently.
Also did the mod to offset rails for better stacking.
We sized to fit long necks height and Sierra Nevada width concurrently.
Also did the mod to offset rails for better stacking.
loud1
Well-Known Member
I've been drawing up some ideas for six packs as well. Thought it would be cool to put one of those wall-mount style bottle openers on the end of it too.
Like the ones here: http://imgur.com/a/ULohS
Those look like the perfect tool caddys for fishing.

Made one prototype crate of each type I listed above. Tightened up the quart and pint about 1/4" in each direction. Somehow the half-gallon crate was a full 1.5" too long. No idea how that happened. Dimensions above updated.
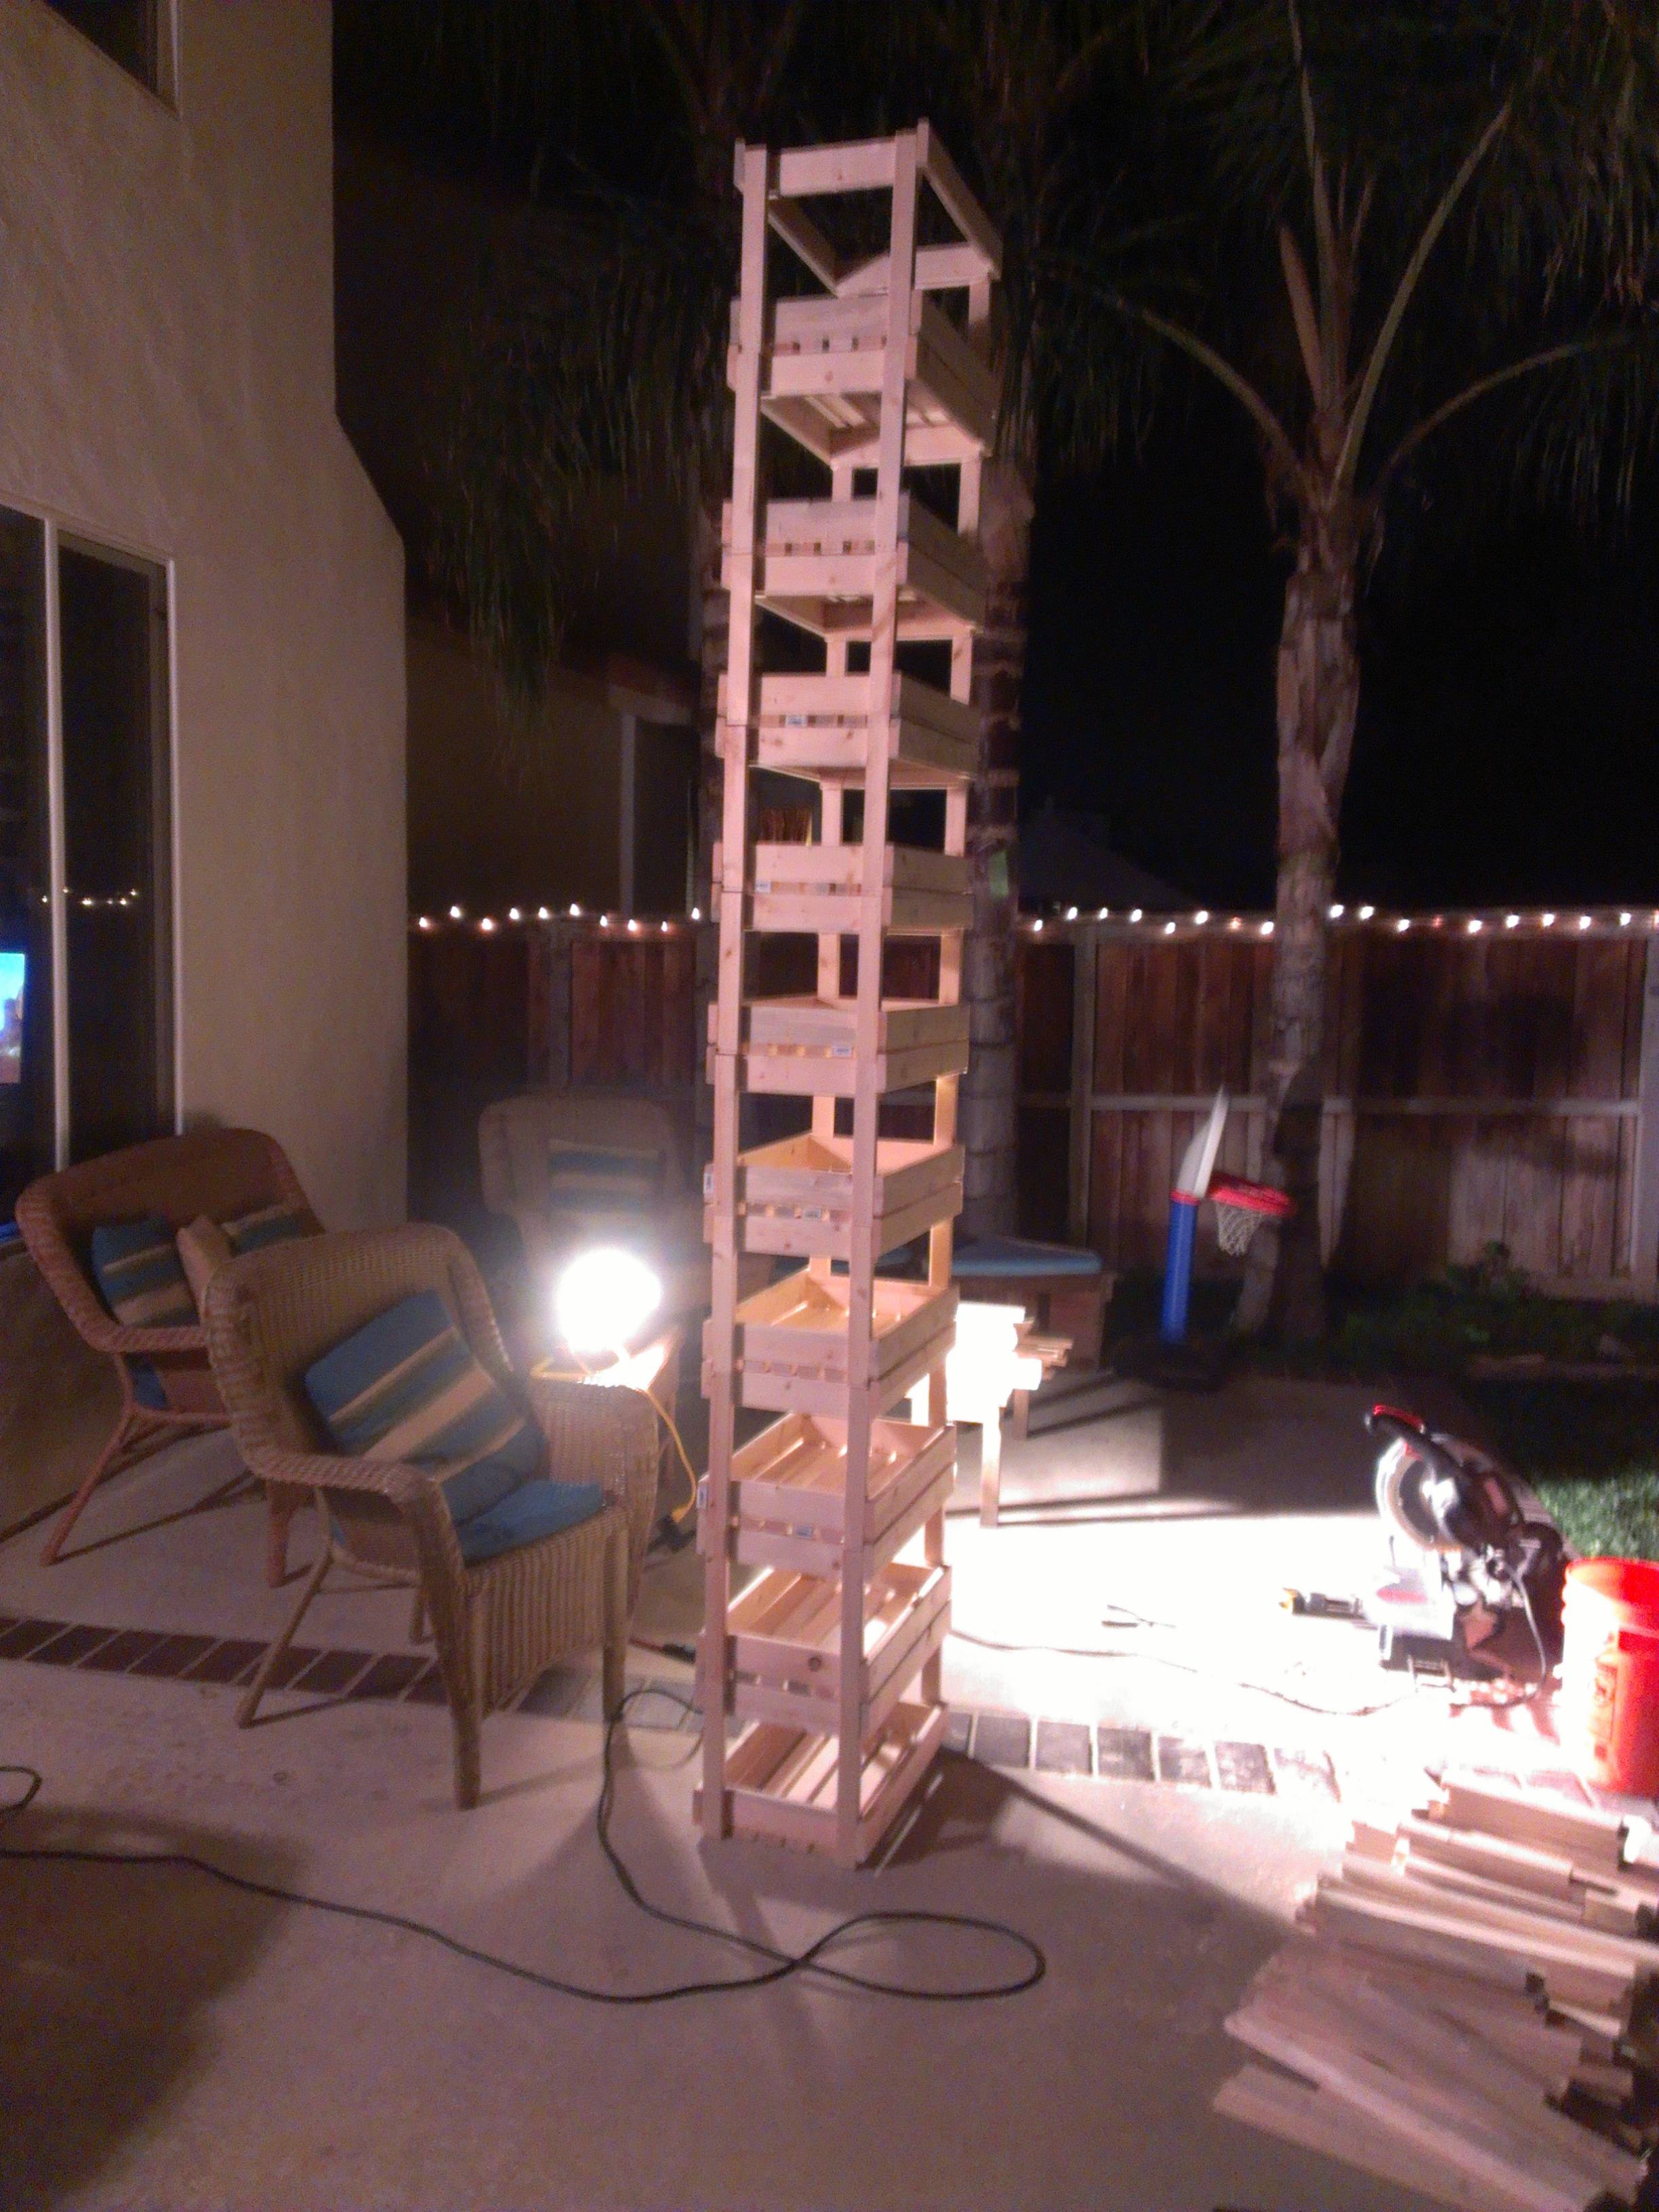
Then I spent all of yesterday cutting lumber for four dozen crates of varying sizes. Think they'll take a while to assemble...
Then I spent all of yesterday cutting lumber for four dozen crates of varying sizes. Think they'll take a while to assemble...
Made one tonight. Need a mitre box before I attempt any more. Came out great for a first try but uneven in places!
Edit: and I used all 1x3 since its all I had around.

Edit: and I used all 1x3 since its all I had around.


For those of us that are not knowledgeable in the fine art of pneumatic nail guns what other way is there to "nail" or screw this together?
My brad gun is electric -- so that is another option if you do not own a compressor
Similar threads
- Replies
- 0
- Views
- 12K

Latest posts
-
-
-
-

-
 is there a real substitute for llalemand kolsch yeast
- Latest: Draft Master Flash
-
-

-
