One Barrel Single Tier System Build

Homebrew Talk - Beer, Wine, Mead, & Cider Brewing Discussion Forum

Help Support Homebrew Talk - Beer, Wine, Mead, & Cider Brewing Discussion Forum:

This site may earn a commission from merchant affiliate links, including eBay, Amazon, and others.

sleepystevenson

Well-Known Member
Joined
Oct 5, 2007
Messages
437
Reaction score
15
Location
North Western PA
After many months of saving and scrounging parts, the one barrel system my brother and I have been working on is finally coming together. Many thanks to everyone here who has given me help so far....:mug:

I ponied up for the membership, so this will be my first post attempt with pics! Please bear with me.

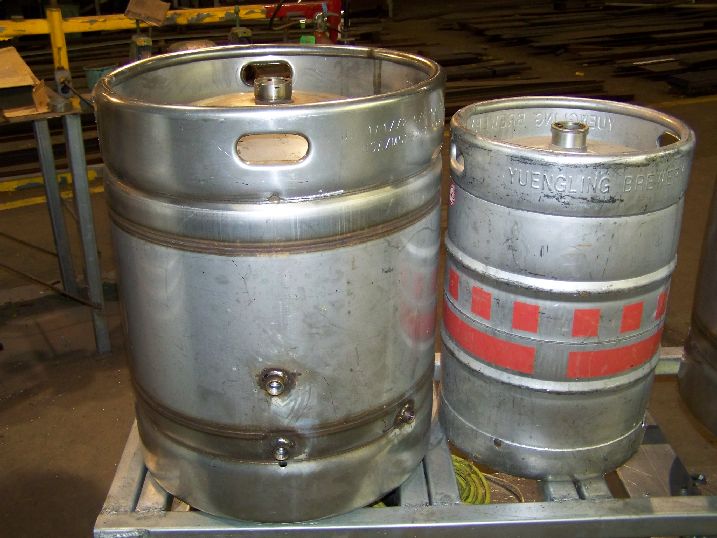
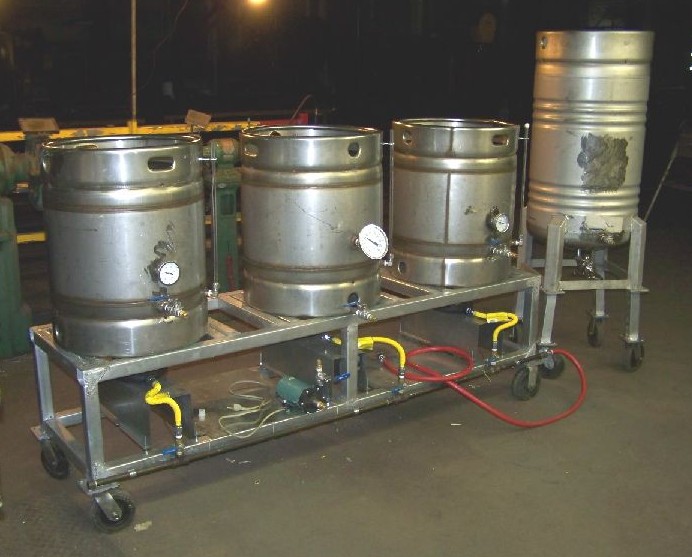
Ok, the heart of the one barrel system are these sweet one barrel kegs. The first pic shows the stand and one of the kegs. The second pic is for size reference between a 1/2 barrel keg and a full barrel keg. The 3rd pic is the whole shootin' match at it's current stage.

The stand is made of 2"x2"x16 ga. galvanized tubing.

Stand.jpg


KegComparison.jpg


CurrentProgress.jpg
 
That is awesome! Great beer Pron. :ban: Where did you get the barrels? I never even thought about full barrels but I am sure the bars have access to them through distributors. Just great!
 
Thankfully, I have a family member who collects stainless stuff like some people collect stamps.... retirement fund, I guess. I don't believe that any distributor, at least in PA, sells full barrel kegs. Maybe elsewhere??

We were gonna go w/ stainless 55 gal. drums for the HLT/MLT/BK, but figured that rarely would we actually use that much capacity. Also the kegs are MUCH heavier steel than the 55 gal. drums, which are only 20 gauge. The single barrels are at least 14 gauge.

Now the fermenter is 2 barrels. That way, if we ever want to do a double batch of the same recipe, we could mash a second batch while the first was boiling and put them BOTH into the same fermenter. Tough to tell the size, cause there isn't much for size reference in the pic, but the overall height is close to 6'! I can just see over the top.

The bottom of the fermenter is not "conical", but does have a nice rounded bottom. I am hoping that that 1 1/2" bottom drain will get at least SOME yeast/trub out. We put a second drain a few gal's up from the bottom drain, which will allow us to gravity drain directly into corny kegs.

Third pic is the top of the fermenter.

fermenter1.jpg


fermenterBase.jpg


fermenterTop1.jpg
 
From left to right, the brew vessels are: BK, MLT, HLT.
(See pic 1 below)


All vessels have sight glasses, which have yet to be calibrated. My plan is to use heavy duty automotive pinstriping tape to mark the gallons. I got 1/16" black tape to be used for each gallon and 1/8" red tape for each 5 gallon mark. Which makes it really simple with no numbers necessary.

Pic 2, interior of boil kettle.
The Boil Kettle has your std. 3" thermometer with interior guard (a la Bobby M - thanks!), and a dip tube with a hop screen placed near the sidewall to allow me to whirlpool the trub into the center.
You will see the return at the top. For you guys who currently have a one tier system, do you think this is ok for BK return?? Sufficient to get enough whirlpool action?

NONE of the copper is soldered at this point. I am hoping that friction fit will be enough, as everything seems pretty tight. Thoughts?

7767d1221852471-one-barrel-single-tier-system-build-bkmlthlt.jpg


7768d1221852506-one-barrel-single-tier-system-build-bkinterior.jpg


BkMltHlt.jpg


BKInterior.jpg
 
You will see the return at the top. For you guys who currently have a one tier system, do you think this is ok for BK return?? Sufficient to get enough whirlpool action??

The return seems pretty high. Will it be submerged in wort? If not, you can get hot side aeration.
 
My return looks very similar to yours. I don't get a strong whirlpool. The march pump just doesn't have enough flow to do that. It's more like a very gentle swirl.
 
I whirlpool from my pickup tube and get a very good whirlpool. I don't think the speed of the spin is as important as allowing it to settle for a full 20-30 minutes. As long as the return is at least a couple inches below the liquid level you will be fine. You could always extend the return tube down farther (nice design btw).
 
I'd like to know too :D .....but I generally ask that question of anyone making batches bigger than 12 or so gallons......;)
 
Ed - the return is right about the 23-25 gal. mark, I am estimating, which will be maybe slightly too high. No problem to lower it a bit. Not til after I calibrate the sight glasses, though! My first planned recipe will be about 25 gal pre boil, I am estimaing, for 22 gal batch. (Wow I love Beersmith...:) ) Actually am basing it on your Haus Pale Ale, Ed, which was our first all grain batch, as well! (Just changing some of the hops to use stuff up that's been in the freezer.)

My other idea is to use the pex-al-pex tubing that I am using for all the quick connect hoses and sparge ring. That stuff is great. Food grade, good for high temps, and it holds its shape whichever way you bend it. Unfortunately, we are really busy this weekend and next week and won't be able to work on the system too much, I fear. Hurricane Ike set us back a week, as we had a LOT of wind damage around our property (80 mph sustained winds). Ah well, its been this long, what's a few more weeks! Just can't wait to brew on her!

I am hoping to get a decent whirlpool. I will keep your advise about letting it rest, Boer K. My pump is an Iwaki (pics to come) which will pump around 5 gal per minute - no fall in the rate until close to 30' of head!

Now, as for the beer and what to do with it?
Well, my brother and I have always brewed together, so that halve's the 20-25 gals. right there. So, if we brew once a month, that's only about 4-5 cases each.

Plus....I love to share the joy of homebrew !

Ok, guys, more to come next week.
 
Well, we did the first water test with the pump today and everything went great! (Did have a few leaks to fix, as expected) I did extend the return in the BK down a few more inches, which should get me at least 4 inches into the wort when whirlpooling during cooling.

The pump is a commercial version Iwaki pump, good for 5 gals. per min, all the way up to 30' of head, with no fall off in flow. Seemed to do a fine job. All tubing is a pex-al-pex, which holds it shape where ever it is bent, very nicely. (Don't have any pics of the tubing yet) Quick connects on both ends. First pic is the pump.

Ok, on to the MLT. There is a full size false bottom (Thanks, Jaybird!) The FB is attached to the bottom by three little stainless feet which were welded to the bottom interior and tapped to receive stainless bolts to hold the FB tight and allow for easy removal for cleaning. After much deliberation and research, we decided to go with a bottom draining MLT setup. The burner below has any jet that would directly hit the drain tube removed, to avoid scorching the wort during recirculation / heating. If it seems like too much heat, I may add some sort of heat shield to the underside of the drain tube. The return into the top of the MLT is simply a straight piece of copper, as we are going to be batch sparging (for now, at least). Eventually, I would like to get another pump to allow fly sparging. (See pics 2 and 3)

The thermometer for the MLT is a 5" Ashcroft with an adjustable back that allows it to pivot up and down. It is definitely easier to read than the 3" thermo's on the other two vessels. (Pic 4)

Pump1.jpg


MLTInterior1.jpg


MLTBottomRemoved.jpg


MLTThermo.jpg
 
We scrubbed everything with bar keepers friend and calibrated the sight glasses on saturday. Sight glass calibration is the definition of tedium. 93 gallons of water (31 in each tank) one at a time....then attaching the pinstripe tape for each gallon. The first two pics below are the recently calibrated sight glasses. The black pinstripe tape is 1/16" the red is 1/8". Red is used for the 5 gal. marks. Note that the first red line is the 10 gal. line.

I think they are gonna work out well. Really look nice and seemed to hold up to our boil session.

After cleaning and calibrating we also checked the capacity our big hoss fermenter, which was 60 gallons, pretty close to what we suspected. (See pic of fermenter below). Also, we now know there are 4 gals between the "top drain" and the drain at the very base of the bottom of the fermenter.

Next, we decided to try boiling about 30 gal of water and cooling it, just to test out the system. No problems anywhere, except perhaps some burner / oxygen / co2 issues. (See my other thread about it here: https://www.homebrewtalk.com/f11/23-jet-burner-first-use-questions-82176/)

Took 1.5 hrs to get to a boil. (See "first boil" pic below.)

The orange hoses you see in the pic are pex-al-pex tubing, which seemed to work really well. They are flexible and hold their shape whichever way you bend them. Think flexible copper that doesn't kink. The pump had no problems.

Now, our cooler is our old Immersion chiller, which we added quick disconnects to. The chiller is placed in the empty HLT fill with ice (we have a commercial ice machine) and water and pump the boiling wort through the chiller. I assumed that we would then have to recirculate back into the BK (multiple times) until it was down to pitching temp. However, to my surprise, if I throttled the pump back to about 1/2 flow, the water was coming out at 60* to 70*. So, I guess I am just gonna pump the wort through the chiller then directly into the fermenter!


Made for a long day, but rewarding.

Now we just gotta find some time to brew! Called the LHBS last week and had him order us a full bag of 2 row for the first brew, which has a 50# grain bill and 12 oz of hops. (Based on Ed's Haus Pale, which was also our first ever all grain batch.)

sightglass1.jpg


sightglassClose.jpg


fermenter1.jpg


First Boil.jpg
 
I know it's an old thread, but I still want to ask how this brewstand worked out. I'm working on moving up to a 1 bbl system, and I'm wondering if your system has changed at all over the past two years.
 
Back
Top