GE 7 CF (FCM7SUWW) keezer conversion

Homebrew Talk - Beer, Wine, Mead, & Cider Brewing Discussion Forum

Help Support Homebrew Talk - Beer, Wine, Mead, & Cider Brewing Discussion Forum:

This site may earn a commission from merchant affiliate links, including eBay, Amazon, and others.
As mentioned airflow is an issue with the kegs packed so tight. I ended up putting some old wire rack down under the kegs to lift them up and allow air through. After that I added a piece of ducting to my bilge blower and dropped it down to the floor.

Now my temp stays a rock solid 41.5 and it cycles rarely to maintain it.

Backwall.JPG

Ducted.JPG
 
I have it pulling the hot air out of the top and pushing it down to the bottom... I tried it the other way but every time I opened the lid I blew all the cold air out in about ten seconds, lol.
 
TomSD, I got my hands on a 9 ft GE for $130 and plan on doing something very similar to what you did. Two quick questions: What's the benefit of a secondary regulator instead of a four way splice? I have a double gas regulator so would still be able to force carb while chilling others. Also, where did you get the blower, marine supply store?
 
I planned to do enough different things in the keezer that I wanted all the gas lines to be on their own regulator. My soda stays at 30 psi where most beer I keep at 12-14. Different styles though suggest different carb levels so that may change. Also it isn't uncommon for me to pull a hose outside to start a siphon or seal up a keg. For that I just need a couple psi. I just figured it was worth the extra up front to have it in place from the start.

I was going to go with manifolds off my dual regulator but liked the look and options of the secondary. The dual regulator will actually be replaced by a single, without a second gauge, today. This will free up space on the hump for storage and whatnot.

How many kegs can you fit in the 9 cf GE? I'm guessing at least one more, more than that if you use the hump. A manifold for each regulator would probably work just as well as I doubt you'd need more than two different pressures running at the same time.

As for the blower and ducting I got it off Amazon since I'm a huge Amazon zombie, lol. Considering I live in San Diego I'm betting I could find it locally at one of the marine stores though.
 
Couple of questions....

Do you think you could get by without the extra blower etc? I am looking for a very similar build, just wondering how necessary you think that is.

Did you find a solution for your drip tray? I like the way the chalkboard paint looks.

Do you think it would work to just move the hinges up to the top and mount them to the collar? that way you're not moving the whole tap assembly when you open it. Although it might be nice to move all the taps etc. out of the way for loading. Thinking out loud, sorry!
 
There is quite a temp difference between the top and bottom without some kind of circulation going on. That means the compressor runs more and (depending on environment) water collecting in the keezer. Some sort of fan would be a good idea though mine is considered overkill by many I'm sure. :p

I just got a stainless mud pan from Lowes and attached it with a couple magnets. It slides if it is on the regular finish because it is slick but on the chalk board it holds fine. Easy to clean I just pull it loose and rinse it out/wipe it down.

(the pan is actually shiny and clean... it is reflecting the tile in my kitchen)

DripPan.JPG


I would not suggest moving the hinges up though some do. You will have to deal with the hoses, shanks and other hardware every time you open the keezer. Also, you will have to lift your full kegs up another foot to clear the collar.
 
I am going to build a keezer out of the same freezer but probably with only 3 taps.

My question is about the internal components for the draft system... Where did you buy yours? Is it cheaper to buy a whole kit or sort of build your own? How much did you spend? I ask this because yours looks like its better quality than the kits..
Also
Which temp controller do you recommend? Been looking at the A419.
 
I mixed and matched. I got my first keg kit (a dual tap w/ picnic taps) from Midwest Supplies then from there it was shopping around. Somethings I paid more for because I really liked them (the secondary regulator I got from Beverage Factory) some I shopped around and found deals on (perlicks, fittings and such).

For the temp control I went with an analog A419 too and it does a great job. I personally don't see the need for a digital in something like a keezer... unless of course you are going for the look. :)

I took my time gathering everything and putting it together. I got the temp controller right up front and just used the kegs with picnic taps until I got everything finished.
 
Where did you get the handle that is on your collar? Do you recommend mounting the collar to the freezer or the lid? obviously you did the lid, so I guess I should ask do you like the setup?
 
The handle I got from Home Depot. I just browsed the hardware isle for the one I liked the best. :p Oh and it makes a great towel rack when down. :)

I can't imagine it being hinged the other way. You'd have to lift your kegs another foot to get them in plus you would have to work around all the plumbing instead of it being up and out of the way in the lid.
 
Sorry for the double post...

How are the hinges holding up to the additional weight of the collar? Also I saw your dimensions for the collar are 2x19" and 2x36.5"... I measured and it seems like 2" is too wide? It looks like it should be 1"
 
No sorry I was talking about cutting the boards for the collar and meant 2 boards each cut to 19" and 2 boards each cut to 36.5" ... I had mentioned I was using 1" boards earlier... I guess that could be confusing.

The hinges hold the weight fine but I don't sling it open as I'm more concerned with the wood holding up than the hinges, lol.
 
Tom, I've basically been doing things just as you've explained them. The 9 CF advertised on craigslist ended up being 7, but I got it for a hundred bucks so whatever. I've been slowly assembling most of the components and am pumped for when it will be finally finished.

For your casters, are you happy with their performance? I have access to a nearby Grainger and McMaster to order and there are several options.
 
Tom my measurements are a little different I was looking at 37" wide and 20.5" deep... is there a reason you ended up doing the collar the way you did or maybe yours is a little different than mine?

Thanks again
 
Tom, I've basically been doing things just as you've explained them. The 9 CF advertised on craigslist ended up being 7, but I got it for a hundred bucks so whatever. I've been slowly assembling most of the components and am pumped for when it will be finally finished.

For your casters, are you happy with their performance? I have access to a nearby Grainger and McMaster to order and there are several options.

The casters I used are great though any larger heavy duty caster will do it. I got mine for the price point and was pleasantly surprised at the performance. I frequently roll it right over things that I know would otherwise be a problem... door jambs, door mats, hoses, my toes, etc. I also have large tile in my kitchen... you know the unfinished looking stone kind with big gaps between them... smaller wheels (like my friggin mop bucket) tend to hang up on them but these roll right over.

Also, I can't stress how much I like having four swivel casters vs two fixed and two swivel. My keezer sits behind my water cooler in the corner of my kitchen. It is a tight fit and having to maneuver with two fixed wheels would be a major pain. With four swivel though I just grab it and pull whichever way I need for it to come out and it does.

Tom my measurements are a little different I was looking at 37" wide and 20.5" deep... is there a reason you ended up doing the collar the way you did or maybe yours is a little different than mine?

Thanks again

Well I failed at the mitering so went with a simple squared up and screwed collar. I just remeasured to be sure and 36.5" for the front/back and 19" for the sides works perfect. 20.5" is the front to back measurement but the front and back boards are cutting into that since they are full length. Also, the 37" you measured across the top doesn't account for that little trim on the sides... it has a lip. The way I did it fit snug all the way around and I even had to razor off the tiniest bit of trim at the corners. The collar is flush with the lid in the front and back and flush with the trim on the sides.

Some of the pics in my gallery show how close a fit it is but I think this one is the best...
NewCollarClose.JPG

It is pre finishing/assembly but it is sitting exactly how it does installed. I worked with the collar on the upside down lid to make sure everything was matching up right. You can actually see the little bit of trim I had to remove there too. It was a trivial amount that should be pretty obvious if you look at your lid.
 
I'm glad I read your last post as I didn't account for the trim on the lid and had the width measurement at 37.5". I plan on changing it up just a little by basically framing the front and sides (like a door or a window) with wood trim to hide the screw heads. If I ever get it done I'll take some pics and post them. (travel a lot for work, 3 kids including newborn, remodeling my kitchen, etc.)

by the way, I'm planning on using poplar, what wood did you use? any reason? I thought the oak might be a bit dark next to the white finish of the freezer.
 
I went with red oak... $10 more which wasn't too bad for the quality. Tried gluing mine as well... lets just say I will be screwing it together and adding some L brackets for extra support.
Went with your measurements, Ill have it done tonight so we'll see how it works!

I recall you saying you used silicone to seal the lid to the collar, hows it holding up?

I'll get a thread started tonight for my build... Going to be copying a lot from what you did :) if you don't mind
 
Oh Oak should look great. How dark are you going to stain it?

Yeah part was the problem with Mitering for the first time but add to that using liquid nails for the first time and it was just all made of failure, lol. Screws worked great though. :p

Yeah all I used was standard silicone caulk like you use in the bathroom. It holds great. Actually it is a stronger hold than I expected. Either way I knew there wouldn't be a problem since I don't ever use the lid to lift. That is what the handle/towel rack is for.

As for making a thread and copying from this one... go for it that is what I did, lol. The way I see it the more build threads and the more pictures the better. I know I wouldn't have made mine half as good as I did without the help of many other threads and picture galleries that were here before mine.
 
Bought red oak and red oak stain. Finally just ended up screwing it together after an unsuccessful attempt at gluing as well. Took a good hour to get all the holes lined up and exactly 1 3/4" from the edge. Looks great.
BUT I decided to take the lid off the freezer and line it up and see how it looked... for some reason it didn't sit on top of the lid right. So I measured it... well the obviously frustrated guy at HD who had to cut my $41 dollars worth of red oak had only cut it 36" after telling him repeatedly what I needed. I'm pretty pissed right now, drinking a home brew to get myself together before my GF takes me back so I can get my money back and go to lowes.....
 
I just read this and the same thing happened to me at Home Depot. I told the guy the measurements didn't need to be exact but each pair of boards had to be the same length. I didn't bank of the cuts not being even close to square. I'm just gonna square it up myself and make the collar a little smaller than planned, it shouldn't effect anything. Got all my shanks and faucets from a user on here, kegconnection. Now the time....

By the way, why even offer to make cuts?? Just so they fit in a car. I wish I could've just made the cuts.
 
What did you use to attach your controller to the back of your collar? I tried to figure out from the photo, but I guess I need new contacts.
 
Tom,

What is the length of your beer hose? I built this exact setup (well... except only the lid opens not the whole collar). I've got 5 ft 3/16 for my 2 lines but I've been getting mostly foam at 10 psi with a serving temp of 38F. I've installed a computer fan, but that didn't seem to solve it. One commerical keg and one homebrew both with Perlick faucets. I can't figure it out. My next step is just to get 10ft and start cutting a foot at a time.

Setting up my lines has been more frustrating then building the keezer. A missing washer here; a missing washer there. 2 CO2 fills later and I'm now I have the foaming issue.
 
Tom-
I just wanna double check that you only used silicon to glue the collar to the lid. Hate that I'm paranoid. I'm getting ready to do my collar with a 1x4 piece of cedar and just want to be double sure. Great post. Thanks for your effort.
 
Yes a bead of silicon all the way around the collar then dropped the lid on it, squished it around to line it up and left it closed with some stuff on top to weigh it down over night.

Only way I can see that being a problem is if you get in the habit of grabbing the sides of the lid instead of the collar when opening your keezer. That is one of the reasons I put the big handle/towel rack on the front of mine. :p
 
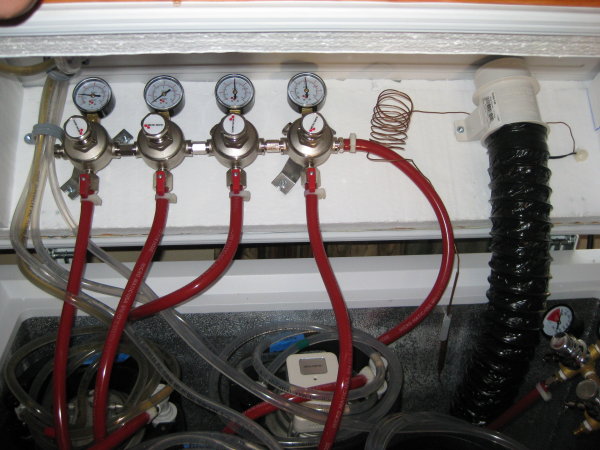
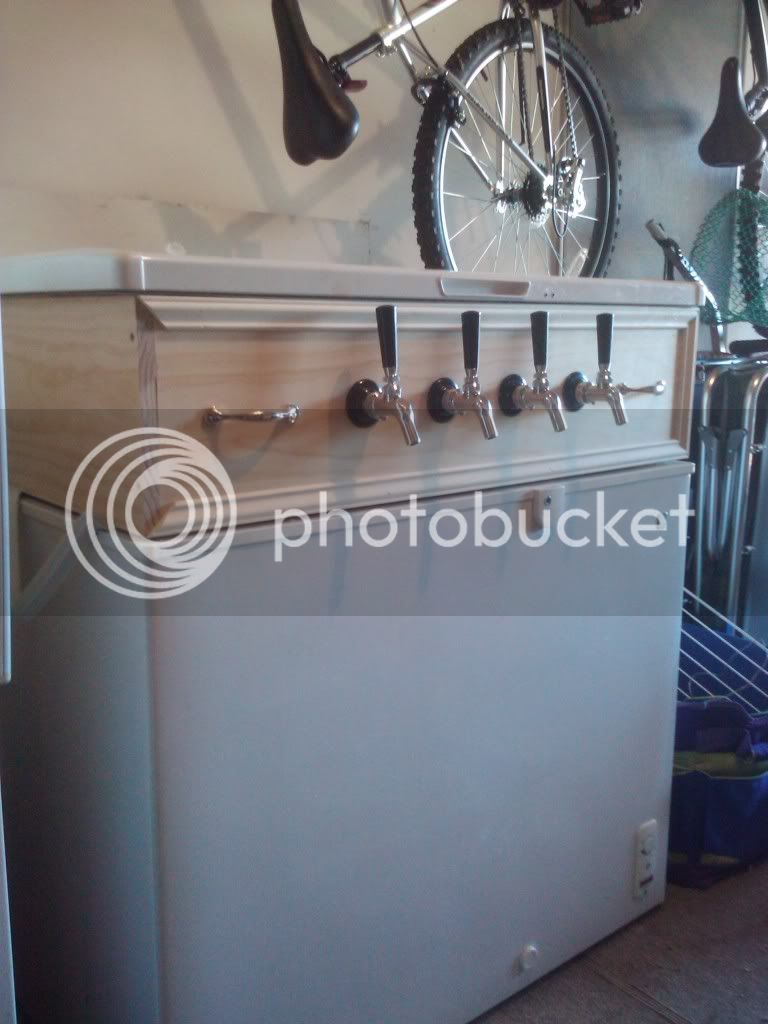
Pretty much done now. I have the system plumbed and the fan mounted along with the power and sensor running through the collar. The only thing I'm missing is one ten foot length of tubing for tap #4. Once I pick that up though it'll be easy enough to run.

FinalPlumbing.JPG


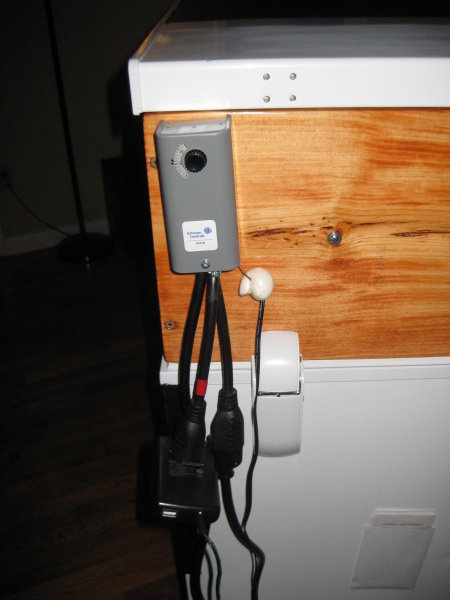
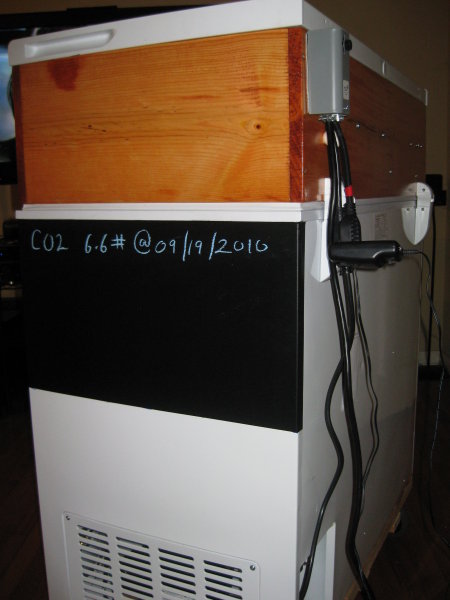
I switched back to the Johnson controller and ran everything through the collar then foamed the hole in. I ended up rewiring the Johnson controller to make my life easier. One plug is always on for my fan and the other is on the relay for the freezer. Saved me running three cords back to the wall.

JohnsonA19AAT.JPG


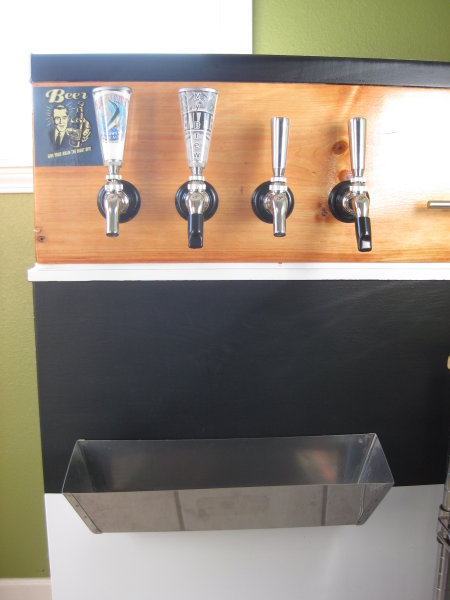
Only real items I have left are the drip pan, which I have everything for just need to come up with a good way to do it, and dealing with air flow inside.

AllButTheDripPan.JPG


The chalk board wraps around the sides so plenty of room for notes and stuff I don't need out front.

SideView.JPG


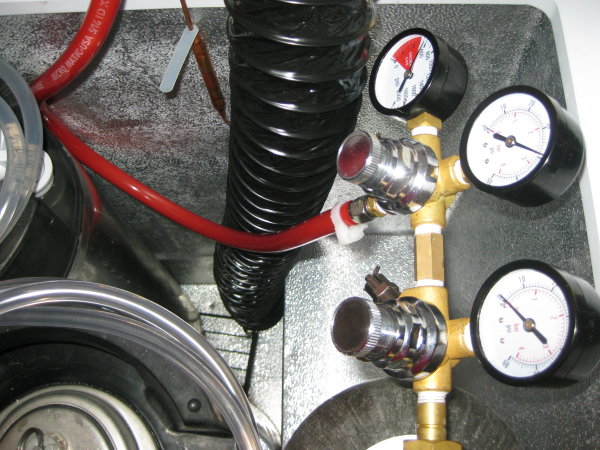
In my testing I'm noticing that since the kegs are so tightly packed and sit so snuggly on the bottom of the freezer the pockets between them will be much cooler than the rest of the space and will ice up given half a chance.

I have plenty of head room though so plan to make a grid of wood or metal to raise them up a couple inches to improve air flow. With the fan pointing straight down at the hump this should increase circulation greatly. If needed I have ducting that I originally planned to run but didn't need. I might run it down so the fan blows directly into the void I create under the kegs.

Either way the bulk of the work is done and I'm sitting here drinking my first draft from it right now so... whoppie!

Men, I wonder why did you attach your collar to the lid instead of attaching it to the surface edges of the freezer? That way you woudn't have to dislocate the taps and hoses at all when you open the door and the result is basically the same!?!?!
 
Huh? Don't understand your point.

With the collar attached to the lid the taps, hoses and hardware are all moved out of the way when I am in the keezer. If it was the other way I would have to be careful not to hit the shanks or other hardware when switching out kegs. For that matter if the lid lifted instead I couldn't get access to the kegs at all since the secondary regulator would be in the way.

Also, it is about ten inches less distance I have to lift the kegs to get them into the keezer and if I bounce the keg off of something it is only the keezer lip and not the taps or wooden collar.

It comes down to personal choice but I just can't see doing it any other way than I did. Hope that helped clear it up.


Well, I guess it's really a personal choice like you said, but I can't help it but find your set up very odd, sorry ;). I mean, I just think it is very nice to open the lid only without having to drag the weight of any hardware with it when opening. Besides, with the collar stable attached to the freezer surface, you don run into the risk of loosen up its attachment to the freezer over time because it just seats there quiet and nice! I think the risk of hitting the shanks when switching kegs is the only real disadvantage I can think of but what are the chances, really? :D

Anyway, about setting the fan, you said you are going to put yours in the bottom? Wouldn't it make more sense to set it in the top of the freezer so it can force that lighter hot air away and allow the cold air to recirculate? Just a thought... I think most of the keezer projects I saw here tend to set the fan in the top.:confused:
 
Well Tom, I actually had the day off of work yesterday so put some time into the keezer. Here is a pic of where I'm at to show you how it looks with the trim, which is missing one piece. I ended up using radiata pine for the wood, it hasn't gotten any poly yet but I wanted to put the taps and the handles on to get an idea of how it would look.

keezer.jpg

Love it! I like the trim idea.
 
Great thread, three things if I may ask:

Do you have a template for your tap handle inserts?

Can you link the amazon store for the blower and hose per chance?

Have you tried rare earth magnets for your drip tray? I have some neodymium magnets i was going to just super glue to a drip tray, but if you have already tried that, I will keep looking.. I don't plan on chalkboard paint, so I need to find something that won't slip on the metal sides.

Thanks.
 

Latest posts

Back
Top