My Chiller Build

Homebrew Talk - Beer, Wine, Mead, & Cider Brewing Discussion Forum

Help Support Homebrew Talk - Beer, Wine, Mead, & Cider Brewing Discussion Forum:

This site may earn a commission from merchant affiliate links, including eBay, Amazon, and others.

JMSetzler

Well-Known Member
Joined
Dec 29, 2008
Messages
899
Reaction score
20
Location
Hickory, North Carolina
3283114865_e9e76da1ae.jpg


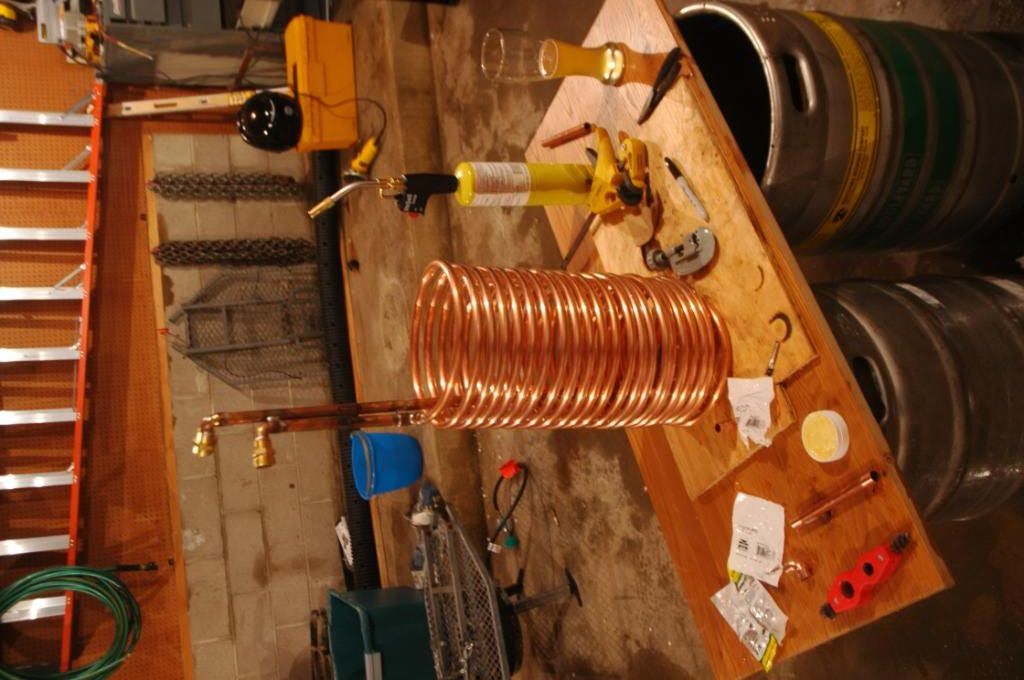
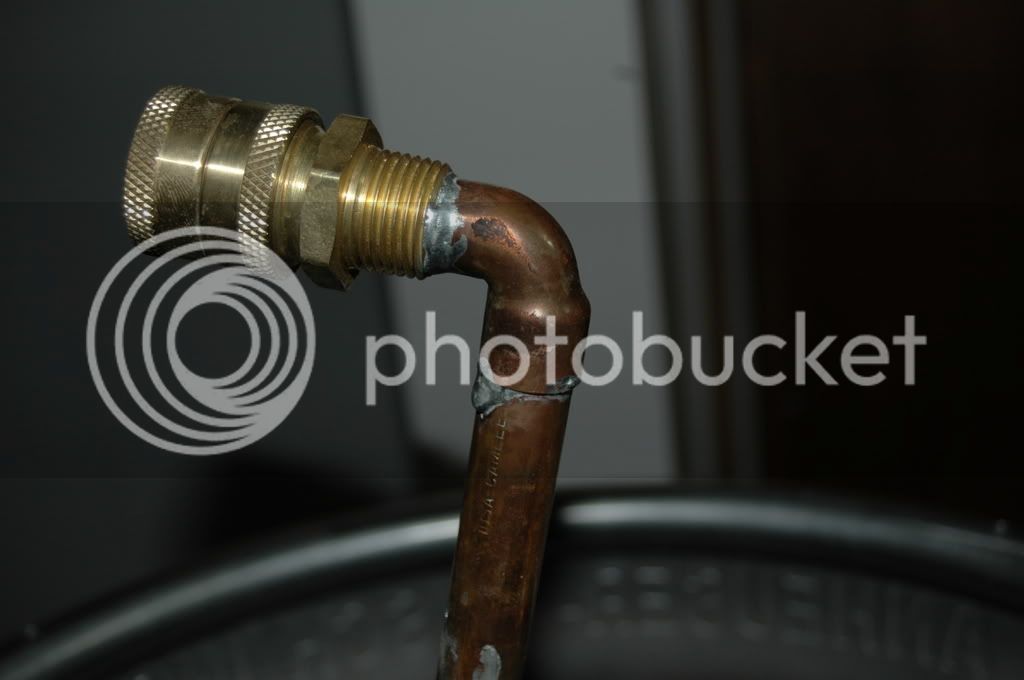
I spent some time this afternoon working on my immersion chiller. I used some information that I gathered from this site and broke from it in some areas as well. I used 50' of 1/2" OD copper refrigeration tubing, but instead of just bending it or soldering on copper elbows, I decided to try out the Watts A-215 Tube-to-Tube brass compression fittings shown below:

3283935522_883fc5dd4c.jpg


I still have a little more work to do on it though. Unfortunately, 3 of the 4 elbows are leaking and I need to tighten them up some more, but I ran out of time this afternoon before I had to deal with other things. I hope to get it tightened up and tested this week so I can use it for a brew next Sunday. A leaky immersion chiller ain't gonna cut it :)
 
Teflon Tape on your metal to metal threads. Also called Plumbers tape.

Teflon tape is a very thin white tape used to wrap the threaded ends of pipes to improve the watertightness of a joint. The alternative is to use pipe dope, a paste type material which seals and lubricates, allowing for a tighter joint. There is also a another variety of thread seal tape that is yellow. The yellow tape is heavier and is for use on gas line connections. Never use regular, white, teflon tape on gas connections.
 
The compression fittings and all look nice, but is there any reason why you went that route vice just bending the ends 90 degrees? Seems like too many more potential leak points.

It's a beautiful chiller.
 
I can tell you why I liked the idea of sweated 90's (which is what he's mirroring here) is because 1/2" tubing is on the threshold for kinking. It could be done with a spring bender if you have one.
 
I didn't want to just bend the tubing. After watching Bobby's video on his build, I liked the extra rigidity provided by putting it together this way. The reason I didn't choose the soldered method is because my soldering skills are practically non-existant and I don't have the tools necessary to do it on my own. I do have a spring bender but it's for 3/8" tubing and I didn't want to buy another one. I'm 99.5% confident that simply tightening up these fittings a little more is going to make it good as gold... or maybe good as copper :)
 
I think the .5% possibility that this configuration won't work is coming into play. I messed around with it for a while this afternoon trying to tighten the fittings and I'm still unable to prevent the leaking. I think I may have to pursue the solder route to make it functional.
 
It's great that you chose to do this your own way.

But for those considering doing their own immersion chiller, I would point out that constant heating and cooling could cause a compression fitting to leak raw hose water into your finish boiled wort. This is the reason that so many use soldered joints.

I have a set of springs, and still chose to use Bobby's method of elbows, to insure a safe seal at all points, and to bring all the tubing as close together as possible, for the purpose of having a solid assembly. I tied 14g copper wire around each loop at three points of the periphery, and tied the inlet and outlet together. I then soldered the inlet/outlet ties together.

I do not believe that soldering is any big skill-you simply scuff the areas to be soldered, you apply a soldering paste to chemically clean that area, you heat the area until the paste starts smoking, then you attempt to put the solder on the joint until it sucks itself into the joint. You wipe with a wet rag to remove any excess solder-you are done.

I finished the tying and took these pics. Later, soldered the ties and pushed the ends of the copper ties down to avoid snags.

Jan_08_013.jpg
 
Ditto to soldering. Whenever I'm doing anything with water, I try and make the fewest connections possible and then soldered connectors where possible. Leaking fittings is one of my Arch Enemies!


And duct tape won't work. spend $20 on a torch and solder and flux. get 2 90* elbows. Hell, get 3 and a scrap peiece. do 2-3 practice sweats adn you'll be fine. It don't have to look pretty. an ugly leak free chiller if worth $1000000000 more than a pretty one that sprays hose water into your wort.
 
I F*ED around with compression fitting for a couple hours on mine.. Then I resorted to soldering (hard part was torch was at parents, so I made do with an iron- turned out suprisingly clean!). I used the compression fitting still, just soldered the flare thing on... Good luck!
 
I F*ED around with compression fitting for a couple hours on mine.. Then I resorted to soldering (hard part was torch was at parents, so I made do with an iron- turned out suprisingly clean!). I used the compression fitting still, just soldered the flare thing on... Good luck!

I just got back from my third trip to Lowes in as many days. I have copper elbows, lead free solder, acid paste flux, and a soldering torch. This chiller has turned out to cost me about twice what I could have bought one pre-built for at this point :) But the learning experience has been worth it... yea... that's the ticket :)
 
Just sweat a brass garden hose coupling to a 90 degree street elbow coming off your 1/2" copper tubing. no leaks ever. I'll post a pic in a min.


here ya go (no comments on my sweat drippy sweat job :)):

DSC_0005.jpg


DSC_0059.jpg
 
I second those who are cautioning any kind of connection where a failure will cause leakage into the pot. It's way too easy to avoid this potential problem.
 
Sweating copper is one of those skills I think everyone should acquire at some point in their lives, just like driving a manual transmission car.

I'm slowly leaving the dark side...

I'm gonna have to learn how on this chiller and then I'll be able to put my copper tube manifold together for the MLT in the next couple weeks too...
 
You can try heating up your 'drips' and hit them with some flux to even them out, and then just take a little sand paper to them.

It definitely is a skill (one which I am out of practice on). I loved it when I used to do plumbing on mission trips, because we typically re did the entire setup, and I had room to solder, rather then deal with compression/flare connections- much better connection and cleaner I think!

Keep up the good work guys! Good news JMSetzler, now you have it for next time :mug:
 
I'm slowly leaving the dark side...

I'm gonna have to learn how on this chiller and then I'll be able to put my copper tube manifold together for the MLT in the next couple weeks too...

I wouldn't solder the manifold. You can take it apart for easier cleaning if you don't.
 
I wouldn't solder the manifold. You can take it apart for easier cleaning if you don't.

That's a bit of information I was looking at last night. My next set of questions will probably be related to optimum construction for a copper tube manifold for my MLT. I haven't chosen the style of cooler I plan to use yet either.

I'll post a question in the DIY forum here in the next couple days after I find an appropriate cooler to get started.
 
Sweating copper is one of those skills I think everyone should acquire at some point in their lives, just like driving a manual transmission car.

I 100% agree. I was scared crapless when I soldered on my frost free spigot, but now I have that skill. A whole new world of possibilities opened up.

Some day soon I hope to put in a slop sink in the garage and just knowing that I can fix my own plumbing is a good feeling.
 
I'm in the process of tossing the last of my compression fittings and replacing with soldered ones also. I will still use compressions on my inside-the-keggle draw tubes, so I can take apart my weldless fittings and such, but that is not a situation where cooling water could contaminate the wort.

The ones on my old immersion chiller, which is now a herms coil, leak a bit after a while into a brew day. Once I am set on electrifying the hlt, I'll likely redo those (once I know if I'll need to reshape the coil at all).
 
I can tell you why I liked the idea of sweated 90's (which is what he's mirroring here) is because 1/2" tubing is on the threshold for kinking. It could be done with a spring bender if you have one.

Yep, you are right. I found out tonight the hard way that if you try to bend too much it'll kink. My 50' chiller is going to be closer to 40'. Looks like I'll be learning how to sweat copper and install some 90 degree copper elbows at a minimum.
 
I rebuilt my chiller today and ditched the compression fittings and soldered on the 90 degree elbows, and everything looks good so far. I'll post another photo of it tomorrow before I put it to the test. Temporarily I'm gonna have hose clamps and tubing for the water connections. The soldering went OK but I'm gonna have to find some help for drilling out the hose connectors to fit on the copper tubing...
 
The soldering went OK but I'm gonna have to find some help for drilling out the hose connectors to fit on the copper tubing...

Lowes has pipe fittings to (I think) it's 1/4 thread, and a 1/4 thread to hose adapter. That's what I did on mine to save some trouble...

Hope the test goes well!
 
3297809275_a86fe5af44_o.jpg


Thanks to everyone for the help and suggestions. I got my chiller rebuilt today. I pressure tested it and tested it cooling boiling water. There are no leaks and it chilled about 6 gallons of water to 65 degrees in just under 10 minutes. It took me nearly an hour to boil the water though. It was 45 degrees and windy outside and the wind was killing my burner efficiency.

I'm eventually gonna rework the intake and output to something a little better, but this is working fine for now :)
 
It took me nearly an hour to boil the water though. It was 45 degrees and windy outside and the wind was killing my burner efficiency.

Go to the hardware store and get a 7$ roll of aluminum flashing to make a nice little windshield. It's with the roofing supplies I think. It's thin enough to be cut with regular scissors. Shown here integrated into my brew rig:
DSCF0908.JPG
 
Go to the hardware store and get a 7$ roll of aluminum flashing to make a nice little windshield. It's with the roofing supplies I think. It's thin enough to be cut with regular scissors.

Thanks for the tip. I think I'll do that. That should take care of wind issues pretty quickly :)
 
I just built my first chiller and cooled my 4 gals of wort down to 70 in 9 minutes with only 20 feet of copper. Reason: I took a 350GPH fountain pump and submersed it in a small cooler full of water and ice. Just re-circulated the water. Never even melted all the cubes!! Worked like a champ. No need for 50 feet of copper unless boiling more!!!:tank:
 
I just built my first chiller and cooled my 4 gals of wort down to 70 in 9 minutes with only 20 feet of copper. Reason: I took a 350GPH fountain pump and submersed it in a small cooler full of water and ice. Just re-circulated the water. Never even melted all the cubes!! Worked like a champ. No need for 50 feet of copper unless boiling more!!!:tank:

That definitely works well too. I'm thinking about trying something like that in the warmer months. There are a lot of things you can do to improve the efficiency of a chiller. Ice water would have been about 15-20 degrees cooler than the water coming out of my hose this afternoon. I checked the temp of the hose water just because it was my first time (after my initial test) using this chiller. The water was running right at 50 degrees.

Do you have any pics of your setup?
 
I'm gonna have to find some help for drilling out the hose connectors to fit on the copper tubing...

Instead of going through all that trouble just head down to a real plumbing supply store (every town, even little ones, has a plumbing supplier somewhere) and pick up a sweated pipe to pipe thread adapter.

You can get them in male or female orientations. You sweat the one side to your chiller and then use regular threaded plumbing parts (and teflon tape, which is truly necessary here) to go to the brass hose connections.

Here's a picture of a female one:
http://www.plumbingfittingsdirect.com/press/images/10100t.gif

Here's a male:
http://www.plumbingfittingsdirect.com/press/images/10800t.gif
 

Latest posts

Back
Top