Tips for coiling stainless

Homebrew Talk - Beer, Wine, Mead, & Cider Brewing Discussion Forum

Help Support Homebrew Talk - Beer, Wine, Mead, & Cider Brewing Discussion Forum:

This site may earn a commission from merchant affiliate links, including eBay, Amazon, and others.

Red Clay

Well-Known Member
Joined
Aug 25, 2007
Messages
132
Reaction score
17
Location
Canton, Georgia
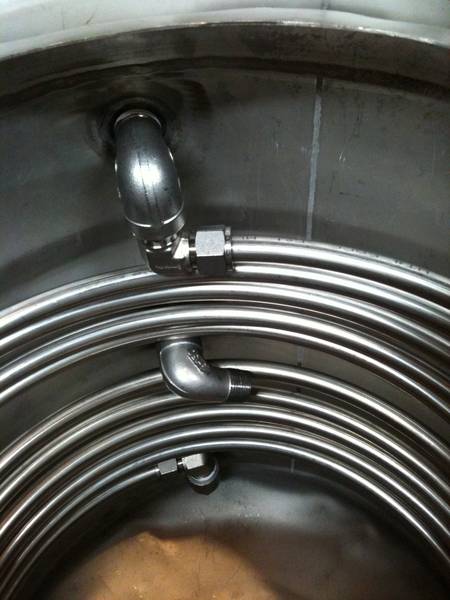
My buddies are coming over tomorrow and we are creating the HLT heat exchanger from 0.020" wall thickness 1/2" stainless steel.

I've searched and seen threads talking about how hard it is to do, but no tips on doing it well.

My plan is to lay the tube on the ground and place my 12" aluminum pot over it. Then we'll slowly bend the tube as we roll the pot as we press the tube against it on the back side.

I couldn't think of a jig to make it work better, so I figured we'd just do it manual-like.

Can anyone who has done it provide some guidance on the do's and don'ts?
 
First, I would say that 1/2" seems big...and expensive. Second, I would build a jig. I did this a while back with 1/4" ss .065 wall tube. you need to find a piece of pipe a bit smaller in diameter then what you want to end up with. the tube is going to spring out when you are done bending it.
 
Don't aim for your target diameter on the first spin.
Don't even try to come close.
Make multiple, multiple, multiple passes to get there.
I gave up and am looking at making a jig...
 
Well, that's not very encouraging at all. I know that several people have put stainless coils in their HLT, so it can't be impossible. I'll try the iterative coiling approach by starting with something really large...maybe a Sanke keg. Then I can try to coil it tighter and tighter.
 
Cap one end with several layers of duct tape, and fill the tubing with sand, tamping the end to make sure it's completely full end-to-end. Then duct tape the other end.

This will prevent the tubing from kinking as you coil it.

Just make sure to rinse the tubing out really, really well afterward.
 
Use baking soda or sugar as that will dissolve in water instead of sand.

+1, Or salt.

Just make sure you pull the tubing as hard as you can while your wrapping it around the "die". Keeping the coil very tight against your "die". Use very slow, controlled, and deliberate movements.

Edit;
Also, move the tubing not the "die"

I keep quoting the word "die", because it can be anything. Once you see the spring back. You may move to something smaller in diameter.
 
Great advice, guys. Thanks :rockin:

My tubing is in a loose coil from McMaster.
I suppose I just wrap directly from that around the die, rather than placing the die in the center of the loose coil and trying to tighten it from the middle?


Any tricks for getting the salt/sugar/soda into a long narrow coiled tube? Is it as simple as a funnel and holding the inside loop of the coil on the ground while pouring the solid from above?

Or is it a lot of shaking and rotating to move the salt to the end?
 
I bent some siphon tubes (maybe 12" of material) using the salt fill method. I can't imagine how you'd fill a 25' coil.

I've bent several coils from copper. I would suggest you just tighten the existing coil you have. It's a pain to work with but drop the coil over your die and tighten starting at one end.

A lot of folks that have coils you see started with a SS chiller that was already coiled.

Good luck, show us some pics of the results.

Ed
 
you did buy soft annealed seamless tubing correct? And why choose .020.
Seems a little heavy on the wall thickness.
If you use something that can handle the impact, I'm not so sure the pot will, something like a gas cylinder, but while rolling your coil on the floor around the cylinder making sure the tubing is tight against the "die" striking the tubing as you form your coil with a heavy rubber mallet will also help the tubing to retain it's shape and reduce the spring back after you release the tension. Do this as the tubing comes into contact with the die while forming the coils.
 
I'd imagine it would be easiest to fill it with salt if the tubing was straightened first. A funnel and a whole lot of patience. And make sure to tamp it down every so often... Any voids in the salt will allow for a kink.

Also, forming it around a die that's slightly smaller than your desired final diameter might account for spring back. Beating it with a rubber mallet sounds like a good idea as well.

I also agree with dfma about the die itself. Not sure a pot will be able to hold up to the coiling, even if you're not whacking it with a hammer. SS tubing is pretty tough.

Bending annealed metal will work harden it. It bend easy the first time, harder after that.

I'm not sure about beating on the tube, you might try a test first to see if it deforms.
 
I used this method on copper to make my wort chiller and it ended up tight enough that I couldn't get it to slide off the cylinder when I was finished.
The mallet didn't deform the copper and it is much softer than stainless.
I'm not saying that it will work as well as on stainless.
Just a suggestion.
 
Well, it worked. But thank goodness I had 50' and only needed ~25'! We couldn't figure out how to fill that long a tube with salt. We contemplated building our own tubing roller (the three-wheel contraptution that bends tubular framing), but decided to go with the 'drop it over and tighten' approach. It worked great as we tightened around the sanke keg. It took all three of us since someone had to stand on the keg as the other two pulled the tube around. While physically tough, it wasn't that hard to do well.

Then we went down to the target size, which was around a 7 gallon pot. That went very well too. It sprung back to about 2" wider than target, but we had one more die to go.

We used a pony keg (slightly bigger diameter than a corney) and tried the same thing. We had three kinks in no time. It was just too tight a radius to tighten the tubing without it kinking.

So we retreated to Taco Mac for reinforcements and liquid encouragement. We re-thought our strategy and plunged back into the fray.

We cut off the offending 10' of tubing (it has another life to live as pick up tubes.) Then we basically screwed the coil down into the top of the keggle. Although it was larger than the opening, it was 2" smaller than the keggle width. A few adjustments later and it was all hooked up on the compression fittings. The only issue we had was the tube had been very slightly ovalized in the pulling process, so we had to reform the end to round before we put it on the compression fitting.

In all, it looks really good. It is a larger diameter than we had intended, but I don't anticipate any issues at all in its role as a heat exchanger in the HLT. I think we got about 35 feet in, and still have 10 feet of tubing that can be used for other purposes (about 5 feet of scraps, cutoffs and kinks.)

I'll post some pics in a bit once I nurse this beer glass to empty.

Oh, and thanks everyone for all the help and advice. HBT rocks :ban:
 
Gonna give this a go in the morning myself, so I'll try to follow the advice above. If you say that SS is work hardened by the coiling, does that mean that I should use a die the size of my target diameter (a 20lb co2 cylinder) on my first run so as not to make the material harder with multiple bends?
 
Gonna give this a go in the morning myself, so I'll try to follow the advice above. If you say that SS is work hardened by the coiling, does that mean that I should use a die the size of my target diameter (a 20lb co2 cylinder) on my first run so as not to make the material harder with multiple bends?

I don't know the advantage of multiple dies other than reducing until you have a problem then stopping.

I think there is going to be a minimum bend radius regardless of how you get there.

I think a 20lb co2 tank is going to be pretty tight. Let us know how it goes.

Ed
 
You may want to have some help. You have to put a bunch of force 'pulling' the coil around the die. Unless you have a way to hold the die firmly in place, you'll need at least one person to stabilize it while you pull. We also found it useful to have one person on each side of the die so that one person could pull the coil while the other pressed it against the die at the point of contact. But I'm pretty sure I could have done the pulling by myself by walking myself around the die.

Slow and steady is definitely the by-word. Don't try to go too fast. Work close to the point of contact and you'll minimize the chances of a kink.

I agree with Ohio-Ed. I couldn't get down to the size of a 1/4 keg (9" diameter). Our last die size was an 11" diameter aluminum pot, and we never felt a great risk of a kink with it. It's possible since it was our third coiling that we had work-hardened the stainless...or maybe a 1/2" diameter 0.02" wall tube just can't be reliably coiled tighter without structural support.

Here are the pics of our work.
Work_Phone_136.JPG


Work_Phone_137.JPG


I'm likely going to find a way to adjust the return (the middle fitting) so that it doesn't mess up the pretty symmetry of the coils. I think a longer nipple to connect the street elbow is all I need. We 'threaded' the coil into the keggle top (since it is 11" to fit the top I use). There is an inch or more clearance between the keg wall and the coil tube. I haven't tested it yet, but I don't see that having it towards the edge should be a problem.
 
You know, if I had it to do over again I might have taken my 1/2" die from my cheap Harbor Freight tubing bender and used it and a rubber mallet to force the tube against the die. That would have kept the force close to the wall of the die, while it protected the tube from kinking and being deformed by the hammer.

The bender die is a 4" long piece of aluminum with a 1/2" channel machined out of it. Shoot, I bet you could use a router and make something like that with a piece of hard wood like oak. Even better, if you could make it curved and to the right radius you might be able to go directly to the final coil size.

I thought about this last night.
I wonder about splitting a 1/2" SS pipe and using it to roll the tubing around the die. If the pipe is long enough you could really get some leverage.

BTW... Nice work. The results look great. Thanks for posting.

Ed
 
Doh! I wish I had remembered Kal's how-to on this. That site is so huge with how-to goodness now that it is easy to forget all the cool stuff. He is so good about taking pictures along the way. I thought about it, but once we were in the fight I was mainly focused on no ruining $85 worth of stainless.

Looking at Kai's system I note that he has HEX down low in the HLT. We debated pushing the top of the coil down to the middle connector to get it as low as possible in the HLT. But when we did, the tubes of the coils pressed against each other. So we thought we'd sacrifice being able to keep it submerged at half-keg so that we could get improved heat exchange in normal conditions (>2/3rd full.)

I figure I'll give it a try, and if running it half-empty is something we want to do a lot I'll move the top outlet down.
 
Are you trying to use logic on me or something? ;)

It's like I told my brewing partners, here are the facts:
1) copper is easier to bend
2) copper is a much better heat conductor
3) copper is cheaper
4) stainless looks better

We have a motto at our little brewery: "There is always an easier way. Don't take it."

Any more questions? :D
 
I ruined my SS coil so I had planned on buying the SS immersion chiller from Midwest Brewing Supplies and cutting that and fitting it in. Since it is only 10" in diameter I thought it would be perfect. But alas, they are out of stock and not expecting any until March. I went ahead and bought one in copper and will use that until I can upgrade to SS.
 
Are you trying to use logic on me or something? ;)

It's like I told my brewing partners, here are the facts:
1) copper is easier to bend
2) copper is a much better heat conductor
3) copper is cheaper
4) stainless looks better

We have a motto at our little brewery: "There is always an easier way. Don't take it."

Any more questions? :D

Now I understand... Luckily your motto is also a great cover story for when I mess up a new technique and need to some extra project time. :ban: Love a good cover story.
 
Back
Top