Lots of learning with this Brutus build!

Homebrew Talk - Beer, Wine, Mead, & Cider Brewing Discussion Forum

Help Support Homebrew Talk - Beer, Wine, Mead, & Cider Brewing Discussion Forum:

This site may earn a commission from merchant affiliate links, including eBay, Amazon, and others.

Daddo07

Well-Known Member
Joined
Jun 20, 2011
Messages
51
Reaction score
4
Location
Waukesha
Thought I would document my build in case anyone else has cold feet. I was (am) a total welding novice. Before starting this project I had never even held a welding gun. Surprising what watching hours and hours of welding instruction videos on YouTube can do for you.

To step back a bit, I received an unexpected bonus from work and decided to use part of it for a brew stand. I had been brewing on the ground, chairs, folding tables, passersby who didn't move quickly enough, etc. Spent a lot of time considering the Blichmann Top Tier but ended up deciding against a vertical setup. A few quick google searches came up with very detailed plans for a single-tier rig. Locally I found a shop willing to build it for $680 using 1.5" sq tube, though estimates ranged from there up to $1200. The commercial stands were just right out of my price range.

Around then I started realizing I had a week's vacation to use before the end of March and no plans for it. I also found a local metal shop charging anywhere from $1/ft for 2" angle to $2.50/ft for 2" square, all for regular steel. Throw in that he would do my entire cut list for $10 and we had a winner!

Found a mint Lincoln SP-100 welder on CL for $120. This was from a local shop that specializes in manufacturing SS machines for food prep. Guess they'd bought the welder years ago and quickly found out it was too small for them. I'm going to say it had had 2-3lbs of wire run through it at the most and then been sitting unused for 5+ years. They ran a test bead for me and the manager (somewhat?) jokingly offered me $150 for it.

So here are a few beginning pics. When I say I had never welded I mean I had NEVER WELDED. Actually always kind of scared me, all those sparks flying around and stuff. First is the welder, then the very first welds I've ever done (including seeing and being surprised by how fast it would burn through), my first try at a butt joint, and the materials pile. All structural pieces are 2" square, the flat stock is for brackets (more on those later), and 1/2" square are for burner stand-offs, and the stainless sheet is for the wind guards.

20130313_113201.jpg


FB_IMG_13636301678105301.jpg


FB_IMG_13636301827163967.jpg


20130319_113021.jpg
 
This was by necessity a garage floor build. Bad thing is we don't have the amperage in there so I had to run a 50' 12/3 extension cord outside to the back of the house, through a basement window, and plug into the washer/dryer circuit. The good part of this super cold spring was the extra security that gave me for the cord heating up (which it really never did).

I already had an angle grinder and bought a wire wheel to clean the mill scale. Bad idea. Took freaking FOREVER. Fortunately I had an old metal grinding disc. Threw that on and it was transformative... now had bare metal in seconds. Just have to be careful you don't carve up the project on accident. Later a switched to a flap disc which, while not as fast as the disc, at least gives you a closer to final finish.

Assembly was really pretty straight forward. Spent a hella lot of time making sure everything was square and plumb which really paid off in the long run. Every minute you spend here is going to save you 20 minutes later on. Once the first few pieces are laid and joined you can use the remaining ones as spacers and worry that much less about plumb/square.

Also, thank all that is good for ratchet straps! Crank down on those and your piece won't move from where they're set.

First day welding and you can see the superstructure taking shape. Everyone kept asking if I was making a coffee table (???). In this shot the upper bar is just a spacer and not all the welds are complete.

I should also mention I decided to go with C25 gas shielding. I'd even bought .035 flux core wire and a chipping hammer, but then the temperature dropped (last Tuesday was 2 degrees overnight). The patio where I had planned to weld outside had 8" of snow on it and the wind was whipping. Moving into the garage was my only option and I couldn't effectively and safely deal with flux core fumes in there. Unfortunately this decision added about $250-$300 to the project for a bottle, regulator, and gas fill-ups. I'm thinking I will probably sell this when I'm done and recoup most of those costs but it sure needs to be factored in any decision.

20130319_164236.jpg
 
Now moving into Day 3. Started having a LOT of problems with the welder not feeding wire through. One issue was backlash on the spool which, while annoying, was easily fixed. The other issue just made no sense...while not welding I could pull the trigger and wire would pay out just fine. As soon as I went to weld it would sputter, pop, and feed nothing out.

I called a local shop and they suggested it could be a kinked liner and gave me tips how to pull it out and check. Took a bit of jiggering but finally got it and discovered...nothing. Liner was fine. So I re-cleaned the nozzle, put on a new tip, cleaned the drive rollers, and reset the tensioner. Seemed to fix it for about 5 minutes and then it would happen again. GAH! Got very little done besides cursing and stomping around. This would plague me for another FOUR DAYS (ooo, foreshadowing!)

20130320_154553.jpg
 
Oops, sorry, this is actually Day 3 now. Got a lot done including grinding down some welds to see what that was all about. Turns out way back in my mind I remembered something about the welds being much tougher than the base metal. Holy crap is that the truth! Was like eating fresh bread versus 2" thick month old croutons! Definitely need a grinding wheel for that. Also do NOT forget ear and eye protection and a welding dust mask. I ended up wearing at least the mask almost the whole time. Spend the money and get one with a valve in it so you don't fog up your glasses (as badly).

I also had originally found a fixed-shade helmet at HD for $10 on markdown. BIG mistake. First, you can't see squat until you hit the spark. Gotta be a whole lot steadier than I am to set your gun and lower the mask without moving. I would say my welding production at least doubled and probably tripled going to an auto-darkening mask. Second, I felt a bit of burn that night in my retinas. Wasn't terrible but sure wasn't comfortable. I know that has nothing to do with the auto-darkening so maybe this second point is more like, "Spend more than $10 on a welding mask."

In today's work I attached all four lower braces and the vertical pump mount. I plan on only using a single pump and if I was redoing this I'd probably skip that piece. My pump is also mounted on a separate stand I built for my Tower of Power. I'd probably also only run a single lower long beam across the middle of the two short ones to save weight. This thing is so vastly overbuilt with 2" square tubing there is just no need for a pair of them.

One of my friends posted on Facebook, "I should have ventured out for a lesson, or at least to look over your shoulder and say, That doesn't look right.'" Freaking cracked me up, but also from then on every time I did something questionable I'd hear Jon's voice in my head, "That doesn't look right." Danmnit, Jon, shut up!

20130321_163404.jpg


20130321_163417.jpg
 
Day Four. Lots and lots and lots of welder problems again today. Just won't feed wire while I'm welding. Might happen right at the start or even during a bead. Still can't find that gremlin. Got the top cross supports in place and that was about it.

Also had to run for a second bottle of gas. Man those prices can vary! Closest place was $37 for a trade-in. Place a little farther out is only $24. I'll drive the extra 7 minutes to save $13. Also wondering about my flow rate. A video I'd seen said to go with 25CFH but that was blowing through (ha!) the gas. I eventually dialed it back to 15, though I'm thinking being in a wind-free garage I might even be able to get away with less. I'm having such good, almost completely spatter-free results with C25 I don' want to cheap out and go with straight CO2 but the stuff ain't cheap.

20130322_165928.jpg
 
Fifth day. Spent the whole day fabricating mounting brackets for the burners. Started with a 2" x 1/8" x 60" flat sheet, clamped it over the brew stand, hammered the curves in, cut it off, and moved on to the next section. Seems to work out decently well, keeps everything pretty far removed from flames. Once I figured out to locate and weld one to the frame, screwed the other three to the burner, screwed the burner onto the welded-on one, and locate the three that way it went quite well.

Big problem today was getting my tacks to stick. I put on at least a dozen over the day which promptly popped off, most while the metal was cooling. Lots of grinding those away. Got a bit disgusted and tired and called it a day. Good stopping point, anyway.

Turns out I had to really preheat the tubing or I was getting NO penetration at all. Never would have figured that out if it wasn't for online tutorials.

20130324_191353.jpg


20130324_191423.jpg
 
Day Six. Wasn't even really planning on working on the stand today but had the opportunity. This was probably my most productive day yet. I figured out the wire feed problem...turns out the welder is especially sensitive to the length of the wire tip and how close you hold the nozzle to the work. Gotta maintain the 3/8" or it stops feeding wire. Whoulda thunk. Well, probably somebody who knows what they're doing which automatically excludes me.

Got all the brackets mounted and four of the stand-offs. I will be using a wind shield around each burner and with the pots sitting directly on the frame those stand-offs just seem like a good idea. Plus they will be left bare and the pots scraping against them should spare the frame from at least some abuse. Being out of the direct path of the flame should keep them fairly cool and prevent a lot of heat transferring to the frame.

The plans I found showed the openings as 12" deep x 13" wide. I opened them up to 13" x 13" and am glad I did; there isn't an excess of room between the keggles even with my change.

The brackets need some final tweaks to get the angles right but that should be pretty easy to accomplish. My big question now is I own one Blichmann burner and would like to keep it whole while using it in the stand. I'm thinking of welding in a shelf for it to sit on and be secured to in the third burner opening but am not sure if it would be worth the trouble. The other options are to either get a third BG14 and mount it like the others or get a smaller jet-style burner for my HLT (a big aluminum pot) and go with the two BG14's I have. The last two will let me have the Blichmann to easily travel with though I don't know how much that will happen. Overall for the money I'm not really impressed with that floor burner...seems like the flame is too close to the pot. I used it only one time and got a LOT of soot buildup and discoloration. Also think I burned way more propane than using my Bayou (which has now donated its burner).

Not sure now when I will get to work on the stand except for weekends. Not right to stick SWMBO with the kids after work and school (and she really has been great this last week letting me work on this) and I certainly can't start grinding and cutting at 8:30PM when the kids go to bed. Since I work from home I may have to start sneaking in some "extended lunches".

Also a little proud of my welds now if you look at the closeup of the stand-off. I'll drink to that! :mug:

20130324_191445.jpg


20130324_191459.jpg


20130324_191525.jpg


20130324_191634.jpg


20130324_191548.jpg
 
That stand looks great! It is pretty satisfying applying some new knowledge and seeing everything come together. I loved building my stand, and now love using it!

I like your burner mounts, and I am curious to see how you will mount the heat-shields.
 
ColoHox, I have three sheets of stainless, 6"x40", 22 guage that I rolled into semi-circles (used the top of my leg as the bending press). I'll drill corresponding holes in the sheet and they will slot between the burners and the mounting brackets to be secured by those bolts. Right now there is about a 4-5 inch overlap which I will probably hold with a couple small stainless bolts.
 
Big day yesterday. Welder was working well though the wire spool was wound poorly and kept binding up on the near side. Got all the burners mounted, installed the rest of the stand-offs, and fixed some welds. Really pushing the limits of my welder with the 1/2" bar stock...LOTS of preheating with the propane torch. Still have some jiggering to do to get the heat shield fit but I like how the one sits.

Smartest thing I did all day was coming up with this clamping arrangement. This let me get the speed square in there and held everything away from the propane heat and tack welds. I'm sure I'm not the inventor of it but the idea just occurred to me.

ForumRunner_20130331_110430.jpg

ForumRunner_20130331_110808.jpg

And then me looking tough in my welding beanie. Well, "tough" is the word I'm going to use in any case.

ForumRunner_20130331_111006.jpg


ForumRunner_20130331_110852.jpg


ForumRunner_20130331_110905.jpg


ForumRunner_20130331_110916.jpg


ForumRunner_20130331_110928.jpg


ForumRunner_20130331_110942.jpg
 
can you throw up a link to the detailed plans you found for this build. Also the description of how you have been brewing had us laughing pretty good for a while. "I had been brewing on the ground, chairs, folding tables, passersby who didn't move quickly enough, etc."
 
The plans are here: http://xa.yimg.com/kq/groups/14085118/1257679793/name/Brutus.pdf

Since they are available easily and directly with a Google search I don't think there's any problem with posting the link. If there is someone let me know and I'll take it down. Otherwise I'll be raising a glass or two to Eric Hedge, wherever he may be. :mug:

I'm getting close enough to the end that i'm thinking of how to finish the stand. On one hand doing it myself is the cheapest and will be easy to repair or repaint if needed, but will cost a lot of time. On the other hand I found a place pretty close who will do all the prep and apply flat-black powder coating (good up to about 550 degrees) for around $100. They do a lot of work for Harley so the finish would be like their handlebars and rocker covers. Any other color would be more expensive since they're already set up for the black. What to do, what to do.

SWMBO asked if I couldn't just leave it bare metal.

download.jpg
 
Haha...I'm in the same situation. Received a bonus a couple of weeks ago and I'm on the same journey, although a little behind you. I just made my cuts today based off of those plans. I'm making mine slightly larger because I have the large B3 heavy duty kettles, one of which is a 26 gal mash tun. I'm lucky enough to know several aerospace tig welders that will be welding for me. I hope to have the frame welded this weekend. I have all my parts procured so I can start the assembly shortly after. Keep us updated when you get to the wiring. Everything I've found has the temp controller wired to a switch. I want to bypass that switch and only have switches for pumps and burners. I'll post pics of my progress soon. Your's is looking good...carry on.
 
Kuckoo, I actually plan on skipping the control portion, at least for now. I have a Blichmann Tower of Power (don't roll your eyes, I got a can't-pass-this-up deal on it) which I built on it's own stand for my MLT temp control. I also only plan on using a single pump which is controlled via switch on my tower. That may change which is why I rotated my burners 180 degrees from where they were originally installed, just in case I need to use that vertical post to mount a pump or two.

A guy I went to high school with works for an aerospace company in Florida as a welder, too. Unfortunately he wasn't willing to fly up here and do my welding for a few beers. Now he just makes fun of me on FB and sends me pictures of the gantries he's building. I keep reminding him to make sure he doesn't copy me too closely and points HIS burners down. He also asked when I would hold my "...first seminar so you can teach me the drunken bead method...", which I claimed was far too advanced for his mere dozen years of professional welding. I then offered to send him the Amazon link to my series of instructional welding DVD's, pointing out that the "DBM" was introduced in disc 7.

Here are some pics of the stand. I pretty much copied the Blichmann model but made it out of maple. Only missing the flow meter and alarm. I built it about 6 weeks before I knew I'd be getting the bonus or I'd have incorporated it into the Brutus stand. I have so much time (and a fair bit of money) into the wooden stand and it looks so nice I don't want to abandon it even though it would be easier in the long run to pull it apart and integrate it.

Pics below.

20130201_211543.jpg


20130201_211453.jpg


20130201_211613.jpg
 
Here is the beginning of my journey. Gas beam is in, but still needs to be pressure tested. I should have the frame Saturday morning and will start the assembly next weekend. I'm getting excited.:ban:
Pieces.jpg
Frame1.jpg
 
Well, as she sits she's brewable! :ban:

Let me tell you, those wind screens were BY FAR the suckiest, crappiest, most frustrating, cursable, MF GD SOB PITA's of the whole build. I am so glad I went with only 22 guage steel. They're non-structural and non-weight bearing which is what led to the choice, but I can't imagine dealing with something harder to form. All the burners fit if somewhat tightly with their brackets. Putting the shields in moved them just enough that only 3 or sometimes 2 of the burner mounting bolts would line up. Bending the brackets to accomodate the extra width moved the holes, too, so that wasn't an option.

Ended up having to go back and overdrill 8 of the 12 bolt holes, snapping one drill bit in the process (here's the plug for eye protection and heavy leather gloves).

My secret plan is to get all the gas piping done this weekend and maybe even fit the shiny, shiny aluminum diamond plate I got for the bottom "shelf". Anyone have any good ideas how to do that to prevent a galvanic reaction? Was thinking of getting some big plastic drywall anchors to sink in a hole drilled in the steel but would love to hear something better.

Going to do a test brew on it in a couple weeks, check to see if anything needs changing before paint. Might do it with water if I want to hurry up and do the powder coating instead of paint.

20130405_163619.jpg


20130405_163627.jpg


20130405_163638.jpg


20130405_163745.jpg


20130405_164052.jpg
 
Well this is just silly. HBT refuses to post pictures in any orientation other than the original shot, regardless what correction has been done? I took these on my phone's camera, which is agnostic what direction is up. I even deleted the shots, rotated them on my computer, and re-uploaded them with the same results? That's ridiculous.
 
Now the problem is running the gas. I've got the 1/2" black water pipe all set up...everything else is questionable.

So it's 1/2" BWP to the ball valves (see pics). From there I have 12" flexible gas hoses from HD. The ends are M/F 1/2" flares, depending on if the adapter is in place. That gets me the length to my burners with a little left over for wiggle room.

First problem is I cannot find needle valves that aren't compression fittings! I'd like to have ball valves for positive/quick gas shutoff followed by needle valves. That way I could leave the needles set at a particular opening without having to futz with them every time. For now I have only ball valves and will have to see how those do for flow control. Not well, I'm expecting.

The control valve for the Blichmann has 1/4" FPT fittings on either end. I had to cobble together that monstrosity from HD to go from 1/2" to 1/4" to 3/8". That at least can go from the flexible tubing into the burner with it.

I'm having a b!^@& of a time going from 1/2" flare (tubing) to 3/8" flare (orifice) for the HLT and BK, especially since I'd like to have a 90 degree bend right after the burner orifice piece. I cannot find an adapter piece like that anywhere! I've seen so many pictures of other rigs so I know they have to be out there but I've also seen very few links to source them.

If I had my druthers I'd just use black tubing like what comes with propane tanks but I've only found that with regulators. I don't need two more regulators hanging out costing money. Jerks.

And...I've got a brewing party set up for Saturday. Will be an introduction for one of my friends to the home brew world. Don't wanna sour him on it cuz my stand isn't working. The pressure.

20130408_174142.jpg


20130408_165358.jpg


20130408_165351.jpg
 
Also, in the pics above I took the valve and flexible tubing off the third feed to have with me at the store in case you're wondering why it's different.

Forgot to mention I plan on securing the pipe to the back of the forward cross member and running the feeds up through the diamond plate. Think it should look pretty clean that way. My welds were just under par to use the rear beam as the manifold. And when I say "just under par" I mean "so far away from par that I'd be kicked off the course". My technical explanation when my friends ask is the holes are purely for safety's sake. Don't want excess pressure building up inside the frame from the burners so the incomplete welds offer a safety release point.

They're really "features", not "mistakes".
 
Down to the wire! Got nine guys coming over to brew tomorrow morning and just got the last third of my gas hardware in the mail at 4:30pm. It's now 10pm and we have...FIRE!

Wasn't working on it that whole time, probably took about 2 hours to finish and check for leaks. Got it ghetto-rigged with zip ties for now until its painted. Hope it holds up for the day! Going to brew Fish FryPA, a strong rye IPA with a caraway/pepper dry hopping. Totally winging this one. Inspiration is the Friday fish fry, a Wisconsin staple. I'm allergic to malted barley (what got me into brewing in the first place) so the recipe is mostly wheat for the base malt. I'll post it if anyone is interested.

But for now, FIRE!!!

image-1347960542.jpg


image-1821010497.jpg


image-2550281815.jpg


image-3036275817.jpg
 
Looks like you have a significant flame issue. It should be at least 3" or 4" tall.
 
No, this was with all valves turned down to the bare minimum. Wasn't trying to burn through gas, only testing to show they all work. Believe me, I turned the valves open for a bit and there were serious BTU's being put out. Started seeing strong condensation on my LP tank within 2-3 minutes. Lovely spring, it's 35 degrees, windy, and rainy tonight. Probably have to put the tank in a vat of warm water tomorrow.
 
First brew day down with the new rig, more of a success than it had a right to be. Stand worked pretty much flawlessly. Only problems were getting all the jets to ignite under the MLT, the flame jumping to the jet opening of the MLT (scares the bejeesus out of you), and the pilot spark arcing.

I'm surprised most about getting all the jets to ignite. When the Tower of Power would cycle on and off I was at times only getting half a dozen jets lighting out of the hundred-plus on a BG14. Gently blowing under the keggle would usually light them, though, so the stoichiometric ratio must be off. I'm pretty sure drilling a few ventilation holes in the wind screen will solve it. Couldn't ask for better fuel efficiency, though, as I heated my strike and sparge from well water at 55 degrees, a five-step mash (including dough in and mash-out), 75 minute boil, and making hot PBW wash with just over 1/3 tank of LP.

Wow will that make you take notice if your LP ignites from the brass orifice instead of the burner jets. I think my leads are too long for the ground and spark from the ToP. Easy enough to fix those by shortening the wires. I added custom extensions to both for flexibility and I'll try it next time with them removed.

It really surprised me how all my friends were shocked at the "complexity" and how fancy the system was. I kept think, "But...but it's just something I built...". Heard many comments like, "Yeah, he learned to WELD just so he could make that". i was also getting picked on for things I excluded for being too much or too complicated, like a temp probe in the output of my CFC. I just stick my ThermoPen in the exiting wort until I find the right flow rate for temp and call it good enough.

There's a lot of things like that in my build. If something already works or the cost/benefit is too low I won't do it. Like rigs with multiple pumps...I'll save the extra $150 and move my lines by hand. I've got everything on QD's so I can't justify spending that much cash to save 30 seconds of moving tubing.

My grain bill for this was 15.5 pounds, plus one pound rice hulls. Lost about .5 pounds to the garage floor in a dough-in incident. Of that weight only 1 pound was barley, all else being some variety of wheat or rye. My OG came out to about 1.058 which is BY FAR the best conversion rate I've ever achieved. Not sure what gets the credit but I was very happy.

Speaking of happy, I was anything but with the weather. Hit maybe 37 with a lot of wind and snow. Brewed the whole day in the garage. Even stepping past the door to the outside dropped the temp another 10 degrees. Think I was the only one to spend the whole brew day outside without going in to warm up. Woke up this morning to about 1" of snow on the ground. Stupid Smarch weather...

Thanks to my friend Adam for the pics!

image-1042295373.jpg


image-897440433.jpg


image-1749977882.jpg
 
I've been following your build...good stuff.
And only a third of a tank...I've seen some pretty big propane tanks...;)
 
Little change today, welded four more stand-offs to the HLT opening. My old brew kettle, now the HLT, is just a skosh smaller than my keggles. Never thought to check it before assembly as they seemed the same size. As it was the HLT was only sitting on maybe 1/4" of the supports at each corner. The four new ones are the same lengths as all the others but since they're on the straight parts and not the corners they project much farther.

Really wanted to keep them out of the flame path but ya gotta do what ya gotta do.

image-2486025031.jpg
 
Painting today. Actually hoping to remove all he hardware, prep (grind and wash) and prime. Unless things go WAY better Nd faster than I expect I can't imagine getting color on.

Decided to high-temp paint versus a commercial coating as the ceramic powder coating would have been hella expensive to deal with the BK burner. We'll see how this goes...found some non-curing spray paint good for up to 1200 degrees. I tried using my IR temp gauge last time I brewed and it wouldn't register. (Crosses fingers)
 
Holy crap. Eight hours or so in and I'm almost done. If I should ever build another stand I will do the following:

1 - Clean/grind all the metal right away before welding.
2 - Not wait a month and two brew days before painting.
3 - If #1 is missed I will pay someone to sandblast the frame.
4 - Remember the phrase "Dries to touch in one hour" on the paint can instructions does not mean "Dries enough in one hour that applying blue painters tape won't leave horrible looking marks".

Went through FOUR FLAP DISKS on the angle grinder. It was hot (82?) and muggy and I was working in the sun on a blacktop driveway, long pants, safety glasses, dust mask, earmuffs. So very very happy it's early and the mosquitoes aren't out yet or I would have probably given up.

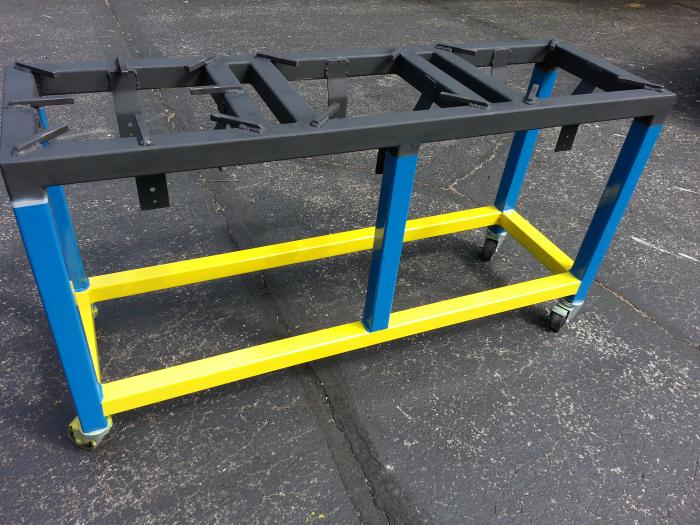
First pic is with one coat of high-temp paint on the top and primer on the rest, Saturday's results. Second is what I got done Sunday. I was born in the Bahamas and black, blue, and yellow are the colors of the Bahamian flag. Still have to shoot the second coat of high-temp black and get the overlap lengths even. Pretty happy with it, overall...don't see many stands sporting more than one color.

Depending on my free time, level of ambition, and ability to convince SWMBO to watch the kids, I'm going to try to sand, prime, and paint the LP black water pipe to match. Something tells me that's going to be more of a PITA than I expect. Then I have to fit and mount the diamond plate, wire up the push button igniter for the HLT and BK burners, reattach all the hardware, and I should have my stand. So I'm thinking somewhere around February 2014...

20130518_191229.jpg


20130520_101347.jpg
 
Back
Top