Photos of the new 5500 watt electric system

Homebrew Talk - Beer, Wine, Mead, & Cider Brewing Discussion Forum

Help Support Homebrew Talk - Beer, Wine, Mead, & Cider Brewing Discussion Forum:

This site may earn a commission from merchant affiliate links, including eBay, Amazon, and others.

GRHunter

Well-Known Member
Joined
Jan 24, 2010
Messages
564
Reaction score
13
Location
Michigan
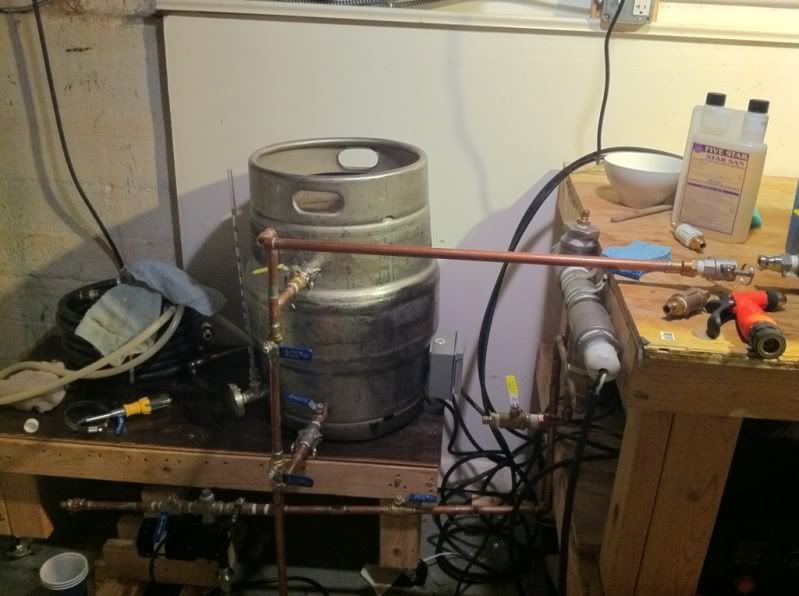
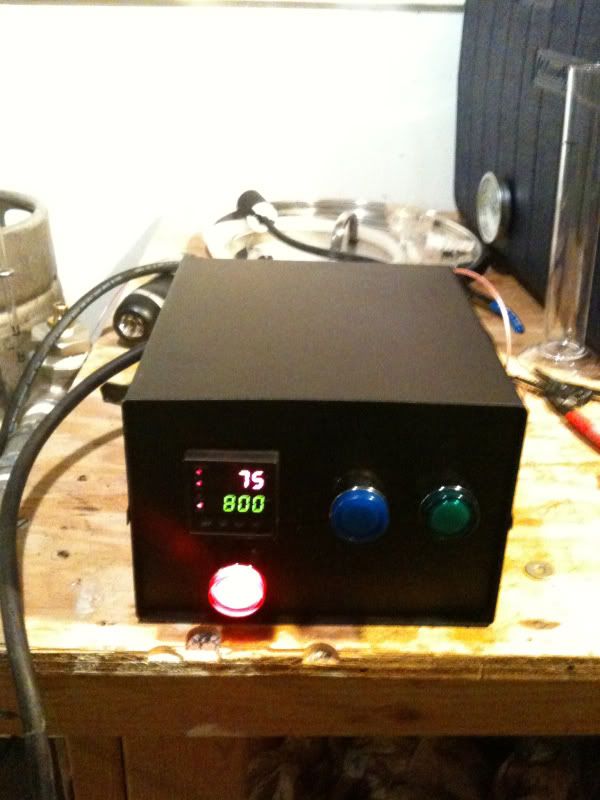
After a couple of months of studying and planning, and then 2 weeks of build time, I am finally finished with my little system. I have to give thanks to Kal for taking the time to document the process so well that even us newbies can get into electric brewing. Also to P-J who provided lots of advice and invaluable schematics.

When I first started I thought this project was going be cheap, quick, and easy. I was wrong on all accounts. But to be fair, because of my ignorance and lack of patience I made it a lot more expensive, slower, and harder. With the lessons learned from this build I expect it to go a lot better next time. Now that I can get back to brewing again I am going to take my time and build a 3 kettle single controller system. AKA the Electric Brewery. I am probably just going to order the kit from Kal as chasing down all the parts was my least favorite part of the build.

And as I mentioned before, I think I may have set the record for the most expensive single kettle electric brew system ever. I tracked every penny I spent on this project except for gas (picking up parts) and my time. I spent a lot of extra money for the following reasons:

A) I bought locally because I didn't want to wait
B) I bought online from a single vendor because I was too lazy to place multiple orders
C) I bought the wrong parts
D) I bought to many items because I didn't know the correct quantity
E) I had to pay an electrician to install my sub-panel
F) I had almost none of the tools I needed

Here is a break down of my costs by category

Cost Description
$228.46 Tools
$97.84 Element Parts
$365.42 Controller Parts
$24.97 Tax
$47.00 Shipping & Handling
$560.00 Electrician

$1,323.69 Total

eb01.jpg


eb02.jpg


eb03.jpg


eb06.jpg


eb07.jpg
 
Very nicely done. Congrats!

The good part? You now have the tools for a lot of other projects. You have your sub panel in place which allows you to do whatever you choose on your next adventure.
And the best part? You have an electric brew rig that looks absolutely great and will serve you very well.

I'm pleased that I could be of some help.

P-J
 
Looks awesome!

I'm embarking on the same adventure. You're right that it's more expensive than you first think. For example, I went to Home Depot the other day to buy some sjoow wire. I had my toddler with me who was amused with the various switches for a while, but by the time I got to buying the wire he was ready to go so I forgot that I wanted 20 feet of 10/3 and 10 feet of 10/4 and I had the guy cut me 30 feet of 10/4! Of course, I didn't even realize my mistake until later that night. Oh, well. I figured out I can now put my controller in a more optimum place....for an extra $50! Live and learn.

Congrats.
 
Actually what setup did you use to do the sight glass with a ball valve? I would love to do that as well.
 
nicely done --

this is 220 - right ? It looks like 110 outlets below the sub panel. Is the GFI breaker in the sub panel, or the main box ?
 
nicely done --

this is 220 - right ? It looks like 110 outlets below the sub panel. Is the GFI breaker in the sub panel, or the main box ?

Yes, it's 240v to the brew controller and 120v to the accessory plug on the side. I have a 50 amp GFCI breaker in my main panel. And then in my sub panel I have two standard breakers, a 30 amp breaker to run the brew system, and then a 20 amp breaker to the accessory plugs. I wanted the GFCI in the sub-panel but my electrician pointed out that technically my sub-panel is in a wet area and by code the GFCI should in the main panel. He also said that having GFCI to another GFCI can be a little quirky, so we went with the typical spa panel design.
 
You can save quite a lot of money if you go with 120v and use existing outlets, if you have them, or if you move them. That's what I did. Two 2000w elements can boil 13-14 gallons for a ten gallon batch. That's enough for just about anyone these days. I used to really want 240v (I'd have to reorganize my panel), but now it's hard to see the need.

98e1de2e.jpg


f368be70.jpg


2b5ec028.jpg


Where I most overspent in both time and money was with the illuminated switches. But oh, well. They're pretty cool. Certainly don't need 'em, but at least I can see what's on. Then again, when I turn on pump or fan I know it's on by the sound, so it is overkill. While I know part of the fun is building new things, I've finally reached a point where I don't need any more upgrades (sort of) and can just brew beer. Enjoy your new rig.

The upgrade I like the most at this point is the RIMS tube and controller. Do you have one or is your pid to control the boil?
 
No. This is a Brutus 20 setup. I use a cooler for the mash tun and then recirculate all of my sparge water at once for about half an hour. Then I just drain into the Keggle and boil in there. The outlets are 120v.
 
You can save quite a lot of money if you go with 120v and use existing outlets, if you have them, or if you move them. That's what I did. Two 2000w elements can boil 13-14 gallons for a ten gallon batch. That's enough for just about anyone these days. I used to really want 240v (I'd have to reorganize my panel), but now it's hard to see the need.

98e1de2e.jpg


f368be70.jpg


2b5ec028.jpg


Where I most overspent in both time and money was with the illuminated switches. But oh, well. They're pretty cool. Certainly don't need 'em, but at least I can see what's on. Then again, when I turn on pump or fan I know it's on by the sound, so it is overkill. While I know part of the fun is building new things, I've finally reached a point where I don't need any more upgrades (sort of) and can just brew beer. Enjoy your new rig.

The upgrade I like the most at this point is the RIMS tube and controller. Do you have one or is your pid to control the boil?

Sweet! That was the one place I went cheap on my system. I found some 240v lights at Graingers for like $6. The 22mm lights were closer to $20. I looked at the illuminated switches but those were big bucks and I wimped out. Nice looking system you got there.
 
You were smarter than I was. As I mentioned, the switches were big bucks and I had a lot of research to do to figure out how to install them. Luckily, the folks from homebrewtalk.com gave the proper advice.

I also really like having hard plumbing, though it occasionally is a pain. Enjoy your rig. It's looking good.

Today is my initial brew on my new system. Because of the hard boil I am anxious to see if I will need to add additional ventilation like you have. Right now I brew directly under an open window so I don't expect a problem. But come winter when the window will be closed I think I'll have a problem. Because I brew in my basement I am concerned about how to drill a hole through cinder block.
 
Today is my initial brew on my new system. Because of the hard boil I am anxious to see if I will need to add additional ventilation like you have. Right now I brew directly under an open window so I don't expect a problem. But come winter when the window will be closed I think I'll have a problem. Because I brew in my basement I am concerned about how to drill a hole through cinder block.

What I did was to put some rigid foam insulation in the window and mount an inline fan with some ducting. You can get 'em pretty cheap at those hydroponics stores. Works great. No moisture issues.

I've heard a lot of people just put a fan in the window so you can try that in the winter for an inexpensive solution.

This is making me want to brew! I just got ingredients for a Green Flash IPA clone. Time to clear the schedule.

Hope your brew day is smooth.

Those hydro Farm fans are reasonably priced. I just hope if I buy one I don't get on some kind DEA list. :) How much noise does that fan make? After a year and a half of brewing to the sound of a jet engine (99,000 btu propane burner) I am really looking forward to some nice quite brew days.
 
What I did was to put some rigid foam insulation in the window and mount an inline fan with some ducting. You can get 'em pretty cheap at those hydroponics stores. Works great. No moisture issues.
QUOTE]

Can yyou pls post a link where to get ?
 
I believe if you use a 4500 watt 240volt heating element on 120 you get 2250 watts at 18.75 amps.

I moved to the Country and my new place does not have 220 wiring.

My options are to rewire my PID and SSR for 120 and use 2 elements or go through the hasel of running 240 from my house to the garage.

Cost will be Cableing another breaker box back breaking working digging a trench etc.

I think I'll be going 120
A 4500W - 240V element powered by 120V delivers 1125 watts.

Ohms law.
 
Not sure what you are brewing in these days, but you can easily mount two 120v elements in a kettle.
 
Back
Top