Another RIMs in a box

Homebrew Talk - Beer, Wine, Mead, & Cider Brewing Discussion Forum

Help Support Homebrew Talk - Beer, Wine, Mead, & Cider Brewing Discussion Forum:

This site may earn a commission from merchant affiliate links, including eBay, Amazon, and others.

BrewSpook

Well-Known Member
Joined
Dec 6, 2008
Messages
447
Reaction score
9
Location
Richmond, VA
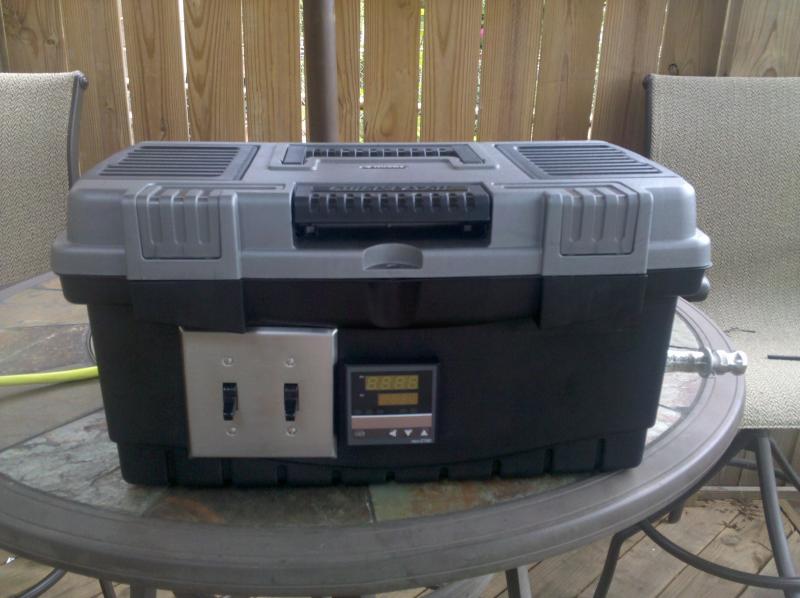
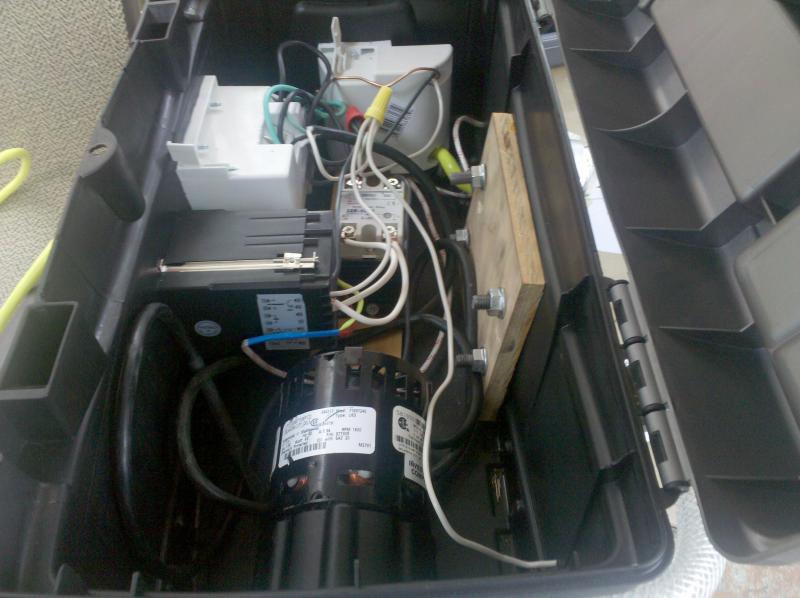
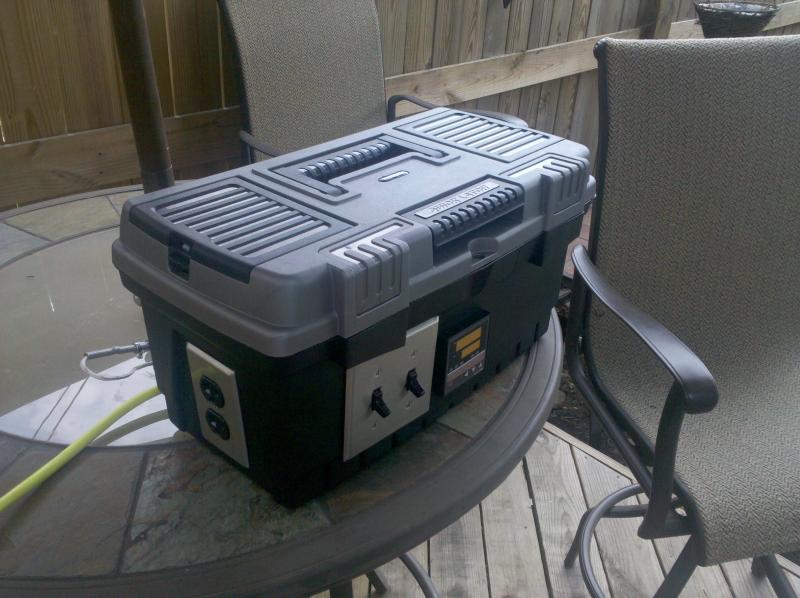
Well folks, it was a good day for the South Addison Brewing Company. I finally completed my RIMs tolbox set up and as soon as I put the last of the tools away the doorbell rang and my new 10g kettle from Jaybird showed up. I haven't gotten $#!^ done around the house today :)

For your viewing pleasure... :mug:

Please note I have not cut the sight glass down yet, as I just pulled it out of the box and threw the thermometer and sight glass on real quick for pics.
RIMs 1.jpg


RIMs back.jpg


RIMs front.jpg


RIMs inside.jpg


kettle.jpg
 
"I'm just a RIMS in a box, a RIMS in a box" Sorry that's all I could think about when I read the thread title.

But, with the pump and all the electrical in there, are you worried about it over heating at all? I know I've seen people have just the pump in there with no issues, but that's alot of wiring and electrical componants adding to the heat.
 
Are the wires coming out of the box connecting to the element going to remain exposed? Which little giant pump did you go with?
 
One other thing. I have to remove my element after every brew. A film gets "baked" onto it...so be careful how permanent you mount it to the tool box. I use a sponge to remove the crud and replace the element. I am using a 1400 watt low density element.
 
BrewSpook - can you provide details on your build? Like model numbers, costs, measurements, etc.? I am in the process of pulling together everything and it wouild greatly assist the build to have some more to look at!

Looks really cool by the way! Like the braided hose so you can monitor the wort flow. I assume it is high temp rated?
 
Mine is a 1500W LD Element I picked up somewhere online. I actually have a quick disconnect in mind for that to make it easier to come apart. Right now it is just wired up so I could make sure I got it all right. The connector I found is water tight so I will have a pigtail coming off of the element and a socket mounted to the box.

When I ran tests with it it didn't seem to get too hot in there, I will be monitoring in case it does and I have an extra fan from my stir plate build to install just in case. The heat sink on the SSR is pretty big though. I don't forsee having an issue.

If I do need to install the fan I will mount it on top under one of the part doors. Remove the tray on the inside and open the door to start the fan. Maybe a few intake holes on the front towards the bottom to draw cold air up and over the components.
 
I would advise grounding the rims tube (you could use the U bolts on the inside) and insulate the wires on the element. oh my response was delayed. Nice toolbox. I keep mine cracked open when I use it until I get some kind of ventilation set up.
 
Badger - I will get a part list and build guide done tomorrow for ya

IP - I will search around for a link for the connector. They aren't cheap so it will be a while before I get one integrated. Till then I will just have to disconnect and clean it.

Bendavanza - Thanks, I saw your build when I was trying to pull something together. You gave me a ton of inspiration for this. Any other tips you can give. I haven't done a wet run yet - planning it tomorrow AM and maybe a no sparge blonde if everything works right the first time.
 
I have a question about sight glass placement. I see a lot of pics where the glass is placed before the thermometer or has its own coupling. Curious if placement before the drain will draw air into the wort and restrict flow. I don't have any experience. Ordered a sight glass from Bobby-M and plan to have a new coupling welded in or order a thermometer with a longer stem. If it works at the drain, though...

Sorry if this is off topic, but your mention of the sight glass and pic of the placement made me curious.

Very neat build. I like it.
 
I have a question about sight glass placement. I see a lot of pics where the glass is placed before the thermometer or has its own coupling. Curious if placement before the drain will draw air into the wort and restrict flow...

You know - I don't know. I ordered the sight glass months and months ago and never had a place to use it. I was gong to put it on my HLT, but with the decision to go "no-sparge" I wont need a HLT so I will end up putting it on my kettle. I am not a big believer in HSA, so I don't think drawing in a little air would bother me as it would go right through that fitting and into my CFC.

As far as restriction goes, who knows. I will have to test it out and see. I am sure there are others on here with a similar setup on their kettle, if anyone has an opinion feel free to chime in.
 
IP - here is the link to the connector I was thinking of. Like I said - its not cheap, but looks like it would work for my purpose. They also have cable connectors and a few other things. I don't know if they have anything for 220V, but this will work for the 110V 20A circuit I will be running off of.

http://www.route66supply.com/store/product12.html
 
I would advise grounding the rims tube (you could use the U bolts on the inside) and insulate the wires on the element. oh my response was delayed. Nice toolbox. I keep mine cracked open when I use it until I get some kind of ventilation set up.

So you are saying I should run a ground wire from the U bolts to the main grounding line? I guess I should have thought about that.
 
Yes, the tube should be grounded. My element had a ground wire, but you should get a good ground by using your mounting bolts, and that's one less wire to run out of the box.
I'm not sure what you're planning with the sight glass, but I would not put it in a Tee with your drain valve. It will suck air and make your pump lose prime, in addition to not reading correctly when ever the valve is open. That's why you see them paired with thermometers, if you see them paired at all. The lower you can have the sight glass, the more useful it will be at lower volumes. Mine are placed as close to the bottom of my kettles as possible with 1/4" fittings, and they read as low as 2 gallon.
 
"I'm just a RIMS in a box, a RIMS in a box" Sorry that's all I could think about when I read the thread title.

But, with the pump and all the electrical in there, are you worried about it over heating at all? I know I've seen people have just the pump in there with no issues, but that's alot of wiring and electrical componants adding to the heat.

It's my RIMS in a box.....SNL.....thats what came to my mind :ban:
 
Success! Brewed with this badboy yesterday. Got a whole brew day in, in less than 4 hours from turning on the water to clean up. I couldn't measure efficiency since my kettle had a slight malfunction that caused me to lose somewhere around 1 - 1.5 gallons of wort. but that was user error (forgot to put a washer on the back of the weldless fitting, lost an oring and a bunch of wort)

Love this setup though... I didn't have to hang around, just set mash temp and go about my business. I got more done around that house during my mash than I did all week.
 
brewspook,

The box looks great and I am glad everything worked out so well.

I am curious about the short tubing on the inlet of the pump? Was this a barb fitting or did you have another reason?

I have my valves/QDs connected directly to the pump head and I am a little nervous about cracking the threaded post. The tubing might offer some protection against that.

anyway - congratulations.

jason
 
Thanks guys. I am really happy with the way this turned out. I have used it for several batches and now that I have my mill I will be able to knock out a system efficiency since every place I get grain from mills it different.

J- the tubing is because my pump head isn't threaded. I have 1/2 ID tube going from the pump head to a barb fitting on the RIMs tube. It wasn't my referred way to do it, but it actually works very well and gives me sight over wort coming through so I know when I have a good prime on the pump.
 
I can only find instructions about the pump toolbox using a March pump. Using the Little Giant you don't screw the pump head so the toolbox is sandwiched between the motor and the head right? In one of the pictures it looks like you cut the hole for the pump exactly the shape of the head and just slid it through, is that correct?
 
Yeah I took the pump head off and traced it on the side of the box then cut it out with an exacto. not the cleanest cut out, but it works. I wish I would have picked a box with straight sides instead of a slope.
 
Obviously this RIMS-in-a-box can maintain mash temps, but is it effective in raising temps (for a mash out, for example)?

I'm putting this contraption on my Christmas list....
 
My rims in a box raises temps around 1˚ every minute (appx) so if I wanted to mash out I would start 15 minutes early to get me from 150 to 165 or wherever it lands. It really depends on the strength of the element and the flow. I need to do some more tuning to mine.
 
Obviously this RIMS-in-a-box can maintain mash temps, but is it effective in raising temps (for a mash out, for example)?

I'm putting this contraption on my Christmas list....

I have one of Derrins Rims tubes mounted on the brewstand. I use a 1500W element, and although it may raise to mashout temperatures, it won't do it very quickly without help based on my experience. It's main role is maintaining mash temps, which it does very well.
 
I will try and get a pic up soon.

I usually fill my MLT with all of my water and set the temp and head out to class or whatever I have going on, when I get back its at strike temp and ready to go. When I mashout I raise the temp (at about the 45min mark) and go do something else for 15-20 minutes before coming back and its always at temp.

The few times I have stepped up with it, I can get 1-2 degrees per minute by adjusting the output flow with the valve coming out of the RIMs tube. I don't know if I wold do anymore than that.

Going no sparge with the RIMs has definitely been the best decision I have ever made. 3-4hour brew days and I can get a bunch of stuff done while mashing in... no worrying about keeping temps up
 
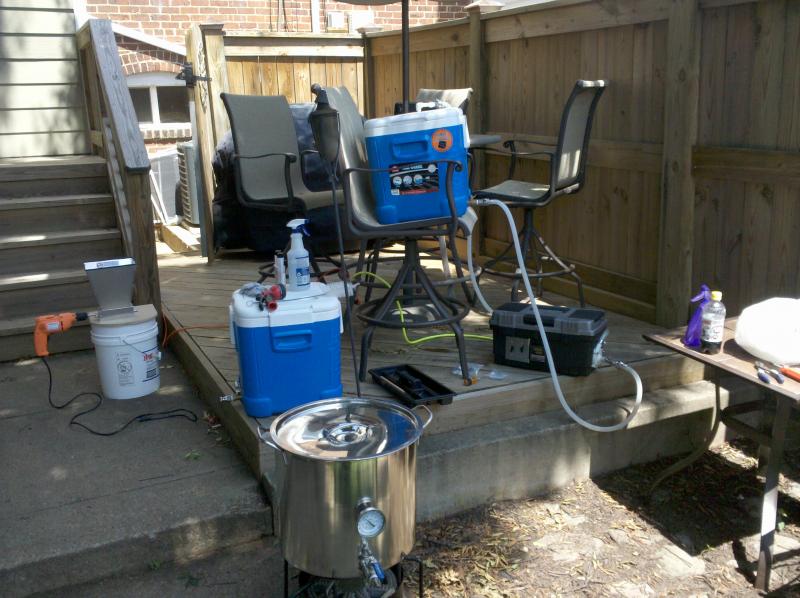
Here is a pic of everything set up. Still working on a stand, but this works for now.

At this point everything was a mess - the only part really attached is the cooler (MLT) sitting in the chair and the RIMs box. It comes out from the MLT valve (through copper manifold) and into the pump. Out of the pump through another valve, and into a sparge manifold that I built into the lid of the MLT.

When it comes time to transfer I turn off the pump and detach the tube from the sparge manifold and drape it into the BK and turn the pump back on. All total (MLT and BK) I lose about a cup or so of wort to deadspace.

To increase efficiency (first time was about 60% - I wasn't happy with that) I condition my grain and crush at about .032 on my barley crusher. About 30 minutes into the mash I turn off the pump and give the grain bed a good swirl. let it sit for 5 minutes and turn the pump back on. last time I ended up with somewhere between 80 and 85%. not bad for a full water volume mash... kind of a continuous sparge.

Hope it helps

system.jpg
 
Back
Top