You are using an out of date browser. It may not display this or other websites correctly.
You should upgrade or use an alternative browser.
You should upgrade or use an alternative browser.
Gas and Temperature Control for Dummies
- Thread starter Sawdustguy
- Start date

Help Support Homebrew Talk - Beer, Wine, Mead, & Cider Brewing Discussion Forum:
This site may earn a commission from merchant affiliate
links, including eBay, Amazon, and others.
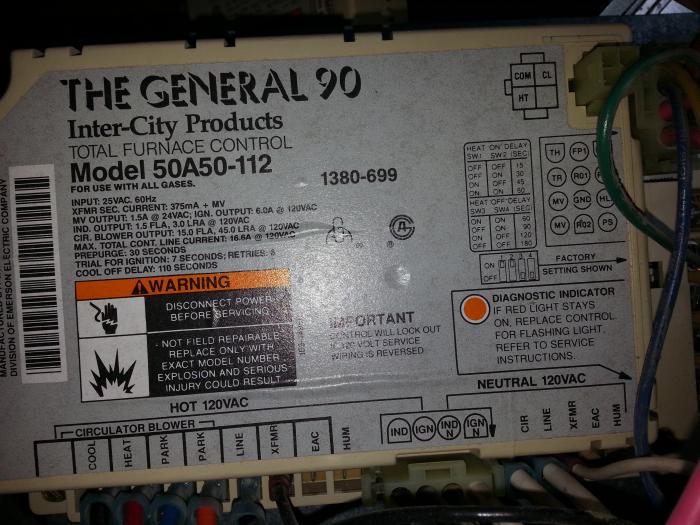
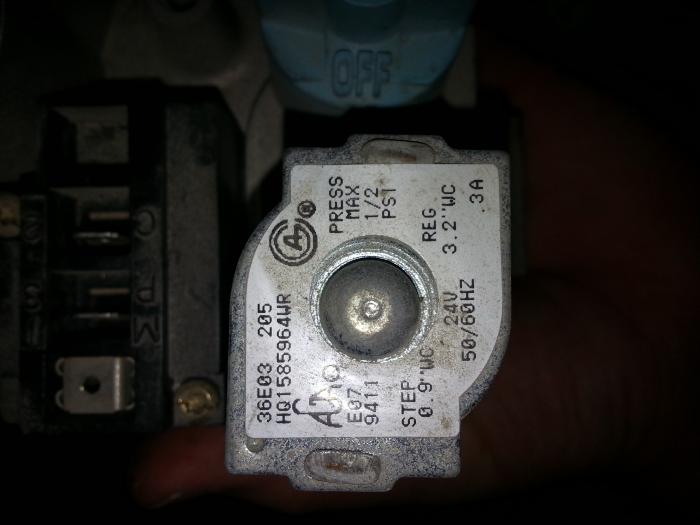
Okay, so I just got a ton of things in the mail to build my control panel. As luck would have it, I was given a gas valve(36E03 205) and control module(50A50-112) from a salvaged furnace (Both supposedly work). Can I work these into my Herms setup by modifying my previously posted diagram?


Kristan
Member
I have installed my gas system/burners and first and foremost, I would like to thank Sawdustguy for starting the thread and for all the useful information. There were several others contributions that helped as well, thank you. My gas system works as advertised. I flip a switch and the burners light right off.
My set-up: Brewtroller 4.1, Y8610U regulators, the suggested pilot light, 3/8" gas lines, banjo burners, (BG-14) with 3/32 orifice, burners mounted 2" below surface of the stand, no burner shields but also no wind in my garage, and running natural gas.
My problem: Tested the burners with 4 gallons of water. The water would reach 200 degrees but go no higher and it took 48 minutes to reach 200 degrees.
I would really like some further info on what i could do to get my water to boil.
Burners closer to the pot? Larger gas lines?
Thanks in advance.

Sounds like 2 problems, orifice is too small, which can be verified by closing the air shutter until flame tips turn yellow. If more than 50% closed you need to enlarge the jet opening, typically 1/8" for start on NG, and increase by numbered drill size until shutter is 80% open. Second problem is burner is still to far from the pot/keg bottom, as long as the light blue inner flame is 1/2" below the pot/keg bottom combustion will complete normally with no sooting. The clearer outer dark blue flames should be in contact with the heating surface for maximum effect like the kitchen range burners do.
Another problem is lack of flame venting from flat bottom pots on typical Brutus stands, a 1/2" spacer will make a significant difference in the way the burner will perform as 1/2 the combustion air flows over the burner, 1/2 into the burner.
Another problem is lack of flame venting from flat bottom pots on typical Brutus stands, a 1/2" spacer will make a significant difference in the way the burner will perform as 1/2 the combustion air flows over the burner, 1/2 into the burner.
starsman20
Well-Known Member
I hope this is the right thread to post this question in. 2 questions. I am almost complete with my automated system. I am using the honeywell valve with the pilot. Electrically everything works great. I can control the valve with the temp sensors and my bcs462. My big problem is the connection from the orifice (LP style with the 1/4 turn valve) to the black iron pipe that runs from the honeywell valve to the orifice piece. I have an adapter in there now (1/2 to 3/4") but no matter what I do it leaks there a little. The orifice has a bevel on the end so I think it is for some type of compression, the black iron is straight 3/4 npt. Can someone give me an idea of the proper adapter to use there? I do not have the same problem from the hose coming off the tank into the black iron, just at the orifice. This is the orifice I have http://www.brewershardware.com/Valve-and-LPG-Orifice-for-BURN10.html
My second question has to do with air flow. With the valves all the way open I get yellow at the tops of my flame. I am not sure if that is too much air or too little although if I close the vent off they go all yellow and wavey. The burner was High pressure before I changed out the orifice. I am wondering if I should drill out all the holes or make the orifice larger.
thanks and this thread has a ton of great info.
Trying to connect to the flare fitting with pipe fittings is not going to work as the threads and method of sealing are not compatible. You would need a 3/8" female flare X MIPS fitting with pipe fitting adapter at a minimum, better is a 3/8" OD gas flex with 1/2" MIPS ends. Most people use the 12"-24" 3/8" gas flex which is already built with flare ends and MIPS adapters and is available from the big box building supply stores. Just remove the adapter from one end and attach the flared gas flex to the orifice fitting, the other end adapter will thread into the gas valve.
The yellow flame tips are probably due to the gas leaking at the orifice connection as the orifice is usually just right for the banjo burners.
The yellow flame tips are probably due to the gas leaking at the orifice connection as the orifice is usually just right for the banjo burners.
starsman20
Well-Known Member
Got got the 3/8" yellow pipe this morning. That will wort perfectly plus allow me to move the valve to a more convenient location. Thank you. I'll post some pics when its all done.
starsman20
Well-Known Member
The 3/8" flexible pipe made the burners work but not very well. The flame was really low. I was able to use the adapters in the kit to mate to the 1/2 black pipe and now it works great. It seems the flow was being restricted too much with the yellow pipe. I should have gotten a larger size maybe but I am all set for now.
look in the manual for the honeywell VR8200 valve, find the internal regulator setting info and turn the screw cap all the way down. Also check to see if the spring has a faint red color (LP pressure range 11"-13"), not just shiny stainless one (NG 4"-7"). Here is a link to the manual http://www.forwardthinking.honeywell.com/related_links/combustion/vr8300_vr8200/install/68_0046.pdf
Can anyone explain why the Igniter Sensor in this kit should not be used and be replaced with the one listed below it? Although a bit bulky, I have used the provided assembly in the kit with no problem. All was installed as described in OP.
I recently ran across an issue where I can only turn on one burner at a time, otherwise my fuse blows and I lose all power on the 24V side. It occurs when the second PID does a call for heat while the other burner is on. (HLT and MT) I did not have this issue for the first year of life.
I am trying to track down the issue and am considering that this could be my problem.
Thanks.
Each Y8610U kit includes:
— 392431 Igniter-Sensor* (Not used for this Application you will need to purchase a Q345A1313. See Below).
You will also need a Pilot Burner and Orifice.
— Q345A1313 Pilot Burner/Sensor Assembly.
— 390868-1 0.010" Orifice for Q345A1313.
You can use the sensor from the kit if you have a pilot assembly it fits into.
If you don't have a pilot assembly, the Q345 pilot is a nice plug and play option.
Your issue doesn't have anything to do with the flame sense. Flame rectification only produces 2-4 micro amps and can be sensed through ground circuit.
24v side issue for sure. What size 24v transformer are you using?
You can use the sensor from the kit if you have a pilot assembly it fits into.
If you don't have a pilot assembly, the Q345 pilot is a nice plug and play option.
Your issue doesn't have anything to do with the flame sense. Flame rectification only produces 2-4 micro amps and can be sensed through ground circuit.
24v side issue for sure. What size 24v transformer are you using?
Thanks for asking. I came out here to update the post in the event anyone else ran across the same issue.
On a whim I tested for connectivity with a voltmeter between pilot lights. Sure enough, both were grounded and had connectivity running between them.
As soon as I correct the connectivity problem between the 2 pilot lights, presto, no issue.
I can only assume since both valves and pilots are grounded to an independent gas valve module, the connectivity between pilots was causing the short.
I hope this helps someone else out.
Now subscribed for info
Will any of the Asco valves work with this application? Like the 8210g2 models
ryandwilson1
New Member
- Joined
- Jul 30, 2014
- Messages
- 2
- Reaction score
- 0
Just curious question what people are using for pilot when they purchase quality valves off of eBay. I purchased this valve, http://www.ebay.com/itm/121333061531?redirect=mobile, but I am having a difficult time finding a method of constant spark when running them off of a Ranco temp controller. Any advice would be appreciated.
ok I have 2 Honeywell S8610U3009 Intermittent Pilot controls, a asco 8210g2 gas valve, a Honeywell vr8300 valve and a Honeywell vr8200 valve. I have 2 love tss2-2100 controls and a Auber SYL-1512A control. Does it matter what kind of transformer I get? I planned on putting the loves on the HLT and MLT with the Honeywell valves and spark ignition. I'd like to use the auber for only a temp gauge either on the BK or at the exit of my chiller. I have no pilots yet but plan on ordering them soon (just unsure which I need...waiting to order all remaining gas parts at one time). Would it be ok to use the asco valve on the BK and have it ignite by push button on the control panel? what other parts would this require? Thanks in advance for any replies!
Didn't see any answers for the ignition system for your ebay valve.... What did you end up doing??? I'm trying to use the same valve right now.Just curious question what people are using for pilot when they purchase quality valves off of eBay. I purchased this valve, http://www.ebay.com/itm/121333061531?redirect=mobile, but I am having a difficult time finding a method of constant spark when running them off of a Ranco temp controller. Any advice would be appreciated.
Thanks
SnowRaven
Well-Known Member
- Joined
- Jan 6, 2014
- Messages
- 128
- Reaction score
- 9
Base Level As it Stands
Controller and Valve on Amazon $195.22
PID and RTD $90.15
Total - $285
Add a Blichmann Tower of Power Ignition Cable 72"
& Blichmann Tower Of Power Ignition Electrode
+ $45
----------------
Total : $330 for MLT HLT or RIMMS
$240 : For just flame on for a Boil Kettle
Plus Case, Wires and Transformer
Vs
$575 for a Blichmann Tower Of Power Gas-Fired Module
Carlscan26
Well-Known Member
Reviving the thread...
Snowraven are you replicating the ToP setup with an Asco type valve or still using the Honeywell valve?
For that matter, has anyone replicated the ToP setup?
Snowraven are you replicating the ToP setup with an Asco type valve or still using the Honeywell valve?
For that matter, has anyone replicated the ToP setup?
Subscribing
jackyl
Well-Known Member
Sorry for bumping an old thread, but this seemed like the right place. Also I've read a bunch of it and appreciate all the posts and information.
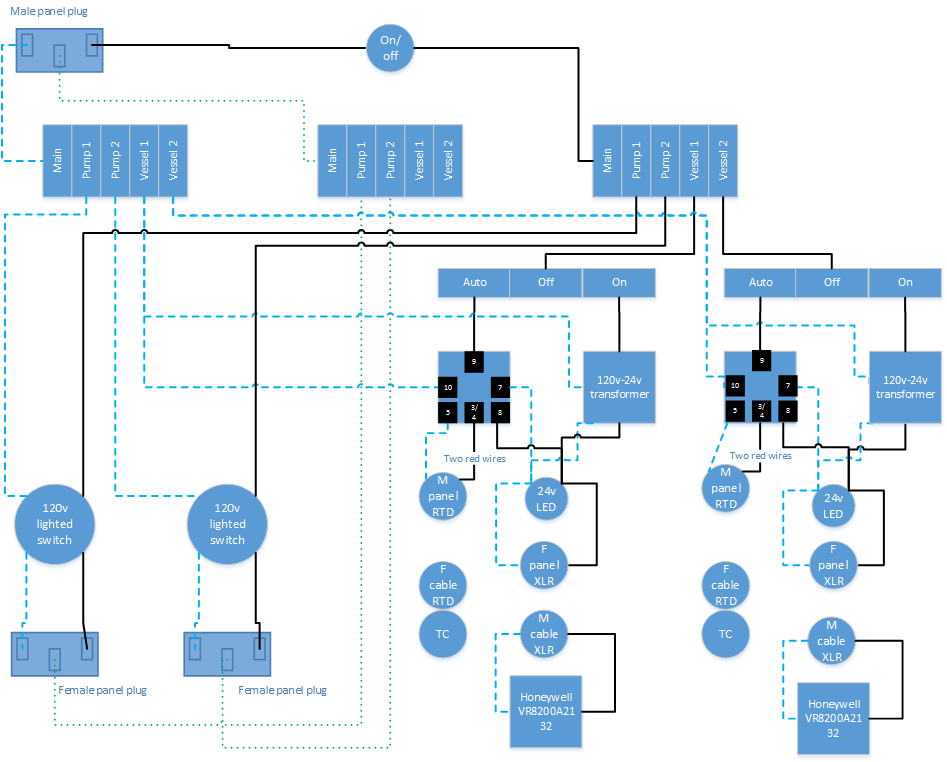
I've put together a rough plan for a NG BIAB control panel with the option to expand to a two vessel brutus 20 style setup in the future. Does this seem about right? I know it's a bad drawing, but hopefully it's clear enough.
Solid black line is hot (except where marked otherwise per the Auber manual), dashed blue is neutral and dotted green is ground. Edit: forgot to mention - the PIDs are Auber SYL-2342 in on-off mode. I also bought the Auber RTD cable 1/2" NPT thermos.
What I am aiming for:
What I thought about, but don't have / decided not to do:
Still in the air
Anyway, any and all opinions would be appreciated. Thanks!

I've put together a rough plan for a NG BIAB control panel with the option to expand to a two vessel brutus 20 style setup in the future. Does this seem about right? I know it's a bad drawing, but hopefully it's clear enough.
Solid black line is hot (except where marked otherwise per the Auber manual), dashed blue is neutral and dotted green is ground. Edit: forgot to mention - the PIDs are Auber SYL-2342 in on-off mode. I also bought the Auber RTD cable 1/2" NPT thermos.
What I am aiming for:
- Independent pump control for whirlpooling, cleaning, etc
- Lighted notification when a pump is on or gas valve is open
- Option for automated or manual burner control
What I thought about, but don't have / decided not to do:
- Pump automatically on when in auto mode to ensure recirculation (not sure the wiring complexity is worth that)
- Alarm (probably lighted) for too high / low temperature (it's not like I plan to walk away for hours while mashing)
- Skipping the auto/manual option for boil and just changing the PID to 230 degrees or something like that (going manual seemed like a good idea in case of PID failure)
Still in the air
- grounding for Honeywell valves or thermo; will depend on exact valves that I get and I think the TC will be fine since it's the auber one with their recommended wiring
- Where I will measure temp: this is an ArborFab basket where I will be recirculating from outside the baskjet to inside the grain bed. So, I could do at kettle exit, inside kettle (but outside the basket) or right before going into the basket.
- Whether or not to put an emergency stop in that will trip the GFCI feeding this panel.
- If the illuminated witches actual need neutral or not, or if I scrap the combination idea and just put in a regular switch and 120v LED
- similarly if a lighted 3 way selector exists for the auto-off-on piece
Anyway, any and all opinions would be appreciated. Thanks!

universalfrost
Keep your stick on the ice.
Great Article.
I', looking at automating my two Anvil Burners (sent them a question on the pressure for the factory regulators)...
Anyone have any updates to this setup since the thread is OLD...
I', looking at automating my two Anvil Burners (sent them a question on the pressure for the factory regulators)...
Anyone have any updates to this setup since the thread is OLD...
- Joined
- Feb 7, 2019
- Messages
- 5
- Reaction score
- 1
I know this is old but I wanted to help out someone else that may be looking. Fat fingered the part number. 390686-1I can't find the 390868-1 part anywhere on patriots web site. Who makes it?
https://www.supplyhouse.com/Honeywe...SxguFX5MSQkEitcXccI-DRfZCFZi779xoCx3IQAvD_BwE
pretender_2002
Member
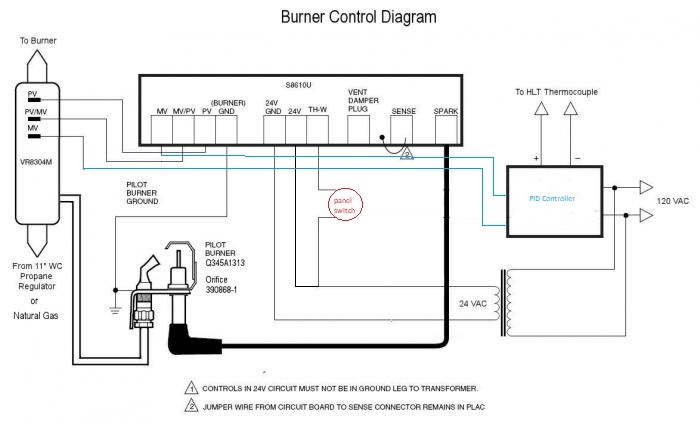
Love this thread as it provided some great information. Anyways I thought I would ask a possibly stupid question here that I am not sure anyone has asked (maybe they have and I missed it). But anyways it seems like all the wiring diagrams have the PID controller setup to switch the spark/ignition on the TH-W line (thus in on/off mode if PID SV > PID PV the spark energizes and the control module takes care of checking pilot light and operating the valve I believe through the MV line).
I was thinking of trying to have refined control of the valve itself (leaving the pilot light on) so it would seem to me that I could simply put the TH-W line with a manual switch to spark the ignition and then leave the pilot light on the whole time. Then I can have the PID controller hooked up to switch the MV (main valve) line itself, thus the PID controller could energize/de-energize the system all while keeping the pilot valve on and not having to restart the ignition with each on/off sequence and this should allow better PID control (instead of simple on/off operation). I have created a simple mocked up revised diagram of what I think it would look like.
Is there any reason why this shouldn't work as desired?

Many of us operate using systems with no igniter, leaving the pilot on and directly controlling the solenoid valve. Works fine. So long as your system is failsafe (no primary flame without a hot pilot) it should be OK.
pretender_2002
Member
Right, based on my wiring it should still be failsafe as I am not bypassing the control module to power the valve, just moving the the pid controller to be a additional switch for the main valve instead of switching the pilot. I tested this and it works the way I want so I definitely prefer this wiring.Many of us operate using systems with no igniter, leaving the pilot on and directly controlling the solenoid valve. Works fine. So long as your system is failsafe (no primary flame without a hot pilot) it should be OK.
Reviving a dead thread.
Looking for some help. I built one of these systems years ago. Since day one I've had issues with the pilots and burners. The pilot would light, the burner would light and then the pilot and burner would both cut out for seemingly no reason. I thought it was a flame sensor issue so I cleaned the ignitors/flame sensors and tested the ground wires to make sure they were good. Still doing it. Now I have two of the three burners with lite pilots but the gas to the burner shuts off for no reason. Thought that seemed like a valve issue so I swapped the valve on one of the burners (I have a spare). Nope, still does it.
Any ideas what this could be? At this point I spend more time tinkering with this POS than I do brewing on it. I like the temp control but really wondering if it's worth all the headache.
I noticed that some people have switched to standing pilots and direct control of the burner/valve instead of using the intermittent pilot. Is this a bit more robust or does it have the same issues?
Am I the only one having trouble with this setup?
Similar threads
- Replies
- 0
- Views
- 540
- Replies
- 0
- Views
- 712
- Replies
- 1
- Views
- 912

