Electric burners - Any builders out there?

Homebrew Talk - Beer, Wine, Mead, & Cider Brewing Discussion Forum

Help Support Homebrew Talk - Beer, Wine, Mead, & Cider Brewing Discussion Forum:

This site may earn a commission from merchant affiliate links, including eBay, Amazon, and others.
Looks like people like that oxyclean - you think PBW would do the trick as well?
 
Ok,

So I plan on adding another switch and installing a 120v fan to the right side of my box so it blows across the fins of my heat sink.

Last on my list is:

1. Add fan to control box - DONE
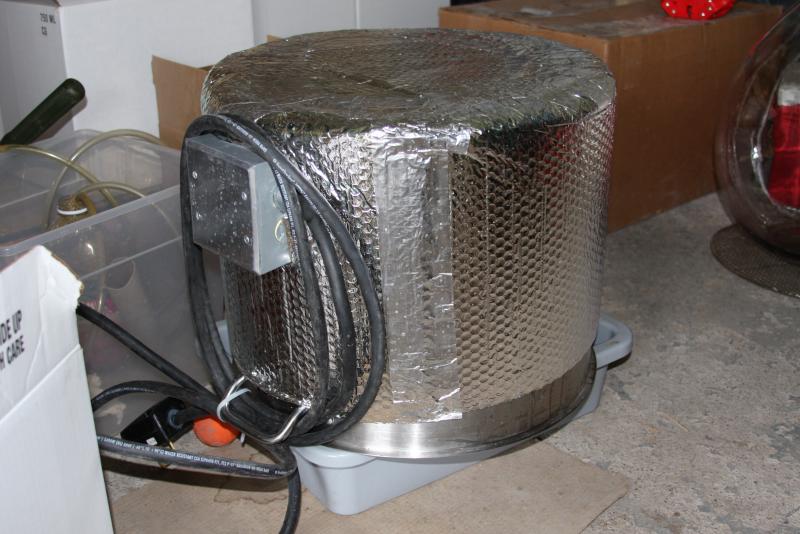
2. Add a insulating wrap on the BK and the MT as well -DONE
3. Silicone the electric box on the kettle and silicone any other areas that need it - DONE

Once I get the final product completed I will take a pic of it. Wish I had a dremel to cut that hole! I will also let you guys know how the insulation works out. Though I doubt I will get to a brew this weekend, more likely next or the following.
 
So due to the bad weather I ended up brewing.

Ok - so I didn't make a permanent insulating wrap, however I used two towels and wrapped them around the pot this time - it was colder out than before. Anyway - It was a much more vigorous boil, and I dialed it back to manual mode 75 and was able to have a good maintainable boil that looked like the one I had last time on auto 100. The 100 this time around was a pretty good rip, and definitely boil over capable. That made me much happier.

A couple more add ons, but for now it looks like the control box is complete and the pot sealed up. Just need to make a convenient velcro on/off insulating wrap when I get the chance.

Thanks for the suggestions guys - they worked!!
 
I'm not sure that you need on/off with the insulation.. I used clear packing tape to adhere the reflectix to my pot, it's holding up great and seems to be doing the job of holding heat in.
 
I'm not sure that you need on/off with the insulation.. I used clear packing tape to adhere the reflectix to my pot, it's holding up great and seems to be doing the job of holding heat in.

Do you take the reflectix off when you clean your pot? Did you go one layer thick? I have a roll of the stuff and plan to use it.

I was just thinking that if I could take the insulation off it would be easier to clean, in the event of a boil over, or just so I don't get the insulation soaking wet.

It has been great to use a hose to spray things down for a quick cleanup.
 
I spray the inside with a hose and the stuff is pretty waterproof so overspray beads up on it and I wipe it down with a towel. No need to remove the reflectix. I'm in CA, so 1 layer thick is already more than I need :)

Also, I'm fairly certain boilovers are a thing of the past (probably just guaranteed my next brew will boil over... ) I've got foam control for the 10G batches, and the 5G batches the heating element duty cycle control is so fool proof that I feel 100% confident not even paying attention during the boil other than to add hops, etc.

Cool - maybe i will just cut it to fit and tape it on then. I am only really at risk for boil overs at hot break with 14G in my 15g pot (for 90 minute boil batches). So I guess, it would be easy to cut some tape and retape, in the event of.

Man I lvoe the electric set up though... freakin' love it (and I am only using it for strike water and boil functions right now).
 
Hey Cidah, great build!
I'm using the same box for my build was wondering if you had any completed pics of the box with the fan installed? Also I couldn't find anything specifically mentioning how you mounted things (DIN rail, heatsink, etc) to the box, could you clear that up?

Thanks,
Sam
 
Hey Cidah, great build!
I'm using the same box for my build was wondering if you had any completed pics of the box with the fan installed? Also I couldn't find anything specifically mentioning how you mounted things (DIN rail, heatsink, etc) to the box, could you clear that up?

Thanks,
Sam

Thanks man - I owe it all to the gents on this thread and forum. Learned a lot, and was a great project.

I used selftapping screws to mount the DIN rail and heat sink. The fan I smartened up and drilled some holes and tapped them for the screws.

If you build a box similar to mine, you can't put much more in it that what i have listed. the fan is actually mounted on the outside of the box just because it didn't make sense for me to put it in the box (space wise).

I would suggest you drill your holes and tap them and use properly sized screws for your mounting. My original plan was to use self taping and then grind the tips off teh bottom. Then I thought... duh what if I need to replace a part. I bought a 12.99 craftsman tapper with 3 dies and that covered me for the rest of the build, installing outlets, etc.

I will get a pic of the completed box up for you. If you have any questions please let me know - I can at least give you perspective of the build with teh auberins box. If you askl a question I can't answer I will tell you I can't, and I am sure the guys here can pick up my slack.
 
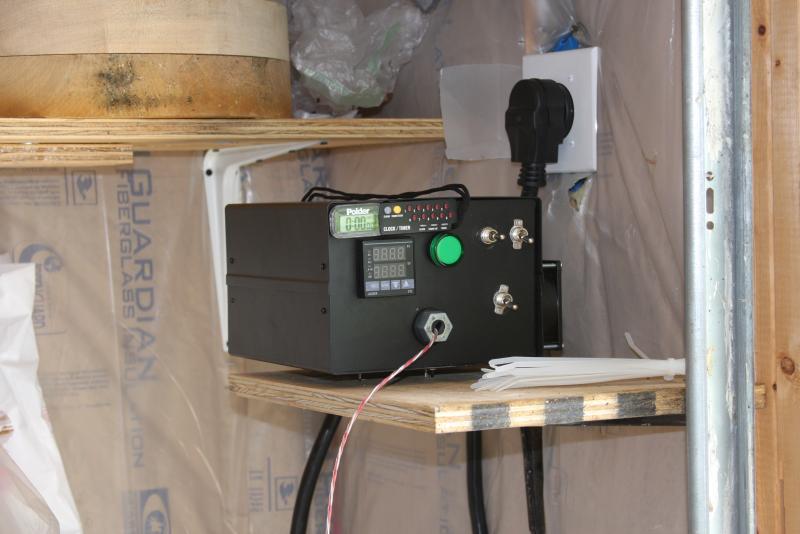
I am not sure if you were looking for "in the box" wiring shots, but it is hard to see with a camera. The din rail went on the left side of the box under the PID - just like in my wiring diagram. Everything else following the diagram.

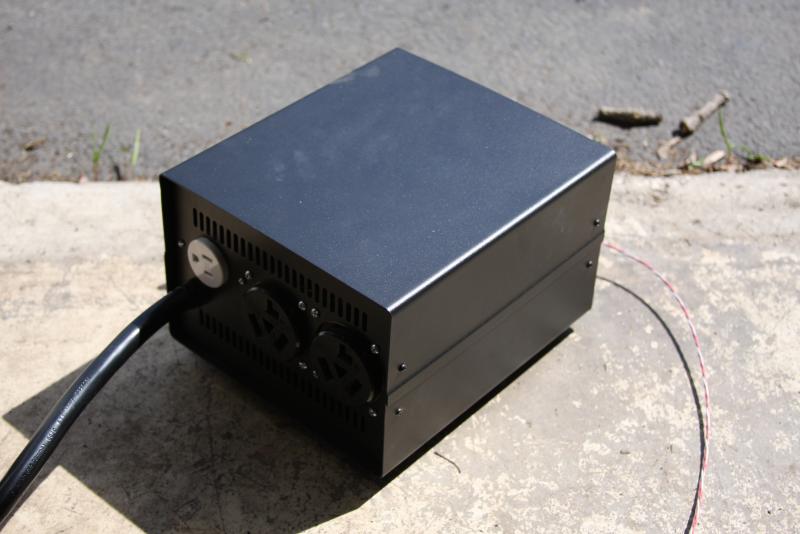
Last pic (upside down from brewing yesterday) - is the brew pot with reflectix that I put on to insulate. Double layer on teh bottom, single layer on the sides.

IMG_4398.jpg


IMG_4399.jpg


IMG_4400.jpg


IMG_4401.jpg


IMG_4402.jpg
 
The fan blows across the heat sink fins and exits the hot air through the back vents. I used a grinder to cut out the space for the fan attachment.

EDIT:

Should have noted the switches - left one is HLT - OFF - BK; right is fan on/off. Bottom switch is pump outlet (though I don't have a pump yet)
 
Some extra stats:

Time from 55F (well water temp) to strike water temp (166F): ~32 minutes
I did an unusually large amount of about 14gallons, just to see how long it would take. Normally my strike water is around 40 quarts, so I will try that volume next time.

I meant to time from mash to first boil, but I forgot. That takes much less time.
 
Thanks Cidah, as soon as I get some more toys this week I'll be starting to post updates in my build thread. One last thing, did you incorporate any type of strain relief or grommet where your supply wires enter your enclosure to prevent any damage?
 
Thanks Cidah, as soon as I get some more toys this week I'll be starting to post updates in my build thread. One last thing, did you incorporate any type of strain relief or grommet where your supply wires enter your enclosure to prevent any damage?

The main power feed in the back was wrapped in electrical tape fanning out as the tape when inward (so you can't pull the power cord out). I filed the opening in the box (with a round bastard) so it wouldn't cut the wire casing; and the extra electrical tape acts as a buffer.

I also used a wire strap on the inside to hold it down when I split the feed lines running through the to the terminals on the DIN rail. I had looked for a grommet everywhere and couldn't find the right size for power cord. If I had been more patient I likely could have found something online, but I am a cost per use guy, and my costs were getting up there, with no use to offset it. I also rationalized that the box would be stationary and fixed once it was up to snuff and working well, so minimal stress is anticipated for the cord.

Other than that I zip tied up my wiring where it made sense to make it neat. I also wanted to be sure no wire casing would ever come in contact with my heat sink or SSR.

My box if pretty neat inside, just filled up to capacity - plenty of airflow is present around the SSR heat sink.

Good luck! Looking forward to seeing the progress.
 
alright - a but of successful brews, and now my GFI is tripping.

So I was hoping to get some trouble shooting help.

I disconnected the element and turned the box on and nothing tripped, so I ahve isolated the issue to the element connection. I took apart and reassembled the connection to the pot, cleaned it all up and it worked for about 15 minutes, then it tripped again. Is it the element - bad ground?

Thanks for any help
 
You're not leaking water into the junction box are you? That'd trip it.
I'm trying to think of something that would work for a few minutes and then trip..
If the connections themselves were bad (ie. you had a hot touching ground), it'd trip right away. Leaking water would take some time before you got water on a hot connection, then trip.
 
oh..forgot one thing.. you've got a GFI breaker right? So it could be that your tripping because of going over current or GFI. So yeah, a bad element could cause that I suppose - although I don't know how likely that is.
 
I do have a multimeter -

had to resort to gas for the brew today totally threw me off...

No leaking water anywhere, though the connection screws to the element were corroded.

I have a spare element, but maybe I need to look at some leaking water. Weird that it runs for a stint, then kicks off.

I do have a GFI breaker
 
That is a strong indicator that you have a water leak into the back side area of the element. I think you have found the source of the problem.

I am going to attempt to fix tomorrow - will try to re-seal. I had a boil over last brew session - but it continued to work for hte entire session. I was thinking I might have cause corrosion when I washed it off after the brew session.

I would think the element is too young to die, so I will assume water and try to repair.

Will you you guys know

wierd that it works for a while then trips the gfi...

I have an extra element that I bought just in case - if it continues to trip tomorrow, then I will swap the element and see if that works.

EDIT:
Had no luck working on this yesterday - will have to give it a go this week!
 
OK so I worked on the element last night and I think it is fixed. I ended up having to use teflon tape on the threading , so there must have been a tiny leak. However I had put silicone behind the element and nothing was leaking into the box - so still not convinced I have it solved, but it wasn't tripping.

I swapped the element out and it still tripped = conclusion was not the element
replaced the o - ring still tripped
used teflon tap - no trip and heated up to a boil.

Any idea on a heat rating for the regular teflon tape? Not sure how that will hold up or if it will melt and ruin a brew. I read a couple places that it as -450F - +550F - so I shoudl be good. Just curious if you guys use it on your rigs.
 
i use teflon tape in a lot of places (pretty much where anything is screwed into anything)... except for my heater element. My element lock nut is welded to the outside of my kettle, and I just use a silicon o-ring between the heater element base and that lock nut.
 
Yeah that is my take on the teflon tape as well - just about everything with threads. I didn't have it on the element before, but I couldn't resolve the issue, so that was my last ditch effort after repeated GFI tripping and no apparent cause. For all I know I will be tripping the element the next time I heat of strike water.

I would love to get it welded to the exterior - possibly a future upgrade. Did you weld yourself? or have a friend in the know? Did you mock the junction box similar to electric brewery's?
 
ok So one more oddity - though I think I know the issue. Brewed Sunday the Westlerven 12 recipe and 70 minutes through the 90 minute boil the element quit. No GFI trip, box was operating fine, it just quit.

I did dry fire it briefly when I was having the GFI tripping issue and I think I might have screwed something up internally when I did that. Weird it went 70 minutes + the previous strike and sparge water heating. can only assume it heated up too much and finished the job I started on it when I dry fired for about 4-5 seconds tops, if that. Now this element says you can dry fire it, so I am still irked that the dry fire could damage it. If it says you can dry fire it.

Walker I think you said you dry fired yours and had issues as well.

I went with this element (see link below) - I have another on hand, but I think I might look for another element if people have had better luck with a different one. That was only 7 batches (counting the partially done Westvleteren 12). I know the dry firing might have been my fault.

Here is my element:
http://www.amazon.com/gp/product/B0...=1789&creative=390957&creativeASIN=B000BPG4LI
 
I did dry fire my element one time. But I never had any problems with it. At least not functionally.

However the black plastic terminal block on the back of the element melted a little bit.

The thing kept working fine but I replaced it because it bothered me.
 
I've got the same element.. I've dry fired it twice and it still works fine. No idea if anything melted since it's sealed inside a junction box.
 
Very odd. Perhaps just bad luck? This is some buggy behavior of late...

I will give it a go with my replacement (same element). But I was very surprised to see the element just stop working in the middle of the brew day.

I guess I will hold off on buying a replacement for a bit since I had a replacement on hand. But I will keep a gas can ready.

I was running the element at manual 65 too.
 
are you sure it's the element and not the SSR?

If your SSR failed in the "off" position, then you wouldn't be getting any heating.
 
How do you have the element mounted and wired? The reason I'm asking is that it is very possible that the problem is in the connections to the element.

An example: A friend had the same thing happen to him. His element was wired with crimp on terminal lugs between the wire ends and the element terminal block. This was all housed in an electrical box mounted to his keg. He got several brew sessions done and then ran into the same problem.

The end happenstance was that the crimp on lugs presented some resistance to the element current and over time this caused the connection to heat up. The more he use it the more it heated until the point of failure. When it failed, the wire/lug connection was burned through.

In his case, the solution was to restrip the end of the wire and reapply new terminal lugs - but - this time he also soldered (electrical solder) the lug/ wire connection. He's still brewing with it that way without issue. This happened several years ago - BTW.

You might want to take a look.

Edit for more thoughts: You might want to test the wiring with an ohm meter. This will help you locate the fault.

Again P-J thanks.

I am using crimped on circle terminals that are rated for 10g wire.

Are you suggesting that I get out some solder and cut, strip, reattached the crimps and solder on? I will do so the next round. Any special way of doing it or jsut soldering like I normally would? I don't mind making shepherd hooks with the bare stranded copper if that would provide a better connection.

I originally used the circle connectors as a safety tool - but I could skip them if there is a better way to do it.

When I test with an ohm meter - you are referring to a continuity check with the failed element?

Edit: The element butt end was hot when I pulled it out, but that was right after disconnecting and emptying the pot to a new kettle. There wasn't any plasticy burning smell, etc. So I assumed the element plastic would get hot like that under normal use. Though.... not sure what the temp was since I don't stick my fingers in there during a boil.
 
First thing is to determine if that is the point of failure. Can you meter it?

I do have a meter (AC/DC/Ohm, etc). Could I meter the terminals as is (without the element installed)? What am I looking for?

I will see if I still have the element - might have been tossed with the spent grain. The GFI wasn't tripping this time. The control box was on and running but the element was not pushing out any heat - like it just failed.

If I have the element I can reassemble and meter it.

If I don't have it I will try going bare copper stranded on the terminal screws on the new element, or solder on new circle terminals.
 
If you have the element, just meter it. You don't need to rewire it. If it is open you will know in a few seconds. If it shows about 12 to 13 ohms, the problem is not the element but something else.
 
If you have the element, just meter it. You don't need to rewire it. If it is open you will know in a few seconds. If it shows about 12 to 13 ohms, the problem is not the element but something else.

Understood

I think I set the element aside in my garage and doing a resistance check will be super easy. Should be able to squeeze that in before I mow the lawn tonight ;) It looks like I am dumpster diving if I tossed it with the grain ha!

In a way I hope it was the element that failed because at least I have some tangible evidence to work from. Will post back.
 
So the bad news is that i couldn't find my element - even did a bit of dumpster diving with no luck.

When I checked the new element I got 10.9 ohms (not that that really tells us a lot about the previous issue).

Would you recommend that when I hook the kettle back up I redo the terminals as bare stranded or crimped and soldered vs. what they are now?
 
I'd say crimp and solder. You could also use the bare copper wrapped around the terminal, but if the wire is stranded, I'd solder it to bond the strands at the end. That way you have a strongly bonded current path.

None of this would matter with a low current draw application. The current draw that we experience in an environment that is hot to begin with changes things a little bit. in any case, I'd do it just for peace of mind.

Piece of mind is always good to have. I will follow your advice and give it a go (I always solder my speaker wire tips so this will be a snap).

Hopefully this go round with the new element will prove a longer run before failure :)
 
Back
Top