DIY 2 stage, single pass beer clarity filter on the cheap

Homebrew Talk - Beer, Wine, Mead, & Cider Brewing Discussion Forum

Help Support Homebrew Talk - Beer, Wine, Mead, & Cider Brewing Discussion Forum:

This site may earn a commission from merchant affiliate links, including eBay, Amazon, and others.

Radix

Member
Joined
Jul 23, 2011
Messages
23
Reaction score
4
Location
Minneapolis
I wanted to share a quick outline of my filtration setup. The total cost including 1 round of filters was $47. I think it’s a better configuration and less expensive than kits sold by the likes of Midwest. I also like this solution over the plate filters which offer less precise filtration.

2x $5.00 A-829D; SP-198 MIP to female pipe bushing 3/4 to 3/8. This is a metal fitting and everything else is plastic. If you can find it I would suggest a plastic fitting as its always better to mate like materials if possible and likely less expensive. Part can be purchased from most big box home improvement stores.

2x $3.16 PL-3026 Watts Quick Connect 3/8 in. x 3/8 in. Plastic Slip x MPT Adapter or $2.96 A-193 Watts 1/4 in. x 3/8 in. Brass Hose Barb x MIP Adapter. I recommend the Watts quick connects over barbs, it simplifies disassembly for cleaning and they have no problem with the very low levels of pressure used in the filtration process. Part can be purchased from most big box home improvement stores.

2x $1.32 Filter (1x 5 Micron for coarse filtering, 1x 1 Micron for finishing). These 1 time use filters can be purchased from many sources but the best value is to buy them in packs of 50 from this seller. If you email them they will split a 50 pack 25 5 micron and 25 1 micron for you. You can skip the finishing filter to save a little money and the results are still great. If you want a finer finishing filter you can also use a .5 micron filter.

2x $5.50 Ball/pin lock liquid post adapter just pickup at your local homebrew supply
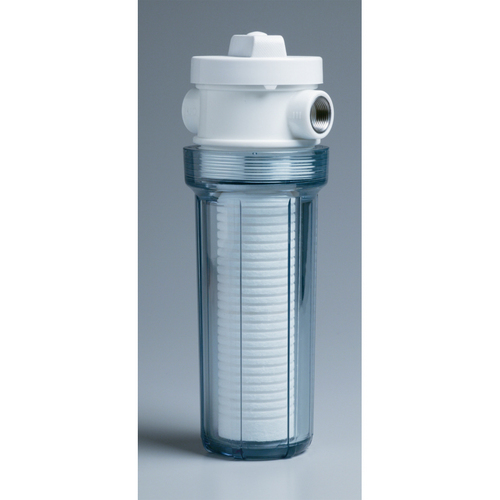
1x $17 10” clear reinforced filter housing. It’s important to get a clear housing to see the level of beer in it (housing should be run full) and that the housing has a pressure release valve on top to bleed the co2 out so the beer fully fills the housing. Most kits from homebrew stores do not sell as nice a housing or one with an integrated release valve. I purchased this two pack from the same supplier as the filters and have been very impressed with the quality, far nicer then the Midwest kit. They also sell the housings in the singles. I like the two pack as it enables me to do both stages of filtering in the same pass. You might consider adding a filter housing wrench to your order for $2.50 to get a better seal.

Assembly seems self-explanatory but I can provide instructions. If there is interest I can also provide instructions on how to do the actual filtering.

Here is a photo of an assembled housing
4684-completed-filter-housing.jpg


Here is a photo of running both the 5 micron and 1 micron filters in a single pass at only about 4 PSI
4683-doing-both-5-micron-1-micron-filtration-single-pass.jpg


Its been a great improvement to my setup. I now just skip secondary fermentation and my beer has a much higher clarity then before. At $2.64 a batch for filters is a clear win and honestly the 1 micron its optional. The 5 micron filter from the first stage comes out looking like it was clearly used where the 1 micron filters come out looking nearly new. I think I will try .5 micron filters in the future.

Anyone else filtering? If so what is your setup? Suggestions?
 
I occasionally use a plate with a medium (7 micron) filter. I have been happy with the results except for the time it takes. I am curious what a .5 micron would do to the beer. What style are you thinking of using that on? This set up does look better than my plate. Do you purge the filters with starsan or something before using?

Thanks for the filter link though, I need one for a Randal and a new one for the brew cart!
 
Cool setup Radix
I already have a filter housing and carbon filters that I use to filter water on a brew days. I have never considered using a disposable filter for clarifying beer but it makes sense in this application at that price. I was wondering your experience with the different micron sizes? I have heard that 5 microns might not filter enough and 1 micron strips to much?
 
Very cool... Just like what I have on the house for my salt. Question: Is that between the keg and the TAP, or for FILLING the kegs?
 
Any reason to not just use a short pipe nipple between the two filters and eliminate two quick connectors and the short piece of tubing?

@Firebat138 This is for filtering going into the keg.
 
How much do you think this will oxidize the beer?

You purge the system with sanitizer before putting in the filters which come sanitized and individually sealed. Then your purge with CO2 so your working in a very low oxygen environment. You do get some foaming but if anything I think the filtering processes helps with force carbonating.
 
Any reason to not just use a short pipe nipple between the two filters and eliminate two quick connectors and the short piece of tubing?

@Firebat138 This is for filtering going into the keg.

The only downside I can think of is it might be a bit harder to screw together each filter housing both because you could not fully rotate the wrench/your hand around the enclosure with the other enclosure fixed right next to it and because the enclosures are rather heavy so you would not want to end up in a situation where your supporting the other enclosure by just the adapter bridging the two.

You could offset these disadvantages by mounting the housings to a board or something similar with these brackets specially made for these housings. That website is from the same seller as the ebay auctions I pointed out in the original post.
 
I have seen a number of questions about the process of filtering

I uploaded a copy the instructions that come with the Midwest kit here. This kit is a a single pass setup but basically the process is the same.

Another good source of instructions on this type of filtering is here. This is a little more details and basically what I do.

If people would like I can generate my own set of instructions but I think the the above links covers the vast majority of what you need to know
 
What does this do to yeasties? Can you still get a bottle carbed up after that? I am guessing you force pressurize in a keg?

Cool setup Radix
I already have a filter housing and carbon filters that I use to filter water on a brew days. I have never considered using a disposable filter for clarifying beer but it makes sense in this application at that price. I was wondering your experience with the different micron sizes? I have heard that 5 microns might not filter enough and 1 micron strips to much?

Lots of people seem interested in what impact each filter size has on the beer.

5 Micron will pull out a good deal of the yeast and all visually individually discernible particulate, but not the haze.
1 Micron will finish removing the yeast and most haze causing particles
.5 Micron will remove particles that cause haze when the beer is chilled

source

My understanding is that any filtration below .5 microns will remove flavor elements. That said yeast is a flavor element, one that I do not like despite the recent trend for unfiltered beer in microbrewery offerings. And yes I understand yest good for you but so is pulp in orange juice and I am not a fan of that also.

Also yes BeerCanuck this is much much faster then a plate filter. The much grater surface area for the filter means that you can filter an entire 5 gallon batch in around 5 minutes at 4-6 psi.

moinkyschmoink you must have a CO2 setup an at lest 1 free keg to do this. I would strongly suggest 2 free kegs. You will need to force carbonate after filtering.
 
Spartan1979 said:
Great system. It makes me think about filtering my beers, but they usually drop clear enough that I'm not really sure why I'm thinking about it. I guess I'm just a gadget guy.

+1
I'm subscribed to this thread but I'm pretty sure I have no plans to do this. Haha
 
Great looking system, I love the idea of filtering prior to kegging to help clear things up and have less sediment in the keg (much easier to transport for a party etc). One question though how much liquid are you losing in the filter housings?
 
Great looking system, I love the idea of filtering prior to kegging to help clear things up and have less sediment in the keg (much easier to transport for a party etc). One question though how much liquid are you losing in the filter housings?

Because the filter housings have purge valves your able to get basically all the beer out expect a small amount that stays in the filters. I would say the loss is maybe worst case 6 oz.
 
You said the the 5-micron filter "comes out looking like it was clearly used", do you think it would last for a 10-gallon batch size?
 
You said the the 5-micron filter "comes out looking like it was clearly used", do you think it would last for a 10-gallon batch size?

I think you could maybe do 50 gallons or more on an single filter and the filter would not clog. When I say it looks clearly used I mean in comparison to the 1 micron filter which looks brand new when used inline after a 5 micron. You will have no problem with a 10 gallon batch.
 
How long does it take to do 5 gallons?

At 5 PSI maybe 5-10 minutes worst case. You can run the pressure notably higher without damaging the filter but doing so results in more foaming of the beer. At some amount of pressure the filter could in theory collapse in on its self but I feel that would me a great deal more pressure then is practical to apply. The foaming is very minimal at 5 psi and in honestly since its a CO2 environment the foaming and distributed prolonged contact with CO2 if anything just helps the beer absorb the CO2 into the beer and thus quickens your force carbonation.
 
Subscribed. I have been toying with this idea myself. It is a great idea for filtering beer that you want to transport over a long distance and don't have time to wait for the keg to settle out before serving.

This should work great when I drag a couple of kegs from NC to a family reunion in WI next summer.

Looks like I have a project this weekend.

Thanks for posting.
 
What would be the downfalls of doing this from keg to bucket, other than the increased chance of oxidation. I never have to kegs empty. I consider that bad, lol.
 
What would be the downfalls of doing this from keg to bucket, other than the increased chance of oxidation. I never have to kegs empty. I consider that bad, lol.

The only downside is oxidation as you said. You can purge the receiving keg with CO2 where you simply cant with a bucket or carboy. That said I would not be to worried about it. You are likely going to want to clean out the source keg before you move the beer back into it as the source keg will have some residual beer/particulate in it which has not been filtered.
 
What would happen if I just used a single filter with the 1 micron filter? Would it clog too quickly? The links you posted indicate that this is how they do it. I would be more likely to do this if if I only needed 1 filter housing and 1 filter for each transfer. And because they are disposable, even if the 1 micron gets really gummed up you just toss it.

I also found a cheap housing that has 1/4 NPT ports (they also make it in 3/8 or 1/2 or 3/4 so you can eliminate bushings) and a pressure release button that goes for $15.85 with free super save shipping on Amazon.com.

With one of these and a couple of 1/4 MPT>barb fitting and you could be good to go for under 20 bucks.

http://www.amazon.com/dp/B003VT79VA/?tag=skimlinks_replacement-20
 
Last edited by a moderator:
They also have these 100 micron filter bags that fit the 10" housings. I'm thinking you could fill the bag with hops and use it as a Randal. the bag come in micron ranges from 50-800. I'm not sure what would work best. I will put a link to the 100 micron bag is anyone is interested.

About 10 bucks.

http://www.amazon.com/dp/B0045LVEUK/?tag=skimlinks_replacement-20
 
Last edited by a moderator:
What would happen if I just used a single filter with the 1 micron filter? Would it clog too quickly? The links you posted indicate that this is how they do it. I would be more likely to do this if if I only needed 1 filter housing and 1 filter for each transfer. And because they are disposable, even if the 1 micron gets really gummed up you just toss it.

I also found a cheap housing that has 1/4 NPT ports (they also make it in 3/8 or 1/2 or 3/4 so you can eliminate bushings) and a pressure release button that goes for $15.85 with free super save shipping on Amazon.com.

With one of these and a couple of 1/4 MPT>barb fitting and you could be good to go for under 20 bucks.

http://www.amazon.com/dp/B003VT79VA/?tag=skimlinks_replacement-20

Your find of a filter housing seems very good. The body looks very similar to the one I used but the cap looks a little less beefy however I cant imagine how that would matter. When I was looking I could not find any 1/4 NPT ported housing with a release valve and that where clear, so very nice find.

All the literature I have seen suggest filter at 5 micron and then optionally at 1 micron which is called a finishing filter. I am unware of any links I posted advocating for only using 1 micron filters. Both instructions manuals I posted follow the 5 then 1 micron system. Depending on style and most importantly the amount of sediment you suck of the bottom of your carboy you might be able to get away with just a 1 micron filter, particularly if you use a hop bag and do 5 gallon batches. The concern with going directly to a 1 micron filter is that the filter clogs to easily then you increase the pressure and the filter collapses. When the filter clogs pressure obviously builds up on the filters surface. Success with just a 1 micron filter will of course depend a great deal on the quality of the filter you use. The filter source I recommend are notably thicker then other filters I have seen and thus less likely to collapse.

If you just want to do a 1 stage system I suggest using a 5 micron filter. The 5 micron does the vast majority of the work. Here is a quick summery of the micron size differences

"The 5.0 micron filter gets rid of any sediment in your beer. The 1.0 micron filter gives you a brilliantly clear beer. And the 0.5 micron filter enables you to eliminate almost all chill haze from your brilliantly clear beer."
 
Last edited by a moderator:
Radix said:
The only downside is oxidation as you said. You can purge the receiving keg with CO2 where you simply cant with a bucket or carboy. That said I would not be to worried about it. You are likely going to want to clean out the source keg before you move the beer back into it as the source keg will have some residual beer/particulate in it which has not been filtered.

Cool, I don't think my beer has lasted longer than a month anyways.
 
They also have these 100 micron filter bags that fit the 10" housings. I'm thinking you could fill the bag with hops and use it as a Randal. the bag come in micron ranges from 50-800. I'm not sure what would work best. I will put a link to the 100 micron bag is anyone is interested.

About 10 bucks.

http://www.amazon.com/dp/B0045LVEUK/?tag=skimlinks_replacement-20

I like the idea of a filtering bag for the hop Randall. I have also been thinking about a similar solution. I would use a 50 micron as that is fairly porous and I think would not clog. These filtering bags fit all standard housings 10" housings.

There are less expensive bags in the aquarium world called filter socks. The bags can be stacked inside each other so you could have a 100 micron and then a 50 inside. I think I will start another thread with whatever I work out for a Randall.
 
Last edited by a moderator:
I just wanted to say thanks for posting all this info. I'm a new brewer (have 5 - 5 gallon batches under my belt (extract and partial grains). I did a lot of reading on filtering vs secondaries and cold breaks and decided that the money was worth the convenience for me.

I was able to find a 1/4" to 1/4" quick connector so I didn't need the bushing adapters at the filters. I'm going to see if I can get the 1/4" tubing to fit the post adapter, but if not then I'll put the adapter at the post adapter. That would mean I only need to buy 2 bushings instead of 4 if I put them on either connector in the filter. At least by my thinking?

Thanks to all of you who posted links and provided insights. I have my filter system mostly complete. I decided to try the 5 micron and 0.5 micron. I'll see how it goes with the .5 instead of the 1 micron 'finishing' filter. I just need to get the ball post adapters and the filter cartridges (both ordered) and I'll be set.

Quick edit: My costs for everything was $62.34 including 1 round of filters (I bought the 50-pack in the link so my initial investment was quite a bit more ($66 for 50 filters, shipped from the ebay seller linked).

Thanks again!

filters.jpg


watts.jpg
 
I just wanted to say thanks for posting all this info. I'm a new brewer (have 5 - 5 gallon batches under my belt (extract and partial grains). I did a lot of reading on filtering vs secondaries and cold breaks and decided that the money was worth the convenience for me.

I was able to find a 1/4" to 1/4" quick connector so I didn't need the bushing adapters at the filters. I'm going to see if I can get the 1/4" tubing to fit the post adapter, but if not then I'll put the adapter at the post adapter. That would mean I only need to buy 2 bushings instead of 4 if I put them on either connector in the filter. At least by my thinking?

Thanks to all of you who posted links and provided insights. I have my filter system mostly complete. I decided to try the 5 micron and 0.5 micron. I'll see how it goes with the .5 instead of the 1 micron 'finishing' filter. I just need to get the ball post adapters and the filter cartridges (both ordered) and I'll be set.

Quick edit: My costs for everything was $62.34 including 1 round of filters (I bought the 50-pack in the link so my initial investment was quite a bit more ($66 for 50 filters, shipped from the ebay seller linked).

Thanks again!

Very nice setup. Thanks for sharing! Its great to know people are materializing there own setups.
 
Just finished my first kegging with this system. Afterwards, the beer has a slightly oxidized flavor (sherry like), BUT, I didn't try it before, so this could have been pre-filtering. It was made in a conical, and when dumping trub (3 times) it naturally sucked in some air. It has been sitting at room air now (currently about 75 degrees) for about 2 months, so it could be oxidized before hand. That being said, I am not sure on the methods exactly people are using. Here is what I did:

I filled a keg with star san, then hooked it up to gas and ran it from one keg through the filter housings (with no filters in them yet). Once all the star san had gone through, I emptied out the housings and placed the proper filters in each one. My understanding is these are already sanitized and don't need starsan to run through them, and I didn't want to get too much star san in my finished product. At this point, I hook it up to a keg full of cloudy beer and run it through at 4 psi. I pressed the pressure relief valve on each of the housings until beer came through them. One problem I had is that two of the little plastic Watts connectors leaked, so I had to push in two hoses constantly about as hard as I could so it wouldn't leak. Is there some trick to using those? Don't you just push the tube in, or is there something I'm not aware of?

Anyway, I am not sure how the beer could get oxidized in the filter even if not flushed with CO2. THere wasn't really any bubbling that I could see (or at least very little), and the oxygen should get expelled completely while the housings fill, or am I wrong?
 
Why are the filters only for single use ?
One filter store suggests back flushing water through the filter to clean it out.
 

Latest posts

Back
Top