VegasJ's coffin Keezer build, yes another one on HBT!

Homebrew Talk - Beer, Wine, Mead, & Cider Brewing Discussion Forum

Help Support Homebrew Talk - Beer, Wine, Mead, & Cider Brewing Discussion Forum:

This site may earn a commission from merchant affiliate links, including eBay, Amazon, and others.

VegasJ

Supporting Member
HBT Supporter
Joined
Oct 12, 2012
Messages
318
Reaction score
66
Location
Pittsburgh
Saw one of these months ago on Youtube when I got into brewing, then saw the thread here for Keezer builds in this DYI section while Googling for keezers. I've been wanting to do one ever since!

So, here we go:

Freezer (7cuft) off CL for $100

freezer2-57438.jpg


Of course, I had to test it with my kegs & Co2 setup...

https://www.homebrewtalk.com/photo/freezer-test-57439.html


misc white pine, dark walnut stain, brown panel nails, Elmers wood glue

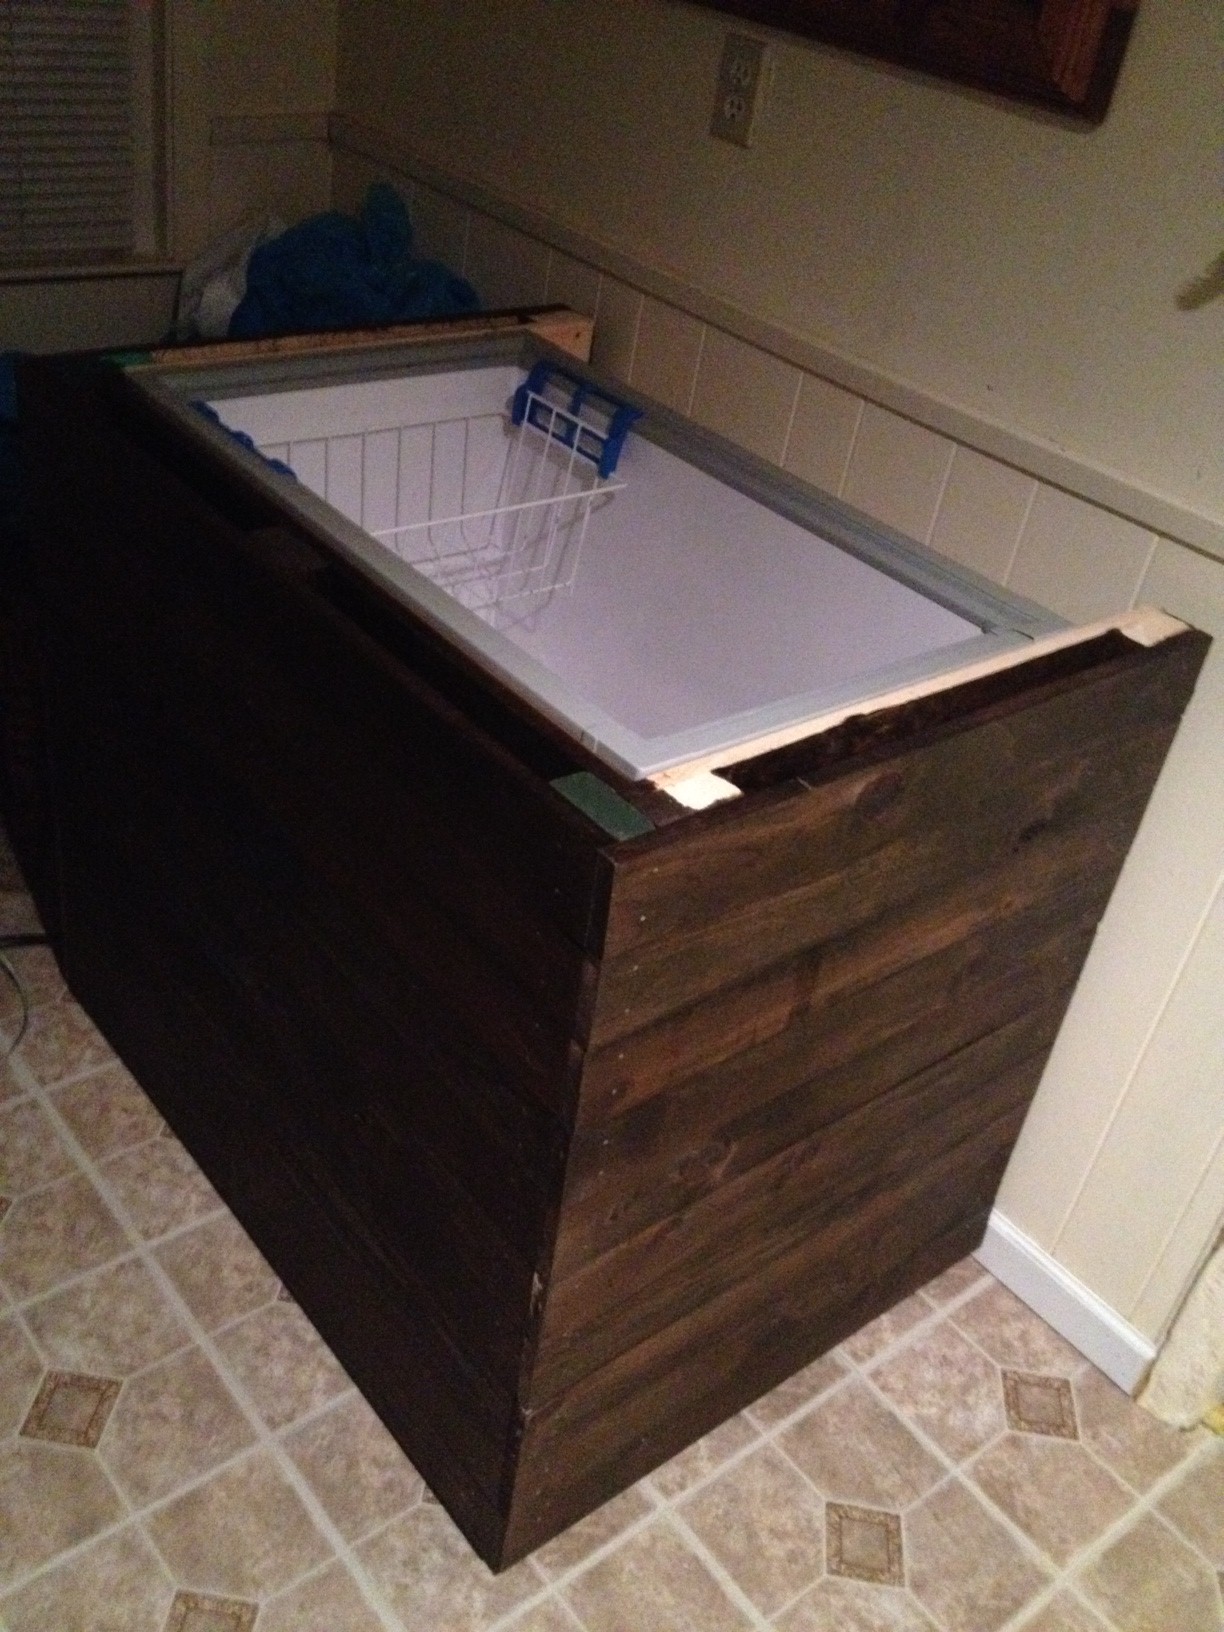
got it all framed up & stained...

photo-2-57440.jpg


photo-1-57441.jpg


photo-3-57442.jpg


going to trim out the top there so the 2x4 ends aren't seen... fits like a glove!

photo-4-57443.jpg


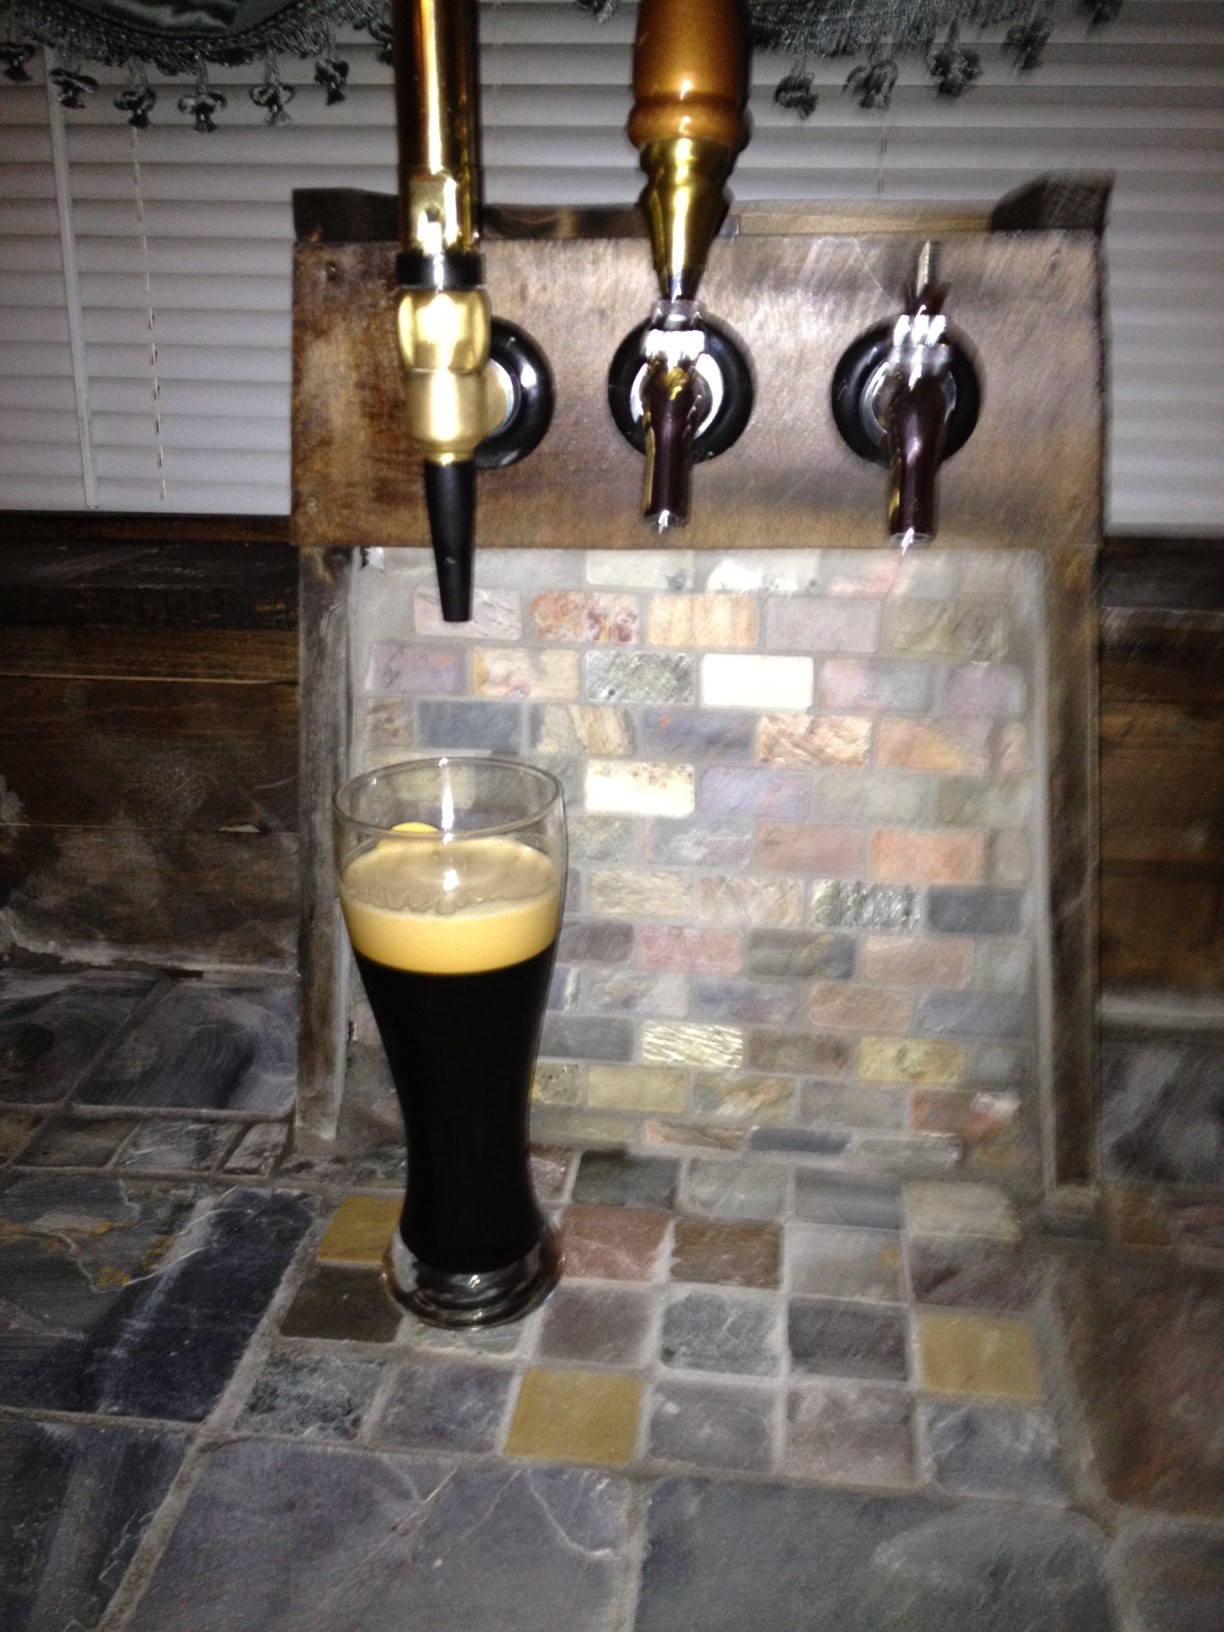
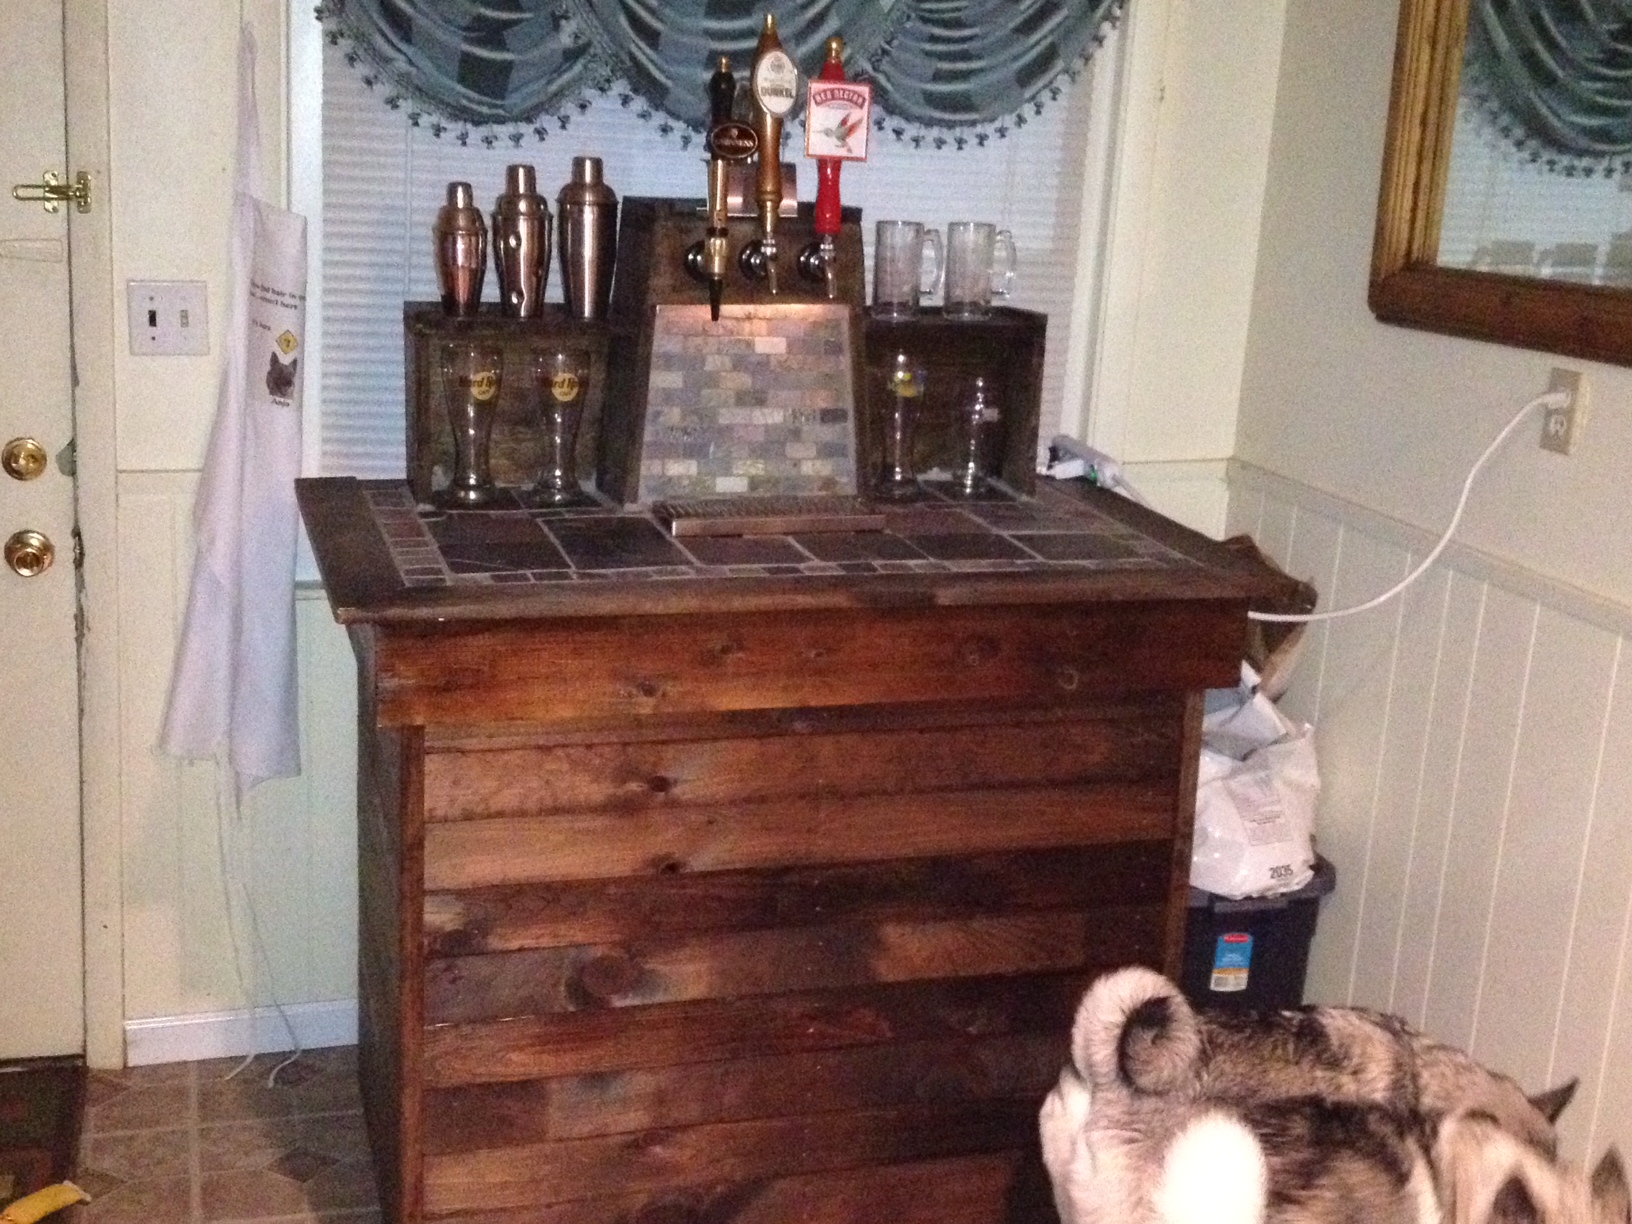
Working on the lid & coffin top over the next few days. I removed the freezer lid & made one out of 2x4's on edge with 1" thick foam rubber weather stripping surround to seal the lid, 1/2" plywood atop that 2x4 frame & will reattach it to the freezer using the hinges. I'll be adding 1/4" cement board to tile the top with something, as well as a small backsplash area like everyone else pretty much. Maybe will add some rope lighting under the lid edge & under the coffin behind the faucet area.


I Just ordered:
2-Perlic 525ss faucets, 3 - 4" ss shanks, 3 - 90* elbows as well as another Co2 regulator for the 25/75 beer gas bottle (the air place near me does beer gas mix in Co2 tanks so Co2 regulators are used) all from Ritebrew.

Just scored this on e-bay for $50

stout-faucet-57444.jpg


I got that blue 20# Co2 tank on CL for $20, kegs, tubing, regulator all from Keggle Brewing in the Vendor list. Just need a 5# beer gas mix bottle tile & misc trim once the lid goes on and it is pour away!

I was originally going to do a 2x10 collar, 4 kegs (3 regular & 1 stout w/beer gas mix) with the 20# Co2 & a 5# beer gas mix on the step inside, and taps out of the front but the room this is going in it would be a tight fit & I can see people bumping into the faucets. I changed it to 3 kegs & the 20# tank on the floor & will put the 5# beer gas in a hole I'll make in the basket so it sits on the step.

more pics to come once the lid is on!
 
Thanks man!

Spent another $150 at the box store today on tile, more pine, & grout n tiling stuff.

I'm not sure yet how I want the coffin top to look... any ideas out there besides scanning through the coffin top thread? I have already done that about... oh, 20 times. LoL
 
What kind of tile did you purchase? With the vintage look you are going for, you have to go with stone on the top......it would be money VegasJ, money! :D

I think that the darker stained wood needs some contrast, so a lighter tumbled travertine stone top with a kick a$$ coffin would look great. You can check out my keezer in my signature line to see the tile that I used if interested. My keezer is very rustic, but the stone top adds a little elegance to the piece as well. As far as the coffin goes, I incorporated flanking shelves on mine to display pint glasses, but there are some other really cool ideas on Jeebas' coffin keezer thread. Can't wait to see the rest of your build come together, because so far, it looks awesome! :mug:

Hoppo
 
multi-color stone tile

:)

going with this on the lid

6x6:

0-0-0.jpg


Got this 12x12 squares of 2x2:

0-0-0.jpg


to go inside the 1st 6x6 tiles around the edge, trimming it to be 2 rows of 2x2 or 1 row of 2x2... not sure yet.

Or trim it to be 2 rows of the 2x2 around the edge then the 6x6 in from there...


and this will go on the coffin top face behind the faucets:

0-0-0.jpg
 
I thought about that... but I think I'll just seal the crap out of the backsplash & go with it.

Coffin done & stain is drying... This is before the stain, it looks crooked as all hell, but I swear it isn't. The faucet side pieces are at 5*... maybe the angle of the pic? LoL


I never thought laying out the coffin & tiles would be such a pain in the ass. really.

photo-6-57489.jpg
 
Oh, that should look great. Is it just me or my monitor or do you have Dr Seuss assisting you with that build? I do not like green beer and ham. I do not like them Sam I Am.
 
Oh, that should look great. Is it just me or my monitor or do you have Dr Seuss assisting you with that build? I do not like green beer and ham. I do not like them Sam I Am.

the left side is sitting on the tile, and the whole thing is on an angle. I'm using my burner as a workbench cause I ran out of room for stuff

Damn, looks like an 80lb lid

yea... hope not too bad. I might need to find a mini garage spring or something to assist the freezer hinges.

Or some gas shocks on the inside! :)
 
all fitted & stained... which is bugging me waiting for it to dry.

Good news is, faucets & tap parts should be here tomorrow, I'm guessing the stain will be dry tomorrow night.Then, tile & pour!


photo-7-57491.jpg
 
ok, slowly but surely... that damn "w" word (work) keeps getting in my way.

All ready for tile now, lid is mounted, lights ran, faucets installed

I would have done a lot different if I had to do it over... like have more tools.

All of this was done with a Ryobi 18v cordless drill & a Ryobi 18v cordless 5 1/2" circular saw. Oh, and a hammer. :) no clamps, table saw, jig saw, noth'n.


photo-12-57518.jpg


photo-13-57519.jpg


photo-14-57520.jpg
 
Tile is on but not grouted yet. I'll be doing that in the morning!

Got lucky at West Penn Laco today. I swear last time I was in there the manager told me they had 5# beergas (75/25 mix) & 20#. I drove 40 minutes to find out they have 20# & 80 or larger for bars...

I was pissed, started thinking in my head how I can just go with a 20# now, exchange that for a custom 5# when the 20 is gone... yadda, yadda...

The manager says, " hold a sec, let me go look in the back" and he comes back with a 10# beergas mix someone custom ordered 4 months ago but never came back to get. So he rang me up for a 5# mix & gave me the 10# tank!

Only catch, when I return the 10# tank he'll have a 5#er for me next time... sweet! Glad I took him a 6 pack of brew to butter him up a little. :)

Anyways... Keezer's 95% done, just have grouting to do as I said in the morning.

Here's a little video I took of the Milk Stout 1st pour after I got the 10# tank home and in! YUM!

 
Last edited by a moderator:
Hey Vegas,
Quick question: How did you cut holes in the freezer top? I thought a jigsaw would be the easiest way, but I may be overlooking something much easier and obvious.
 
I'm not using the freezer lid. I made one out of 1/2" plywood & made a 2x4 on edge frame the same size of the lid.

I put 1" thick foam/rubber weather stripping around the 2x4 edge on the box frame that seals the new "lid" when closed & lined inside the 2x4 frame with 1/2" insulating foam, then I mounted the plywood covered 2x4 frame to the chest freezer bottom using the hinges that were on the lid.

Did this for a few reasons...

1) if I even need to return the chest freezer to a chest freezer the original lid is still in stock form &
2) if the chest freezer dies, all I need to do is unscrew the hinges on the wooden 'lid' and place it over a new chest freezer without having to modify a new freezer lid.
 
Ah okay. I took the day off and planned to build my lid and surround today/tomorrow. That freezer has been sitting in my garage still in it's box for a month now.
 
thanks spkguitar!

Got it grouted & all done this evening... finally!

Still going to put a shiny sealant over the stone tile & grout & it needs 1 tap handle but that can wait.

so, what do you all think?

photo-15-57565.jpg


photo-17-57566.jpg


photo-16-57567.jpg


photo-18-57568.jpg
 
Vegas, it looks great! I think I may have bought the same tile...or very similar. Did you get that at HD?
 
Looks great! I love the dark colors for wood more so than the lighter. Also, excellent beer porn video!
 
Man alive! This defnitely needs to be added to the Coffin Keezer list(if it isn't already). I've been slowly gathering materials to build my own and this IS going to be my source of inspiration. Thanks VegasJ!

Also, with the stone tile in place, about how much do you really think that lid weighs? Did you have to add any extra support for it?
 
Like I said...I'm missing the obvious! That would be a pretty big holesaw, but that would definitely be the easiest :mug::mug:

I picked up a 3inch ran 12tap line through a PVC pipe into coffin cut 2 other holes for push/pull fans dremel cut a slot through the sidewall of the lid and ran14 gas lines inside (I have 14, 5 gallon and 2, 3gallon kegs cold and conditioning)
 
Man alive! This defnitely needs to be added to the Coffin Keezer list(if it isn't already). I've been slowly gathering materials to build my own and this IS going to be my source of inspiration. Thanks VegasJ!

Also, with the stone tile in place, about how much do you really think that lid weighs? Did you have to add any extra support for it?

thx man


I'd say the lid weighs about 100lbs or so.

No extra support really, it was 1/2" plywood with the 1/4" tile backer board then the tile. I used a tile adhesive instead of mixing mortar. When I get inside I just leave the lid rest on my shoulder while I grab or work on what I need in there. Easy for me at 6'-1" & 290lbs. :)

I don't plan on lifting the lid except to swap kegs. I might even run my air lines out to the back through 1/2" holes in the 2x4 lid frame... that way my tanks are outside, so I really won't be lifting the lid for anything except to swap kegs.
 
Hey! Great job! Definitely going to use this as my base for my keezer.

Can you take a picture with the lid open? My only confusion (well as far as a keezer build) is that I don't know how the top closes/seals.

thanks!
 
Unless the OP did something significantly different from most coffin keezers, the seal is made by the original freezer lid, that just has the wood lid with tile or whaetever else on it bolted to it.
 
Does the fabricated lid/top bear against something besides the foam insulation? Seems like after a short time, the weight of the lid would compress the insulation and cause the lid to start drooping toward the front while being held at the original height in back by the hinges. Maybe the wood bears on some wood from the cosmetic skirting frame?
Just didn't see a great picture of how the lid interacts with the chest to seal and bear that weight.
 
Nothing. I'm sure the weight is compressing the rubber stripping.

It has sat closed for a week now, I'll be lifting the lid to hook up 2 kegs that I've brewed up & will check the rubber surround to see how bad it ahs compressed or if it still has sponginess left.

It was more a rubberized foam than just foam though.

When I put the kegs in perogi I'll get a pic.

Jeebas - The freezer lid is in my basement. I fabbed a new lid out of 2x4s on edge then covered that with an over-sized piece of 1/2" plywood & attached it to the freezer bottom using the original hinges
 
Hey! Great job! Definitely going to use this as my base for my keezer.

Can you take a picture with the lid open? My only confusion (well as far as a keezer build) is that I don't know how the top closes/seals.

thanks!

Hey Perogi! Good to see you have made it out to other places!


OP
I really like the way this keezer turned out. When (future planning) I build mine I will more than likely follow your lead on not using the original lid. Better to keep the thing in as 'stock' condition as possible.
What about using some type of gas strut to assist in opening the lid? Like the kind that lift back hatches of mini vans or SUV's. I once saw a Keezer build here on HBT where a guy had done just that. He ended up having to chain the keezer down in back because they would heave the keezer up in back.
 
I thought about that, a gas shock or something like on the back of a SUVs hatch... I'm fine with holding it open for now.

I really don't wish to be in and out of it except to connect a new keg!

Here's a lid pic & the back. I moved the Co2 & 25/75 mix tank to the back, put 2 holes for the air lines & siliconed them up. The back and underside of the lid aren't pretty... but it works.

photo-19-57623.jpg


photo-20-57624.jpg


and to answer the earlier question about something to keep the foam surround from compressing... I'll be leaving it alone right now. It is compressed but still leaving about 1/4-1/2" before sitting down all the way. Just making a tighter seal imo.


Final - w/drip tray!

photo-21-57679.jpg


photo-22-57680.jpg
 

Latest posts

Back
Top