Monster Mill mm-3 drive shaft wear

Homebrew Talk - Beer, Wine, Mead, & Cider Brewing Discussion Forum

Help Support Homebrew Talk - Beer, Wine, Mead, & Cider Brewing Discussion Forum:

This site may earn a commission from merchant affiliate links, including eBay, Amazon, and others.

kds1398

Well-Known Member
Joined
Sep 2, 2010
Messages
134
Reaction score
4
Location
Wilmington
I emailed Fred about this & am waiting for a reply. I was wondering if anyone experienced a similar issue.

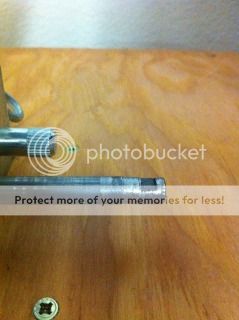
After both times I ran the mill using a 1/2" drill to drive it there were bits of metal shavings on the drive shaft. It appears the drill is slipping enough that it is causing an issue and wearing the shaft down enough that the area normally inside the chuck is ~1/2mm smaller in diameter. The three flats are barely there on the shaft. I am cranking the chuck on the drill as tight as i can and it is still slipping.
 
I have the MM3-2 and I had some slippage at first but that was due to the fact I was not centered on the flat. I think you could take a dremel and grind down the flat so they are a bit more prominent.
 
I'm gonna guess that you are using a drill with a keyless chuck. The best way to tighten this type of chuck is to set the clutch just below the highest setting then pull the trigger while holding the nose of the chuck. You want to use the highest setting that will still allow the clutch to chatter. The effect is somewhat like an impact wrench and it will tighten the chuck much more firmly than what you can do by hand only. The problem you are experiencing is due to the chuck slipping on the drive shaft. If you happen to be using a keyed chuck, you can use a nail set or chisel and a hammer to tap the toothed outer ring on the chuck (in the right direction, of course) to tighten it more firmly.
 
I'm gonna guess that you are using a drill with a keyless chuck. The best way to tighten this type of chuck is to set the clutch just below the highest setting then pull the trigger while holding the nose of the chuck. You want to use the highest setting that will still allow the clutch to chatter. The effect is somewhat like an impact wrench and it will tighten the chuck much more firmly than what you can do by hand only. The problem you are experiencing is due to the chuck slipping on the drive shaft. If you happen to be using a keyed chuck, you can use a nail set or chisel and a hammer to tap the toothed outer ring on the chuck (in the right direction, of course) to tighten it more firmly.
Keyed chuck. This drill: http://www.harborfreight.com/power-...inch-heavy-duty-spade-handle-drill-93632.html
 
Good choice on that drill. I just helped my buddy rig up his mill with the same drill. You may already know this, but it works best to use all three holes in the chuck when tightening. Grab the chuck key with some vice grips to apply more torque if necessary. I like to use the tapping method with a nail set to really get is snugged down firmly.
I didn't know to use all three holes when tightening. Do you think I should just leave the drill attached to the mill after trying to get it tightened up more? What is the tapping method?
 
I have that same drill, I will post a picture later. I have mine mounted on a cabinet and bolted in place with U-Bolts.

I have the drill resting on 2x4 blocks, it took some time to get everything level but its working and I've crushed about 3000# of grain with it already
 
I didn't know to use all three holes when tightening. Do you think I should just leave the drill attached to the mill after trying to get it tightened up more? What is the tapping method?

Yes, use all three holes and go around more than once for max grip. The tapping method is simply using a small hammer and a chisel or nail set to turn the toothed ring on the chuck. Tap it in the same direction as the key would turn it. You may have to repeat the tightening more than once, but eventually it should stay tight. Yes, I would leave the drill permanently attached to the mill if that would be convenient. This would reduce or eliminate having to go through the tightening process every time you use the mill. Use eye protection if you try the hammer and chisel method on the chuck.
 
Yes, use all three holes and go around more than once for max grip. The tapping method is simply using a small hammer and a chisel or nail set to turn the toothed ring on the chuck. Tap it in the same direction as the key would turn it. You may have to repeat the tightening more than once, but eventually it should stay tight. Yes, I would leave the drill permanently attached to the mill if that would be convenient. This would reduce or eliminate having to go through the tightening process every time you use the mill. Use eye protection if you try the hammer and chisel method on the chuck.
I didn't leave the drill attached only because I was concerned that the weight pulling on the shaft all the time might deform it.
 
I have an old Craftsmen version of that drill. I've had times when I tightened large bits on that chuck and cursed up a storm trying to loosen it when done. For $40 I'd try to set and forget if you can.
 
I put a mark with a Sharpie on the shaft right in front of a flat spot, then another mark on the drill chuck inline with one of the jaws in the chuck. Just line up the marks and tighten down the chuck. This way you will always have the jaws on the three flat spots of the mills shaft.
 
I put a mark with a Sharpie on the shaft right in front of a flat spot, then another mark on the drill chuck inline with one of the jaws in the chuck. Just line up the marks and tighten down the chuck. This way you will always have the jaws on the three flat spots of the mills shaft.

Ditto!
 
I didn't leave the drill attached only because I was concerned that the weight pulling on the shaft all the time might deform it.

IMO, it's not good to have the weight of the drill motor hanging from the shaft. The biggest concern I would have is that it would cause premature and excessive wear on the roller bushings. Support the drill motor however you can.
 
I have an old Craftsmen version of that drill. I've had times when I tightened large bits on that chuck and cursed up a storm trying to loosen it when done. For $40 I'd try to set and forget if you can.

+1 That's the ticket!
 
Keith,

I would suggest removing the drive roller, and putting it in your bench vice, and filing the three flats out flat again, and possibly widening them slightly. Try to make them all the same width. Then when you chuck up the drill, make sure that the fingers of the chuck are on the flats. It never should slip if the fingers are on the flats, and the chuck is tight.

~~fred francis
Monster Brewing Hardware

I filed the flats down a bit, marked the center of the fingers in the chuck, & cranked it on really tight after lining the flats up with the fingers in the chuck. I went around several times & tightened the chuck as much as possible. I won't be able to see if this is the fix yet because I'm not brewing anything for another 3 weeks. With the drill I'm using, it appears the fingers don't have much of a flat spot like my other drill. I plan to re-tighten every time I mill going forward & leave the drill attached all the time. I also found a book the perfect size to rest the drill on for support during storage so I don't warp the drive shaft from having the drill hanging off it all the time. Thanks to everyone that replied for the assistance. I'll let you know how it works out next time I mill.
 
I finally got to use the mill again this weekend. It mowed through 15.5 pounds of grain with ease. Loving the MM-3.

Filing the flats down a bit to widen them, marking the fingers of the chuck, and going out of my way to go around the drill several times & really crank down to tighten the chuck seems to have been resolved the issue. No slippage at all this time. After milling the grain, the marks I made on the chuck for the fingers were still aligned with the flats on the drive shaft.
 
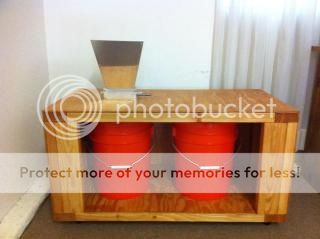
I hate to necro an older thread, but I can't seem to find what i'm looking for, and this thread is on the same subject. I'm having issues getting my drill chuck tight enough around the end of the handle on my grain mill. I mounted it on the top of a cabinet I built myself, and the way my drill attaches, it's darn near impossible for me to get my hand around the end of the keyless chuck in order to really get it tight. Also, the end of the drive shaft on my mill doesn't have flats ground into it, it just has a small cut out where the handle was attached with a set screw. I'll include a picture.

My question is, does anyone make or carry an attachment that would use a set screw to clamp onto the end of the drive shaft, and adapt it to a hex drill bit that my poor Ryobi HD special drill can get some torque on?

driveshaftwear.jpg


The cabinet itself.

grainmill.jpg
 
there used to be an attachment that was used as a drill bit extension.
the end was about 1/2-3/4" in diameter with a cupped set screw in it.
you could set screw a drill bit in it to reach an area where normally the shorter drill would be unable to reach like in a hollow wall to drill thru a stud.

why couldn't the drill end be set screwed onto the roller drive of the mill with the cupped set screw biting into the flat and then cut the shaft to a usable length and attach your drill to it . if the drill ever slipped it would damage the extension and not the mill roller shaft.

just an idea


GD51:mug:
 
That would be perfect if I could find one. So far I haven't had any luck at Home Depot, Lowe's, or Harbor Freight. I'm going to start checking smaller hardware stores because I really don't want to destroy the drive shaft on this mill, no to mention the metal shavings in close proximity to my grains.
 
Try grinding 3 flats on the shaft, using a small grinding bit available from home depot. Those flats will let the drill chuck get a better hold of the drive shaft and present slipping.
 
That would be perfect if I could find one. So far I haven't had any luck at Home Depot, Lowe's, or Harbor Freight. I'm going to start checking smaller hardware stores because I really don't want to destroy the drive shaft on this mill, no to mention the metal shavings in close proximity to my grains.

electricans use an extension somewhat like i mentioned to drill thru studs when wiring wire thru a hollow wall. ya might try an electrical supply shop.
the mom & pop hardware stores used to sell the one i mentioned earlier.
you could always make your own using a barrel nut. drill and tap a set screw hole on the end you plan to use for the mill drive shaft and then thread the other end onto a rod with a short threaded end the smooth end is chucked into a drill; chose your own shaft diameter and length.

GD51:mug:
 
Back
Top