Volume Measurement

Homebrew Talk - Beer, Wine, Mead, & Cider Brewing Discussion Forum

Help Support Homebrew Talk - Beer, Wine, Mead, & Cider Brewing Discussion Forum:

This site may earn a commission from merchant affiliate links, including eBay, Amazon, and others.

Bobstin

Member
Joined
Sep 17, 2013
Messages
10
Reaction score
0
Hi!

Apologies if this has been posted elsewhere, but I am looking to add some volume measurement to my brewery, and am interested in what people have found effective. (I am using a Raspberry Pi to run the system, if that is helpful to know)

Initially I was thinking of using the brewtroller method, but the need to hook each of the sensors to an aquarium pump, then calibrate the flow seems like a hassle (I am in an NYC apartment, so I need to set up/take down my setup each time).

I also saw some people have used float sensors, but I was hoping for non-discrete volume measurement.

I then saw these, but they are really pricey: http://www.atlas-scientific.com/product_pages/industrial/pressure_sensor_7_5.html

Has anyone found something similar at a more affordable price? What methods are you using to measure volume?

Thanks!
Bobstin
 
I'v been think about this as I start transitioning from a manual brewery. I really only care about what goes into and out of the MLT and I use a cooler for that. I am thinking about mounting it on a scale and just using that to measure the water input, outlet. I haven't started building my system and I know I'll probably need to use somewhat flexible connections to allow the scale to see the weight but it is much, much cheaper than good flow meters and less of a pain than trying to set up an air pump etc. At 8 lbs per gallon it seems that I should be able to figure out how much I'm running out and how much is being pumped in accurately enough.
 
You can bypass the need for an aquarium pump by swapping out for direct contact sensors. There are some options available, most are expensive, but BrewTroller is working to find less expensive options. We have successfully tested the more expensive ones as direct replacements for the freescale ones that brewtroller has typically recomended.
 
This was the best sensor I could find for "direct contact" as Shake puts it: http://www.cynergy3.com/product/low-range-industrial-transducer-npt-pressure-sensor. Model IPSLU-GP001-D. Runs $200+.

1 psi means a 28" high kettle... if you are using a 15 gal pot it may only be 18" high, so a chunk of your usable bandwidth is buh-bye. Still, this is a very accurate unit and can be screwed directly to the bottom of your tun or kettle as it can handle the temperature and is food safe.

That said, I personally see no reason to do it differently than I did. Mine is bottom ported, but you could easily side port it, too, which would be even easier to clean. Cost, all-in for parts was <$50 including sensor and hardware. No pump or other silly stuff inside the pots, and very accurate.


I have one of those.
 
The factor in your type of setup (and why people starting using bubblers) is that you risk loosing air volume as it heats up (expanding) and loosing calibration of that sensor. Hence why bubblers started being used. Your setup looks like it might mitigate some of that, but it is still something to at least be aware of.

This was the best sensor I could find for "direct contact" as Shake puts it: http://www.cynergy3.com/product/low-range-industrial-transducer-npt-pressure-sensor. Model IPSLU-GP001-D. Runs $200+.

1 psi means a 28" high kettle... if you are using a 15 gal pot it may only be 18" high, so a chunk of your usable bandwidth is buh-bye. Still, this is a very accurate unit and can be screwed directly to the bottom of your tun or kettle as it can handle the temperature and is food safe.

That said, I personally see no reason to do it differently than I did. Mine is bottom ported, but you could easily side port it, too, which would be even easier to clean. Cost, all-in for parts was <$50 including sensor and hardware. No pump or other silly stuff inside the pots, and very accurate.
 
The factor in your type of setup (and why people starting using bubblers) is that you risk loosing air volume as it heats up (expanding) and loosing calibration of that sensor. Hence why bubblers started being used. Your setup looks like it might mitigate some of that, but it is still something to at least be aware of.

The problem actually occurs when the temp of the liquid cools (causing liquid to rise in the tube). The air pump eliminates that problem.

My solution is essentially unaffected, because the assembly is in ambient air which changes temperature little, and because there is limited air space above the liquid level, which is sealed off by its own pressure, so the liquid volume height does not change, only the pressure.
 
You could look at the problem being either way I guess. When the air heats up and expands, some of it can bleed out of the space, causing the volume of air to change, thus changing the pressure. Your right moves the entire column of air away from the heat, so I see the advantage there.
 
...When the air heats up and expands, some of it can bleed out of the space, causing the volume of air to change, thus changing the pressure...

Sorry, that is not correct. The pressure in the tube is determined by the hydrostatic pressure of the liquid in the vessel. The difference between the top of the liquid in the vessel and the top of the liquid in the tube sets that pressure. As the air in the tube heats, its volume expands and bubbles will escape the bottom of the tube, ensuring the level difference is top of liquid to bottom of tube (which is a known reference). When the liquid cools, the air in the tube cools, causing it to contract, drawing liquid up into the tube. Now the measurement is from the top of the liquid in the vessel to the top of the liquid in the tube, which is unknown. The bubbler puts in additional air to make sure the liquid does not rise beyond the bottom of the tube.

Anyway, that design is silly to me. Even without the air pump, with proper calibration you would still get pretty accurate results. But having a tube down into your pot from the top is a headache (cleaning, positioning the lid, piping running out, etc.)

My design can measure from essentially zero as it reads off the bottom, but who really needs the small volume at the bottom? The best way, IMO (and how I would do it if I were to do it again), would be a very small port with vertical elbow entering the vessel on its side as low as possible. Then the sensor above that, separated by the small tubing. This would eliminate stuff going down the hole and the flush valve I had to put in. You couldn't measure below the hole that way, but who really cares - the final few quarts at the bottom of the vessel are not relevent as you always are measuring 1 gallon +.
 
I get what your saying, but since air is compressible, volume of air affects the pressure the water can exert on it.. I've seen the calibration results. This is why guys started adding bubblers. The first few brewtroller guys were not, and were loosing calibration after liquid started to heat.

I've also done bottom ports with the bubbler, mostly to keep liquid from getting into the tube for cleaning purposes.. but all of that is not really on topic.

I like your design! Its better than most others!
 
Would a U-bend in the tubing help? That may prevent the air from escaping when the liquid is heated.
 
Would a U-bend in the tubing help? That may prevent the air from escaping when the liquid is heated.

Not really.. the air at the end of the tube (or after the U-bend) would still be a problem. However, BrunDog's method is actually quite nice since it moves the sensor and the air away from the heat.
 
Too bad...

Would an MPX5010DP work as the sensor? BrunDog - what is the sensor that you ended up going with?
 
That sensor is differential, which is fine, but not necessary. You can go with a vented gauge and reduce the cost.

More importantly, that sensor has a range to almost 1.5 psi, which would be great if your kettle were almost 4 feet high. For a 18 inch high kettle (assumption), you need a range to about 0.75 psi.

I am using a Panasonic sensor - I will have to let ok it up for you.
 
I get what your saying, but since air is compressible, volume of air affects the pressure the water can exert on it.. I've seen the calibration results. This is why guys started adding bubblers. The first few brewtroller guys were not, and were loosing calibration after liquid started to heat.

I've also done bottom ports with the bubbler, mostly to keep liquid from getting into the tube for cleaning purposes.. but all of that is not really on topic.

I like your design! Its better than most others!


True, when adding liquid, the level will rise up in the tube. That's why mine probably works ok... there is very little volume of air above the liquid level in the fitting, and it's a large diameter compared to the tubing, so a filling the kettle increase causes only little increase in the fittings. Plus heat isolation.

Anyway, this horse is considered beat to death!

Agreed!! HA!!

You do have me thinking though.. with your kinda rig mounted in the side or bottom, could eliminate the need for bubblers for a bunch of guys, and would still work with their existing freescale sensors. I may have to rig up something on a test rig and play with it!
 
Absolutely. You could easily put a hole low on the kettle's side, and do a weldless fitting. Screw in an elbow, then a barb fitting, tube, and sensor. I would do as small as possible... either 1/8" or 1/4" NPT... or heck, even an M5 elbow fitting would work and would require a very small hole. I have only done my mash tun so far, but I think I will go this side mount route instead of bottom mount for the BK.

BTW, the sensor I used was https://www.digikey.com/product-detail/en/panasonic-electronic-components/ADP51B61/P17123-ND/3244557

You could also use the https://www.digikey.com/product-det...uctor-nxp/MPXV5004GC7U/MPXV5004GC7U-ND/951844 as it has a lower range, but it has slightly less accuracy (not that it matters that much in our application).They are price comparable.
 
Since I am planning on building this setup, happy to do some testing and report back (likely to go side mount). Probably won't be for a few weeks, though; working on building my control panel.

Do you have a sense of how large the external tube should be? Smaller would be better, but I don't want the liquid to reach the sensor, I assume.
 
That's cool. Personally, it's already been tested, so I can tell you it performs well. The real-world result was only a smidge off my calculation. I ordered parts to solder on a coupling to the side of my BK. I will take pics of the install and put on my build thread.

As far as tube size, it's the ratio of the elbow fitting inside area to the tubing that matters. You want a big area where the liquid level reaches because any increase in pressure will result in a minimal rise in the liquid level, which gets subtracted from the vessel liquid level.
 
This was the best sensor I could find for "direct contact" as Shake puts it: http://www.cynergy3.com/product/low-range-industrial-transducer-npt-pressure-sensor. Model IPSLU-GP001-D. Runs $200+.

1 psi means a 28" high kettle... if you are using a 15 gal pot it may only be 18" high, so a chunk of your usable bandwidth is buh-bye.

Subject below is a little academic. I struggled with this at one time and thought it may help someone else in the future.

Assuming your sensor is outputting an analog signal, resolution depends on the controller being used. I am using Arduino and am able to manipulate the reference voltage to increase resolution(search "Arduino Aref"). Default is 1023 increments from 0-5v but this can be changed in software to have the same number of steps between 0-1.1v or 0-2.56v.
If that isn't enough there is a reference voltage pin that can be utilized (using a potentiometer for example) to fine tune your range by feeding the voltage range you desire to the Aref pin on the Arduino.

For example: my kettle height is about 14in tall and my sensor will report ~5v at 10kPa. Skipping the math, if my kettle is completely full the sensor will report ~1.75v. If I use the default reference voltage (5v) I will have a resolution of ~357 increments. 8 gal kettle so resolution of ~0.09 qt per increment. I am using a ref voltage of 2.56v which give a resolution around 0.045 qt per increment.

Example specific to arduino but I assume other controllers may have similar capabilities as well.
 
I don't think you are following the 'academic' point correctly. My comment was about sensor range, not its output voltage range. A 0-1 psi sensor will measure a fluid column almost 28" high. If you only use about half of that, you lose resolution, because a 0-5V sensor will only output ~3.2V at max level. Yes, you can change the analog reference voltage to match that, but you have effectively eliminated some of the device's accuracy, because it spans the entire pressure range. More importantly, by lowering your voltage range, you are decreasing the signal:noise ratio. At the end of the day, it is much better to select a pressure sensor which spans the range you will actually be measuring.The sensor I linked also only puts out 0.5 - 4.5V, so even more resolution is lost because the span is reduced.

BTW you should never use a variable resistor to create a voltage divider circuit for an analog reference - it is too subject to change. Create a proper divider with two resistors.

Also, note that difference micros have different maximum PIN voltages. Some (eg. ESP8266) have a max ARef of 1.0V, some (eg. SAMD21) are 3.3V, so you have to know the limits, and matching a 0-5V sensor without a divider to one of these would be dangerous.

Finally, all analog circuits should have at least passive noise filtering incorporated. Some low leakage capacitors to create a low pass (RC) filter is needed. Arduino internal ADC's are convenient but really not super high quality.
 
Let me start by saying I generally agree with all of your points and I should probably go back and strike out my comment with the potentiometer.

My experience reducing the reference voltage has been positive. I only want to share this in case someone down the road may find it useful.

My pressure range is less than half of the sensors rated max. I am reducing the reference voltage by ~half to gain resolution in the range I will be using. Doing this WILL increase noise and that COULD be a problem if the noise is bad enough.
However, using my specific sensor (MPX5010GP) with an arduino mega I get +/-3 increments of noise (out of 1024) without filtering (hardware or software) and I have reduced it to +/-1-ish analog increments with a hastily made averaging filter (10 readings over 0.5sec). I suspect if I use the hardware filtering as outlined in the tech doc and/or chose a more effective filter then the noise would likely be insignificant.

Summary:
1) I could spend another $20 on a sensor closer to the pressure range and have a solution which is technically superior or
2) Use what I have on hand, change my reference voltage, manage noise on an as needed basis and put that $20 towards a sack of grain. :)
 
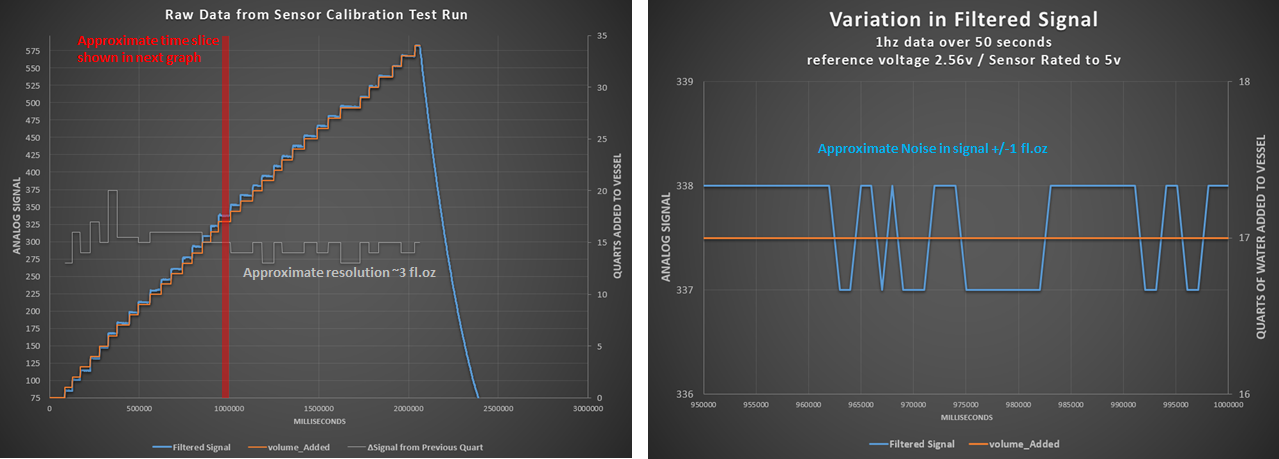
I was collecting data to calibrate my system tonight and thought some data might help the OP or others down the road.

Sensor: MPX5010GP (0v-5v sensor)
Controller: Arduino Mega 2560
Reference voltage: 2.56v (done in software)
Kettle Diam ~13.25"

I was recording data to an SD while adding water 1 quart at a time as measured by a glass measuring cup from my wife's cabinet. I actually did this twice. Once with 5v ref and once with 2.56v ref just for fun. Then I accidentally deleted the 5v file so... oh well...

Just grazing over the plotted data you can see that I am getting 14-15 analog increments per quart so roughly a resolution of ~3fl oz with signal noise of +/-1 fl oz (filtered). Not too bad for putting almost zero effort into the filter.
Next I need to write a formula to try and predict volume from the signal. I expect this to introduce much more error than the signal noise. I'll post more about that when I sit down and post a build thread

Unprocessed Test Data.png
 
Good data. What filtering did you implement? Sorry it wasn't clear. These sensors are low impedance so don't need much in hardware. A low leakage capacitor across the output goes a long way. Remember accuracy is another beast, but your test shows this is super-usable for our application.

This also demonstrates pretty good A:D by the 2560.

How did you mount the sensor?
 
What size brewery are you all using? Why the need for expensive electronic measuring? I see a lot of electric breweries that just use sight glasses.
 
@BrunDog: The filter for the data above was a rolling average of 20 readings @ 1 reading per 5msec. Didn't even try to optimize it...
I am still working out how to mount the final solution but for now I slid some soft small dia hose over the end of the sensor and then jammed it into the end of a piece of soft copper tubing. This is not meant to be permanent. Hold your breath b/c there is a lot in the pics that is scabbed together atm.

@kh54s10: theKraken nailed it:rockin:. I want to load the grain, 'push Go' and let the system deliver cooled wort without my intervention.
If my numbers are correct I could pull off ~7gallon batches but I plan to target 4 gallons. My goal is variety over volume. If that changes, I'll just need to swap out for larger kettles. Its just another variable to my software.
If I was using this strictly for level sensing I could pull probably it off for ~$35 using inc micro controller & LCD display. Not sure what a decent sight glass costs but this solution is probably competitive.

PressureSensorMount.JPG


CloseMount.JPG
 
@BrunDog: The filter for the data above was a rolling average of 20 readings @ 1 reading per 5msec. Didn't even try to optimize it...
I am still working out how to mount the final solution but for now I slid some soft small dia hose over the end of the sensor and then jammed it into the end of a piece of soft copper tubing. This is not meant to be permanent. Hold your breath b/c there is a lot in the pics that is scabbed together atm.

@kh54s10: theKraken nailed it:rockin:. I want to load the grain, 'push Go' and let the system deliver cooled wort without my intervention.
If my numbers are correct I could pull off ~7gallon batches but I plan to target 4 gallons. My goal is variety over volume. If that changes, I'll just need to swap out for larger kettles. Its just another variable to my software.
If I was using this strictly for level sensing I could pull probably it off for ~$35 using inc micro controller & LCD display. Not sure what a decent sight glass costs but this solution is probably competitive.

I guess you need this for a set it and forget it system though looking at the links I saw sensors for $300 + That is way more than a sight glass.

Good luck. I see the commercial automated breweries spending years figuring out the system and most cost thousands of $$.
 
bheinecke, two comments, please take as constructive: first, your filter is excellent, but you probably don't need to calculate that rapidly. I do weighted average every 1/2 second, 25% new and 75% existing. That said, if your controller is doing nothing else, no harm done. Second, the tube method you used will report accurately until the temperature goes cooler. For a mash tun it never does. For for a BK, if you cool into it (whirlpool, etc.) it will read incorrectly as the air in the tube's volume shrinks and draws liquid up into it. From boiling to ambient, that's a 35% volume change, representing about a third of the vessels volume. Again, no issue if not cooling the measured liquid.
 
@kh54s10: I paid around $15 for the MPX5010GP I am using.
Challenge accepted :)

@Brundog: I appreciate the advice! At some point I will return to that that filter but for now I just tossed in some numbers, they worked, so I moved on.
My pics are of a joint HLT/BK in a 2 vessel system (I call it my BLT ;)). Based on your findings, I will hit this issue shortly after I incorporate the heating element and start looking at the heating/cooling cycles.
At some point along this journey someone posted on that issue and had their pressure sensor mounted at the bottom of their vessel to deal with that issue (actually..I could have sworn it was you) and I have a weldless bulkhead + camlock fittings waiting in the wings. I am just holding off drilling another hole in my kettle until I know I need it.
 
Cool. As long as you know. Other people have used a small air pump to keep air all the way to the bottom. I didn't like that design so I did the mount underneath. So yes it was me. Anyway not trying to flex my chest, just share learnings.
 
To be honest the reason for the pump escaped me until you explained what happens as the liquid cools. I had heard about it but thought it was more to do with boiling. Thanks for the education :mug:
 
I am going to try a side mount in my BK. Since I don't need to measure to the bottom, I will solder a half 1/8" coupling and use a small stainless barb fitting. The key is to eliminate as much vertical air space as possible.
 
Back
Top