You are using an out of date browser. It may not display this or other websites correctly.
You should upgrade or use an alternative browser.
You should upgrade or use an alternative browser.
Simple Immersion Wort Chiller
- Thread starter Schlenkerla
- Start date

Help Support Homebrew Talk - Beer, Wine, Mead, & Cider Brewing Discussion Forum:
This site may earn a commission from merchant affiliate
links, including eBay, Amazon, and others.

what do you guys think about this one? http://www.amazon.com/dp/B000FDVD5S/?tag=skimlinks_replacement-20
I took a leap of faith after reading the customer reviews and ordered it. I figure Amazon is a safe place to get it from incase it isn't want is described.
I'll let you guys know.
I took a leap of faith after reading the customer reviews and ordered it. I figure Amazon is a safe place to get it from incase it isn't want is described.
I'll let you guys know.
Last edited by a moderator:
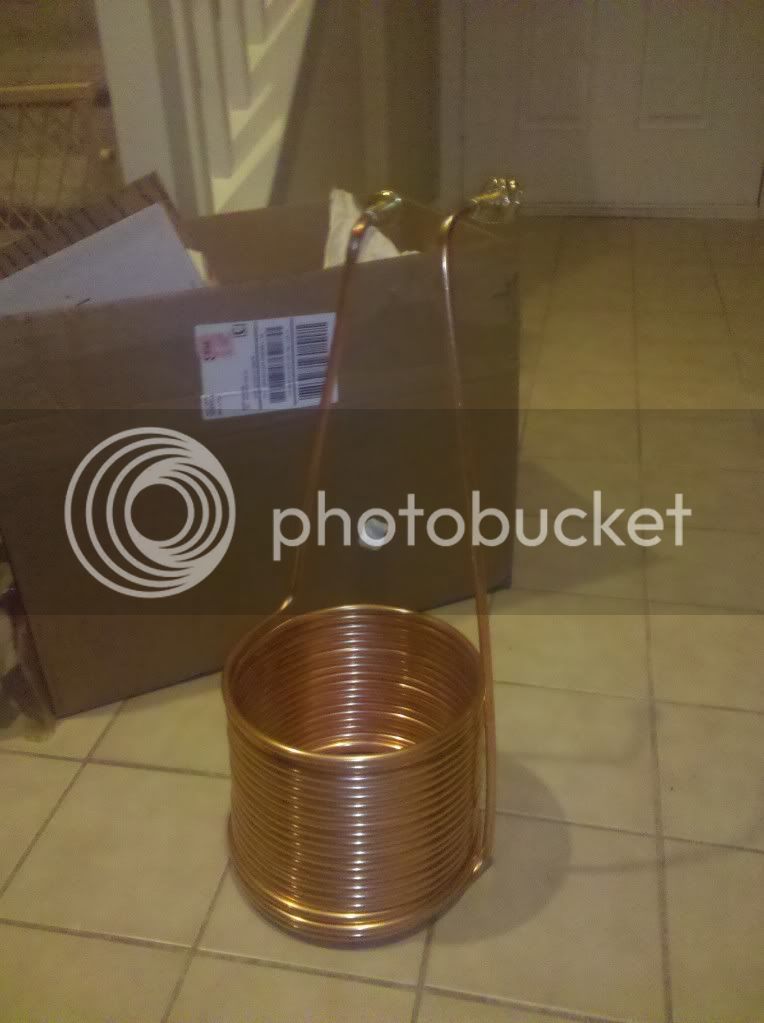
I bought 50' of 1/2" copper about a month ago for 63.56 shipped. I thought that was a pretty good deal for 1/2" pipe. Bought some compression fittings and garden hose adapters from Home Depot to complete the chiller.
Here's the link:
http://fierychill.com/catalogsearch/result/?q=1/2+X+50ft+Copper+Coil&x=0&y=0
Here's the link:
http://fierychill.com/catalogsearch/result/?q=1/2+X+50ft+Copper+Coil&x=0&y=0
sensibull
Well-Known Member
So, here's a dumb question, but how are you guys using these outside with *2* male hose fittings. The female end of my input hose is attached to my spigot, so I only have a male end for the input. I saw at least one person mention a female adapter but I didn't see one at HD and I'm wondering how everyone is using the 2 male adapters.
Nevermind. I think this is the part I need:
http://www.homedepot.com/h_d1/N-5yc...splay?langId=-1&storeId=10051&catalogId=10053
Nevermind. I think this is the part I need:
http://www.homedepot.com/h_d1/N-5yc...splay?langId=-1&storeId=10051&catalogId=10053
thejakeshow
Member
So, here's a dumb question, but how are you guys using these outside with *2* male hose fittings. The female end of my input hose is attached to my spigot, so I only have a male end for the input. I saw at least one person mention a female adapter but I didn't see one at HD and I'm wondering how everyone is using the 2 male adapters.
Nevermind. I think this is the part I need:
http://www.homedepot.com/h_d1/N-5yc...splay?langId=-1&storeId=10051&catalogId=10053
My local HD had a Watt's adapter that I used. I do not see it on the HD website. I found it on the Watts' website, though:
http://www.watts.com/pages/_products_details.asp?pid=6514
I use something very similar to this on both ends: http://www.amazon.com/dp/B003VKIIKK/?tag=skimlinks_replacement-20
I connect the female end of the garden hose to the spigot. (Actually a kitchen sink adapter for this time of year)
The male end to the adapter in the link.
The garden hose adapter hooks to a compression fitting that goes to the copper pipe.
This is the same on both ends so I have another garden hose for the exhaust.
Last edited by a moderator:
Hopefully making one tomorrow. I'm going w/ 20 ft. 3/8" seeing as how I only have a 4.5 gal brewpot. When I upgrade to a larger pot I'll make a new chiller using more footage of tubing and use the 20 footer as a pre-chiller. Thanks for the post, it was the same idea I had it's good to see the finished product though. Cheers 
Made one last night with 50' at 3/8" tubing. Had a hard time finding something to wind the tubing around and I thought it would be a good idea to stretch half of it out to wind it. Best trick I learned was to wind the tubing down into my primary bucket from the coil. Came out nice and tight and was the perfect size for the opening on my keggle.
building one of these right now from the orginal posters part list at HomeDepot.
I am not doing the washer hose plan as my water is a little farther away so i chose a barb to 1/2 fitting with braided hose for the exit flow... other than that my set up is the same and a garden hose will supply the water :rockin:
gotta finish it tomorrow night so i can brew tomorrow or Tuesday night
So, here's a dumb question, but how are you guys using these outside with *2* male hose fittings. The female end of my input hose is attached to my spigot, so I only have a male end for the input. I saw at least one person mention a female adapter but I didn't see one at HD and I'm wondering how everyone is using the 2 male adapters.
Nevermind. I think this is the part I need:
http://www.homedepot.com/h_d1/N-5yc...splay?langId=-1&storeId=10051&catalogId=10053
Did it work out? I was just at HD today to buy my stuff to build one... I wondered the same thing actually and found a female adapter... but then changed my mind and got a barb-1/2 inch and a vinyl hose instead for the exit flow.
OP
OP
- Joined
- Apr 18, 2006
- Messages
- 16,779
- Reaction score
- 5,896
building one of these right now from the orginal posters part list at HomeDepot.
I am not doing the washer hose plan as my water is a little farther away so i chose a barb to 1/2 fitting with braided hose for the exit flow... other than that my set up is the same and a garden hose will supply the water :rockin:
gotta finish it tomorrow night so i can brew tomorrow or Tuesday night
Its good to see this thread is still going.
Fwiw- I used the washer hoses, so that I had a way to use a sink or the garden faucet. For the later I just couple the hoses together. I'm an outdoor AG brewer, but I do PMs or extracts in the winter. Having something for both is what I wanted.
Hope yours works good, mine does. It cools boiling wort to room temps in 15 minutes.

Guidry
Well-Known Member
WOW! You got a steal on that tubing. Around here you could sell that right back to a scrap yard for a decent profit. I assume that's the original packaging?
WOW! You got a steal on that tubing. Around here you could sell that right back to a scrap yard for a decent profit. I assume that's the original packaging?
Yes it was brand new. They weighed the package at 6 pounds and their price was $4.50/pound. They had many sizes to choose from.
sensibull
Well-Known Member
Did it work out? I was just at HD today to buy my stuff to build one... I wondered the same thing actually and found a female adapter... but then changed my mind and got a barb-1/2 inch and a vinyl hose instead for the exit flow.
Yep. That part fits the bill.
Reading through this thread I noticed that there are some people using zip ties and other methods to make it less slinky like. Has anyone thought about actually using this slinky action as a way to stir the wort while promoting better heat exchange? Basically I left the discharge side higher so I can push and pull to mix the wort while it's cooling. I drilled two holes in the lid so it is a sealed kettle. Thoughts?


I'm thinking about using a couple rubber grommets in the lid but I'm not sure how they will handle the heat.
I'm thinking about using a couple rubber grommets in the lid but I'm not sure how they will handle the heat.
OP
OP
- Joined
- Apr 18, 2006
- Messages
- 16,779
- Reaction score
- 5,896
What you got looks good but I think you might be containing heat at the start using the lid. Try to keep the lid off until you hit the 70-80 mark. I gently stir for the first ten minutes. Then every few minutes there after, until it hits the pitching temperature. Having a lid would make that kind of hard to do.
What you got looks good but I think you might be containing heat at the start using the lid. Try to keep the lid off until you hit the 70-80 mark. I gently stir for the first ten minutes. Then every few minutes there after, until it hits the pitching temperature. Having a lid would make that kind of hard to do.
You're right about the lid containing heat. I didn't think of that. You're concern about stirring is exactly what I was trying to accomplish by leaving the supply side longer so I could use the slinky effect of the coils to stir the wort. I would simply move the supply side up and down to mix.
OP
OP
- Joined
- Apr 18, 2006
- Messages
- 16,779
- Reaction score
- 5,896
You're right about the lid containing heat. I didn't think of that. You're concern about stirring is exactly what I was trying to accomplish by leaving the supply side longer so I could use the slinky effect of the coils to stir the wort. I would simply move the supply side up and down to mix.
Test it unwire-tied. Filled with water. It adds weight, enough so that you could uncoil the thing.
In my opinion, its best to use your brewing stir spoon to slowly stirr the cooling wort. I have a 36" spoon/mash paddle. If you don't have one buy one they are cheap.
Also add the thermometer & chiller in the last 10 minutes of the boil.
Test it unwire-tied. Filled with water. It adds weight, enough so that you could uncoil the thing.
Another good point. I'll test it tonight.
In my opinion, its best to use your brewing stir spoon to slowly stirr the cooling wort. I have a 36" spoon/mash paddle. If you don't have one buy one they are cheap.
I have a 28" plastic paddle that would work.
Also add the thermometer & chiller in the last 10 minutes of the boil.
Do you use a floating thermometer?
OP
OP
- Joined
- Apr 18, 2006
- Messages
- 16,779
- Reaction score
- 5,896
Another good point. I'll test it tonight.
I have a 28" plastic paddle that would work.
Do you use a floating thermometer?
I use a regular brewing thermometer. 12-16" with dial on top. I clip it to the coil and then let sit inward. You can clip to kettle too.
Thanks for the parts list. It will save me a lot of time next week when I'm shopping for everything.
MMBB
Well-Known Member
I tried to search this thread but didn't get any answers.
Any problem with having some of the chiller sticking out of the wort? I am going to initially do five gallon batches in a keggle but will be stepping up to ten gallon batches in the future. I'd be using 50ft of the 3/8ths tubing and I want to avoid having to make two chillers.
A friend and I made one out of 25ft of tubing when we were only doing partial mashes and it worked just fine if not a little bit slow. I may also hook the new one up to a fountain pump and run ice water through it.
OP
OP
- Joined
- Apr 18, 2006
- Messages
- 16,779
- Reaction score
- 5,896
I tried to search this thread but didn't get any answers.
Any problem with having some of the chiller sticking out of the wort? I am going to initially do five gallon batches in a keggle but will be stepping up to ten gallon batches in the future. I'd be using 50ft of the 3/8ths tubing and I want to avoid having to make two chillers.
A friend and I made one out of 25ft of tubing when we were only doing partial mashes and it worked just fine if not a little bit slow. I may also hook the new one up to a fountain pump and run ice water through it.
No it is not a problem. Just keep the spacing vertically as small as possible, the more contact with the wort the better. Improves cooling efficiency.
well mine has worked out a couple times now
apparently tightening the weld-less fittings more than i thought was key to getting them to seal up! i didn't want to over-tighten...but apparently they can take it until you can't tighten anymore!
apparently tightening the weld-less fittings more than i thought was key to getting them to seal up! i didn't want to over-tighten...but apparently they can take it until you can't tighten anymore!
Elweydoloco
Well-Known Member
As far as weldless/solderless fittings, go with swagelok. I used swagelok stainless 3/8 with 50 feet and used hose barbs so I can fit up poly tube to it and use it on anyones sink after taking off the aerator. Anyway the hose barb idea was cause I have a buddy that brews too and I know he'll be stealing it often enough and people like to learn how to brew in their own kitchen. I should upload the build. I made the bends on a train motor piston. It was interesting.
Trying to put the hose fittings on mine.
Does the copper need to be flared to work in the compression fitting?
I bought a flaring tool today, mainly to do the same thing for a diptube.
Thanks
JR
Does the copper need to be flared to work in the compression fitting?
I bought a flaring tool today, mainly to do the same thing for a diptube.
Thanks
JR
Trying to put the hose fittings on mine.
Does the copper need to be flared to work in the compression fitting?[...]
Compression fittings for copper tubing don't require a flare - in fact you can't even use a compression fitting if the line is flared...
Cheers!


tankcrash
Well-Known Member
I plan on building my own I just wonder if we put spacers in between each coil, if it would open up the area that comes in contact with the wort. might increase efficiency
Do.have to clean the tubing somehow before using it? Just wondering if the copper tubing might have some kind of oil or lead in or on it.
Hutch
Not really, you can just do a good spray down with water and if you feel inclined to clean just lightly scrub with a sponge and some dish soap.
I plan on building my own I just wonder if we put spacers in between each coil, if it would open up the area that comes in contact with the wort. might increase efficiency
i think when its compacted its more effective, but if you just naturally coil with lots of space like my early post above it covers a great deal of surface area. i can cool 10 gallons from boil to 75 degrees in about 20-25min.
JiHadJoe910
Member
so, i have a question. would this go on the outside or the inside. if you put it on the inside you would have to worry about contamination and possibly a metallic taste? i am thinking of making one of these but im not sure how to use it. I am new to brewing so any help would be appreciated. BTW i am using a bucket kit for my brewing.
JiHadJoe910 said:so, i have a question. would this go on the outside or the inside. if you put it on the inside you would have to worry about contamination and possibly a metallic taste? i am thinking of making one of these but im not sure how to use it. I am new to brewing so any help would be appreciated. BTW i am using a bucket kit for my brewing.
It would go on the inside of your kettle or pot to cool down the boiling wort. No worries on metallic taste, all of our lines in the house are made with copper too!
Copper tubing sales has immersion chiller kits in 25 & 50 ft lengths for 3/8 or 1/2 tubing. All fittings and coil for 50 ft 1/2 inch chiller is 65 bucks. Put that on the Santa wish list. Will build over the holiday...been awhile since I sweated joints, but it is easy and should be fun to do it.
Copper tubing sales has immersion chiller kits in 25 & 50 ft lengths for 3/8 or 1/2 tubing. All fittings and coil for 50 ft 1/2 inch chiller is 65 bucks. Put that on the Santa wish list. Will build over the holiday...been awhile since I sweated joints, but it is easy and should be fun to do it.
TSCHMITT, have you built yours yet? I was cruising through this thread and today searched for copper tubing & found the 'Home Brew Immersion Chiller Kits' on their website. The prices seems very fair, 50ft of 3/8 tubing with fittings for $50...Not bad at all. It would seem with the garden hose fitting option all I would need to pick up are the washing machine hoses to go with it.
The only real conern I have about building it is making sure it fits properly (diamter and height wise) in my kettle (10Gal. Bayou Classic). Is there any issue with having a 50' chiller with coils sticking out of the wort as I'm only doing partial boils at this point? (I suppose I could just spray it with StarSan before using too, right?)
Similar threads
- Replies
- 0
- Views
- 418
- Replies
- 4
- Views
- 1K
- Replies
- 0
- Views
- 576
- Replies
- 14
- Views
- 2K