Blichmann BrewEasy

Homebrew Talk - Beer, Wine, Mead, & Cider Brewing Discussion Forum

Help Support Homebrew Talk - Beer, Wine, Mead, & Cider Brewing Discussion Forum:

This site may earn a commission from merchant affiliate links, including eBay, Amazon, and others.
Not sure why the photo didn't show.

20171013_115747.jpg
 
I've been considering one of these and have read all reviews & threads I could find. I almost exclusively brew 5.5 gallon batches and want to make the move to electric. As expensive as it is, I think I'd bite if Blichmann offered a 240V, 10 gallon MT atop of a 15 gallon BK. Also, why wouldn't they make the auto sparge outlet tubing flow into a manifold of some kind that distributes the wort evenly over the entire grain bed like a fly sparge? Wouldn't that reduce the potential for channeling and the need to rake?

Off topic... the Unibrau (240V element) looks like an interesting setup...

https://brausupply.com/products/unibrau-all-in-one-electric-brew-system-v-3?variant=6116207165475

What watt density is that element? It looks kind of scorchy. Though that could be the low voltage one.

The Autosparge defeats channeling by pouring the wort back to the top of mash bed in a gentle swirling pool. It flows horizontally out of the hose, not straight down. For an all in one system, the BrewEasy is very efficient. The false bottom is the best in the industry.

Listed @ 5500W. My thought on the Autosparge, based on the instructions to "rake" the top third of the grain bed, was that channeling would/could occur. I guess if you are careful in insuring the hose stays totally horizontal, and maintaining a couple of inches of wort on top, channeling can be avoided. Some videos however show the outflow undermining the settled bed.
 
Channeling is generally a concern associated with maximizing efficiency. The BE is a kettle rims system...kettle rims is a no sparge process...please don’t buy a BE or any other kettle rims if care about the effects of channeling on your efficiency will bother you. You’re looking at the wrong process..not brand.

Go ahead and spend the extra $1.50 on grain per 5G batch and enjoy 67% eff with the rest of us kettle rims brewers.

Cheers!
 
Anybody have good ideas for mouting Therminator to LTE? I’m not really excited about mounting it above my chugger pump. I like the quick release they have for the Top Tier because it actually hangs the chiller off to the side. I’m just not sure that the Top Tier bracket will fit on the LTE.
LHBS said “This quick release would only be designed for use with the TpTier stand and not guaranteed to work on the TOP LTE or TOP stands”. I read that to mean they don’t know.
I will probably ask Blichmann but thought I’d see what others have done.
 
Here's what you need:

Quick Release Therminator Chiller Bracket for Tower LTE

https://parts.blichmannengineering.com/product-p/aqr-chiller-bkt-lte.htm

Quick Release Bracket for mounting therminator chiller on the Tower of Power LTE.

You have to make certain that your stand has the two holes above the pump for the bracket. Before the quick release bracket, those holes didn't exist on older Lte stands.

I’m familiar with that bracket but I’m not excited about my Therminator being right above my chugger pump. It would seem that you have a high risk of dripping water into the pump as you’re connecting/disconnecting hoses.

Do you use that bracket?
 
I’m familiar with that bracket but I’m not excited about my Therminator being right above my chugger pump. It would seem that you have a high risk of dripping water into the pump as you’re connecting/disconnecting hoses.

Do you use that bracket?

There's three things that can be done to prevent dripping onto the pump:
1. Mount the therminator "upside" "down" so that the fittings are over the wet side of the pump.
2. Spin the pump around so that the head is under the fittings on the chiller
3. Change the process to where you connect the hoses to the chiller before placing it above the pump.
Bonus option: Create some sort of splash shield for the motor.

Opt 1...not optimal for therminator performance based on label indicating which side should be facing up for chilling.

Opt 2. .. I’m already oriented this way but chugger pump has slots on both ends so still exposed to water getting in

Opt 3 ... works until i need to clean which requires a few flow reversals by switching hoses. Not much point to mounting it if i have to constantly unmount ... mount...unmount....mount....unmount....mount so I can clean chiller correctly

I would really like to know what you are actually doing vs options I could try.

Do you mount your chiller? If so, how?

If not...thanks for playing. :)
 
I had another idea. I hope i'm not dragging this out too far. You said the pump is flipped around from the stock location. (pump head on the left?) If so, and only if so, mount the quick release bracket on right side of the stand. You would have to drill a couple of holes in the stand, but it would mount the chiller to your stand and keep the fittings on the right-rear side of the tower away from the cooling holes in the motor.
 
You’re not dragging it out...I admire your persistance.

Now, kindly leave me alone.

I kid...I kid... :p)

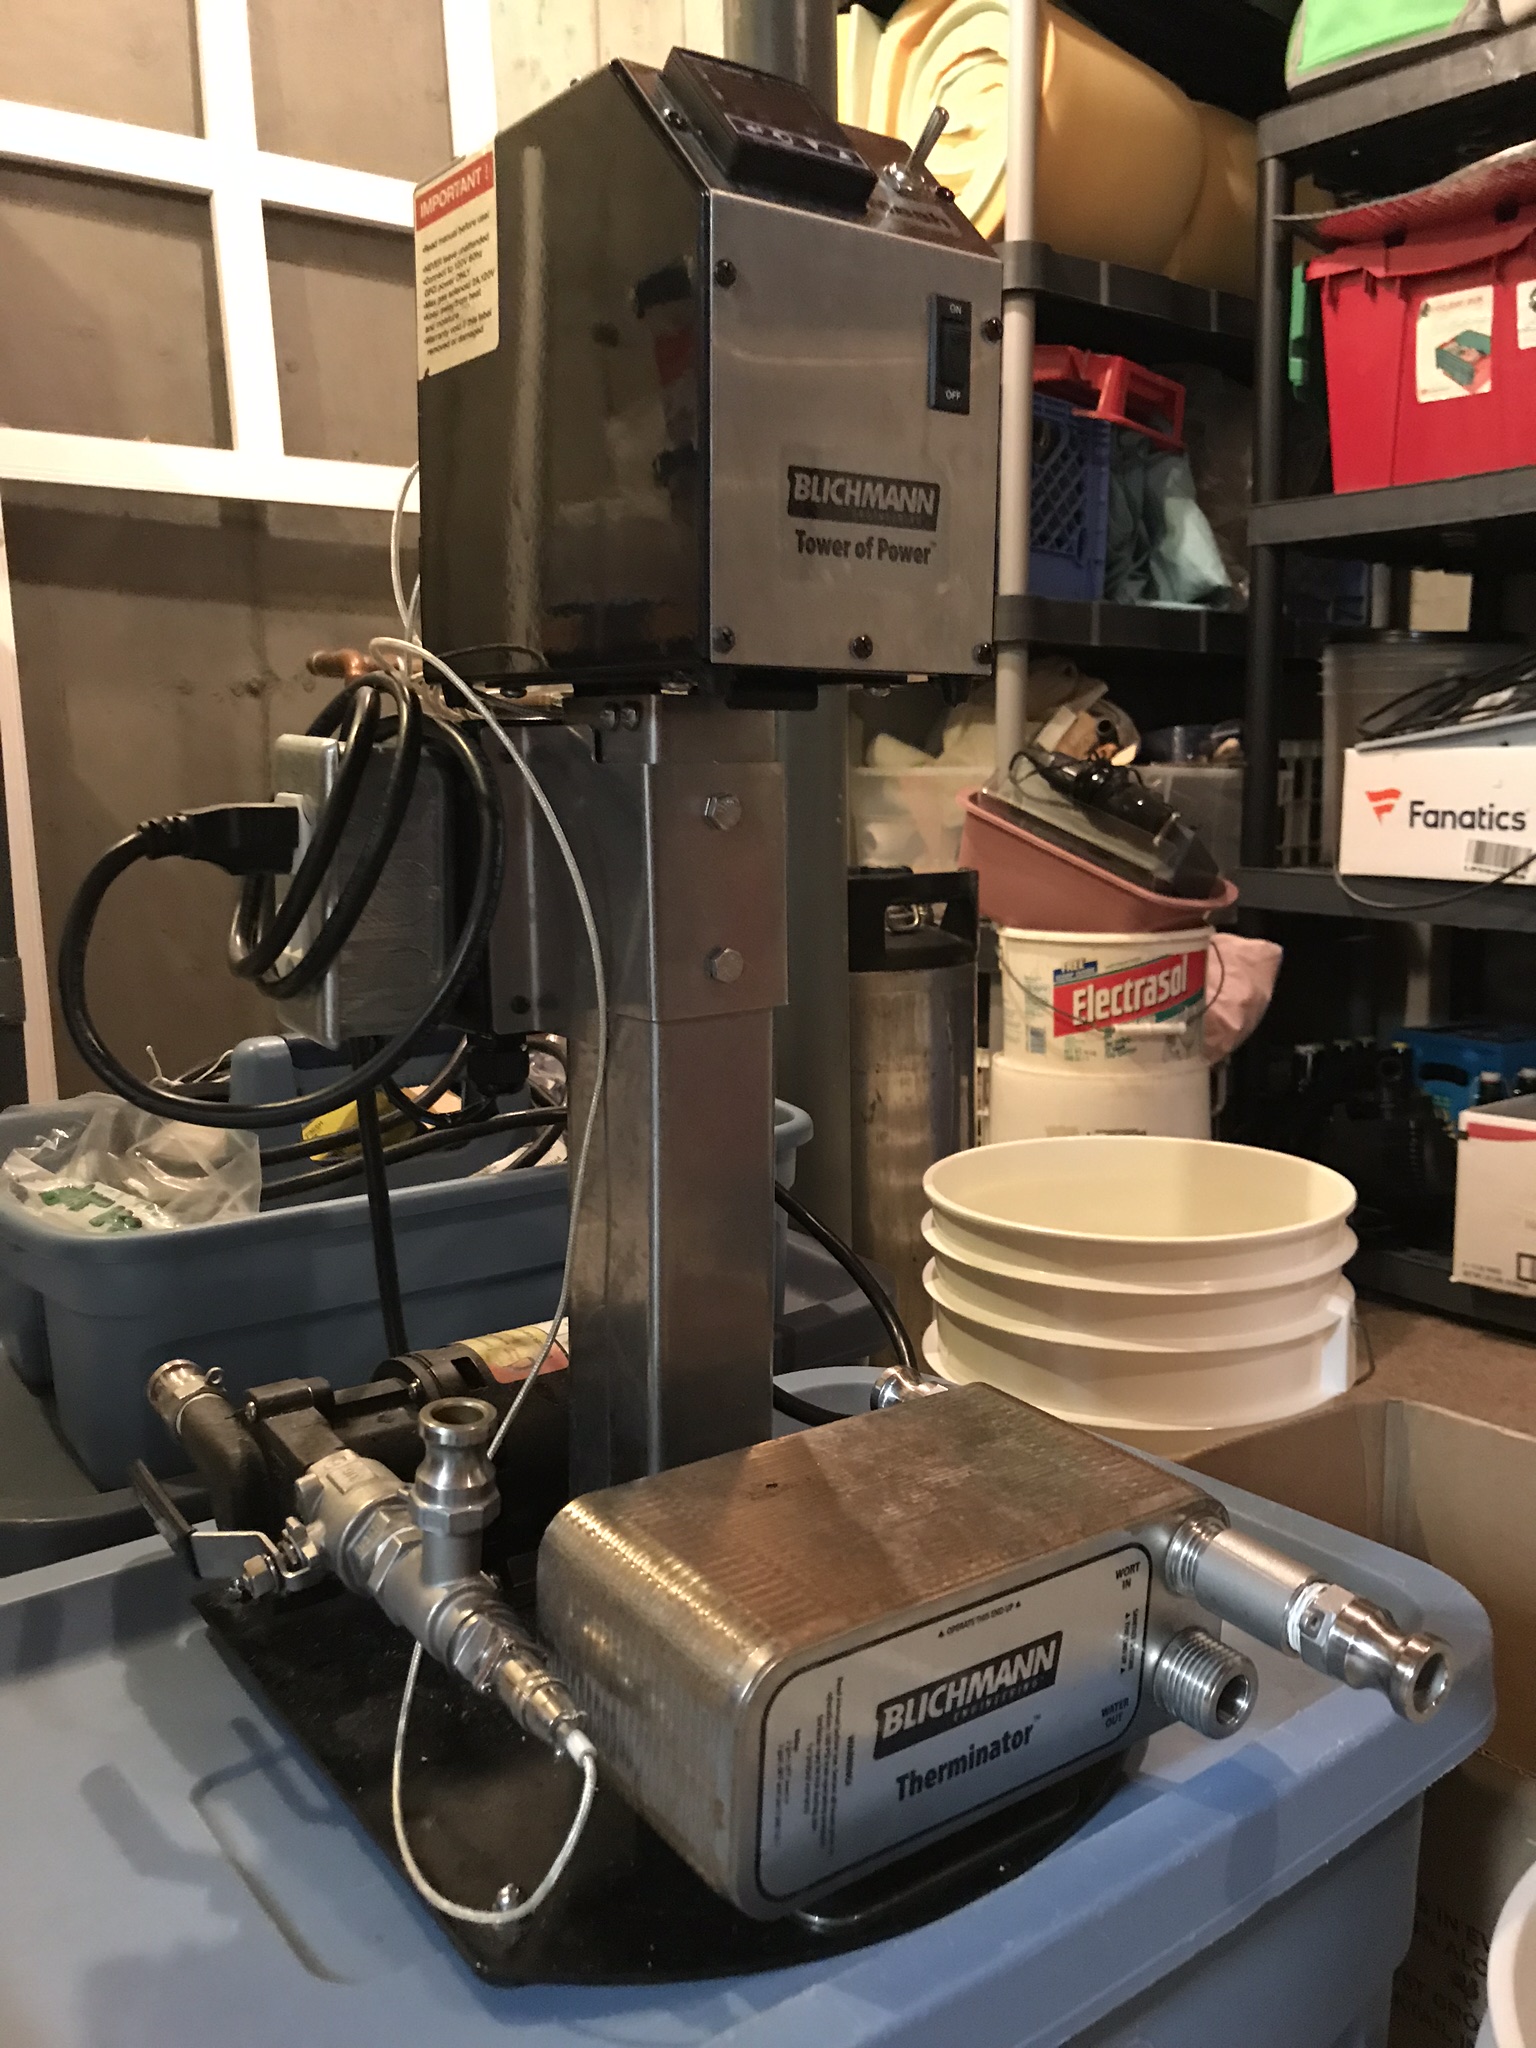
I took a picture to help clear up any confusion about how i currently have things set up.

The metal outlet box on the side is something I added in order to operate my pump with the switch on the stock outlet box. I didn’t want to cut off the plug on my pump cord to be able to wire it directly into the stock electric outlet box.

The chiller pictured is just sitting there...not mounted in any way but if you look close you will see the standard Therminator mounting bracket (not the quick release or BrewEasy bracket....just a regular old “L” bracket for therminator) is attached to my chiller which lifts the chiller about 1/2” off the base when it’s just sitting there.

If i mount to post it would have to be on left side and I would have to start operating my LTE at full height and I’d have to mount chiller half way up the post since I don’t have room between my pump and add-on outlet box. That means my chiller is now over my add-on outlet which is not ideal.

I’m actually thinking about simply getting heavy duty Velcro and just “mount” the chiller where it is at on the base pictured below.

I also like the idea of using the quick release bracket they make for the TopTier. I think i could mount it the bottom post basically using the holes that are already there but this bracket would actually hang the pump to the right side out past the end of my pump so that I wouldn’t have to worry about drips getting in the pump.

Do you have your chiller mounted? How’d you do it?

963B450D-B2F0-4C56-A0F2-114ED97A979B.jpeg
 
thanks for a hell of a thread guys. I am working quickly towards purchasing a gas 20 gallon system for both 20 and 10 gallon batches. I will be ordering it with the full ToP and most likely two 14 gallon conicals with 14 gallon extenders. With all the different systems I have brewed on in the past I think i am set up to have some early on success.
Minus the water stuff. all i do now is at a tsp of CC per 5 gallons. Ill have to learn more about that.

anyways. My current plan whenever the system arrives is to use my calibrated BBQ thermometer with a couple probes in the mash. and i will set the PID to be whatever it needs to be to get those temps where i want them. after a few brews i should be able to program in the average offset into the PID correct? and then its just a matter of checking throughout the mash to make sure things are true.

I also plan on potentially adding some ballast in the BK for around 3-4 gallons worth. That will allow me to heat that up separately and once the kettle is drained I'll do a bit of a batch sparge stirring the top 1/2 while mixing in the remaining water to try and get a rinse, but not disturb the filtration on the grain bed.

I also plan to follow the method that has a bit of water reserved to reduce the BK temperature after mashing in before re-circulation has started. possibly may just use a chunk of frozen water as well, same concept.

So aside from creating great water chemistry, and purchasing a PH meter or test strips, are there any other go to tips that people are using with great success?

I condition my grains and typically use a .38 to .40 crush. and add a 1/2 pound of rice hulls per 15 pounds of grain. I have gotten pretty good flow out of that in the past. I have never calculated efficeiency on any of my systems before, but i have almost always seemed to hit the numbers pretty accurately.

I care more about predictable dependable repeatable results than i do spending a few more dollars chasing some magical number. BUT, i need to be able to hit the numbers that i am expecting to hit when i create a recipe.
 
Welcome to the BrewEasy family! I have the 20G gas w/ LTE and I do 15g batches. Very happy with this system...1/2 bbl brewery in 2x2 sq ft :)

Water chem is important in any system. That doesn’t mean it has to be complicated...keep it simple. I use brewers friend and add cc to get to about 100 Ca on all my beers. Also acid additions for the lighter beers are critical for mash ph. A little gypsum for hoppy beers. That’s it.

I ignore my mlt thermometer. I get what your planning and its a great plan but don’t drive yourself crazy (like i did). I now use the pid and just RDWHAHB. :)

I don’t know that you really need the ballist in bk. I just reserve 3G...I’ve stil got 20G of water to work the mash...that’s plenty. I will heat my 3G up to 150-170ish in the kitchen to “sparge” but i recently read about sparging with tepid water so i may try that. 1 less thing to mess with

The gal of water in bk to lower the temp at the beginning of sparge is something that i do and I’ve never heard of anyone else doing it. I cant say it’s required but it makes me feel good. :)

I also condition my grain..not sure of gap but it’s pretty much what i see others doing. I don’t use rice hulls very often and always use the 2g/min orafice .. no issues

Your comments make me think you’re on your way to a happy BE experience. Sounds like you’ve been brewing a while and have a good handle on things. My only suggestion is simply to be patient..give yourself a chance to dial in the new rig and as always RDWHAHB.

:). Cheers!!!
 
Last edited:
Here's one way to complicate things and cause all kinds of testing and control until the process is dialed:

Heat up your hot liquor to 190-200 degrees and pump it into the clean, sanitized conical fermentor. Dough in per usual, but with very little water left in the boil kettle. This would work especially well in the gas system because you wont need to cover the boil coils. Recirculate as needed, maintaining temperature with the sensor in the flow. While draining the mash, pump the hot liquor from the fermentor (which has now chilled to perfect 174 degrees (hopefully)) to the mash.

This method could give you better efficiency because the mash ph is unaffected by a thin water to grist ratio. Ive seen it done, havent tried myself, but it seems to work well. It could give you the benefit of a three vessel brewing system without taking much more space.

Cheers!
 
I wanted to ask if any Breweasy owners have encountered problems with regard to GFCI breakers tripping when connecting a Riptide pump via the Tower of Power LTE. I am able to heat up water in the brew kettle but as soon as I turn on the control module, with pump connected to the ToP, the breaker for the control panel trips. The strange thing is, the breaker trips even when the ToP is plugged in to another circuit, whereas everything is fine if the pump is plugged into an outlet directly. I thought perhaps it was user error, but Blichmann said they've heard of strange issues like mine but couldn't elaborate, so before I call the electrician I thought this was the best place to hear of strange issues....many thanks for any suggestions.

Edit: I should add that this is a 10 gallon, 240V version. I have a 30a breaker for the control panel/boil coil.
Realize this was an older post but never saw an update/solution. Same issue here, were you ever able to figure it out?
 
Sorry, I can't believe I didn't follow up. I contacted Blichmann who responded with the below:

"1) Get an extension cord for the 120 volt to the tower and run it to another outlet on another breaker to see if it changes anything.
2) Unscrew the controller from the LTE stand and try it again with the TOP controller off the pump stand. We had one case where there was some goofy ground issue between the two systems (240 & 120 systems) that caused it to trip.
We never go an answer back other than a electrician found a problem.
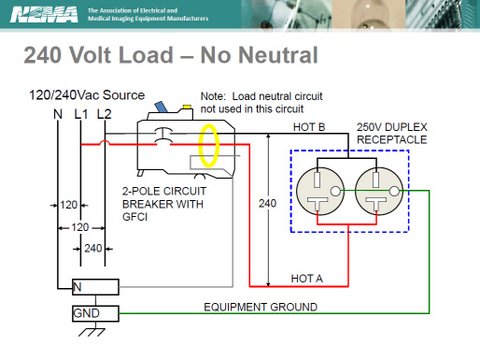
Attached is how the GFI should be wired In your panel."


I gave the below wiring diagram to the electrician who installed my GFCI outlet, and all of a sudden it was working. I think it was because the electrician didn't wire the GFCI properly in the first place, though he never admitted it.

NEMA GFCI Picture.jpg
 
Hi all-

I'm still getting terrible BH efficiency with my BE, and it's driving me nuts at this point.

-I have a significant amount of loss. Yesterday, I did a 10 gallon batch of IPA (1.072), and Brewer's Friend has me at 56% BH efficiency:

-Conversion 79.5%
-Pre Boil 78%
-Ending kettle 75% (which I suspect was a little lower....)

I got about 8.5 gallons of 1.072 wort into fermenter. Started with 16.28 gallons of water. I threw in a couple more OZ of hops, which probably affected things.

How much loss are you guys experiencing?
 
I did a 15G batch this weekend..33lbs grain..6oz of hops...22.5G of water total...i got 16G into fermenter..~72% Brewhouse eff.

For what it’s worth it took me several batches to get my volumes and efficiency dialed in. I dont know how long you’ve had the BE but it takes a few runs to start to dial it in. Hang in there...

I’ve been on the system for a few years...(this is year #4)

I started with 16 gallons of water, and ended up with about 8.5 of good wort...that’s under 60% efficiency. Now, I have my Brew Bucket filled with 6.5 gallons, and other carboy has about 2 galllons off usable wort + 2 gallons of hop trub.

I hit my OG, so I’m happy. But either I’m calculating efficiency wrong, or I have a **** ton of loss.

Ive come close to 70% maybe once on a 12 gallon batch of 4% pale ale.

So folks out there are hitting 65-70% BH efficiency with a 10 gallon batch of 1.072 IPA with 14 oz of hops?
 
I’ve done something close once and got 67% Eff. I don’t Brew beers that big very much. It was an IPA w/ 18oz of hops.

I do some extra steps that make it a little less “easy” but I think they help so I choose to do them.

1. Always makes sure my Calcium is at 90-100 ppm. The BE instructions say conversion is optimized with those levels of Calcium. I make sure PH is range....anywhere in 5.2-5.6 is OK in my brewery.

2. I reserve 3-4G OG water and do a mini-sparge. Nothing fancy...just heat 3-4 G up to 140-160ish and just poor into the MLT as I’m draining to BK

3. Once I mash in i poor about 1G of room temp water into the BK to lower the water in BK from strike temp to something closer to mash temp before I start recirculating.

4. After I scoop out my grains from MLT, I will poor what little water remains ..about 1Gal usually...into a pitcher and let it settle and then pour the clear portion into BK..about 1/2 of it makes it in. Every little bit helps :)

5. I use hop baskets/bags during boil and I’m sure to let them fully drain when i pull them out. I also use whirfloc and whirlpool. When I’m done I like to see only about 1/2G of really nasty wort left behind in BK...everything else is in the fermenter and generally clean&clear.
 
I’ve been on the system for a few years...(this is year #4)

I started with 16 gallons of water, and ended up with about 8.5 of good wort...that’s under 60% efficiency. Now, I have my Brew Bucket filled with 6.5 gallons, and other carboy has about 2 galllons off usable wort + 2 gallons of hop trub.

I hit my OG, so I’m happy. But either I’m calculating efficiency wrong, or I have a poopy ton of loss.

Ive come close to 70% maybe once on a 12 gallon batch of 4% pale ale.

So folks out there are hitting 65-70% BH efficiency with a 10 gallon batch of 1.072 IPA with 14 oz of hops?

Recently did a 15G high gravity porter (1.069) and hit mid 70s. I pay attention to water chemistry, rake the top third of the MT, and add rice hulls to improve circulation. Finally, I have a hops spider (fabric) and whirlpool to minimize hop trub going into fermenter, but don’t sweat whatever gets past, though I’ve never approached 14 oz hops levels either!

I’m conscientious to slow rate down as MT is almost empty to avoid prematurely pulling air, but don’t go to the lengths mentioned above.
 
Good points...I also rake the top 3rd and slow rate of mash out towards the end. I’ve also had positive results when I double mill my grain but I dont do it all of the time...sometimes I’ll just double mill about half...just depends on my mood. I always condition grains before milling
 
I recently just picked up a used 10gallon BrewEasy. Getting ready to break it in but was curious what others are using to contain their hops? I was reading some good reviews on the Anvil Kettle Strainer and was curious if others are using it with success? I'm hoping to find something that will clear my immersion chiller.
 
I recently just picked up a used 10gallon BrewEasy. Getting ready to break it in but was curious what others are using to contain their hops? I was reading some good reviews on the Anvil Kettle Strainer and was curious if others are using it with success? I'm hoping to find something that will clear my immersion chiller.
I use a hop spider (it was homemade) as well as hop bags. I hate having my plate chiller clog.
 
I use a hop spider (it was homemade) as well as hop bags. I hate having my plate chiller clog.

Sold my plate chiller with my last setup so I'll be using a immersion chiller. With my plate chiller I did use a stainless hop spider and worked great, but I realize I won't be able to leave a big one in the kettle while trying to also put in an immersion chiller.
 
I recently just picked up a used 10gallon BrewEasy. Getting ready to break it in but was curious what others are using to contain their hops? I was reading some good reviews on the Anvil Kettle Strainer and was curious if others are using it with success? I'm hoping to find something that will clear my immersion chiller.

I have one of these and absolutely love it. I even use pellet hops and have not had any issues. The most I've thrown in there however is 5 ounces (I am currently brewing on the Anvil Foundry). I am amazed at the spent hop cake at the bottom of the kettle after draining to the fermenter with it. It's pretty slick.
 
I have one of these and absolutely love it. I even use pellet hops and have not had any issues. The most I've thrown in there however is 5 ounces (I am currently brewing on the Anvil Foundry). I am amazed at the spent hop cake at the bottom of the kettle after draining to the fermenter with it. It's pretty slick.

Thanks for the feedback! Pellets is what I'd primarily be using as well however hop usage would likely be around 5-10oz normally. Very tempted to just pull the trigger on it.
 
Thanks for the feedback! Pellets is what I'd primarily be using as well however hop usage would likely be around 5-10oz normally. Very tempted to just pull the trigger on it.

I think its very much worth the $50 bucks or whatever it is now. If you order it through Adventures in Homebrewing or MoreBeer I believe you can just take on another $10 bucks worth of supplies and you can get the free shipping.

It's honestly one of my favorite additions to the equipment that I've purchased. Especially now that I am back to doing 5 gallon batches, there's nothing better than seeing nice clear wort without all of the trub and spent hop material getting into the fermenter. It allows me to harvest the yeast from my carboy batch after batch because there's no junk in it (from the kettle).

Another perk is knowing you'd get full utilization. Thanks again, I'm definitely leaning towards it.
 
Any suggestions for best practices in planning salt & acid additions on this kind of setup?

Something I'm struggling to understand is that the instructions say to first dough in for 10 min at strike temp before you begin the recirculation (and add the remaining mash water) .

I'm assuming PH in the first ten minutes matters and you can't just look at the total mash volume when calculating

How would you best calculate the salt & acid additions for the dough in stage and then for the remaining mash water to be added at 10 min?

I'm sure the process would also require different procedures depending if you are planning to lower PH (most beers) or raise it (on say a stout)
 
I spent time trying to figure this out as well. Since the mash volume is less than total water volume (especially before recirculation) the water to grist ratio is different than a full volume BIAB. This should affect pH calculations as you said. I never got a good answer form the beersmith forums and I just use Beersmith to do the water pH calculations. I believe its using the full volume for calculations. Despite this, I check mash pH regularly and it is always within the range I want so I quit worrying about it.
 
The brew easy is essentially a full volume mash, BIAB process with the only difference being the total volume of mash is split between two vessels. The profile in all software you would use are built around BIAB and no sparge. The water calculations, including salts, acids and volumes should just be based on the total water.

In my opinion, the dough in phase should begin with pumping almost all the water up into the mash tun (make sure you disable the BK element first) or as much as you can fit along with the grain. Keep in mind that grain displaces .075 gallons per pound so 10 pounds needs .75 gallons of space. Stir the grain in gently and let it settle for 10 minutes. Then allow at least 4 gallons of wort to drain to the boil kettle, set the autosparge float at that point and begin slow recirculation.

The alternate way to do it is to keep all the water in the boil kettle, put all the dry grain into the mash tun, then pump all but 4 gallons into the mash tun through the drain port to underlet the mash.
 

Latest posts

Back
Top