muslin bags vs nylon bags

Homebrew Talk - Beer, Wine, Mead, & Cider Brewing Discussion Forum

Help Support Homebrew Talk - Beer, Wine, Mead, & Cider Brewing Discussion Forum:

This site may earn a commission from merchant affiliate links, including eBay, Amazon, and others.

jaycount

Well-Known Member
Joined
Dec 25, 2010
Messages
990
Reaction score
26
Location
Wichita
I did my first brew yesterday that required steeping grains and despite the fact that I also bought 2 nylon boiling bags I decided to use the muslin bag that came with the grains.

Everything was kosher until I tried to take the bag out and it completely fell apart.:mad: Managed to strain the grains out of the wort before boiling. What a daunting task.

So, I've learned, to use the high quality nylon bags from here on out. :tank:
 
I've used the muslin bags that come with the kits and had no problems. . . . . So far. . . . . .

NRS
 
Brewing my first batch tomorrow. Reading this I am glad i picked up a nylon bag at my local home brew store this afternoon. I also grabbed a bottle of star san.
 
Nylon bags at the LHBS - $3.95

1 Gallon paint straining bags from Lowe's $0.98 for TWO

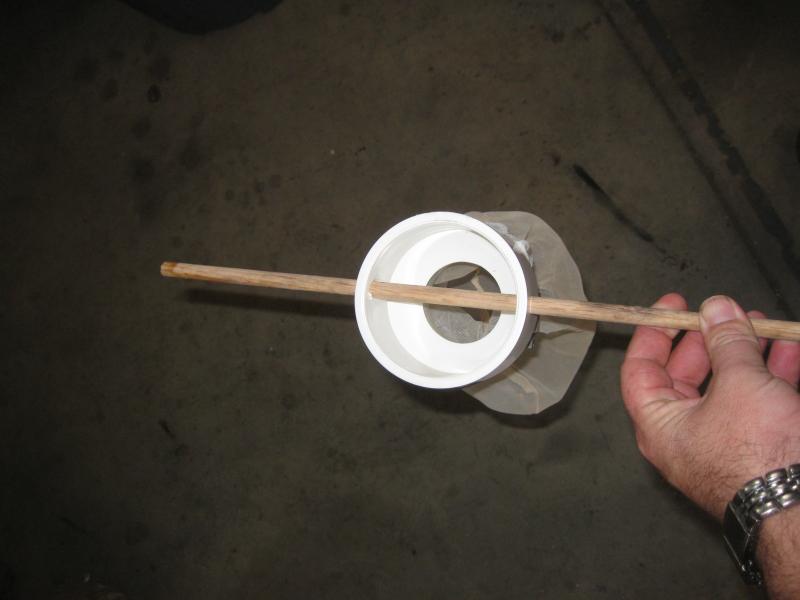
I made a simple hop spider from a 3 inch to 1 1/3 coupling and a wood dowel, with a stainless clamp, and love it. I actually have 2 - I have used one for steeping grains in the past. Works great, though admittedly the amount of grains was not as large as some batched I have seen.

+3 on the lowes paint strainer bags. They are nylon.
 
I just use my stirring spoon to support the grain as I pull it out. Maybe separate your grains into two or three smaller bags to distribute the weight.
 
Good thinking on the paint strainer bags. I've been paying $4.50/pc for the nylon bags on MWS
 
Nylon bags at the LHBS - $3.95

1 Gallon paint straining bags from Lowe's $0.98 for TWO

I made a simple hop spider from a 3 inch to 1 1/3 coupling and a wood dowel, with a stainless clamp, and love it. I actually have 2 - I have used one for steeping grains in the past. Works great, though admittedly the amount of grains was not as large as some batched I have seen.


Could you either post a picture of your hop spider or send me a picture via pm?

Thanks
 
Could you either post a picture of your hop spider or send me a picture via pm?

Thanks

My brewing gear is out in my shop, but I can take detailed pics later.

I started with ONE OF THESE

Then drilled two holes in the bigger part and suspend on the dowel, attaching the bag to the smaller park with a stainless pipe clamp.

The on in the pic I used threaded rod, but opted to use a wood dowel on subsequent brews.

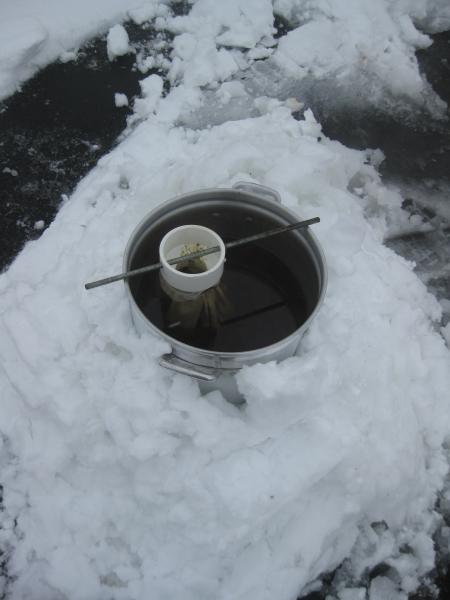
IMG_0731.jpg
 
Thanks for posting this picture. If you have time in the next month to take another one that wold be great but I can also try to make one just from this picture.

How effective is the pushed up snow against your brew kettle in reaching a good cold break? I would like to try a few more brews this winter but it is just too cold to run my wort chiller via the garden hose and I don't have the right type of sink to use inside the house for this.
 
and I don't have the right type of sink to use inside the house for this.

If you go to Home Depot or Lowes, you can buy an adapter that screws onto your kitchen faucet which gives it garden hose threads. It's only about 4-5 dollars. Then you can use your chiller inside.
 
Thanks for posting this picture. If you have time in the next month to take another one that wold be great but I can also try to make one just from this picture.

How effective is the pushed up snow against your brew kettle in reaching a good cold break? I would like to try a few more brews this winter but it is just too cold to run my wort chiller via the garden hose and I don't have the right type of sink to use inside the house for this.

Meh, it was OK. That was a rare occasion though, but not the norm for NC. I usually do the ice bath in a sink method.
 
Thanks for posting this picture. If you have time in the next month to take another one that wold be great but I can also try to make one just from this picture.

How effective is the pushed up snow against your brew kettle in reaching a good cold break? I would like to try a few more brews this winter but it is just too cold to run my wort chiller via the garden hose and I don't have the right type of sink to use inside the house for this.

Pushing it up against the snow is a lousy idea. The snow keeps melting away from the kettle leaving you an insulating air space. Much better to put some snow in a larger container (I use a laundry basket for my 5 gallon kettle) and fill it up to the level of the wort with water. Moving the kettle around cools it pretty quickly. You may have to add more snow if what you have in the basket melts.
 
If you go to Home Depot or Lowes, you can buy an adapter that screws onto your kitchen faucet which gives it garden hose threads. It's only about 4-5 dollars. Then you can use your chiller inside.

Thanks for the advice. I actually have that adaptor but the faucets we have in our new house do not have threaded pieces on the end that would allow me to use the chiller. For some reason the previous ownwer choose faucet heads that were soldered at the end.
 
Pushing it up against the snow is a lousy idea. The snow keeps melting away from the kettle leaving you an insulating air space. Much better to put some snow in a larger container (I use a laundry basket for my 5 gallon kettle) and fill it up to the level of the wort with water. Moving the kettle around cools it pretty quickly. You may have to add more snow if what you have in the basket melts.

I give this a try if I get to brew soon. We might also have ice we could add to this bath.
 
Pushing it up against the snow is a lousy idea. The snow keeps melting away from the kettle leaving you an insulating air space. Much better to put some snow in a larger container (I use a laundry basket for my 5 gallon kettle) and fill it up to the level of the wort with water. Moving the kettle around cools it pretty quickly. You may have to add more snow if what you have in the basket melts.

Yeah, i had to keep packing more. Like I said, not the norm.
 
It took 45 for me to cool my wort using snow and I poured water over it every few minutes.

Next paycheck a wort chiller is incoming.
 
I thought I heard that straight PVC was not safe to use in contact with things you consume. Is this not right. My understanding was that only CPVC was food safe?

It's a temp thing, CPVC is rated at a higher temp than regular PVC so it's used in instances where the water temp would be over 160 deg.

Either way, though, the hop-spider sits above the BK, with only the nylon bag in the wort itself. Nylon's good to over 400F, so as long as it's not on the burner directly, there's really no issue.
 
I found nylon 8x10 nylon bags in the produce section of my grocery store. For washing produce. 3 for $2. Work great as hops bags for both the boil and dry hopping. For grains I use a laundry bag that was 30 x 36 for $5. I cut it in half and my d stitched it up so I have two grain bags. Planning to move towards BIAB before too long and these should work great as they work pretty well now.

The thing is if you look around you'll find many brewing things for much less because they don't have that brewing tag.
 
I quit using the muslin bags for my grains in pb/pm biab. The nylon bags stretch over the lip of the kettle & stay "open",unlike muslin bags which tend to squeeze shut. So the nylon bags allow stirring of the grains to break up dough balls & evely wet them for better efficiency as I've seen.
I even started adding the hops loose in the kettle & strain them out going into the fermenter. I get a better edge to hop bitterness & flavor. But I still use hop sacks for dry hopping to contain the mess. No more than 1oz per muslin hop sack. I'd like to get a small nylon bag to use for dry hopping. They're way easier & quicker to clean than muslin,which absorbes staining easier than nylon.

Instead of bagging your hops for dry hopping, try bagging the inlet end of you racking cane/autosiphon and see if you notice any difference with the hops floating free in the beer. I sanitize a paint strainer bag (small ones work best, 1 gallon size perhaps) and slip it over the end of the autosiphon, held in place with a rubber band.
 
I tried a hop sock over the end once. Didn't work quite as well,with hop grains in the bottles here & there. I just like straining out as much as I can one way or other,especially if I'm going to wash the yeast. But since adding hops loose in the boil works a tad better,dry hopping that way might as well. I just don't like the hassel with the extra mess. Not to mention,more trub that might not pack down that well.
 
Im going to try BIAB for the first time.

Can I load 9lb of grain into 4 or 5 bags (muslin 8"x 12") and steep those in the mash water?

My concern is this will cause serious clumping right off the bat.
 
Im going to try BIAB for the first time.

Can I load 9lb of grain into 4 or 5 bags (muslin 8"x 12") and steep those in the mash water?

My concern is this will cause serious clumping right off the bat.

Nylon bags would be so much better. You want a bag that your entire pot will set inside so when you put the bag inside it can be loose. You need to be able to stir the grains into the water without clumping. You can get a custom bag made for your pot (check out what Wilserbrewer makes) or buy a paint strainer bag at the big box store. :rockin:
 
Back
Top