You are using an out of date browser. It may not display this or other websites correctly.
You should upgrade or use an alternative browser.
You should upgrade or use an alternative browser.
Brewtality 2
- Thread starter Couevas
- Start date

Help Support Homebrew Talk - Beer, Wine, Mead, & Cider Brewing Discussion Forum:
This site may earn a commission from merchant affiliate
links, including eBay, Amazon, and others.
OP
OP
Couevas
Well-Known Member
Here is a sketchup drawing of the new rig. I ordered the steel, 1 march pump, 3/8 & 1/2 inch silicone tubing, and QD's yesterday. Will be able to start welding Monday.
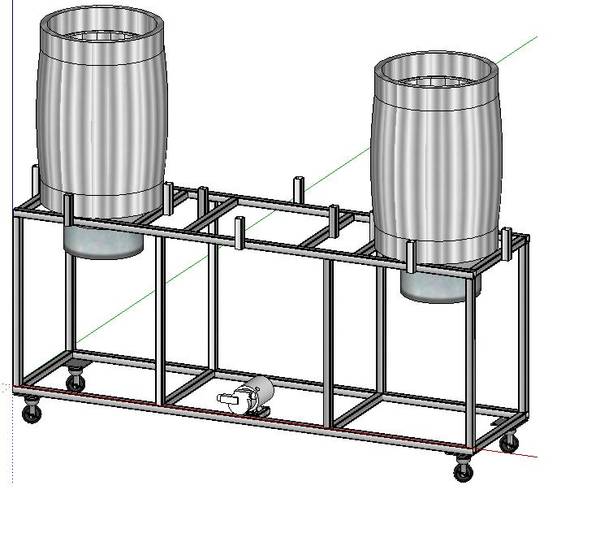
a few changes:
1. It will be about 2/3 as tall
2. It will only have 1 vertical support in middle instead of two.
a few changes:
1. It will be about 2/3 as tall
2. It will only have 1 vertical support in middle instead of two.
OP
OP
Couevas
Well-Known Member
my idea for now (and I am leaving room for improvement)......
A manual HERMS setup
By this I mean I will have a HERMS coil running through the HLT, but I will have no auto temp control. I will also use the same coil to chill the wort and aerate (I will recirculate back into BK through coil and allow to splash for aeration; HSA is a myth), The coil will be made up of two 25' 3/8 copper IC's; one with a smaller diameter inside the larger one.
It will have nothing hard plumbed. There will be two silicone hoses: one 1/2 inch for drain to pump and one 3/8 from pump to coil and outlet that will hang over top of keggles. These two hoses will have QD's as well as the pumps I/O. Should keep it simple, cheap, and have no maze of valves (except for just after the pump to control flow).
Is that understandable? I will post pics as I build and finish.
Boerderij_Kabouter
Well-Known Member
Looks good to me. Nice and clean.
Those kegs look familiar
Those kegs look familiar
OP
OP
Couevas
Well-Known Member
Those kegs look familiar
Yeah, I think I got the march pump mockup from you too.
Good work and thanks for submitting those.
- Joined
- Nov 6, 2007
- Messages
- 62,016
- Reaction score
- 6,922
I also use those kegs in my sketchup files
OP
OP
Couevas
Well-Known Member
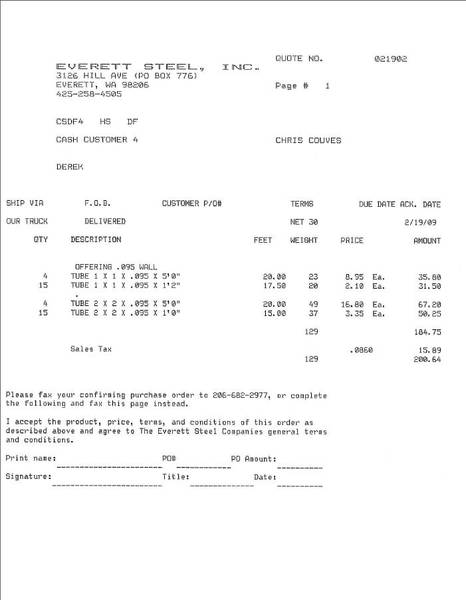
A local steel yard (Everett Steel) is cutting my tube to length before hand. All I will have to do is weld it. 1 inch square at 13 gage (.095) wall thickness is plenty strong enough, and at 70 bucks total....you can't beat it!
And I got my little, flux core, wire feed for 120 bucks at Harbor Freight! It is a cheap little 90 amp 110 volt unit, but it will weld up to 1/8 no problem. I have had good experiences with these, and for the price, if it craps out in a few years, who cares?
And I got my little, flux core, wire feed for 120 bucks at Harbor Freight! It is a cheap little 90 amp 110 volt unit, but it will weld up to 1/8 no problem. I have had good experiences with these, and for the price, if it craps out in a few years, who cares?
I also use those kegs in my sketchup files
You know, sketchup just doesnt cut it. I work with AutoCAD all day, maybe I should switch from buildings to brew systems. If any of you would like some drawn up blue prints to send to a manufacturer I would be more than happy to conver them. Okay done sticking up for CAD, love the setup, are you welding it all together yourself?
OP
OP
Couevas
Well-Known Member
sketchup is perfect for what it is.....it is a free solid modeling program. In that realm, I cannot sing its praises enough.
However, being an engineer myself, I realize there are many suites that are better (probably all commercially available suites are better in some respect). My experience is in autoCAD, Solidworks and ProE. IMHO, solidworks is superior to all, for 3D modeling. AutoCAD honestly limps along when it comes to 3D and ProE is just to cumbersome.
But if you are a private user, and can't afford the astronomical price tags, sketchup works great for getting your ideas in visual form.
And yes, I am welding myself.
Sketchup rocks. The free version is great, and the pro version is cheap. It is very intuitive and easy to use. There are tons of online tutorials and plugins available to do some pretty cool stuff. It's not a CAD program, but I don't need a CAD program. I just want to visualize stuff in 3D, which Sketchup does very well... and they don't put out a new version every year. Milk that revenue stream Autodesk!
OP
OP
Couevas
Well-Known Member
My point exactly. For what it is designed for, sketchup is great. But in a professional environment, I would go with SolidWorks.
Sorry, just not an AutoCAD fan.
Sorry, just not an AutoCAD fan.
ftlstrings
Well-Known Member
any pics yet?
~M~
~M~
OP
OP
Couevas
Well-Known Member
sorry, none of the supplies have arrived yet.
I am picking up the steel tomorrow afternoon.....
I am picking up the steel tomorrow afternoon.....
OP
OP
Couevas
Well-Known Member
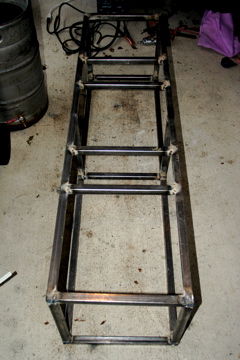
These pics aren't very exciting......but I got my steel today. I had the lengths pre-cut by the steelyard; just cuts down on work I have to do. They didn't charge any xtra for it either.:rockin:
I also simplified the design so that there are only 2 lengths of tube. I have 4 5-foot sections and 15 14-inch sections. This was another way of keeping it simple. The height of the sculpture will be the same as the depth.
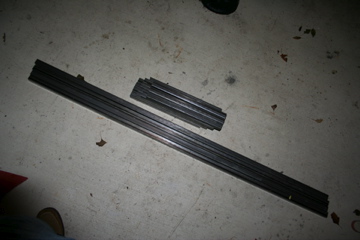
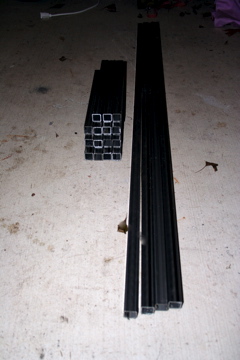
It is 1"x1"x.095" CRS square tubing. My wife wouldn't let me weld today, since our baby was sleeping just on the other side of the wall. I will try to get some of this tacked together tomorrow after work. I will post pics then.
I also simplified the design so that there are only 2 lengths of tube. I have 4 5-foot sections and 15 14-inch sections. This was another way of keeping it simple. The height of the sculpture will be the same as the depth.
It is 1"x1"x.095" CRS square tubing. My wife wouldn't let me weld today, since our baby was sleeping just on the other side of the wall. I will try to get some of this tacked together tomorrow after work. I will post pics then.
OP
OP
Couevas
Well-Known Member
March pump from AHS is on it's way. Scheduled for Friday delivery. Thanks Forrest, best pricing on 809.
QD's and silicone tubing will be delivered today from McMaster. McMaster FTW on service, speed and pricing (at least on the tubing and QD's). 1/2" Brass QD set are ~ 13 bucks each. I bought 3 females and 5 males.
Pics to come when I get home.....
QD's and silicone tubing will be delivered today from McMaster. McMaster FTW on service, speed and pricing (at least on the tubing and QD's). 1/2" Brass QD set are ~ 13 bucks each. I bought 3 females and 5 males.
Pics to come when I get home.....
OP
OP
Couevas
Well-Known Member
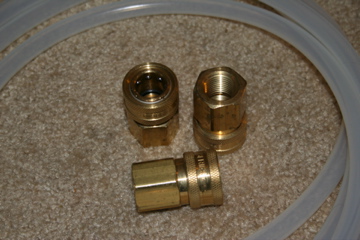
McMaster shipment got here last night......
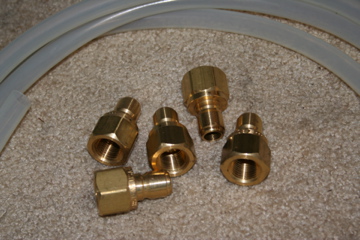
These QD's are sick!:rockin:
I highly reccomend them. They are very heavy-duty and weigh nearly a half pound each end. Lots of brass in these things. And you can get 3 for the price of one set of plastics from a brew store.
Didn't get a chance to tack together the frame last night; I had to do my taxes. Getting a refund, but it is already spent
If not before, I will post some pics of the equipment on Friday when I get my March. I plan on finishing all the welding and grinding on Friday as well, as it is a day off. I love working 4-10's.
These QD's are sick!:rockin:
I highly reccomend them. They are very heavy-duty and weigh nearly a half pound each end. Lots of brass in these things. And you can get 3 for the price of one set of plastics from a brew store.
Didn't get a chance to tack together the frame last night; I had to do my taxes. Getting a refund
, but it is already spentIf not before, I will post some pics of the equipment on Friday when I get my March. I plan on finishing all the welding and grinding on Friday as well, as it is a day off. I love working 4-10's.
OP
OP
Couevas
Well-Known Member
Here are some pics of the Silicone tubing and brass QD's I got from McMaster. Great deal at about $13 a set and they are seriously heavy duty.

OP
OP
Couevas
Well-Known Member
Here are some pics of the power box I built for her. It has a GFCI dual outlet plug and a switch that kills power to both plugs. I built this for two reasons. The first was to have a GFCI unit on the rig so that it would be safe wherever I brew and the second reason is have a power point for the march pump to plug into that is switched so I can turn it on and off without unplugging it. There is also a second plug for whatever.....


gartj
Well-Known Member
That is a great deal. Are the o-rings in the QD's safe for high heat?
OP
OP
Couevas
Well-Known Member
Are the o-rings in the QD's safe for high heat?
Good question.
These fittings are rated to 250 degrees. It is just over, but still over boiling point.:rockin:
gartj
Well-Known Member
I take it they came from McMaster Carr but I can't seem to locate them. Do you have a part #?
OP
OP
Couevas
Well-Known Member
The female sleeve locks are 6537K75
The male plugs are 6537K13
Catalog page 282.
There are 90 degree ones and ones with hose barbs on them already too if you want. I have seen some people on here use those as well.
The male plugs are 6537K13
Catalog page 282.
There are 90 degree ones and ones with hose barbs on them already too if you want. I have seen some people on here use those as well.
OP
OP
Couevas
Well-Known Member
Here is the welded up rig. The welds aren't perfect, but you can see the penetration in the surrounding areas, so it is plenty strong. I haven't cleaned the slag and debris off yet, but here it is......

I will take more pics tomorrow. I still need to weld on the tabs that will keep the kegs from sliding off and a mount area for my pump and power box.
I will take more pics tomorrow. I still need to weld on the tabs that will keep the kegs from sliding off and a mount area for my pump and power box.
OP
OP
Couevas
Well-Known Member
Well,
Doesn't look like I will be able to get much more done this week on the rig (at least until Friday afternoon).
I have my GMAT exam to take on the 6th and need to do some last minute prep this week.
Doesn't look like I will be able to get much more done this week on the rig (at least until Friday afternoon).
I have my GMAT exam to take on the 6th and need to do some last minute prep this week.
OP
OP
Couevas
Well-Known Member
I need some opinions.....
I think I have somewhat of a unique idea for my manual HERMS setup (or at least I haven't seen anyone else do it this way). I am going to run only two hoses in the whole brewery. One will be a half inch drain that will connect from keg spigots to the input of the pump. This hose will be moved to whichever keg needs to be drained via QD's. The second hose will be 3/8 inch line and will run from the output of the pump, through an IC and out of a homemade "shower-faucet" type copper sparge arm that I am making (pics to follow later).
The plan is to solder this for no leaks and robustness. However, I want to use it for both recirc/sparging and for recirc in the pre-pitch chilling phase. Does that make sense? I want to use the same line and IC to chill the wort. While it is chilling, it will be recircing back into the BK and aerating at the same time.
I know this might be hard to picture with a picture (HA HA) but is it understandable? I am trying to achieve maximum simplicity (KISS) in a somewhat complex (HERMS) system as well as multi-task (chill & aerate at same time).
What do you guys think?
Boerderij_Kabouter
Well-Known Member
So your chiller will be a hybrid? You will pump hot wort through the chiller that is submerged in ice water, and cascade the chilled wort into the fermenter? Is that what you mean?
or do you mean that you will cascade the wort back into the full volume of the boil kettle?
I don't fear HSA either, but that seems like tempting the devil with dark chocolate and an oatmeal stout. I prefer to leave hot wort unaerated.
or do you mean that you will cascade the wort back into the full volume of the boil kettle?
I don't fear HSA either, but that seems like tempting the devil with dark chocolate and an oatmeal stout. I prefer to leave hot wort unaerated.
OP
OP
Couevas
Well-Known Member
So your chiller will be a hybrid? You will pump hot wort through the chiller that is submerged in ice water, and cascade the chilled wort into the fermenter? Is that what you mean?
or do you mean that you will cascade the wort back into the full volume of the boil kettle?
I don't fear HSA either, but that seems like tempting the devil with dark chocolate and an oatmeal stout. I prefer to leave hot wort unaerated.
More the latter....
The idea was to use the same plumbing as the HERMS coil to chill with and recirculate back in the BK until pitching temps are reached. This would give me the best performance out of an IC setup possible (in theory) and have oxygenated wort just as it becomes pitchable. Then the wort will be pumped from the BK to the fermentation vessel through the same line (aerating slightly more as the vessel is filled).
If HSA is real, then there would definately be a possibility due to the aeration beginning at the same time as the start of the chilling.
Is that clear now? I apologize if it is not.
OP
OP
Couevas
Well-Known Member
Anyone else have an opionion on this?
I am really curious as to what some of you think about this setup (primarily the aeration starting at flame out along with chilling)
In other words...........BUMP
I am really curious as to what some of you think about this setup (primarily the aeration starting at flame out along with chilling)
In other words...........BUMP
Whether the output of the coil is directed into the fermenter or back into the kettle is irrelevant. I would still call the chiller design a hybrid chiller or maybe more specifically a reverse immersion. The downside of it is that you're going to need a LOT of ice and you'll have to agitate the ice water quite a bit throughout the chilling cycle.
I always suggest that no matter how warm one's tap water is, it is still the most efficient means of getting boiling wort down into the low 100F area. Getting from there to pitching temp can certainly leverage ice and it would require much less. Unfortunately in such a large vessel, it would be time consuming to fill with tap water, drain, refill, drain, refill and add ICE.... drain.
I always suggest that no matter how warm one's tap water is, it is still the most efficient means of getting boiling wort down into the low 100F area. Getting from there to pitching temp can certainly leverage ice and it would require much less. Unfortunately in such a large vessel, it would be time consuming to fill with tap water, drain, refill, drain, refill and add ICE.... drain.
OP
OP
Couevas
Well-Known Member
Bobby,
Your response got me thinking. At first, I was worried one pass through the coil would not be enough to chill to pitching temps. However, if CFC's can do it in one pass, why wouldn't this? I will have to give it a try with some water when I am done building.
BTW, my frankenstein "reverse IC" is two seperate 25 foot, 3/8 copper IC's. I took one and reduced the diameter of the coil by about 40% and mounted it within the loop of the first. I will post pics later.
Now that I think of it, I don't see why the wort coming out of the coil can't be below pitching temp. I think this will work!
CFCs (and plate chillers for that matter) work so well because a very small volume of wort is met with a small volume of cold coolant (which is constantly being refreshed). The "counterflow" is the key. When the 212F wort hits the chiller, it's met with coolant at about 150F. You'd think that doesn't do much good but you still have a 62F delta there. Obviously the further down the coil you get the cooler the wort will become as it encounters colder and colder coolant. All the way at the wort's exit end, the coolant it encounters is whatever your tap is, say 65F.
You very well might get it to cool in one pass but again, it's going to take a lot of ice to keep the water cold and you have to stir it big time because the water near the coils is going to heat quickly.
You very well might get it to cool in one pass but again, it's going to take a lot of ice to keep the water cold and you have to stir it big time because the water near the coils is going to heat quickly.
OP
OP
Couevas
Well-Known Member
I will probably drop an aquarium pump in the ice bath to facilitate stirring.
The amount of ice doesn't bother me. The real test is going to be the ability to cool within 50 ft of tubing.
The amount of ice doesn't bother me. The real test is going to be the ability to cool within 50 ft of tubing.
OP
OP
Couevas
Well-Known Member
Finished the structure today. Below are some pics of it before painting. It is in the garage with the first coat drying. I will post some pics of it later this week when I get the peripherals attached and the last coats of paint on her.


This gives a proportional view with a keg. The top of the keg is mid-chest. The height worked out perfect.

A close-up showing the tabs that keep the kegs from sliding off.
This gives a proportional view with a keg. The top of the keg is mid-chest. The height worked out perfect.
A close-up showing the tabs that keep the kegs from sliding off.
bendavanza
Well-Known Member
SHINY!
don't you hate painting shiny metal?
Looks good Couevas. I'm brewing 2 beers today, I f'd up and left the MLT ball valve open part way while adding my sparge water, live and learn.
don't you hate painting shiny metal?
Looks good Couevas. I'm brewing 2 beers today, I f'd up and left the MLT ball valve open part way while adding my sparge water, live and learn.
Major props for going with the lesser used, but easily capable 1" square tubing.
OP
OP
Couevas
Well-Known Member
Major props for going with the lesser used, but easily capable 1" square tubing.
Half the price and half the weight......no brainer.
The only thing that made me consider 2 inch tube was the margin for error on the keg width. There would be more "shelf area" if I went with 2. But I just put faith in my measurements and went for it.
$70 for the steel and about 40 pounds total weight (without kegs).
- Joined
- Nov 6, 2007
- Messages
- 62,016
- Reaction score
- 6,922
\]$70 for the steel...).
Is this normal prices or did you have a connection/hookup or whatever you wanna call it?
$70 puts the idea of a rig out of my dreams and into reality for sure! I know the $70 is only the steel, But once you ahve a frame you can always brew on it and add as you go.
OP
OP
Couevas
Well-Known Member
Is this normal prices or did you have a connection/hookup or whatever you wanna call it?
...And these prices include the fact that it was precut to length. I had to do absolutley NO cutting. Just weld, grind welds, and you are good to go.
Also, I didn't have a hookup. Go to google maps and type in "Chillicothe, OH." Once you are looking at your town, type "Steel" in the search bar. Then just start calling the companies listed until you find one that serves the public. Then send them an RFQ (Request for Quote, incase you hadn't seen that before). See what comes up. That's all I did. Here is the quote they sent me...(note that this is a quote for both 1 inch and 2 inch steel)......
OP
OP
Couevas
Well-Known Member
Here is the new manifold I just finished. I never was that happy with my bazooka T and now I am done with it
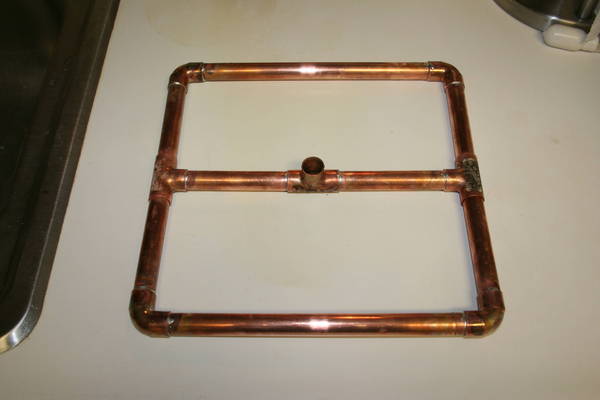
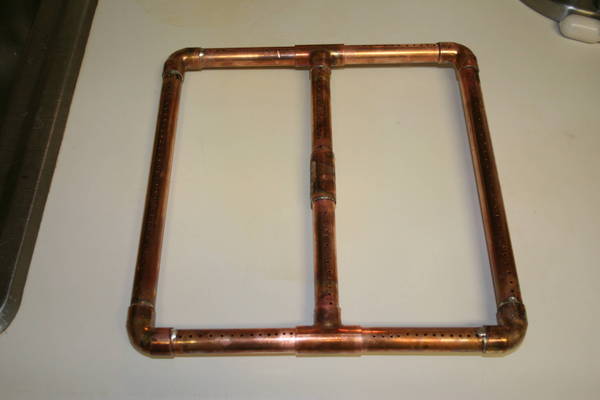
Holes not slits.


All joints are soldered except these. I wanted it to be strong enough to withstand stirring the mash, but I also wanted to be able to disconnect for thorough cleaning every once in a while.
Holes not slits.
All joints are soldered except these. I wanted it to be strong enough to withstand stirring the mash, but I also wanted to be able to disconnect for thorough cleaning every once in a while.
Similar threads
- Replies
- 2
- Views
- 635
- Replies
- 1
- Views
- 492
- Replies
- 4
- Views
- 544
- Replies
- 3
- Views
- 989
- Replies
- 25
- Views
- 1K
