$112 Tri Clover RIMS Tube Pictures

Homebrew Talk - Beer, Wine, Mead, & Cider Brewing Discussion Forum

Help Support Homebrew Talk - Beer, Wine, Mead, & Cider Brewing Discussion Forum:

This site may earn a commission from merchant affiliate links, including eBay, Amazon, and others.
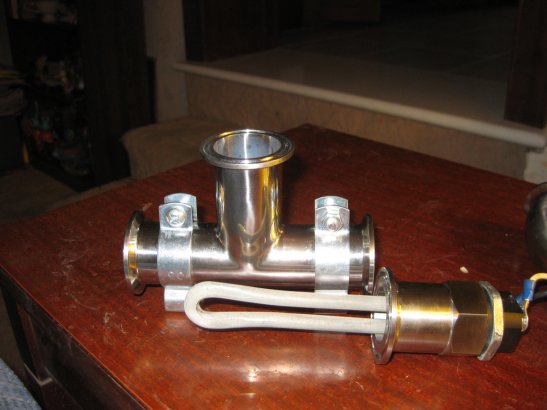
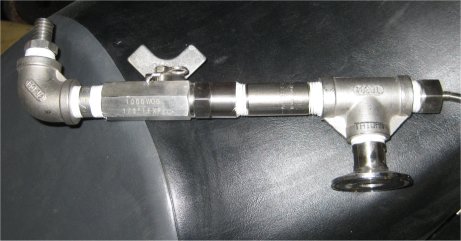
It's nice, but it's another case of the build vs. buy discussion. I refuse to pay $179 for this, but someone else might pony up. This is essentially what I was describing by drilling out an end cap. The beauty of this is that you're not totally effed when the element fails....just drop in a new one.
 
So I just got a 5500W LD element and inserted it into the 1.5" triclover pipe....it definitely touches in several places, I don't think I can bend it away from the inner wall.

So why would this cause element failure? Overheating at the point of contact? I think it's too late to go with 2" pipe....I've already bought everything ! :(
 
I was thinking of some thing similar

Rims_tube.jpg


I am hoping this idea will give better flow over the output sensor
 
All

Thank you for sharing all the experience & R&D information you have invested in this project.

I was wondering how the system is working now that you have had some time on it.
Any key learnings ?
Do you find that the dead spaces at the ends of the tees are causing heating and or monitoring problems?

Would you recommend using the tees?

Many thanks
 
I built mine as the diagram above. due to a rims tube i had before that the temp sensor wasn't in the flow very well. the other tri clamp T may work but i defiantly have a good flow over the temp sensor
The only thing is that i wish the heating element was a little furtherer into the main Tri clamp T. i belive this can now be achieved by using the new heating element fitting that Derrin is now selling. this maybe an upgrade for me in the near future, as it looks like it will also make it a waterproof housing.
http://www.brewershardware.com/TC15F10NPSCOV.html

Overall though my rims tube does the job well.
 
Wurz

Thanks for your feedback.

I found your design to be an interesting take on a rims tube. Good to hear that it is working well for you.

In regards to the element in your system....your tee is ~4" or so... plus the tri clover 1" fpt ~2"? How far into the tube do you estimate your element is?

I am guessing that your element is 7.75" or so?

Do you think that a 220V element would work in the single tee elbow combo? I am guessing that the longer 22v 5500W element might not fit in your tube.

Did you go all SS with the temp probe section?

I agree that Darrins element housing is looking sweet. Might have to pick that up when it is avalible.

Merci

Biereniox
 
I actually have that element adapter on order from Derrin. I will post a review once it comes in.

Wurz, if you use Derrings adapter, it will allow you to have your element pushed more into the RIMS tube. If your element is to scale in the above picture it looks like it will move it an inch or 2.
 
My Drawing is pretty much to Scale. I originally drew it up in autocad. ( but it was before i had all the pieces and was designing it) so the actual sizes may vary a little.

looking at my drawing. using Derrins adapter it looks like it may put it up to another 1.5" into the flow. which would defiantly help.

I will have to check all dimensions and post when i get home from work.
 
This drawing is to scale

A. shows the setup i am using at the moment.

B. shows it with the heating element in Derrins adapter showing approximately 1/2" to where the element tightens up to.

rims_model.jpg


Wurz

Do you think that a 220V element would work in the single tee elbow combo? I am guessing that the longer 22v 5500W element might not fit in your tube.

Did you go all SS with the temp probe section?
I belive the 220vac heating element is a lot longer than the 110v and would not work in this situation.

Yes i did go with all SS on the probe outlet Side.

rims.jpg


rims_temp_probe.jpg
 
What kinda fasteners did u use to on the tee? Those look like they work well

They are for 1.5" electrical conduit. apparently you can get them in SS to if you go to an electrical supply store. mine are just galvanized from a job site.
been searching for a while tried all plumbing sizes nothing fit that well had to put spacers in.
 
Do those fasteners allow you to easily remove the tubing to clean it? Thats what I'm really after.

Is your temp probe threaded into a bushing?
 
Do those fasteners allow you to easily remove the tubing to clean it? Thats what I'm really after.

Is your temp probe threaded into a bushing?

Yes those clips will let you easily remove it for cleaning.
They are just regular steal clips with a bolt on top they are not sprung steal of any kind. they are meant to be put on a conduit and not removed.
The clips do bend on and off the rims tube with ease.

They will wear out and break with constant taking tube in and out.
but I do expect it to last a while and the clips are ready available at home depot I am told, for only a bucks or 2 each.

The Temp probe I use is a type K Liquid Tight, which threads straight into a 1/2" SS Tea, which fits the Auber Instruments PID controllers
http://www.auberins.com/index.php?main_page=product_info&cPath=3&products_id=165&zenid=5cb5793c5d7d0bc8e40880dcbd6dded9

you might want to check out Sawdustguys other thread

https://www.homebrewtalk.com/f51/rims-dummies-114997/
 
I have been following his thread, that is what inspired me to make my rims tube. see below for pics.

I used u bolts to hold my rims tube down but they don't work that well. My tube is top heavy so it always wants to rotate down but I think i figured out a solution. If i can find some rubber I will put it between the rims tube and the u bolts which will create friction and in the end preventing the tube from rotating down. Regardless, I should come up with a different method for ease of disconnecting and cleaning. Right now it's going to be a main to remove it.

4111 004.JPG


4111 005.JPG
 
I have been following his thread, that is what inspired me to make my rims tube. see below for pics.

I used u bolts to hold my rims tube down but they don't work that well. My tube is top heavy so it always wants to rotate down but I think i figured out a solution. If i can find some rubber I will put it between the rims tube and the u bolts which will create friction and in the end preventing the tube from rotating down. Regardless, I should come up with a different method for ease of disconnecting and cleaning. Right now it's going to be a main to remove it.

If you slide about 3" of silicone tubing over the u-bolt, you should be good to go. Wing nuts will make it easier to remove.

Ed
 
I have been following his thread, that is what inspired me to make my rims tube. see below for pics.

Looks Interesting Derrins rims Tube with sight glass. Nice
Do you use a 220VAC element in there as its long enough?

Your Therminator also Looks Interesting. Care to share?

I"m sure the clamp that i use would also fit your tubing.
 
Looks Interesting Derrins rims Tube with sight glass. Nice
Do you use a 220VAC element in there as its long enough?

Your Therminator also Looks Interesting. Care to share?

I"m sure the clamp that i use would also fit your tubing.

I am using a 1500w 120v element from plumbing supply. I think it's overall length is 7 or 8 inchs. Thats all I need for a RIMS setup. I also have valves that welders use on their torches so I can control the burners so that there is barely a flame but just enough to produce heat without burning the wort.

The terminator setup, I liked the chill-wizard from sabco so i tried to do something similar, it's still not done yet as i am waiting on parts but heres the deal. I have a thermometer on the outlet of the wort and the inlet of the water, it just makes it nice to see what your incoming water is to help throttle the valves. Then i have a sight glass on the wort out connected to a tee with a diffusion stone in one end and a valve on the other. This will be my inline aeration fixture. Thats about it.

41211 007.JPG


41211 009.JPG
 
I'm interested to hear this as well. I am looking at the 1.5" system, with the 1" reducer for the element and I can't decide which thermocoupler I want to use with which controller.
 
I'm interested to hear this as well. I am looking at the 1.5" system, with the 1" reducer for the element and I can't decide which thermocoupler I want to use with which controller.

still use mine works great

I have a Auber PID SLY 4342 as stated in thread Rims for dummies
I only use the Pt 100 RTD sensors which have disconnects making them easier to handle clean and not so worried about breaking or kinking the cables.
you can get the sensors from Auber instruments 1/2" mpt Thread or the Tri Clamp sensor. they also have may more sensor types to chose from, to suit your needs.
pay the extra for the Deluxe cable option and you can put a plug on the controller box and rims unit and or HLT / Mash Tun, have a cable to plug and play in between.
 
Back
Top