
cyclogenesis
Well-Known Member
I got quite into home brewing back in my PhD days in Canberra, Australia. I started with the Coopers Kit, went to steeping grains and hops and worked my way to all grain even playing with decoatation mashing, yeast propagation etc...
Then I got a job and it all went downhill (plus moving into the inner city in Melbourne)... I ended up selling almost all of my kit. We have just moved to Chicago and it is time for brewery rebirth.. Rather than use the old name (PotOfGrass Productions) I thought I would start anew..
Being an Aussie when the temperature heads south I want to be indoors and I have an awesome unfinished basement (been in the house about a year) so I have decided to go the E-Brewery route.. The build will be a four tier (HLT-MLT-Kettle-Fermenter) gravity system, I intend to mainly batch sparge (worked for the previous build so why change?)
First step was to build a stand.. I had a heap of scrap wood from when we had our deck built, plus zero metal working skills so wood it was:
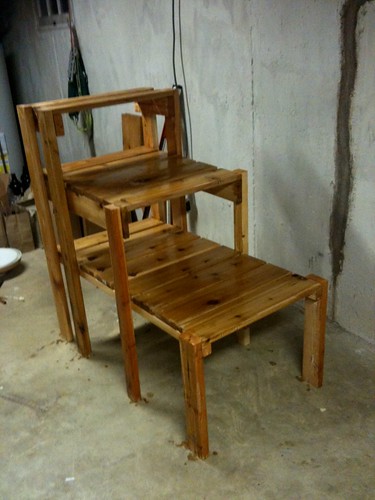
IMG_0964 by Cyclogenesis_au, on Flickr
Plan will be to build some heatpads, probably out of copper tubing (saw this at the inteligensia cafe in Chicago, they had some great four legged "tables" out of copper piping for heat protection)
With the stand built I went out and bought a cooler from target.. decided to go the rectangular one rather than the Gatorade cooler shape to keep it low profile and lower rise..

IMG_0969 by Cyclogenesis_au, on Flickr
Here it is with a bulkhead kit installed from bargainfittings.com
Kettle is from morebeer (Loving homebrew finds!) single port welded, can't remember where I got the cheep 20qt stockpot, this will be converted to the HLT (yes I know it will be very small for a 5 Gal batch brewery... will upgrade)
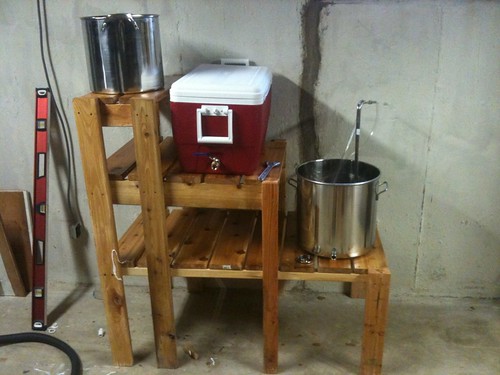
IMG_0970 by Cyclogenesis_au, on Flickr
Next step is the manifold for the mash tun... basically followed some designs off here and came up with this:
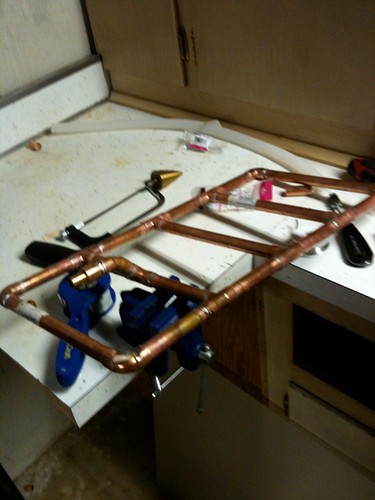
IMG_0973 by Cyclogenesis_au, on Flickr
did a test run and was very please to see almost zero deadspace... the sipon pulled up almost all the test water!
Next I used a step up drill bit to put a hole in the HLT (following advice here I used some dishwasher soap as a lubricant... ) installing a morebeer converter kit (needed a few extra washers as it is a very thin flexible wall) and we have a non-leaking HLT!
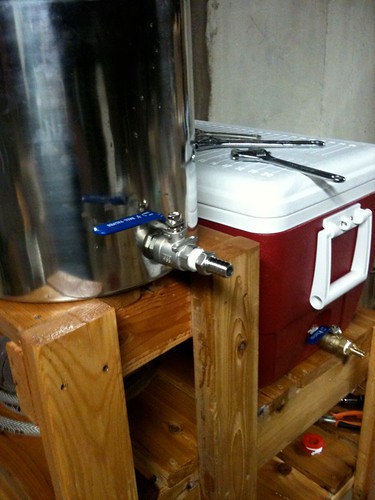
IMG_0976 by Cyclogenesis_au, on Flickr
So I am 99% sure I will go with the EBC II from high gravity as I lack the confidence to build my own controller... plan is for an element in the HLT and an element in the kettle and switching between them..
I ordered cam couplings today, as in my old brewery I intended to mash in by sending the strike water through the outlet of the MLT...
Next: Plumbing hot and cold water to the brewery, quick connects, electricals etc.. ! (and then BREWING!)
Then I got a job and it all went downhill (plus moving into the inner city in Melbourne)... I ended up selling almost all of my kit. We have just moved to Chicago and it is time for brewery rebirth.. Rather than use the old name (PotOfGrass Productions) I thought I would start anew..
Being an Aussie when the temperature heads south I want to be indoors and I have an awesome unfinished basement (been in the house about a year) so I have decided to go the E-Brewery route.. The build will be a four tier (HLT-MLT-Kettle-Fermenter) gravity system, I intend to mainly batch sparge (worked for the previous build so why change?)
First step was to build a stand.. I had a heap of scrap wood from when we had our deck built, plus zero metal working skills so wood it was:
IMG_0964 by Cyclogenesis_au, on Flickr
Plan will be to build some heatpads, probably out of copper tubing (saw this at the inteligensia cafe in Chicago, they had some great four legged "tables" out of copper piping for heat protection)
With the stand built I went out and bought a cooler from target.. decided to go the rectangular one rather than the Gatorade cooler shape to keep it low profile and lower rise..
IMG_0969 by Cyclogenesis_au, on Flickr
Here it is with a bulkhead kit installed from bargainfittings.com
Kettle is from morebeer (Loving homebrew finds!) single port welded, can't remember where I got the cheep 20qt stockpot, this will be converted to the HLT (yes I know it will be very small for a 5 Gal batch brewery... will upgrade)
IMG_0970 by Cyclogenesis_au, on Flickr
Next step is the manifold for the mash tun... basically followed some designs off here and came up with this:
IMG_0973 by Cyclogenesis_au, on Flickr
did a test run and was very please to see almost zero deadspace... the sipon pulled up almost all the test water!
Next I used a step up drill bit to put a hole in the HLT (following advice here I used some dishwasher soap as a lubricant... ) installing a morebeer converter kit (needed a few extra washers as it is a very thin flexible wall) and we have a non-leaking HLT!
IMG_0976 by Cyclogenesis_au, on Flickr
So I am 99% sure I will go with the EBC II from high gravity as I lack the confidence to build my own controller... plan is for an element in the HLT and an element in the kettle and switching between them..
I ordered cam couplings today, as in my old brewery I intended to mash in by sending the strike water through the outlet of the MLT...
Next: Plumbing hot and cold water to the brewery, quick connects, electricals etc.. ! (and then BREWING!)
")


