Another dorm fridge-based fermentation chamber

Homebrew Talk - Beer, Wine, Mead, & Cider Brewing Discussion Forum

Help Support Homebrew Talk - Beer, Wine, Mead, & Cider Brewing Discussion Forum:

This site may earn a commission from merchant affiliate links, including eBay, Amazon, and others.

MrFebtober

Well-Known Member
Joined
Jul 11, 2006
Messages
619
Reaction score
8
Location
Greater Cincinnati area
My fermentation chamber/cabinet is now about half complete so thought I'd post some progress pictures. My main inspiration was the one Thomcat333 built a while back. It's constucted of 2x2 and paneling and will be stuffed with 2" of rigid insulation (the pink stuff) and lined with melomine board. It should hold 2 large carboys/buckets, or 8 cornies, or some combination of each.

Initial framing:
IMG_1643.jpg


A skeleton is formed:
IMG_1648.jpg
 
I decided to rabbet the joints instead of using angle brackets. This would have been easier if I had a table saw, but I made due with my father's sliding compound mitre saw.
IMG_1653.jpg


Here, some of the panels are in place and the dorm fridge is in place to show a bit more of how the design works. I've yet to build the door, but it will go the full length of the front of the cabinet (opposite the fridge).
IMG_1657.jpg
 
Slowly and over-budget, but it's coming along. I probably should have waited until I was further along before posting the initial pics. I'Ve got all of the framing, exterior paneling, and insulating completed. All that's left is the mounting the door, wiring installation and the melomine paneling for the interior.

Here's a pic from a week ago, but i've made a lot of progress since then. I'll post more pics this evening.
IMG_1667.jpg


My goal is to have it up and running by this weekend so I can use it for the oktoberfest lager I'll be brewing Saturday. Thanks for asking!
 
hope it cools down enough. i know when i built the extension for mine for testing i wasnt able to get it below 60* and it was internal 20x36x36 and i was using a 4cf dorm fridge. i am thinking if you have to though you can split the bottom into two chambers and use a temp and fan to cool the area for fermenting and you might be able to lager in the other chamber. find a way of circulating the warm air into the fridge for cooling then back into the chamber.
 
Some more progress. I used some thermal epoxy to bond a large heat sink (from an old Pentium 2 processor) to the inside of the freezer compartment of the cube fridge. Then, I added the 120mm DC fan to the freezer door. Hopefully these measures will help move the cold throughout the chamber.
IMG_1671.JPG

IMG_16761.JPG


And one more picture of progress on the chamber (can't go any further until I install the wiring for the LED lighting system and control wiring).
IMG_1677.JPG
 
I am loving these ideas, I cant wait for you to get this done and see how well you can hold the temps. I am wanting to do something similar to this so I can ferment more then 5g at a time in my small fridge
 
how thick is that foam? and remember the air gap behind the foam to give it max r rating. i need to take the box i made for mine as a test and make it smaller to see what size is the best size. right now i made a little 17" extension that allowed the 6.5 carboy in the bottom of the fridge and then one of the cornies in the foam box. was down to 38* today with it closed up for 3 straight days. have a 4inch fan to circulate the air but didnt think about a heat sink. interesting. BTW lowes carries 1.5" foam board least i found it here in tulsa.
 
pen25, I'm using 1.5" foam in between the 2x2 frame members, plus a layer of .5" foam lining the interior of the chamber. So, 2" total in most places. Oh, and the bottom/floor is two layers of 1.5". Hopefully it's adequate. I don't have an air gap behind the foam, though, just thin paneling.

Hopefully the fan will create enough of a current through the chamber, but i may add a second fan to a lower part of the chamber if necessary. Interior volume of the chamber, including the volume in the fridge, is maybe 14 - 16 cu. ft. If I can get it to hold steady temps down into the mid 40s I'll be pleased as punch. I believe the cooling power is there, it's just up to me to seal everything up adequately.
 
I am loving these ideas, I cant wait for you to get this done and see how well you can hold the temps. I am wanting to do something similar to this so I can ferment more then 5g at a time in my small fridge

I would recommend this project to anyone who enjoys designing and building stuff with their spare time. However, I certainly would not recommend this to anyone looking to obtain a fermentation chamber for cheap. I already had the fridge and paid next to nothing for the watlow controller I'm using, but even so I have spent more than $150 on materials to build this thing--I could have gotten a great used chest freezer for that price. It's amazing how the cost can add up for: screws, panel adhesive, caulk, wood glue, lumber (six 2x2s, two 2x4s, two sheets of paneling, two sheets of melomine board), two sheets of 1.5" insulation, two sheets of .5" insulation, weather stripping, and other hardware.

It's become a vicious cycle: The more I time and money I spend on this project, the more I feel like I have to make it as nice and well-made as possible b/c that's the only way to justify all the time and money I'm putting into it...which means putting even more time and money into it! :drunk:

Anyway, I'm not trying to discourage anybody and there are certainly less expensive ways to build a chamber. I'm having a good time with this because I enjoy working with my hands and it had been a while since I built anything. this will quench that desire for some time, though...or at least until I attempt a brew sculpture.:p
 
Lay a couple of 1x1's on the bottom to put your carboys on. It allows for more even temps on the bottom.
 
No new pics, but I did finish everything except for the wiring over the weekend. I took a bunch of build pictures, but did not get a chance to upload them. I'll get them loaded up and posted this evening. Construction of the door took longer than I thought, but i'm pleased with how it turned out.

Tonight, it will run!
 
Well, finally got it together and running. I still have some odds and ends to deal with, like slapping a poly finish on the outside and tucking some wires away, but I think I'm mostly done making a mess in the basement for a while. :ban:

Here is the front of the chamber, complete with spray-on chalk board on the door and controller mounted in a project box on top.
IMG_1708.JPG


Close-up of controller, and here you can see the one of the cam-action window latches that worked out for closure:
IMG_1709.JPG


Last, but not least, the interior of the chamber, lit by 5 white LEDs inside the chamber.
IMG_1707.JPG


I've already placed a couple batches in there. I'm quite sure I can fit 3 fermenters if they are staggered, or up to 8 cornies. Preliminary testing shows the chamber is holding temp pretty well, but I'm only bring it done a few degrees at a time for now.
 
Here are a few random construction pics.

Latch to hold minifridge tight to chamber:
IMG_1695.JPG


Wiring for LEDs, fan, and control circuit:
IMG_1698.JPG


This box is going to be mounted near the back of the chamber. The outlet is for the minifridge to plug into (rather than hard-wiring it). This box also contains the 5VDC/12VDC power supply for the LEDs and fan, respectively.
IMG_1701.JPG
 
looks great. let us know how low it can get to and hold. never would have thought about putting the door on the end. i figured you were going to do a hutch type setup with 3 doors. 2 on bottom one on top.

also what dimensions is the inside end up being? figure the way it looks is 3 foot possibly 4 foot deep 4 foot tall by 20" wide?
 
Thanks! I'll be doing more temp testing throughout the week.

As for doors, I didn't want to deal with any more openings (potential leak areas) than necessary. Also, with the door where it is I can shove the cabinet into a narrow corner of the basement and have stuff piled on either side--it just worked out well for my application.

You'd think with all the cutting I did I would have every dimension memorized, but not so much. Yeah, it's in the neighborhood of 4' tall, 3' deep, 22" wide. Interior dimesions are smaller by about 4" each, but like I said, should hold up to 8 cornies, plus some storage up top as well for a few special bottles or whathaveyou.
 
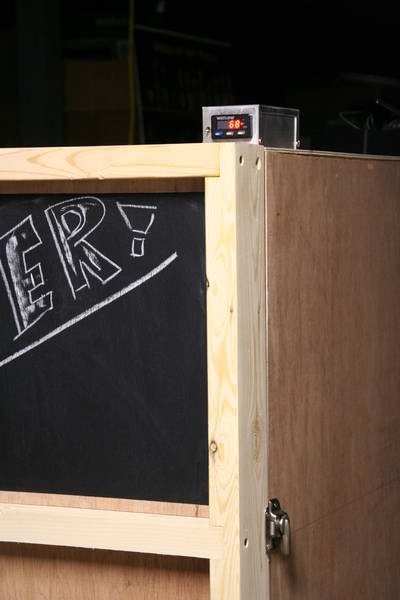
Temp holding update:
I've got it holding steady at 55F, but not sure what an ideal cycling rate is and if the compressor is supposed to be so hot all the time. With the current configuration it's cycling little more than twice an hour: 10 minutes on, 15 minutes off, 10 minutes on, etc. Interior air temps rise about 4F in that 15 minutes, then it takes 10 minutes of the compressor running to bring it back down to the setpoint. Anybody know if this cycling rate is acceptable or if I am shortening the life of the fridge? The compressor doesn't seem to get much of a chance to cool down in that 15 minutes of off time. I could make it cycle less frequently, but of course then the compressor would have to run longer when on. Final question(s): Is there an ideal length of time that a fridge compressor should run? i.e. How long is too long or how short is too short? Would 30 minutes on, 20 minutes off be better?

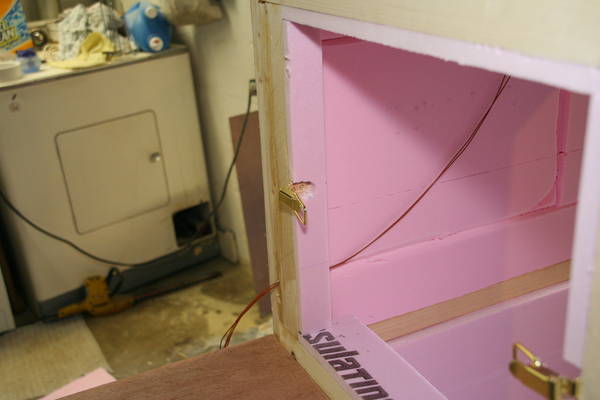
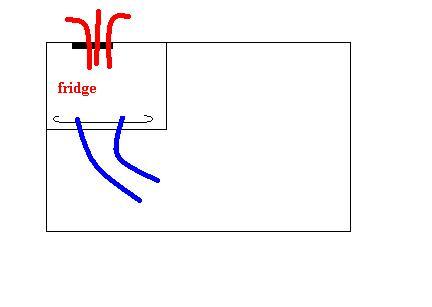
Probe configuration:
I experimented with JohnBeere's idea of placing probe in yeast vile of freezer-pack gel to buffer the probe from fast air temp change, but that dulled controller response too significantly, even with controller hysteresis set to 1 degree; this resulted in wide temp swings. I'm back to using a bare thermocouple probe with 4 degrees of hysteresis in the controller.

Losses:
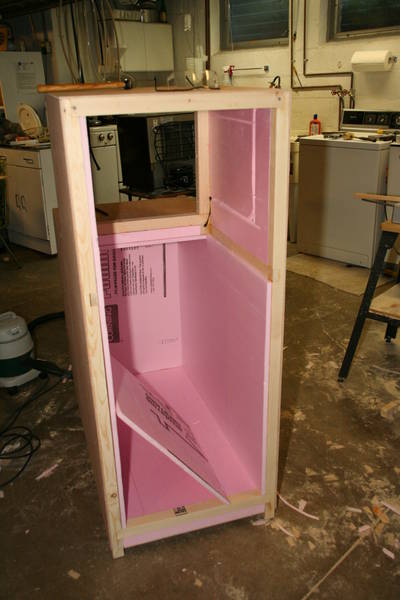
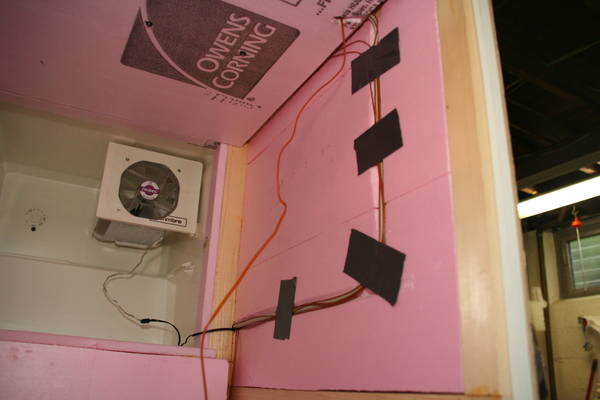
Using a cheapy digital IR thermometer ($15 on clearance from RadioShack!), the main area of loss is the gasket between the minifridge and the chamber, particularly on the side near the freezer compartment. Whereas most of the outside of the chamber was about 74F (ambient), that gasket was measuring 66F in same places. In retrospect, I wish I'd encased the sides of the minifridge (heat coils are on the back of this one). I'll come up with a way of addressing this issue (more foam, likely). The front door weather stipping is also a small loss area; about 1 degree lower than ambient around those areas, which seems acceptable.
 
That seems like it is cycling on quite a lot. I have no idea what an ideal amount is though. I am surprised that your temp rises that much in such a short time. Mine only rises about a degree in 45 or so minutes before the compressor will kick in.
 
I have a thermistor-based probe in the chamber as well which only fluctuates by a couple degrees, even though it's in close proximity to the controller thermocouple, which is very sensitive. I'll see what happens if I extend the cycles. The beer, however, is staying at a steady 55F, so at least it's cooling the important stuff properly!
 
I believe when you have full fermenters in there your cycling will change and the temp. swings will settle a little. An empty chamber reacts differently.
 
do you have the fridge enclosed in wood? if so your fridge isnt able to cool itself off. you should have air space on the sides top and back and a vent to the top with vents on the bottom for air to enter the bottom and exit the top like a chimney. if you have a plunge router you can cut slots on the sides for your cool air and add a fan to suck hot air out. this takes into account of an airspace on the sides and the ability for it to vent. if its not enclosed then disregard

2719730079_4fb8fcfae0_o.jpg
 
I believe when you have full fermenters in there your cycling will change and the temp. swings will settle a little. An empty chamber reacts differently.

I do have 10 gallons of beer in there, actually. They've been in there since the beginning of the week and are definitely stabilzed at this point. Heck, maybe it's the heat from the lager activity that's contributing.
 
if its not enclosed then disregard

Yeah, it's not enclosed, though I wish it was, now. It's an older minifridge, so the heat radiator is hung on the back of the fridge, not built into the sides and top like newer minifridges, so it would have been okay. In fact, it would have been better insulated that way.
 
bravo job! I <3 LED anything! I like your idea of having it on the top, since cold air falls, and having the entire bottom open for buckets/carboys, etc
 
I will certainly be taking your build into consideration...I've been waiting for an opportunity to take advantage of my girlfriends father's cabinet making skills for brewing purposes...this looks like a great way to do so!
 
Wanted to let you know your creation has inspired my own variant, but I gutted an old mini frig for the compressor and coils... Im about half done with the build (frame is done and cooling coils almost mounted). It was more expensive than I expected... and very labor intensive.
 
Wanted to let you know your creation has inspired my own variant, but I gutted an old mini frig for the compressor and coils... Im about half done with the build (frame is done and cooling coils almost mounted). It was more expensive than I expected... and very labor intensive.

Good luck with the project and post pics of it! As stated earlier, mine turned into a bit of a money pit, too. A used chest freezer with new temp controller would have been cheaper. Oh well, it was fun to build and that's what hobbies are all about!
 
what kind of LED's are those?

I believe they are 5mm, but can't recall the exact specs. Nothing special, though. Just some cheapies I picked up at my local electronics shop.

I've been away from this site for a while (been busy at work plus buying a house), but I do have updates on this project:

1) It's stained/sealed a dark mahogany.

2) With a fan blowing on the radiator coils and compressor, it's capable of holding steady temps down to 40F, which is the furthest I've pushed it. The 12" walmart-grade fan only operates when the compressor is running and adequately keeps things from over-heating. I believe this fan to be essential for using such a small fridge to chill such a large space.

3) It's essentially complete. I keep meaning to post pics of the completed project but have yet to upload them from my camera.
 
Back
Top