You are using an out of date browser. It may not display this or other websites correctly.
You should upgrade or use an alternative browser.
You should upgrade or use an alternative browser.
Show us your panel
- Thread starter Jps101
- Start date

Help Support Homebrew Talk - Beer, Wine, Mead, & Cider Brewing Discussion Forum:
This site may earn a commission from merchant affiliate
links, including eBay, Amazon, and others.
Here's my custom Kal clone build. 2 elements 50a.
View attachment 1431804280936.jpg
View attachment 1431804365350.jpg
View attachment 1431804280936.jpg
View attachment 1431804365350.jpg
BannersBasementBrewery
Member
- Joined
- May 13, 2015
- Messages
- 21
- Reaction score
- 43
Finally upgraded.


augiedoggy
Well-Known Member
And heres pretty much the the same exact enclosure sold for...... you guessed it.... $80 shipped instead of $168+ shipping from aubrins... But if you need support for how to use the metal box I guess the extra $90-$100 is worth it? it is $2 less than double the price if you pretend you dont have to pay aubrins extra for shipping...
http://www.ebay.com/itm/NEW-YuCo-YC...953?pt=LH_DefaultDomain_0&hash=item3f43b7c639
Seriously though I'm just busting your chops Gameface... and the the ones sold by the distributer on ebay do not come with the heatsink like the ones distributed by auber.
the heatsinks are around $20 more for a comparable one if bought separately and would likely need to be painted black along with the enclosure..
the ebay seller does have many different sizes though...
http://www.ebay.com/itm/16x16x8-400...Domain_0&var=430784349479&hash=item1e9a534b85
The same US texas based seller (PBC company) also sells a kit including contactors, indicators and switches for $119 plus shipping... The same components from auber would be
$270 plus shipping
http://www.ebay.com/itm/Beer-Brew-K...993?pt=LH_DefaultDomain_0&hash=item5d5502bf89
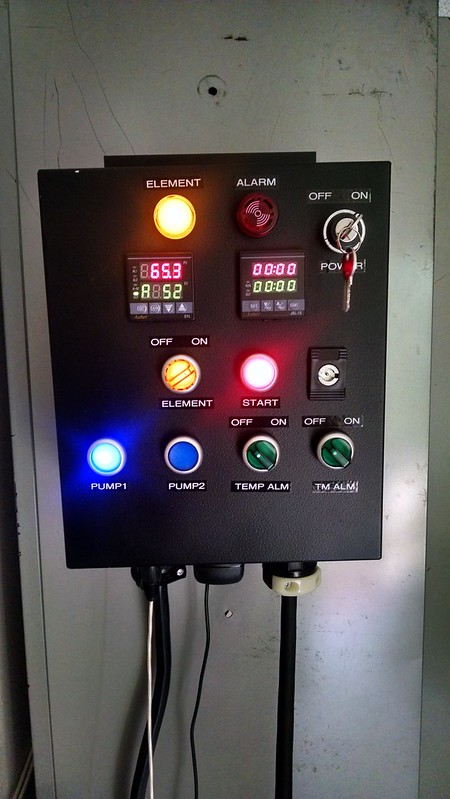
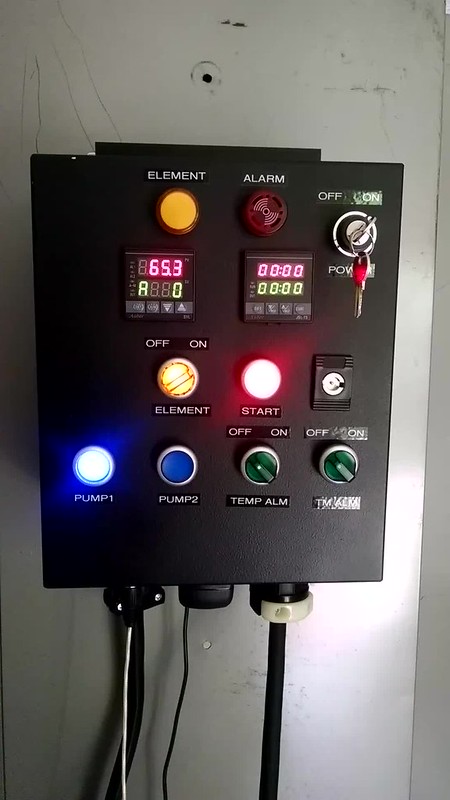
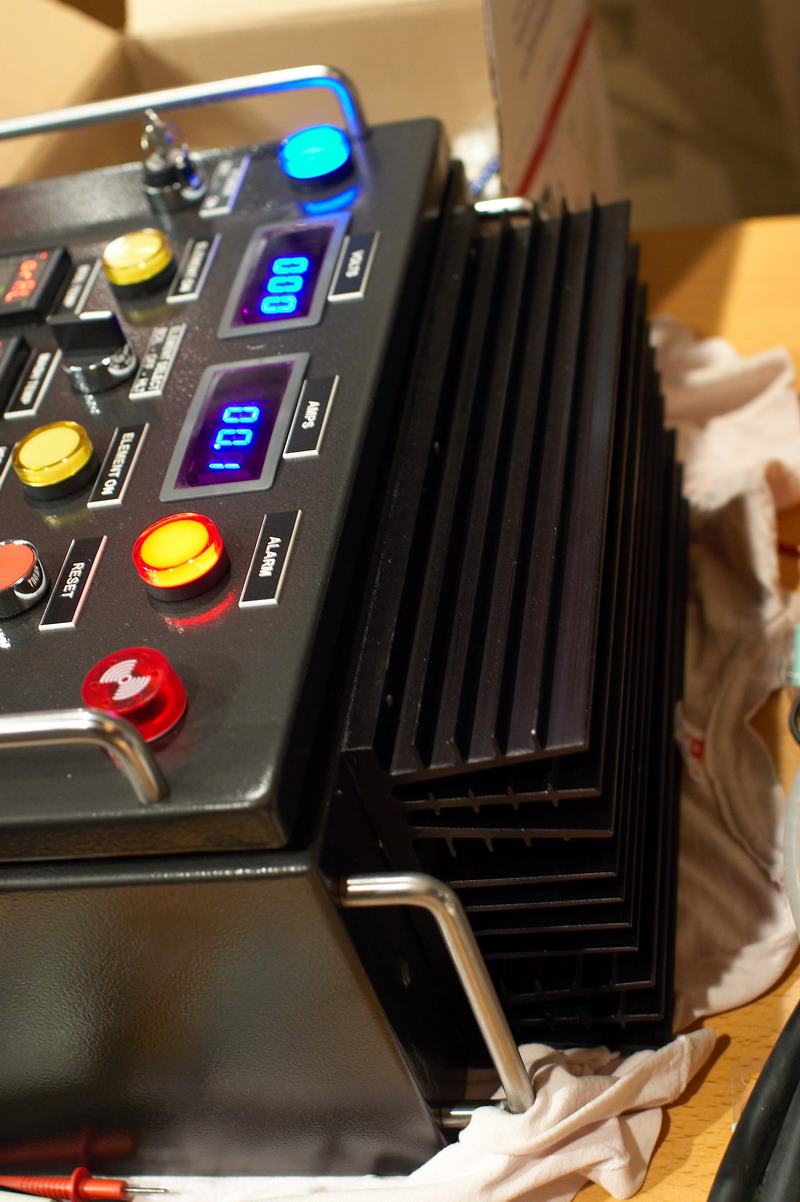
My panel is built in an old PC chassis that was originally used for HVAC control. it has 2 PID's and a timer, but is wired to replace the timer with another PID if needed. The red switches control elements, the black one toggles between element 1 and 2. the bottom row has 2 blue switches for pumps, a yellow switch that does nothing more than light up at this time. The green switch is power. There is also a switch on the side that turns the alarm buzzer on and off. It is loosely based on Kal's build. I have it attached to the brew stand with an LCD TV mount.


augiedoggy
Well-Known Member
My panel is built in an old PC chassis that was originally used for HVAC control. it has 2 PID's and a timer, but is wired to replace the timer with another PID if needed. The red switches control elements, the black one toggles between element 1 and 2. the bottom row has 2 blue switches for pumps, a yellow switch that does nothing more than light up at this time. The green switch is power. There is also a switch on the side that turns the alarm buzzer on and off. It is loosely based on Kal's build. I have it attached to the brew stand with an LCD TV mount.
I almost used the same type of lcd mount myself...
Nimbus3000
Well-Known Member
- Joined
- Feb 14, 2015
- Messages
- 61
- Reaction score
- 21
Front of the control panel (still need tags), back plane ( I have since replaced the bottom rail with a longer rail for more room and arranged the components in slightly different locations) all of the components are rated at 60 amp or higher and the two SSR are rated at 80 amp attached to a 75 amp heat sink to allow for expansion to a 50 amp system in the future, back side of the door (RTD plugs not yet wired).
The panel is wired for 30 amp now (the two breakers that are not wired are for 50 amp upgrade). The terminal block on the bottom left is power for four 120 volt plugs.
I punched an additional hole under the boil kettle element indicator and inserted a plug. This will allow me to upgrade to a back-to-back 50 amp system if I want to in the future.
Huaco
Well-Known Member
^^^
Four pumps? What is the array of switches on the bottom for?
Four pumps? What is the array of switches on the bottom for?
Nimbus3000
Well-Known Member
- Joined
- Feb 14, 2015
- Messages
- 61
- Reaction score
- 21
Initial plan is to go with two pumps. I had the space in the box and the cost of adding two more switches was not expensive. Just included them for any possible upgrades in the future. Easier to put them in now than later.
Silentdrinker
Well-Known Member
- Joined
- Nov 7, 2014
- Messages
- 409
- Reaction score
- 184
Initial plan is to go with two pumps. I had the space in the box and the cost of adding two more switches was not expensive. Just included them for any possible upgrades in the future. Easier to put them in now than later.
Ya, my 60a BCS462 build has four 30a and four 15a plugs. I also put 4 input buttons and 10 XLR connectors. I figured it's not much to max it out if need be. I even added a pass through rj45 even though I'll probably use a wireless adapter for it.
Chances are I'll only use three 30a, two 15, and a few of the XLR connectors for the temp probes and float switches. But I can easily add electric ball valves, temp sensors, extra element, run fermentation off it or even run my grain mill... Lay it out once and it's all there if need be.
tjpfeister
Well-Known Member
augiedoggy
Well-Known Member
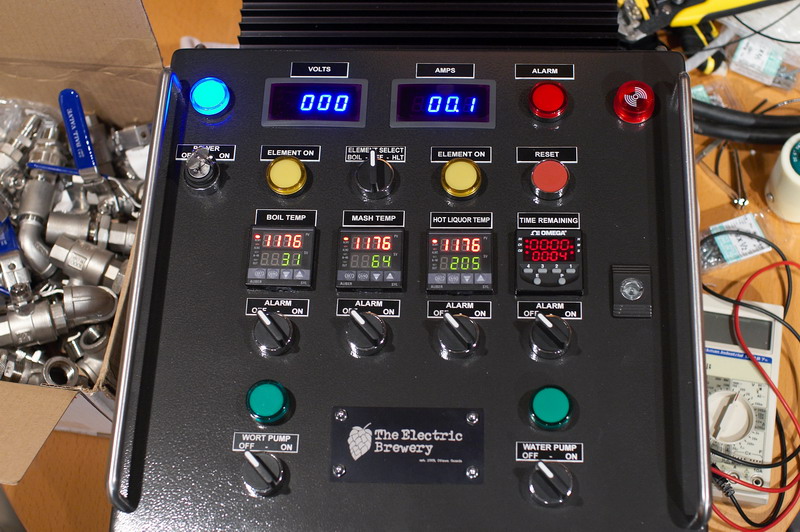
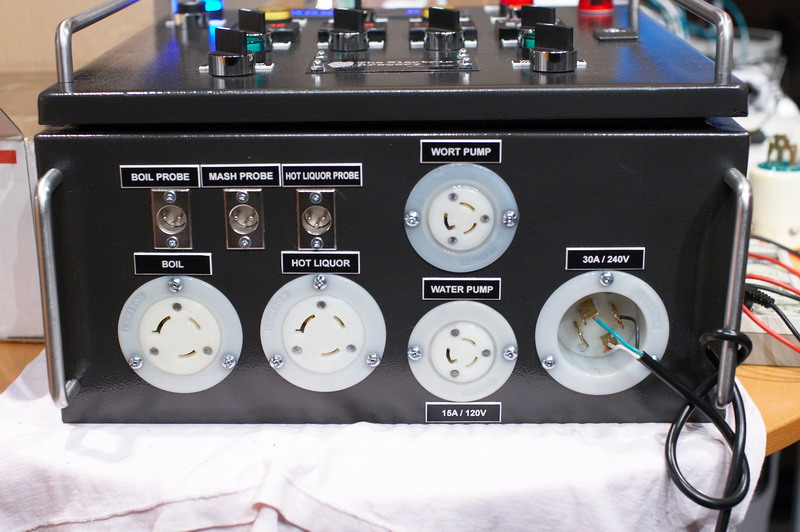
My spin on the norm.
looks a lot llike my panel before I gave it the facelift in the thread below...
dfigravity
Member
- Joined
- Jan 13, 2015
- Messages
- 21
- Reaction score
- 5
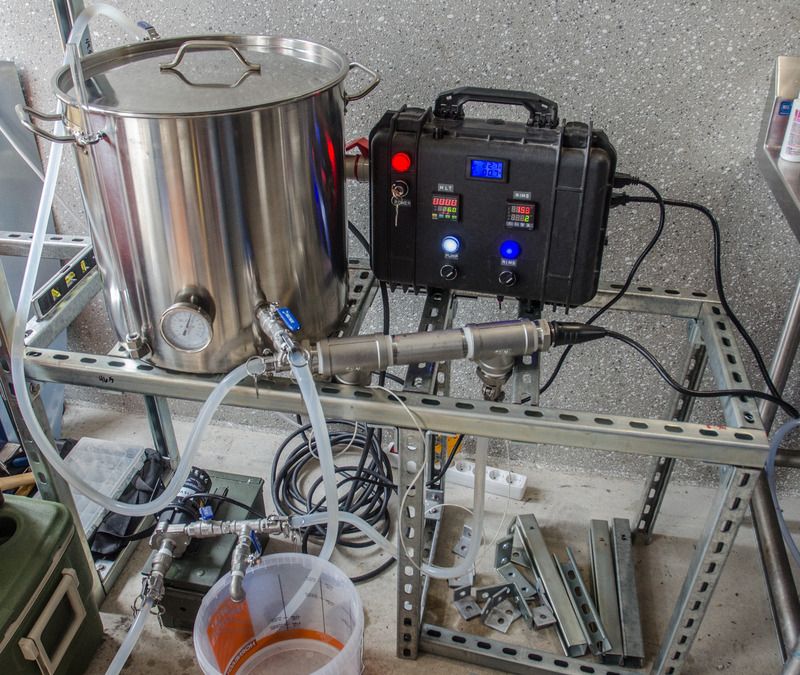
Here is my RIMS control box...we are using three 15gal SS kettles on our rig and wanted a RIMS setup to help ramp and hold the MLT temperatures. The systems only uses one pump.
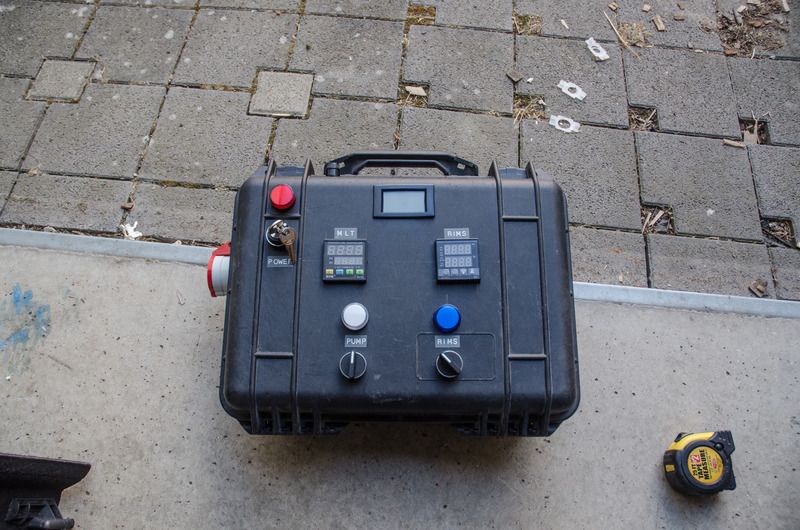
I used a briefcase sized pelican case to house our control box. We currently live in Germany, so all of the (external) electrical connections are euro spec.
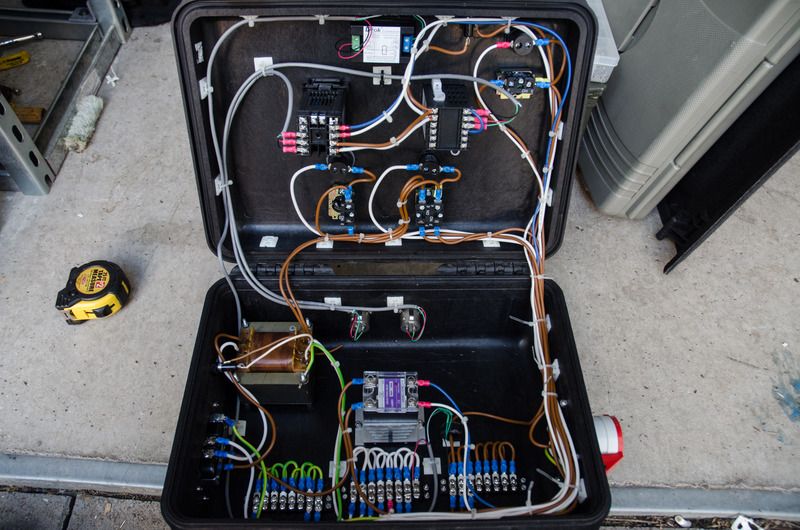
The outside of the box...The pump switch interlocks the RIMS switch so that we cannot run the RIMS element if the pump is off.
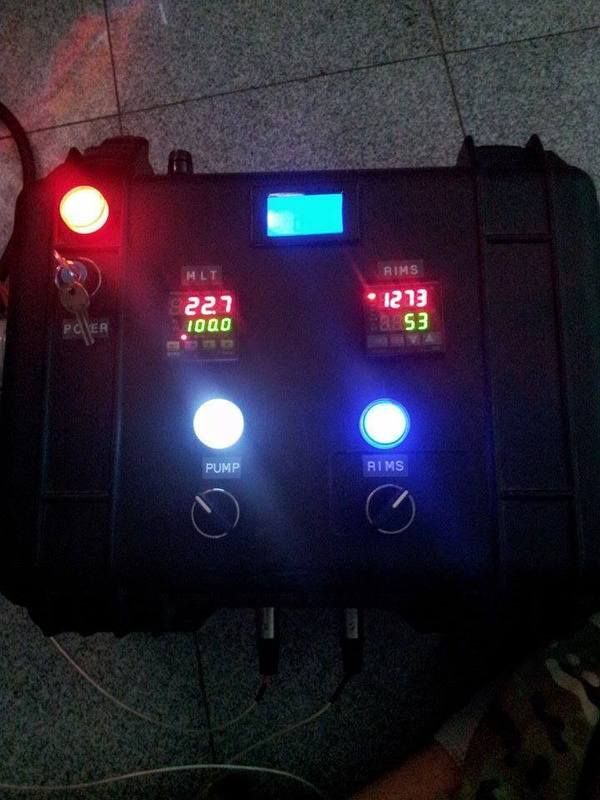
Here's the box, running its first test!
I used a briefcase sized pelican case to house our control box. We currently live in Germany, so all of the (external) electrical connections are euro spec.
The outside of the box...The pump switch interlocks the RIMS switch so that we cannot run the RIMS element if the pump is off.
Here's the box, running its first test!
Bowtiebrewery
Well-Known Member
Here is my upgraded panel:

Here is my extremely messy brew area... yes I need to get on that stat!

Maxed out my MT:

And here is the wonderful hop/trub cone I was able to form from whirlpooling:

Sorry no shots of the inside of the panel... Way too embarrassing to show that...
Here is my extremely messy brew area... yes I need to get on that stat!
Maxed out my MT:
And here is the wonderful hop/trub cone I was able to form from whirlpooling:
Sorry no shots of the inside of the panel... Way too embarrassing to show that...
augiedoggy
Well-Known Member
Lol your brew area looks like mine with all the fittings and such laying around... And yeah the inside of my panel resembles a birds nest too.Here is my upgraded panel:
Here is my extremely messy brew area... yes I need to get on that stat!
Maxed out my MT:
And here is the wonderful hop/trub cone I was able to form from whirlpooling:
Sorry no shots of the inside of the panel... Way too embarrassing to show that...
SilverZero
Well-Known Member
Finally upgraded.
Maybe it's obvious to people in the know, but what software is that?
Gameface
Well-Known Member
And heres pretty much the the same exact enclosure sold for...... you guessed it.... $80 shipped instead of $168+ shipping from aubrins... But if you need support for how to use the metal box I guess the extra $90-$100 is worth it? it is $2 less than double the price if you pretend you dont have to pay aubrins extra for shipping...
http://www.ebay.com/itm/NEW-YuCo-YC...953?pt=LH_DefaultDomain_0&hash=item3f43b7c639
Seriously though I'm just busting your chops Gameface... and the the ones sold by the distributer on ebay do not come with the heatsink like the ones distributed by auber.
the heatsinks are around $20 more for a comparable one if bought separately and would likely need to be painted black along with the enclosure..
the ebay seller does have many different sizes though...
http://www.ebay.com/itm/16x16x8-400...Domain_0&var=430784349479&hash=item1e9a534b85
The same US texas based seller (PBC company) also sells a kit including contactors, indicators and switches for $119 plus shipping... The same components from auber would be
$270 plus shipping
http://www.ebay.com/itm/Beer-Brew-K...993?pt=LH_DefaultDomain_0&hash=item5d5502bf89
I enjoyed this post. And, you're right... hard to justify the extra $90 for what you get. But, to say they are the same (even after the lack of a heat sink) is not completely correct.
For one, you do get a heat sink and the top of the enclosure has a cut out made specifically to mount that heat sink, with pre-tapped holes to mount the heatsink and the SSRs (up to three). So no awkward oval hole to seal up with JB weld. No tapping. No problems with alignment (due to not being the best at drilling holes and tapping holes in the exact location to the nearest 1/10th of a mm).
Not the biggest deal if you're already cutting holes and everything else to build your own panel, but it is part of the value of the box. I'd say you get at least $40 worth of work you don't have to do and $20 for the heat sink. So, it's not a steal but not the biggest scam in history, either.
seal up with JB weld.
There is ALWAYS a better way than JB weld. Liquid duct tape has it's place, maybe, I suppose, maybe not, no NEVER! Throw it out now!
Get a plastic or fiberglass enclosure. So easy to make holes. No electrical bonding. Wont rust. Supports the suffering oil industry
")
Its not quite finished but almost there. Just got the programming done and debugged and need to wire in the heat elements and pumps... View attachment ImageUploadedByHome Brew1435579183.521885.jpgView attachment ImageUploadedByHome Brew1435579209.350247.jpgView attachment ImageUploadedByHome Brew1435579232.434556.jpg
Everything is run through the PLC. Recipes can be set up and run automatically up until the boil. This is a HERMS and can be programmed to cycle through four mash steps. I should have used a bigger box.
Everything is run through the PLC. Recipes can be set up and run automatically up until the boil. This is a HERMS and can be programmed to cycle through four mash steps. I should have used a bigger box.
augiedoggy
Well-Known Member
There is ALWAYS a better way than JB weld. Liquid duct tape has it's place, maybe, I suppose, maybe not, no NEVER! Throw it out now!
Get a plastic or fiberglass enclosure. So easy to make holes. No electrical bonding. Wont rust. Supports the suffering oil industry
Well actually you wouldnt need jb weld for anything..
The box comes with a plate to cover the hole (same one auber provides) which would actually work well if one wanted to use a smaller but taller heatsink and mount it directly to the plate and the ssrs on the other side. Gameface is right though if one wanted to use the same heatsink as auber sells the best way to do it is to flip the box over and use the plate on the bottom... you could reill all the holes for the outlets in it and mount them to it if you use smaller military or switchcraft connectors and xlr connectors...
But when you look at the saving I linked below that I think most people would choose to save the $150 and just mount the heatsink to the bottom once they understand its all the same chinese goods here just marked up (and in this case modified by auber so I have to give them credit that ithe case itself is not really a ripoff depending on how you look at it)... Theres nothing wrong with using the thermal grease and having the ssr mounted on one side and the heatsnk mounted on the other of the enclosure... I use a fan and mount my heat sinks internally inside the panel and have had no issues in the 2 years I've been using it so its really only a disadvantage depending on how you want to set it up.
Gameface
Well-Known Member
Well actually you wouldnt need jb weld for anything..
The box comes with a plate to cover the hole (same one auber provides) which would actually work well if one wanted to use a smaller but taller heatsink and mount it directly to the plate and the ssrs on the other side. Gameface is right though if one wanted to use the same heatsink as auber sells the best way to do it is to flip the box over and use the plate on the bottom... you could reill all the holes for the outlets in it and mount them to it if you use smaller military or switchcraft connectors and xlr connectors...
But when you look at the saving I linked below that I think most people would choose to save the $150 and just mount the heatsink to the bottom once they understand its all the same chinese goods here just marked up (and in this case modified by auber so I have to give them credit that ithe case itself is not really a ripoff depending on how you look at it)... Theres nothing wrong with using the thermal grease and having the ssr mounted on one side and the heatsnk mounted on the other of the enclosure... I use a fan and mount my heat sinks internally inside the panel and have had no issues in the 2 years I've been using it so its really only a disadvantage depending on how you want to set it up.
Well actually...
The box from auber that comes with the large heatsink doesn't have an oval cutout at all and has, at the top, a rectangular cutout specifically for mounting the heatsink with pre-drilled mounting screw holes. And the heatsink is pre-tapped both where it mounts to the box and where you mount the heatsinks. It comes with all the hardware and some thermal paste.
augiedoggy
Well-Known Member
Well actually...
The box from auber that comes with the large heatsink doesn't have an oval cutout at all and has, at the top, a rectangular cutout specifically for mounting the heatsink with pre-drilled mounting screw holes. And the heatsink is pre-tapped both where it mounts to the box and where you mount the heatsinks. It comes with all the hardware and some thermal paste.
Really? That's not what the pictures on their website show.... you can clearly see picture of both the top and bottom with openings in each..
http://www.auberins.com/index.php?main_page=product_info&cPath=34&products_id=430
From the looks of the size of the opening and the heatsink It looks as if that hear sink would fit on the removable factory plate after all but it would be close...
Gameface
Well-Known Member
Really? That's not what the pictures on their website show.... you can clearly see picture of both the top and bottom with openings in each..
http://www.auberins.com/index.php?main_page=product_info&cPath=34&products_id=430
From the looks of the size of the opening and the heatsink It looks as if that hear sink would fit on the removable factory plate after all but it would be close...
That's a comparison of their normal box cutout and the cutout on the box that includes the heatsink.
ryanryates
Well-Known Member
Here's mine:


Last edited:
augiedoggy
Well-Known Member
That's a comparison of their normal box cutout and the cutout on the box that includes the heatsink.
Your correct, I missed that when reading from my phone.
Nimbus3000
Well-Known Member
- Joined
- Feb 14, 2015
- Messages
- 61
- Reaction score
- 21
Updated picture of my nearly complete panel. After wiring the SSR's I did notice that it looks a bit confusing, what looks like a second red wire from the relay to the SSR is actually a black #6 with red shrink tubing on each end. My plan was to use different color shrink tube for each of the wires (one is black with yellow ends, black with blue ends, solid black and black with red ends). in retrospect I should have used something other than red. Still working on the panel stand.

Here is a few of mine, I got most of the kinks worked out still need to program the boil timer better but otherwise appears to be all in order. View attachment ImageUploadedByHome Brew1439686110.844532.jpgView attachment ImageUploadedByHome Brew1439686134.850772.jpgView attachment ImageUploadedByHome Brew1439686160.592283.jpgView attachment ImageUploadedByHome Brew1439686211.138932.jpg
Roadliner
Well-Known Member
That is pretty :cross:
dlaramie08
Well-Known Member
View attachment ImageUploadedByHome Brew1439730770.175613.jpg
View attachment ImageUploadedByHome Brew1439730804.641535.jpg
Exactly as fancy as I wanted it. No alarms, no buzzers, and no timer. Works perfectly for for me though. Two separate circuits. The rims and pump run off of a 15 amp 120v circuit and the hlt/bk hot rod runs on 240v.
View attachment ImageUploadedByHome Brew1439730804.641535.jpg
Exactly as fancy as I wanted it. No alarms, no buzzers, and no timer. Works perfectly for for me though. Two separate circuits. The rims and pump run off of a 15 amp 120v circuit and the hlt/bk hot rod runs on 240v.
dlaramie08
Well-Known Member
Dlaramie08, did you have the hop grenade sticker made? If not where did ya get that, I like it. Nice clean panel also
Thanks! A friend of mine had a friend of his make it a couple of years ago and gave me six of them. I'm afraid I don't know where to point you as I don't know if it was a custom job or not.
FuzzeWuzze
I Love DIY
Thanks! A friend of mine had a friend of his make it a couple of years ago and gave me six of them. I'm afraid I don't know where to point you as I don't know if it was a custom job or not.
Lol dont let the guys on the Beer Network Sunday podcast session hear where you got it, they technically "own" the trademark of the hop grenade in the US(http://www.thehopgrenade.com/)...they seem talk about it every god damn week on the podcast i swear...

1MadScientist
Well-Known Member
 IMG_20150725_160850438_HDR by Mad Scientist Brewhaus, on Flickr
>>> video link <<<
 VID_20150725_160322244 by Mad Scientist Brewhaus, on Flickr
MS
Roadliner
Well-Known Member
Here is a few of mine, I got most of the kinks worked out still need to program the boil timer better but otherwise appears to be all in order. View attachment 296734View attachment 296735View attachment 296736View attachment 296737
Where did you get the box from? or did you have one custom printed?
Where did you get the box from? or did you have one custom printed?
I made it. Ce across a stainless door that fit my enclosure programmed the dxf file for it an ha it Cnc plasma cut. I then took the same file and used it as a template for the graphics. It's clear vinyl layers over the stainless front. Printed it out and lined up the cut lines in the vinyl with the Cnc cuts. Worked really well.
View attachment ImageUploadedByHome Brew1440042021.907839.jpgView attachment ImageUploadedByHome Brew1440042049.435690.jpgView attachment ImageUploadedByHome Brew1440042094.170900.jpgView attachment ImageUploadedByHome Brew1440042116.213096.jpg
Roadliner
Well-Known Member
I made it. Ce across a stainless door that fit my enclosure programmed the dxf file for it an ha it Cnc plasma cut. I then took the same file and used it as a template for the graphics. It's clear vinyl layers over the stainless front. Printed it out and lined up the cut lines in the vinyl with the Cnc cuts. Worked really well.
View attachment 297692View attachment 297694View attachment 297695View attachment 297696
Well done.. that is beautiful.

kal
Well-Known Member
+1 to that. Amazing work. That's also an incredible number of PIDs!
Funny, but I thought I had already posted pics of my panel in this thread but it doesn't seem to be the case, so here it is for sake of completeness... (It's not a Kal-clone)
Under construction:
In use:
Kal
Funny, but I thought I had already posted pics of my panel in this thread but it doesn't seem to be the case, so here it is for sake of completeness... (It's not a Kal-clone)
Under construction:
In use:
Kal
BazzookaBuddy
Member
- Joined
- Mar 15, 2014
- Messages
- 13
- Reaction score
- 1
Funny, but I thought I had already posted pics of my panel in this thread but it doesn't seem to be the case, so here it is for sake of completeness... (It's not a Kal-clone)
Kal
I'm taking the opportunity to thank you Kal! Although you get a whole lot of credit and props, it's not enough!
You're site have inspired me to build my own adaptation of your system and I'm now starting to build my second panel (For three phase power since I'm in Sweden and our residential amperage are somewhat weak compared to you guys).
Any how, besides the fact that I've had loads of fun it's been highly educational for med.
If you're ever in Sweden I will buy you a pint!
Similar threads
- Replies
- 10
- Views
- 684
- Replies
- 2
- Views
- 676
- Replies
- 4
- Views
- 178